Often, many VAZ 2110-2112 car owners are in too much of a hurry at the first generator malfunction and prefer to replace it with a new one, instead of simply finding out the cause of the breakdown and eliminating it. In this case, we will not consider repairing this device, but will only look at the procedure that must be performed to remove and install the unit.
So, to dismantle it without problems, we will need a tool such as:
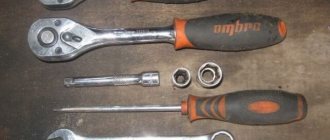
- Socket heads for 10 and 13.
- Ratchet handles or cranks.
Before starting repairs, be sure to disconnect the car’s battery by removing the negative terminal. Otherwise, you risk getting a short circuit when disconnecting the positive wires of the generator.
Replacing the generator: removal and installation
Often, many VAZ 2110-2112 car owners are in too much of a hurry at the first generator malfunction and prefer to replace it with a new one, instead of simply finding out the cause of the breakdown and eliminating it.
In this case, we will not consider repairing this device, but will only look at the procedure that must be performed to remove and install the unit. So, to dismantle it without problems, we will need a tool such as:
- Socket heads for 10 and 13.
- Ratchet handles or cranks.
Photo report on repairs
I would like to warn you right away that in this example of my VAZ 2110, the generator is slightly clamped by the mounting bracket, since it broke off during the accident, so I cannot show you the removal procedure in all its details. But still, the main points will be shown quite clearly in the photo.
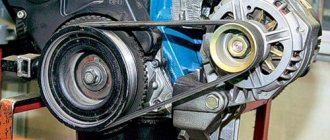
Unscrew the tensioner nut, which is shown by the arrow below:
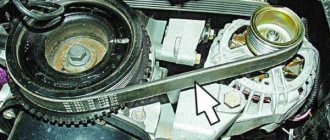
After this, move the generator back (towards the car interior) and remove the belt from the pulleys. Now you can disconnect all power wires. One “bundle” is secured with a stud and nut, and another plug is simply fixed with a connector:
Then you can unscrew the lower nut securing the generator, first crawl under the car and remove the engine protection (if installed):
Usually the bolt fits tightly, so it can be knocked out carefully and without excessive force with the handle of a hammer:
Then from the reverse side we try to remove this very bolt to the end:
Next, unscrew the tensioner nut from top to bottom and you can carefully move the VAZ 2110 generator to the side in order to remove it later:
If you are replacing the complete device, install it in the reverse order. But please note that the generator model, if possible, should be the same as the one installed by the factory. That is, first of all, look at the applicability specifically to your car, and then at the current rating in Amperes.
As for the price of generators for VAZ 2110-2112, it may vary depending on the type and manufacturer. But if you take the KZATE model, which in most cases is installed by the factory, then the cost can be about 3,500 rubles. Although, Chinese options can be obtained at almost half the price. True, you should not chase low cost, since the service life of these parts can be quite short.
Source
What to choose?
The choice of motorists is not limited to Katek generators. Therefore, if the old device fails, you should think about who will take its place.
There are several main options.
- Katek. A standard, fairly reliable and very efficient generator. AvtoVAZ’s choice in its favor is due precisely to this. Plus it is a domestic manufacturer.
- Chinese products. The attitude of motorists towards Chinese generators is quite skeptical. There are explanations for this. Compared to them, Katek is simply an ideal solution. Although in fairness, we note that you can find some pretty good Chinese-assembled options. But this is the exception rather than the rule.
- Imported analogues. Here, first of all, you should pay attention to Bosch companies. Denso and Delphi. High build quality, impressive service life, efficient operation. They cost more than their Russian counterparts in the form of Katek, but for such a thing it makes sense to spend a little more.
Among imported devices, the following are considered good options:
- Dynamo - manufacturer Bulgaria;
- Eldix - also produced in Bulgaria;
- BATE - produced in the city of Borisov, in Belarus.
When choosing a new generator for your car, pay attention to its technical characteristics and safety margin. Then think about the manufacturer. We do not recommend looking towards China if you are doing repairs for yourself and want to achieve high quality work.
Replacing the generator on a VAZ 2110, VAZ 2111, VAZ 2112
Welcome! A generator is a very important thing without which it will simply be impossible to drive a car (This is if the battery is dead, but if not, then you can drive it), thanks to it (the Generator), the battery and the entire on-board network of the car are powered by current when the engine started, due to this, with the engine running, you can play music for a long time, turn on the stove for as long as you like, etc., (the battery does not run out), but if the generator suddenly fails, then the car will drive on one battery, for a long time it will it won’t go that way (depending on what’s on, if there’s music, as well as lights and other devices, the battery will run out very quickly) and therefore, ultimately, when the battery is discharged, the car will stop and won’t go anywhere else (Vit the ignition system is powered by electricity, but if more than one part does not supply electricity to the engine, then there will simply be no spark on the spark plugs, and therefore the mixture will not ignite, due to which you will no longer start the car or, if it was started, it will immediately stall).
Note! To replace the generator with a new one, you will need an inspection hole, or you can use a jack to lift the car, remove the wheel and thus work, but the following tools will be useful to you: Wrenches, if you have socket wrenches, also stock up on them, and of course, gloves to protect your hands when working don't get dirty!
Examination
It happens that the generator begins to act up ahead of schedule and the battery does not charge properly. Actually, it serves to ensure the operation of the source of electricity to power all cars - the battery.
We advise you to rely not only on our instructions, but also on video lessons that will allow you to carry out repairs and replacements with your own hands, even without much experience.
Troubleshooting
The first step is to determine whether your generator is actually the source of the problem. To check, you need to carry out a series of sequential activities.
- Start the engine and let it warm up to operating temperature.
- Increase the crankshaft speed to approximately 3 thousand rpm.
- Turn on all the headlights, activate the high beams, start the heater, emergency lights, heated glass, and wiper blades. That is, all electricity consumers should be turned on as much as possible.
- Measure the voltage on the battery.
- If the device shows less than 13V, then a short circuit or break has most likely occurred in the generator windings.
- Another option is a breakdown of the voltage regulator, oxidation of the contacts of the excitation winding ring.
You can check for breaks and the condition of other elements of the generator only by dismantling it. But if you don’t have any experience in disassembling a generator, then you shouldn’t try to go there with your own hands. Replace the entire assembly or entrust the repair to professionals.
How to replace the generator on a VAZ 2110-VAZ 2112?
Note! Before you start, remove the minus terminal from the car, this is done using a wrench, usually size “10”, for more details on how to remove the terminal, read the article: “Replacing the battery on a car”, read point 1 in this article!
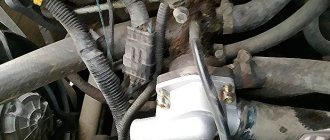
Removal: 1) At the beginning, you will need to drive into the pit, or raise the right front part high and remove the right wheel from the car (Look as the car is moving), if you do not know how to remove the wheels from the car correctly, in this case, read the article: “Replacement wheels on a VAZ", after the work done, unscrew the nuts and screws that secure the crankcase protection and boot to the car, then remove the protection (If you have one) and remove the boot and move into the engine compartment of the car, and while there, disconnect the wire connector from the terminal (This connector is indicated by a yellow arrow), unscrew the nut securing the two terminals (see small photo, it is indicated by a blue arrow) and remove the terminals, and most importantly, get close to the nut that secures the “+” terminals (This nut is indicated by a blue arrow) , don’t forget to take the rubber boot (Indicated by the red arrow) to the side and don’t forget to put it back (When you install the generator) in its place.
2) As soon as all the contacts are disconnected, completely unscrew the adjusting bolt indicated by the blue arrow and remove it, as well as unscrew the nut indicated by the red arrow and remove its bolt from the generator (You can knock it out with a hammer, or try to remove it by hand) , after these operations, crawl under the car and unscrew the bolt nut (the place where the nut should be is indicated by a yellow arrow) and remove the bolt itself, which is indicated by a green arrow from the hole, then lift the generator, remove the belt from its pulley and thereby completely remove the generator from the car remove.
Price list
- Special offers
- KAMAZ spare parts
- Spare parts KAMAZ-5490
- Spare parts MAZ, YaMZ
- ZIL spare parts
- Spare parts ZMZ, for GAZ vehicles
- Spare parts for Volzhanki cars
- Spare parts for Gazelists
- Spare parts for trucks Lawns
- Spare parts for GAZ-71 caterpillar
- Spare parts UAZ, UMZ
- Spare parts KrAZ, BelAZ
- Spare parts URAL
- Spare parts BUSES
- AMAZ spare parts
- IKARUS spare parts
- KAVZ spare parts
- LAZ spare parts
- LIAZ spare parts
- NEFAZ spare parts
- PAZ spare parts
- Other buses
- Tractors, computer equipment, attachments
- Tractors and walk-behind tractors
- Municipal vehicles
- Attachments and trailed equipment
- Spare parts for TRACTORS and SPECIAL EQUIPMENT
- JCB - spare parts for special equipment
- Truck crane (KS-3577, KS-4517, etc.)
- AMZ (A-01, A-41, D-440, D-442, D-447, D-461, D-467)
- Amkodor (TO-18, TO-28, TO-30, etc.)
- ATZ (T-4A, TT-4M)
- VgTZ (DT-75)
- VMTZ (D-120, D-144, D-130, D-145T)
- VTZ (T-25, T30A-80, VTZ-2048)
- LTZ (T-40, LTZ-55, LTZ-60)
- MKSM, UNC, DETVAN
- MTZ - spare parts for tractors
- OTZ (TDT-55)
- PTZ (K-700/701/702/703/704)
- KhTZ (T-150, MT-LB)
- ChTZ (T-130, T-170, B-10, B-12, B-170, T-10M, DET-250)
- YuMZ - spare parts for tractors
- Other special equipment and tractors
- RVD - high pressure hoses and sleeves
- MMZ spare parts and engines
- Spare parts for MMZ engines
- MMZ engines: D-242, D-243, D-245, D-246, D-260
- VAZ spare parts
- Spare parts OKA VAZ 1111
- Spare parts VAZ classic 2101 - 2107
- Spare parts VAZ front wheel drive
- Spare parts VAZ Granta and Largus
- NIVA spare parts and all-wheel drive
- Spare parts Moskvich, IZH
- Spare parts for Korean trucks
- Spare parts for Starex, H-1
- Spare parts for Porter, H-100
- Spare parts for HD65,72,78, County
- Spare parts for HD120, AeroTown
- Spare parts for HD160,170, . ,700,1000
- Spare parts for HYUNDAI, KIA buses
- Spare parts for Korean passenger cars
- Spare parts DAEWOO, CHEVROLET
- FOREIGN CAR spare parts more
- BMW spare parts
- DAF spare parts
- FIAT spare parts
- FORD spare parts
- Spare parts HONDA, ACURA
- IVECO spare parts
- MAN spare parts
- MAZDA parts
- MERCEDES spare parts
- MITSUBISHI spare parts
- Spare parts NISSAN, INFINITI
- OPEL spare parts
- Spare parts PEUGEOT, CITROEN
- RENAULT spare parts
- SCANIA spare parts
- SHAANXI spare parts
- SSANGYONG spare parts
- SUZUKI parts
- Spare parts TOYOTA, LEXUS
- VAG spare parts: VW, AUDI, SEAT, SKODA
- VOLVO spare parts
- Other foreign cars
- Trailers and semi-trailers
- SEMI TRAILERS foreign
- Domestic SEMI-TRAILERS
- TRACTOR TRAILERS
- Passenger TRAILERS
- Towbars and spare parts for passenger trailers
- Car audio and navigation
- Antennas
- DVRs
- Automotive video equipment
- Memory cards, flash drives
- Speakers, subwoofers, acoustics
- Accessories
- Radio tape recorders
- FM modulators, MP3 players
- Navigation, parking systems
- Radar detectors, antiradars
- Radio stations and accessories for them
- Sound amplifiers
- Auto chemical goods, filters
How to remove the generator from a car:
- Be sure to disconnect the terminals from the battery;
- turn the car wheels to the right;
- remove the engine crankcase protection (if there is one);
- loosen the fastening nuts;
- loosen the screw on the tension bracket;
- by moving the generator towards the engine, loosen the belt tension;
- remove the drive belt from the generator;
- remove the wire coming from terminal “D”;
- unscrew the nut securing the second wire “B+”, having first removed the rubber cap from it;
- unscrew the tension screw;
- unscrew the nut of the upper mounting of the generator and remove the tension bar;
- unscrew the lower fastening nut and, holding the generator with your hand, remove the bolt and bushing;
- take out the generator;
Reinstallation procedure when replacing the generator on a VAZ-2110 and tensioning the drive belt:
- take a new generator, attach it to the lower mount and insert a bolt with a spacer sleeve and tighten the nut;
- screw the tension bar to the upper mount of the generator, through the tension bracket;
- screw in the tension screw;
- install the wiring on the terminals corresponding to the markings;
Now, let’s move on to an equally important part of the work, when replacing the generator on a VAZ-2110, tensioning the belt. Incorrect belt tension can lead to a number of undesirable consequences.
Insufficient drive belt tension will result in insufficient or complete lack of battery charging. A poorly tensioned belt can jump off the pulleys and cause damage to engine parts and components.
An overtightened belt puts a large load on the bearings, which will lead to their rapid failure. A belt that is too tight will wear out faster and eventually stretch and break. Therefore, it is imperative to ensure the correct tension of the generator drive belt.
Under ideal conditions, when measured between the alternator pulley and the crankshaft, the drive belt should deflect by 10-15 mm with a force of 10 kg/cm.
Alternator drive belt tension:
- put the drive belt on the crankshaft and generator pulleys;
- screw in the tension screw until the belt is tensioned, checking it by hand;
- tighten all fastening nuts;
- the belt should not sag, but there is no need for excessive tension;
As you can see, the procedure for removing and installing the device is not so complicated. Any car enthusiast can do it. But to facilitate the work, it is better to perform it in a pit or overpass (if it is necessary to remove the crankcase protection and ease of access to the lower mount of the generator).
Proper operation of the generator ensures uninterrupted operation of the vehicle's electrical equipment. Monitor the operation of the device using indicator lamps. If the red battery charging lamp lights up, you must immediately eliminate the cause of the malfunction.
Timely detection of problems in the power supply system significantly extends the life of your vehicle's electrical equipment
And here we have a video on the topic:
Source
Stages
The replacement procedure is different for cars equipped with and without power steering. Below we will look at both options.
Replacing the alternator belt on a VAZ 2112 16 valve with installed power steering consists of the following steps:
- First, remove
the power steering fluid reservoir.
Then, using a key set to “13”, you need to unscrew the nut, thanks to which the generator is attached to the mounting plate.
Generator drive with hydraulic booster
the motor from the support. First you need to unscrew the cushion, and then jack up the engine in anticipation of the gap. We take out the belt through the gap formed.
KEY-DOP
This is where the difference between a car with a hydraulic booster appears - there is no adjusting bolt. The tension is adjusted using a tension roller.
The procedure on a car without power steering is simpler:
- Using a wrench set to “13”, unscrew the generator mounting nut.
We loosen the belt tension by turning the adjusting bolt with a wrench to “10” counterclockwise.
towards the cylinder block, we remove the belt.
furthest away from the cylinder block. By rotating the adjusting bolt clockwise, we increase the tension, and counterclockwise, we loosen it.
Generator drive without power steering
At this point, the procedure for replacing the alternator belt on a VAZ 2112 16 valves is completed. Having completed it in a homemade manner, you benefit from a trip to a car service center. Now, knowing how to change the alternator belt, you will feel confident when traveling, because you can always change this spare part without the help of others.
How to remove a VAZ 2110 generator
The generator produces electricity using the mechanical energy of a car engine. Acts as a miniature power plant, providing power to an ever-growing number of consumers.
Automakers strive to improve the comfort of using a car by installing additional devices, controls, and controls.
Design, principle of operation of the VAZ 2110 generator
Initially, vehicles were equipped with DC generator equipment. Growing energy consumption has forced the abandonment of low-power generator devices and the use of more powerful alternating current devices. A method of energy generation is used, based on inducing an electromagnetic field on static windings by a rotating electromagnet.
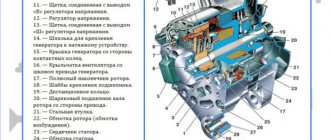
Design of the VAZ 2110 generator: 1 - casing; 2 — output “B+” for connecting consumers; 3 - noise suppression capacitor 2.2 μF; 4 - common terminal of additional diodes (connected to the “D+” terminal of the voltage regulator); 5 — holder of positive diodes of the rectifier unit; 6 — holder of negative diodes of the rectifier unit; 7 — stator winding terminals; 8 - voltage regulator; 9 — brush holder; 10 — back cover; 11 — front cover; 12 - stator core; 13 - stator winding; 14 — spacer ring; 15 — washer; 16 — conical washer; 17 - pulley; 18 - nut; 19 — rotor shaft; 20 — front rotor shaft bearing; 21 — beak-shaped pole pieces of the rotor; 22 — rotor winding; 23 - bushing; 24 - tension screw; 25 — rear rotor bearing; 26 — bearing sleeve; 27 — slip rings; 28 - negative diode; 29 - positive diode; 30 - additional diode; 31 — pin “D” (common pin of additional diodes)
The rotor, supplied with a constant excitation voltage by graphite brushes, rotates inside a metal housing equipped with series-connected coils. The electromagnetic field created by the rotating closed loop produces an induced electric current in the stationary windings. A three-phase rectifier bridge makes it possible to obtain a constant voltage.
Structurally, the device is made in the form of a cylindrical unit, closed on both sides with lids.
The front cover includes a bearing that supports the rotor. The axle has a pulley connected through a belt drive to the car engine. Under the back cover there are electronic elements - rectifier diodes, a relay-voltage regulator.
Initially, when starting the engine, the excitation circuit is powered by the battery, then it switches to supply itself - it receives voltage from the rectifier.
There are holes for natural airflow. The cooling radiator for the rectifier bridge is a metal holder.
Technical specifications
Setting timing marks on a 16-valve VAZ-2112 with your own hands
If the old generator fails, many motorists wonder which generator they should now replace the old one with.
There is no need to invent anything here. The most correct solution is to install the same generator as before, or a more powerful one.
Today, the VAZ 2110 provides for the use of three types of power supply devices:
- Katek 5102.3771. The generator produces 80 Ampere power and its voltage is approximately 14V.
- Katek 94.3701. This is a device with the same parameters. They are not seriously different.
- Catek 120 amp. A generator that is more adapted to modern realities, when in addition to standard electrical equipment, motorists install many additional devices.
If you have a powerful audio system in your car, you use an electric pump powered by the car, as well as a number of other additional consumers, it is recommended to install a 120-amp unit instead of a standard 80-amp generator.
If we take into account the size of the devices, then we can distinguish between ordinary and compact ones. They have a certain difference in design
To be specific, the differences are in the following components:
- Brackets;
- Anchor;
- Excitation wire;
- Drive pulley;
- Number of mounting bolts.
But in reality this does not play a special role. After all, the structure of all generators used for the VAZ 2110 is the same. Therefore, let's look at the circuit and structure of this unit.
| Element | Functions |
| He's an anchor. It is a rotating element of the generator, which creates a magnetic field due to the excitation winding located on the shaft. The field wire receives power from the slip rings. They are mounted on the same shaft. There was also room for a drive pulley, field winding wire, bearing assembly and fan impeller. There may be 1-2 last ones | |
| This is a stationary three-phase element that includes three windings. They provide the creation of alternating current. The windings are connected to each other using a triangle or star | |
| A lightweight non-magnetic aluminum alloy is most often used to make the generator housing. The body looks like a pair of covers connected by a bolt. The front cover is located near the drive pulley, and the rear cover is located on the side of the slip rings. Each connecting bolt must be tightened. To disassemble the housing, simply unscrew the mounting bolts. | |
| The upper mounting bracket for the generator uses two bolts, while the lower bracket is predominantly mounted on one bolt. In some cases there are two. It is not recommended to modify the brackets, since the factory one performs important functions. The purpose of the brackets is to hold the generator. It is recommended to monitor the condition of the brackets as they are subject to wear and breakage | |
| Brush unit | It consists of a pair of graphite brushes, springs that press the brushes, as well as a brush holder |
| Brush holder assembly and voltage wires | This design is typical for modern Katek generators. Therefore, if the regulator fails, you will have to replace the entire assembly |
| Rectifier block | Equipped with 6 diodes, it is responsible for converting alternating current into direct current. It is direct current that is required for the operation of all auto equipment. This element charges the battery, among other functions. |
| Belt drive transmission | The belt drive allows you to increase the speed at which the crankshaft rotates. If the pulley has a small diameter, then the V-belt will wear out faster. Therefore, for small driven pulleys it is recommended to use a poly-V-ribbed drive. It is most often found in modern generators |
The presented device is relevant for all generators used on the VAZ 2110, regardless of their power - 80-120 Amperes.
Margin of safety
If we take into account the standard Katek generator, which is installed on domestic dozens, then its resource is enough for about 10 years of operation or 140 thousand kilometers. The specified safety margin of the device can only be relied upon if it is handled properly
The specified safety margin of the device can only be relied upon if it is handled properly.
Many people fear that a powerful 120 A generator can negatively affect the condition of the battery. In practice, nothing like this happens. Moreover, installing a more powerful unit is recommended if you plan to install an impressive audio system or video equipment on the car.
Location, dismantling of the VAZ 2110 generator
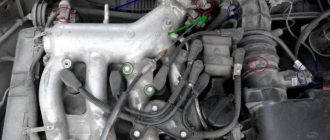
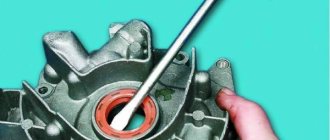
The unit is located under the hood at the bottom right, at a level below the right headlight, opposite the passenger seat. Dismantling work does not cause any particular difficulties. The device is planted deep in the engine compartment. It is more convenient to remove it downwards.
Location of the VAZ 2110 generator
- work by placing the car on a viewing hole,
- use a jack.
The third option is that the fault occurred on the road. There is a spare generator; there is nothing to lift the car with. Repairs are carried out for a long time, by touch, blindly.
- Set the car to the handbrake.
- Raise the front right side with a jack.
- Loosen the fastening, remove the negative terminal of the battery.
- Pull off the rubber protective cap, unscrew it with an M10 wrench, remove the nut and washer from terminal B+. An open-end wrench will do. A ratchet wrench or head will speed up and simplify the process. - Disconnect the wire with the connector.
- Unscrew and remove the alternator belt tension adjusting bolt.
- Reduce the belt tension and move the generator closer to the engine.
- Unscrew the nuts of the upper and lower mounting bolts. Remove the bushing.
- Knock out the bottom bolt, remove the top one with the bar.
- Holding the generator with one hand, remove the belt from the pulley with the other, release it, and remove the device.
- A working device is installed in the reverse order. Check the reliability of the contacts, avoiding sparking.
- Adjust the belt tension: a whistle indicates a weak tension, a humming noise from the generator bearing indicates an excessive tension.
Replacing parts of the VAZ 2110 generator
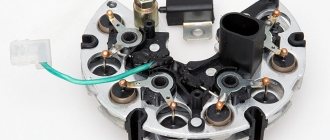
There are situations where the electronic components of the VAZ 2110 generator set fail. Replacement can be made without completely dismantling the generator, directly on the car. The voltage regulator and diode rectifier are located under the rear cover of the generator. It is much more convenient to make such repairs on a repair table.
In the field it is necessary:
- de-energize the generator (disconnect the negative battery cable, the wires on the back of the device);
- remove the plastic cover on the back of the device, gaining access to the electronics;
- unscrew, remove the relay-regulator,
- pay attention, remember the location of the fastening elements (screws, insulating washers, metal), wrap them, strictly observing the order of placement, excluding short circuits,
- replace the holder with diodes, put it back together, tighten the contacts.
Source