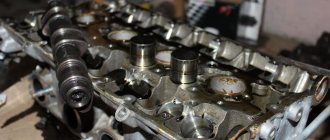
In order for a car engine to operate stably, it is necessary to open and close the valves in a timely manner. But this alone is not enough. A certain amount of clearance must be maintained between the valve and the camshaft. The timing assembly has seriously evolved over the past few decades. Previously, mechanical “wide” pushers acted as a regulator of the gap, but later they were replaced, albeit not fully, by hydraulic compensators. When the hydraulic compensator is working properly, it silently performs its functional duties. But this mechanism is characterized by wear and tear, so replacing hydraulic compensators is an important and mandatory job.
Design and principle of operation of the hydraulic compensator
During operation of the vehicle's power unit, temperature fluctuations constantly occur in the system. The parts heat up under the influence of high temperatures, they expand, which means the gap size is also constantly changing. A certain clearance level set by the engine manufacturer plays an important role during vehicle operation. Deviation of the value from the norm leads to a decrease in the dynamic performance of the car and an increase in gasoline consumption.
The hydraulic compensator was first tested in practice in 1930. Then the American automobile company Cadillac equipped its brainchild with a similar mechanism. The result exceeded all expectations. But due to the fact that this engine design was too complex and expensive, hydraulic elements had to be abandoned for a while
With the advent of hydraulic compensators, life has become a little easier for the average car enthusiast - there is no longer any need to adjust the valves. All the work will be done by these mechanisms, which significantly increase the life expectancy of the machine’s power unit. Their design predetermines the presence of the following components:
- Camshaft cam
- Plunger and sleeve
- Timing spring and plunger valve
- Valve and oil passages
This design uses oil pressure to adjust the clearance level between the valves and the shaft. The valve is in the closed position under the influence of a spring if there is no pressure on it from the cam. When the spring presses on the plunger and bushing, the compensator moves towards the shaft, which ensures minimal clearance. The oil entering through the channels under pressure enters the plunger pair and actually envelops the valve. Thus, the compensator acts as a rigid element, acting on the timing valve, thereby opening it.
What it is
Hydraulic compensators are parts for tuning a car engine. The device automatically adjusts the valve clearance.
The GKK was never installed by the factory on the old sevens. Some cars of that time had mechanical type regulators. But the efficiency of their work left much to be desired.
Owners of the VAZ 2107 must manually adjust the valve clearance every ten thousand kilometers. To do this, you have to dismantle the cover and use a feeler gauge to set the gaps.
Built-in mechanical elements are subject to wear. An incorrectly adjusted gap leads to increased engine noise. As a result, the car's dynamics decrease and fuel consumption increases. After 50 thousand mileage it is necessary to install new valves.
Hydraulic compensators on the VAZ 2107 are free of these disadvantages. The part lasts a long time: it works properly for up to 150 thousand kilometers. The gap is set automatically and is constantly maintained at the desired level.
The engine responds positively to such care, which is reflected in an increase in engine life, its power and in a decrease in gasoline consumption.
Pros and cons of hydraulic compensator
It is also worth saying that today several types of hydraulic compensators are known: in the form of a hydraulic pusher or a roller mechanism, or a hydraulic support. The obvious advantages of such a mechanism compared to what was before are much greater than the disadvantages. Thanks to the hydraulic compensator, the engine of a modern car has become more advanced in terms of design. The obvious advantages include the following:
- The compensator does not need to be serviced, it works automatically
- Increases the resource of timing elements
- Creates the maximum possible pressure
- Significantly reduces fuel consumption
- Reduces engine operating noise
Many motorists are familiar firsthand with one of the main drawbacks - when hydraulic compensators knock. This is the main problem of the mechanism, which, as a rule, makes itself felt when the resource of the part is completely exhausted. Other significant disadvantages include:
- The operation of the compensator is possible due to oil pressure, therefore, the use of low-quality lubricants is unacceptable
- If it fails, expensive repairs will be required.
- They tend to clog, which does not have the best effect on the functionality of the engine.
- Complex design causes difficulties during repairs
They can knock not only for the reason that “the time has come,” but also because the oil was poured “anyhow.” It is necessary to use a certified product from a reliable manufacturer, then there will be no premature failure.
Why is the hydraulic compensator knocking?
Has there been a knocking noise while the car's power unit is running? Thus, the hydraulic mechanism notifies the driver that its resource has come to an end. But there may be other reasons. Most often, malfunctions occur ahead of schedule due to incorrect oil levels or the use of a low-quality product. Other reasons include:
- Lack of oil, or the required pressure is not created to pump the lubricant into the plunger pair
- The oil channels are clogged, this can happen if carbon deposits form
- The plunger pair is jammed
- The ball valve has become suitable
- Carbon deposits have formed on the outside of the plunger body
If carbon deposits have formed in any place, then it is enough to disassemble everything, clean it thoroughly and put it back in place. Such a mechanism will be able to continue its work in the future. But with high mileage of the car, such work is unlikely to bring the desired result. It is necessary to act more radically, namely, replace the hydraulic compensator.
The operation of the hydraulic compensator depends on the quality of the oil. It is advisable to use synthetics and replace them more often than expected. If the manufacturer has indicated that the lubricant must be replaced every 10 thousand km, change it after 7-8 thousand km. Engine components will last much longer
Self-diagnosis and replacement of hydraulic compensators
Please note that repair or replacement of this mechanism is required in extreme cases. The design of the compensator is thought out to the smallest detail; under normal operating conditions there is nothing to break in it. A breakdown can be caused by the driver himself by neglecting basic scheduled maintenance of his car’s engine.
Prevention and replacement of hydraulic compensators is impossible without partial disassembly of engine components. However, such work will not cause difficulties even for novice drivers. You can do everything yourself, without contacting a service center.
In any case, to successfully replace hydraulic compensators, you need to arm yourself with all the necessary tools: socket heads, new compensators, cylinder head gasket, sealant, camshaft seal. If engine knocking occurs, first of all you should check the hydraulic compensators and, if necessary, replace them according to the following instructions:
- Replace engine oil and oil filter
- We start the engine and make sure that the unpleasant sound has disappeared. If not, we move on to more difficult and energy-intensive work.
- We provide access to the valve mechanism. We remove the cylinder head and other components that prevent access to the valves
- We begin the search for the knocking hydraulic compensator
- We move the rocker arm and pusher rod of each valve to the side and press it on the compensator with a drift
- If the hydraulic mechanism goes down, it means it is working properly
- Otherwise, we continue to search for the failed mechanism
You can do otherwise, immediately remove all hydraulic compensators, by standard disassembling the valve mechanism, and carry out diagnostics separately for each element. You can remove the hydraulic compensator using a magnet. You just need to install a new one in place of the faulty element, replace the camshaft oil seal and the sealant on the valve cover. At this point, all work on replacing hydraulic compensators is considered complete. It remains to install in reverse order everything that was disassembled earlier.
In rare cases, hydraulic compensators begin to knock or break completely. Basically, they serve reliably and unpretentiously throughout the entire declared resource of the power unit. They do not require maintenance, their operation is fully automatic. For preventive purposes, it is recommended to remove hydraulic mechanisms after 80-100 thousand kilometers and clean them of carbon deposits that form after using low-quality motor oil. Replacing one compensator will cost 150-500 rubles, it all depends on the design of the engine. If you turn to a specialist, you will have to pay several thousand rubles on top for the work. To increase the service life of the compensator, remove low-quality lubricants from the engine’s diet, giving preference to famous oil manufacturers: Motul, Castrol, Liqui Moly.
Installation
Several times they sent me links from forums about the fact that they installed German hydraulic compensators, but it became little better than it was. The issue is not with the INA hydraulic compensators, but with the cups. If you look at how the hydraulic compensators are installed in the cylinder head, you will see that the vector of application of force by the camshaft cam goes vertically, and the hydraulic valves and cups are at an angle to the vertical. The cups are traditionally made from shit of poor “half-baked” material, so after a while (50-70 thousand km) an elliptical groove begins to appear, along which the oil pressure required for the hydraulics begins to disappear. Therefore, if you want to update the system and install German hydraulic compensators, install new glasses.
A series of articles devoted to hydraulic compensators and bolts:
Part 1. Hydraulic compensators, review article
As promised, I describe my method of installing and pumping hydraulics with pictures.
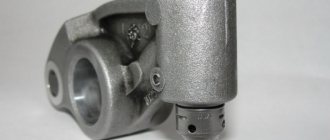
The design of the VAZ21214 hydraulic compensator is shown in the picture (drawn schematically).
First of all, remove the covers that secure the plunger (they are made of tin and can be pryed off with a screwdriver); the functionality of this cover is purely for transport.
We disassemble the hydraulic compensator (partial disassembly) according to the first figure. By the way, if you did not wash the hydraulics with partial disassembly, I recommend doing a complete disassembly, i.e. disassemble the check valve, the valve plate is pryed off with a knife, be careful not to lose the small spring (not shown in the diagram, located between the plate and the ball, it springs the ball). We wash all parts thoroughly in gasoline. Dry and collect. Place it in a clean container (I recommend marking the location of the hydraulic compensators). Accordingly, we wash and dry (blow out) the wells of the hydraulic supports and the oil supply ramp (it is disassembled).
We check the functionality of the hydraulic compensators. Hydraulics are dry and assembled. We hold the hydraulic fluid in the palm of our hand and press the plunger with our thumb. The hydraulic fluid should shrink and return to its original position without jamming.
Before installation, hydraulic compensators are a) washed, b) dry), plunger covers are removed, d) checked.
Let's start the installation.
To work you will need a) a torque wrenchb) a 24mm socketc) a sliver) tweezers or a slotted screwdriver) a medical syringe 5 ml or more) clean motor oil
Operating procedure:
1) Checking the hydraulic support. We squeeze the assembled and dry hydraulic mount with the force of a strong finger, it should be compressed and return without jamming. 2) install the oil supply ramp, screw in the dry hydraulic mounts by hand 3) tighten all the hydraulic mounts (while they are dry) with a torque of 22 N per m. We check that when you press the hydraulic mount, it pressed to the end, returns to its original position and does not jam
If it jams, then there are options a) reduce the torque to 18 N per mb) swap the hydraulic mount with the adjacent one c) replace with a new one. Please note that all hydraulic mounts must be tightened with the same torque. 4) Fill each hydraulic mount with oil in order a) pull out the plunger, place it in side to a clean place (for example, an empty small box). b) using tweezers (or a slotted screwdriver) we take out the piston with a ball valve; if you also get a spring along with the piston, unhook the spring and lower it back into the hydraulic support housing. We put the piston in the same place as the plunger) We fill the syringe (I use 5 ml) with motor oil, fill the oil with the syringe into the hydraulic support body to the brim.d) lubricate the piston with oil, fill it with oild) insert the piston into the body, pressing the valve ball with an awl
We push the awl all the way until the piston plunges in and you feel that the spring has compressed (you can hold it in this position for another 2-3 seconds). f) add oil in the housing to the level (to the brim) g) fill the plunger with oil and insert it into housing) check the hydraulic mount, it should not shrink. After you have assembled all the hydraulic mounts in the described way, put the engine in working condition by installing the CV, sprocket, chain, tensioner, etc., connecting the missing pipes and wires. Feel free to start it and you will be pleasantly surprised by the sound of your engine.
The topic of the article is the new model 21214 hydraulic compensator. This spare part began to be installed on the engine in November 2008. The first two or three years the quality was still average, and then, as expected, AvtoTAZ experienced a sharp decline. I will try to explain what happened and what this node is.
Everything should be nearby, don’t start without preparation
Lada Priora can serve as an example to consider the replacement process. To avoid unpleasant surprises, any work must be planned and everything necessary must be prepared. In our case we will need:
- Gasket Maker - sealant (anaerobic);
- camshaft plugs and seals;
- 16 INA compensators.
Let's start by disconnecting the battery minus. Then we dismantle the air filter, throttle cables, wires that will interfere with manipulation, injector ignition coils and intake manifold.
Replacing hydraulic compensators on a Priora is complicated by the fact that the manifold mounting bolt is located under the generator.
To get to the hydraulic compensators:
- The generator belt is removed, the generator itself is freed from the mounting bolts and carefully moved to the radiator. Using a wrench with a rotary head, the manifold mounting bolt is unscrewed.
- The ramp with nozzles is dismantled and the air conditioning pipes are disconnected (if equipped).
- The collector is dismantled. First, we lift its left edge and then the entire part, and then we move it to the left.
- The valve cover is removed using a screwdriver inserted into the technological grooves.
- Next, the timing belt is removed, the pulleys, camshaft bed and the shafts themselves are dismantled.
All compensators are open to view, among them it is necessary to identify the faulty ones. This is done by pushing. Defective ones will sag without much effort.
The hydraulic compensators are removed using a magnet. The entire set must be replaced, since they are used in similar conditions and wear should be approximately the same.
The above modifications have engines with a camshaft located on top. But there are also those in which it is located below. In this case, the rocker (rocker arm) acts on the heel of the automobile valve. Replacing hydraulic compensators on a Chevrolet Niva (where the timing belt is designed exactly like this) will be technologically different from what is described, and the “hydraulics” there are of a different type.
Assembly nuances
After replacing 16 hydraulic compensators, everything must be restored to its original form. The most important operations in order:
- We clean and degrease the camshafts and seats of the bed and valve cover, both on the parts and on the engine.
- We change the seals, plugs and put both shafts in place. The inlet has a special belt, which is not present on the outlet. This is its distinctive feature.
- Apply Gasket sealant to the mounting location of the camshaft bed and mount it (no gasket required).
- We treat the fit for the valve cover with sealant and mount it (no gasket required).
- We install injectors, condenser tubes, mount the manifold, generator, its belt, pulleys and timing belt.
- We restore the operation of the throttle valve, filter and connect all the wires.