Ask any experienced driver with extensive driving experience: why do you need a front strut brace? He will answer without much hesitation. But not every beginner has a complete idea of what it is all about. In addition, for most ordinary car enthusiasts, this element is just some kind of tube, usually yellow in color, nothing more. Some even find it a kind of highlight to show off in front of their friends.
And if you ask them why the front strut is needed, they either don’t know what to answer, or they begin to come up with a completely passable explanation from their point of view. Of course, from the outside it looks unprofessional, and such excuses have nothing to do with the actual purpose. And to understand why this yellow tube is needed, you will have to turn to the structure of the car body.
General overview
The body of any vehicle is assembled from many elements that are connected to each other by welding, bolts, rivets, etc., so if a certain load is applied, they gain some degree of freedom of movement in relation to each other. Most likely, anyone who has gone through extreme driving school knows this firsthand.
And the lower the degree of such freedom, the more integral the body becomes, approaching the state of a single whole. In other words, it becomes more rigid, and the higher this parameter, the better its control. This is especially felt when performing various maneuvers at high speed.
The essence of spacers
Now we are gradually approaching the most important thing - the pipe is not at all a way of self-expression in front of others. By and large, this is a technical modification of the vehicle; in another way, it can be called “tuning,” which is pleasant for many car enthusiasts.
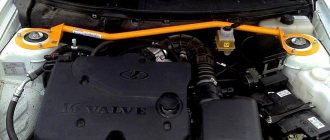
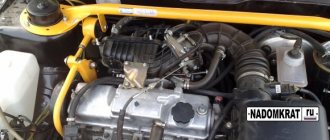
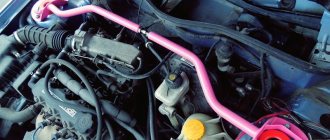
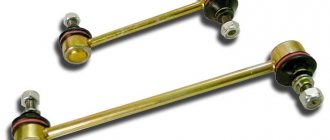
A spacer (or guy) is a metal tube with a rectangular or square cross-section. Special platforms are welded to both sides for reliable fastening to a VAZ (“Ten”) car or any other brand.
These elements are usually located in the transverse direction of the engine compartment. The platforms are attached to the rack glasses with bolts from the supports. This allows you to minimize the displacement of parts of the car body relative to each other. In addition to the fact that the installed spacers improve the handling of the vehicle, they are able to take on part of the loads placed on the suspension elements. In turn, this helps to extend the life of the body.
As for cornering, a brace connects the front shock absorber cups into a single unit. As a result, their movement is limited, which gives additional rigidity to the car body.
Maintenance and testing of the front suspension of VAZ 2113-2114-2115
Maintenance and checking the suspension for damage.
During each maintenance, as well as during repairs, you should always check the condition of the protective covers of the suspension ball joints, paying special attention to the absence of mechanical damage to the covers. Find out if there are any cracks or traces of contact with road obstacles or the body on the suspension parts, deformations of the transverse arms, braces, stabilizer bar and its struts and parts of the front body in the places where the suspension units and parts are attached
Deformation of the suspension parts of the Lada Samara 2 and, above all, the braces and parts of the front body of the body violates the wheel alignment angles and makes it impossible to adjust them
Find out if there are any cracks or traces of contact with road obstacles or the body on the suspension parts, deformations of the transverse arms, braces, stabilizer bar and its struts and body front parts in the places where the suspension units and parts are attached. Deformation of the Lada Samara 2 suspension parts and, above all, the braces and front body parts disrupts the wheel alignment angles and makes it impossible to adjust them.
Check the condition of the rubber-metal joints, rubber cushions, suspension ball joints, as well as the condition of the upper supports of the telescopic suspension struts.
Rubber-metal hinges of the VAZ 2113, rubber cushions and the upper supports of the telescopic racks of the VAZ 2114 must be replaced in case of ruptures and one-sided “bulging” of the rubber and when their end surfaces are cut.
Front suspension assembly 1 – upper support of telescopic strut 2 – upper support cup 3 – compression stroke buffer with protective casing 4 – compression buffer support 5 – suspension spring 6 – lower spring support cup 7 – steering rod ball joint 8 – steering knuckle 9 – telescopic strut 10 – eccentric washer 11 – adjusting bolt 12 – strut bracket 13 – steering knuckle 14 – front brake protective cover 15 – brake disc 16 – lock ring 17 – wheel hub nut 18 – splined shank of the wheel drive joint housing 19 – guide pin 20 – wheel hub bearing 21 – ball joint 22 – suspension arm 23 – shims 24 – stabilizer bar 25 – stabilizer bar 26 – stabilizer bar cushion 27 – stabilizer bar mounting bracket 28 – body bracket for mounting the suspension arm 29 – suspension arm extension 30 – brace mounting bracket 31 – ball pin protective cover 32 – ball pin bearing 33 – ball pin 34 – ball pin housing 35 – suspension strut rod 36 – outer housing of the upper support 37 – inner housing of the upper support 38 – bearing of the upper support 39 – rubber element upper support 40 – travel limiter of the upper support 41 – protective cap of the upper support B – area for checking the suspension hinge
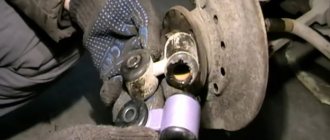
To check the condition of the suspension ball joint, remove the wheel and measure the distance between the lower arm 22 and the protective casing 14 in zone B. If, when the suspension is rocked, this distance changes by more than 0.8 mm, replace the ball joint. A more precise check of the ball joint is described in the chapter “Checking the technical condition”.
To measure the gap in the ball joint on a VAZ 2115, use tool 02.7834.9503.
Key Features
To summarize, here are some key points to better understand the role of spacers. When driving on a bad road (potholes, potholes, country roads), rolls, turns, strong loads act on the car body, which deform it. This negatively affects the vehicle's handling, which ultimately leads to a reduction in its service life. And there are reasons for this:
- The weaker the rigidity of the body, the more it will “twist” when entering turns or hitting bumps.
- Metal tends to “get tired” over time, which is why cracks appear in the load-bearing elements.
- The constant impacts that fall on the wheels are also transmitted to the side members of the body. Over time, they begin to bend inward, which can lead to the fact that at one point it will become impossible to adjust the camber of the front wheels.
As a rule, in cars (for example, VAZ “tens”) that have been used in difficult conditions for more than 10 years, the side members are already quite severely deformed.
In this case, it is necessary to use a special stand to stretch them, only after that it is possible, if not necessary, to install the stretch marks.
Body problems
In the modern automotive industry, body frame structures are not used. The thickness of the body metal does not exceed one millimeter, and this causes damage and deformation of various parts of the body. As a result, the car's handling deteriorates and control is lost while driving, which often leads to accidents.
The process speeds up if the car owner likes to drive fast. There are drivers who like to dive into corners at high speeds. The spectacle is very impressive, but irreparable damage is caused to the body. If the car is new, such changes will be unnoticeable, but over time they will certainly remind themselves and force the owner to take urgent action.
There are car enthusiasts who prefer installing braces on the rear pillars. Although this option is not widespread enough. An extra spacer takes up free space in the trunk, and most often there is not enough of it. Thanks to such tuning, it is possible to preserve parts secured by welding. Stretching, as it were, holds all the elements under the hood together into a single whole, preventing loosening or breaking of welded and threaded connections. Thanks to this, the car's handling is improved, and it can withstand increased loads during aggressive driving.
Adjustable and non-adjustable stretchers
The non-adjustable spacer is a one-piece piece with no detachable connections. The peculiarity of adjustable stretch marks is that they consist of two units connected by a coupling. Due to this, it becomes possible to change the length of the spacer, making it smaller or larger depending on the need.
Many drivers prefer one-piece structures because they provide a higher degree of rigidity than their adjustable counterparts. However, there may be cases when it is impossible to select a one-piece design for a single vehicle. In this case, adjustable stretch marks are the only correct solution.
What other stretch marks are there?
In addition to non-adjustable and adjustable spacers, there are other types, it all depends on the attachment points of the spacer:
- Two-point - ordinary tubes that are attached to the shock absorber strut cups.
- Three-point – usually this design has the shape of a triangle. Such spacers are attached in the same way as two-point ones, but there is one more point for mounting on the body. Because of this, the rigidity is even higher.
The fact that the 3-point bracing gives a lot of extra rigidity to the body is definitely a plus. However, the large time investment required to install this type of structure is a clear disadvantage.
Clear benefits
Car body struts have both their advantages and disadvantages. But perhaps it’s worth starting with something pleasant. The obvious advantages include:
- Due to the increased rigidity of the body, the vehicle corners better.
- Improved car handling is manifested in the fact that it becomes more confident on the road.
- The trajectory when cornering is more precise and clear.
- Less likelihood of age-related cracks appearing on the body.
- Increased machine stability during straight-line movement.
- No deformation when driving over road irregularities.
With regard to cars with high mileage and at least a shorter service life (15 years or more), one thing can be said: after the procedure of retracting the side members (and with such a long history it is necessary to do this in any case), it is recommended to install stretch marks. This is due to the previously mentioned reason – metal “fatigue”. Without proper reinforcement, the car body can quickly become unusable.
A number of disadvantages
Unfortunately, there are also some drawbacks, and now let’s look at a number of disadvantages. All extreme driving school graduates are well aware of them. The negative sides are:
- Under the influence of the load on one wheel, the second one is also affected. Fortunately, modern designs have special notches that allow the part itself to bend, leaving the other wheel intact.
- Some drivers note that after installing the spacers, both struts are damaged. This drawback is quite controversial, but it is still worth considering this possibility.
- Due to stretching on some car models, it may be difficult to change the brake fluid.
- In the event of an emergency or an impact on only one side, the entire front part of the vehicle body is affected.
A natural question may arise: why, for example, are there no front strut struts on the VAZ-2110 from the factory? This is not done for reasons of economy, as it might seem at first glance. It's all about the need to improve the safety of the driver and passengers, because the cars are designed for the mass market.
In addition, studies have shown that cars with stretch marks receive much more serious damage than vehicles without them. We can conclude that in the first case the driver and his passengers are in greater danger.
Varieties
Most often, 2 types of spacers are used for tuning - adjustable and non-adjustable. In practice, it turned out that a spacer with a control mechanism is worse than without it because it consists of 2 parts. Such a spacer will not bring much benefit after installation and will not achieve the desired success.
There are also differences in fastenings. The most commonly used spacers are 2-hole and 3-hole spacers for installation. The hardware with 3 mounting points will last the longest, but to install it, sometimes it is necessary to drill holes in the body. It is also worth noting that its installation is more complicated.
Non-adjustable strut extensions are mainly made for a specific car model. Adjustable ones are most often universal; they can be installed in any car, even if the holes do not fit.
Spacers also differ in the manufacturing method. Some of them are made from solid material using hot stamping technology. There are also spacers consisting of previously manufactured parts that are connected by welding. The first option is more reliable, but the second can also bring a lot of benefits after installation, increasing the rigidity of the body.
Some car owners increase the rigidity of the body by installing rear strut struts, but this option is not common, since the part reduces the free space in the trunk, which is often not enough.
Driving on uneven or dirt roads
In addition to the above advantages, it is worth considering the behavior of the car when driving on uneven roads, as well as when cornering. Let's start with the peculiarities of moving on uneven terrain: in this case, the wheels are constantly subjected to heavy loads.
Here is another argument for those who doubt the question of why the front strut strut is needed: as the speed of the vehicle increases, the impact force will also increase. Because of this, the lower suspension arms suffer, which can lead to their deformation. Thanks to the installed spacer, shocks are absorbed by it. As a result, part of the load is removed from the main suspension elements, which helps protect them from harmful effects.
Are there any for rear pillars?
In short, yes. And they have no fundamental difference from the front struts. All the same pipes made of light alloys, all the same rings for glasses. The difference may only be in the shape of the bend of the pipe, or it may even be straight.
Unlike the front strut brace, this strut bar has no bends.And what’s more, today enthusiasts install spacers not only on racks, but everywhere else they can:
This number of spacers is usually installed on racing cars
However, such tuning is the lot of racers who do anything for speed. All these parts are made exclusively from carbon fiber to keep their weight to a minimum. The average car enthusiast is unlikely to need such things.
Is it possible to make a strut brace for the front struts yourself? Yes. However, this will require skills in using an angle grinder and a welding machine. If you don’t have duralumin at hand, it doesn’t matter, you can use a regular steel pipe. In the end, it is quite enough for trips around the city and to the country.
Entering a turn
What happens to a car when it turns? Most of the weight of the body is transferred to the side opposite to the turn; excessive roll occurs, which can lead the vehicle away from the given trajectory.
Usually the anti-roll bar should combat this. And yet, why do you need a front strut strut, if there is a stabilizer, which is equipped with all cars without exception. The fact is that such an important part is not always able to withstand lateral loads. With the front struts stretched, it is noticeably easier for the stabilizer to perform its functions.
Let's give an example: if earlier, before the car went through a turn, it was necessary to reduce the speed to 60 km/h each time, then with installed stretch marks this parameter can be safely increased to 80 km/h.
Step-by-step replacement process
Any repair of thresholds, regardless of complexity, goes through the following stages:
- Preparation of the necessary material and tools.
- Dismantling the interior.
- If it is necessary to partially or completely change the thresholds 2112, then prepare a welding machine.
- The part is being dismantled.
- Welding a new threshold or installing a patch.
- Anti-corrosion treatment.
- Painting and installation of overlays.
In order for independent work to proceed quickly, you need to prepare tools and materials. For a full cycle of work you will need a repair kit:
- new threshold, amplifier, metal for patches, price of factory threshold VAZ 2112 from 1000 rubles;
- electric drill, drills with a diameter of 0.8 for drilling out the old element, 1 cm for perforating a homemade amplifier;
- chisel with a wide blade;
- Bulgarian;
- clamps for holding parts when completely replacing the threshold;
If the threshold changes partially, professional craftsmen use pliers to grip the part.
Experienced drivers object to the use of epoxy resin if it is necessary to repair a through hole, rightly believing that the method is used by irresponsible drivers before selling a car. The method allows you to hide traces of destruction, but does not solve the problem; after 3-6 months, the corrosion of the metal will be greater and the owner will need to replace the part completely. The cost of repairs will double.
Individual elements
If it is necessary to eliminate minor corrosion on the threshold or remove a hole in the metal, then welding of metal patches is used. This reliable method allows you to restore the rigidity of the body and ensure a long service life of the part. If the threshold is rotten by more than 40%, it is recommended to cut out the element completely, check the condition of the bottom and install a new replica. Step-by-step process for repairing through holes:
- Disconnect the negative terminal from the battery or remove the battery completely.
- Remove the front and rear doors.
- Dismantle the interior, lift and roll up the floor mat, and hang the windows.
- To raise the car to a level, some drivers simply lift part of the body.
- If the front or rear jack has failed, it is recommended to change part of the threshold and the place for the jack.
- Use a grinder to remove the paintwork from the outer part of the threshold.
- Cut out the rusted part with a chisel. Check the condition of the amplifier.
The difficulty of partial body repair of domestic cars lies in the fact that the tinsmith never knows in advance how damaged the metal is under the anti-corrosion layer, paintwork and how badly the amplifier has rotted. Technologically, the corrosive area must be cut out completely. Therefore, partial replacement often ends with complete overcooking of the threshold and part of the bottom.
Paint the repaired area with auto enamel to match the body color, and, if necessary, install plastic linings or iron moldings.
Entirely
Replacing the entire element is the most common type of repair at a service station; professional craftsmen cut out the metal threshold using welding; when dismantling it yourself, it is recommended to use an angle grinder and a chisel, having previously drilled out the points of the factory fastening. Replacement process step by step:
- Pull out the seats and remove the floor covering.
- Dismantle the sound insulation of the bottom, remove the plastic lining of the interior.
- Remove the front and rear doors.
To maintain the geometry, install a brace between the side posts or lay down a metal channel.
All flammable trims and parts must be removed or covered from the vehicle. When working with electric welding, beginners are advised to keep a couple of buckets of water near them just in case.
When cutting, leave up to 1 cm of the old threshold for overlapping welding of the future overlay. In the area of the central pillar, cut out the old element with the recess, being careful not to catch the central pillar reinforcement. If the B-pillar reinforcement is rotten, it is necessary to cut out the part and weld a new one before welding the main threshold.
During the repair process, it is necessary to pay attention to the condition of the body in the area of the side members and jacks. If necessary, patches are installed on rotten areas, the welding area is cleaned and treated with a thick layer of mastic. Before laying sound insulation on the floor, the bottom surface is additionally protected with anti-corrosive.
Before starting welding work, it is necessary to adjust the semi-automatic welding machine, check the current strength, put on safety glasses, a respirator and gloves.
Spacer Installation Procedure
To install spacers, it is not necessary to contact specialized service centers. You can do all the work yourself, except if necessary, enlist the support of loved ones. If the vehicle owner does not have the slightest idea about struts and braces, then it is better to visit the nearest service station to install front strut struts.
But if you have confidence in your abilities, then the following algorithm of actions will be useful:
- Place the car on a flat surface.
- Unscrew the nuts from both shock absorber strut cups.
- Washers are installed on the studs or bolts.
- The spacer is put on - the part suitable for the car will fall into place without any effort.
- Tighten and tighten the nuts. If the installed stretcher is of an adjustable type, its position should be adjusted.
There should no longer be any doubt about why the front strut strut is needed, and there is no doubt about the benefits of such an element. At the same time, most car enthusiasts are not ready to donate their funds to purchase factory blanks, preferring to make such a part themselves.
From a theoretical point of view, this is feasible, but it should be understood that the process is no less expensive and complex. This requires skills in working with a lathe and experience as a welder, but who can guarantee the quality of a homemade design?!
Making a spacer with your own hands
The first thing to do is to make flanges. To do this, unscrew the nuts securing the stands to the glasses and, placing cardboard on them, mark the future holes with a marker. Then cut them out in paper and put it on the pins. Now all that remains is to outline the outline of the flange according to the shape of the glass and trim off the excess cardboard. Inside the template, make a round opening corresponding to the protruding part of the support.
Ready cardboard template with holes
Important point. Make the outer edge of the template facing the engine not round, but straight, since a rib for attaching the pipe will be welded to it.
Perform further operations in this order:
- Attach the cardboard template to the sheet of metal, outline it with a marker and cut out the steel flange using a grinder. Round all edges and sand to ensure there are no burrs.
- Mark the centers of the holes and drill them according to the diameter of the studs. Use a small drill first and then a large one. Bevel both sides of the holes and try the part in place. If a discrepancy is found, widen each hole slightly with a round file.
- Cut a 4cm wide strip of steel and weld it at a 90° angle to the straight edge of the flange. To prevent the strip from bending back under pressure from the pipe, make triangular stiffening ribs and weld them along the edges.
- Place the flanges on the studs and check for distortions. Press them with two nuts and carefully measure the distance between the strips to cut the pipe as accurately as possible.
- Disconnect the battery and cover the engine compartment with a damp cloth. Attach a pipe cut to size to the flange brackets and securely weld it at both ends. Check the gap between the hood cover and your structure.
- Unscrew the nuts and remove the brace from the car. Boil all the seams thoroughly, remove the slag and try to put it back. If the structure has been welded so badly that the flanges do not fit on the studs, file the holes again.
- Remove the finished spacer again, clean it with a brush from rust, degrease it and paint it in 2 layers, after applying a primer. Place the jumper in place and finally tighten it with nuts.
Advice. If you plan to bend the spacer, do it before cutting the pipe to size.
The coupling for regulation is placed in the pipe gap
If you are a specialist in welding, then you can easily make the stretch adjustable. To do this, buy a ready-made threaded coupling of the required diameter and weld it in the middle of the cross member, having previously cut it into 2 parts. After welding, twist them together, secure the coupling with a locknut, and only then cut the pipe exactly to size between the flanges.
Note. The described method is quite suitable for making a back stretcher, if you want to do it yourself. In this case, think carefully about the design so that the jumper takes up minimal space in the luggage compartment and does not block it in the middle.
Successful design of the stretcher - it stands right behind the seats
How to make a spread with your own hands - photo
A workpiece cut from metal The workpiece must be rounded and cleaned The part is tried on in place Strips and stiffeners are welded to the homemade flange The pipe must be carefully grabbed to the flange Correct design - the pipe goes around the tank with liquid After painting, the spacer is finally attached To distribute the load, a gusset must be welded to the pipe Last fitting spacers before painting First you need to unscrew the fastening nuts