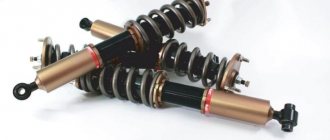
Shock absorber struts directly affect the comfort and safety of driving a car. Therefore, if a deterioration in controllability or other symptoms of unit failure are detected, the car owner should make repairs as soon as possible. Delaying replacement may result in an emergency situation due to loss of control over the vehicle.
The front axle of the Ford Focus 2 has different right and left shock absorber struts. They have different catalog numbers, but have similar prices. So, the right original rack comes with article number 1619269, and the left one - 1619274. The price for an original standard part is 6-8 thousand rubles.
Stand 1619269
After the restyling was carried out, improved ones were added to the standard racks. They also have a different part number depending on which side of the front axle they are intended for. The right unit has article number 1619281, and the left one - 1619283. The price of the improved rack ranges from 6,500 to 9,000 rubles.
Improved stand 1619281
Kits of original shock absorber struts are also available for sale. This set allows you to replace nodes on both sides. A set with article number 1919323 is for sale. Its cost starts from 10 thousand rubles.
Catalog number and cost of good front shock absorber struts for Ford Focus 2 from third-party manufacturers
Due to the high cost of original front shock absorber struts, car owners are inclined to purchase products from third-party manufacturers. The tables below provide a list of brands that have proven themselves best in Focus 2.
Table - Good analogues of the right front shock absorber struts
| Manufacturer | vendor code | Approximate cost, ruble |
| Kayaba | 334838 | 3000-3500 |
| Hola | SH22033G | 2600-3000 |
| Profit | 20041037 | 3100-3700 |
| Japan Parts | MM00231 | 1800-2100 |
| Patron | PSA334838 | 2050-2300 |
Table - Recommended analogues of the front left original shock absorber struts
| Manufacturer | vendor code | Approximate cost, ruble |
| Kayaba | 334839 | 3000-3500 |
| Patron | PSA334839 | 2050-3000 |
| Quinton Hazell | 178963 | 2150-2600 |
| Japan Parts | MM00230 | 1800-2100 |
| Lynxauto | G32513 | 2300-2800 |
How to change the rod, valves, how to adjust the stiffness of shock absorbers.
Another problem is a violation of the integrity of the rod, seals, and valves inside the strut.
But of course, stores already have a set of spare parts for this unit. And an experienced driver is not in a hurry to take old parts to a landfill; he repairs them. At least some useful details can be extracted. First, we disassemble the shock absorber. It is better to carry out the work wearing gloves and work clothes. We take it out and identify damage to the rod with the piston, valves and o-rings. Damaged parts are removed. We recommend choosing suitable replacement rubber bands on the market. If it was not possible to select the metal parts to the required size, then they are ordered from a turner. The labor of a turner will cost less than buying a new shock absorber. The shock absorber is assembled, but you need to check yourself often: whether the sequence is broken and whether the parts are mixed up
We highly recommend filming the disassembly with a camera, this way it will be much easier to cope with the task and nothing will be lost. It is important to maintain cleanliness when assembling the unit, because debris and small particles can easily render a newly repaired shock absorber unusable. Remove dirt and stains while disassembling the unit. It is necessary to carefully inspect the valve mechanisms, because the parameters of the shock absorber depend precisely on their normal functioning
You can adjust the shock absorber stiffness by changing the number of washers. Just before doing this, you need to read the factory instructions. Now we put the rod in place in the unit. It is better to replace the oil seal, but if it is in perfect order, then you can simply clean it and add fresh lubricant. Next, fresh lubricant is added to the shock absorber, right to the very edge of the pipe. When you put the rod back in place, the excess will flow out on its own. Don’t be afraid that you will waste a lot of oil; here you need to not let air inside the pipe. When the oil is pumped in, the strut needs to be pumped as always. When the rod is in place, it is slowly moved so that the bubbles come out using the valves. After this, the shock absorber is completely assembled and installed on the car.
Important! General work tips
- Drivers, do not forget that the racks are changed in pairs. If you are planning to change the left shock absorber, then the right one is also subject to this procedure. The same can be said about renovations. Moreover, the unit may outwardly work without problems, but after 1500 km it breaks down.
- We advise you to carry out repairs of both the rear and front shock absorbers not on jacks, but on goats that are more appropriate in this case. The main reason is safety.
- Note that VAZ shock absorbers at the front are easier to change than on foreign cars with front-wheel drive. In the second case, you will have to use ties to be able to compress the springs evenly on both sides.
- Once you've finished replacing the strut, don't forget about the wheel alignment. After repair, the required optimal angle is usually violated. This leads to rapid damage to the tires, poor vehicle handling, and damage to the suspension unit.
- If you have basic information about the design and operation of your car's shock absorbers, you can save money on replacing them.
- Often, shock absorber strut repairs are done on your own, and other parts are made independently or purchased inexpensively.
- To work independently with shock absorbers, it’s a good idea to see and look for defects in the part. There is nothing impossible about this. Just imagine what your “new” shock absorber was like and what it is like now. In case of even minimal discrepancies, there is already a reason to think about repairs. When it comes to establishing the working capacity of the spring - if you don’t notice any damage or cracks - you don’t have to change it
Replacement process
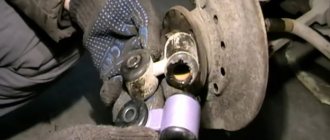
Replacing the front wheel bearing on a Ford Focus 2 is carried out by analogy with other Ford cars. The only caveats that remain are rusted mounting bolts and corroded parts. But, VD-40 will help to cope with this problem.
We collect tools. So, you need:
- Set of keys and sockets.
- Wheel bearing puller.
- Puller for tie rod ends.
- Torque wrench.
- Crowbar and jack.
- VD-40.
- New part.
- Press if you cannot remove the bearing using standard methods.
Everything is prepared and assembled, you can proceed directly to replacing the part. Replacing a wheel bearing can take a significant amount of time and therefore needs to be calculated. So, let's start the process:
- Loosen the front wheel nuts.
- Loosen the hub nut.
- We put the vehicle on a jack, and install a support under the front beam so that the car does not accidentally fall on its foot.
- Unscrew the wheel and remove the hub nut.
- We dismantle the stabilizer strut. This is done to make the replacement process more convenient.
- We get to the hub; to do this we need to remove the brake elements. We dismantle the caliper and brake disc. To avoid having to bleed the brakes, move the caliper to the side.
- If your car has ABS, you should first remove the retaining bracket. Then remove the ABS sensor.
- Remove the steering rod from the steering knuckle.
- Now you need to press out the ball joint.
- We remove the hub.
- Press out the hub bearing.
- We press in the new element. Many car repair specialists recommend carrying out the pressing process on a press.
We reassemble the unit in reverse order.
Characteristics and selection of parts: original or analogue
In addition to the original, you can select analogues. Many motorists do not trust analogues. Thus, the motorist is faced with a difficult choice - to buy an analogue or an original. Both options are often no different, except for the price.
As for quality, the issue remains controversial, since in the modern spare parts market there are increasingly counterfeits that are quite difficult to distinguish from an original production part, even if it is an analogue.
To avoid wasting money and time, it is worth understanding the characteristics of the part. The original front wheel bearing has dimensions of 37*39*72 mm. If the car is equipped with an ABS system, there will be a black magnetic film on the end of the part.
Original
1471854 is the original catalog number of the front wheel bearing, which is installed on the Ford Focus 2. The cost of the product is around 5,000 rubles.
Recovery
First, the dismantled device must be washed and then carefully inspected. If there are cracks or jams, repairing the shock absorber makes no sense: it is better to scrap it and buy a new one. The whole body requires further checking: pull the rod up and push it down - if there is play or jamming, replace the spare part. There are two types of shock absorbers, disassembling each of them has its own characteristics:
- double-pipe: pull out the rod completely to gain access to the fastening nut, which can be unscrewed with a special wrench;
- single-pipe: there is a protective cap at the top, which must be knocked down, and then unscrew the fixing nut to remove the rod together with the cylinder or cartridge.
Peculiarities
If the shock absorber is oil, you need to drain the oil from the cylinder by pressing on the valve spring. Then knock down the bushing, remove the rod with the piston, remove the valve from the other side of the cylinder. If the device is gas or has a replaceable cartridge, simply unscrew the fixing nut and install a new one.
Recovery methods
There are two ways: the first involves completely replacing the rod along with the cylinder with a new cartridge, the second involves replacing the parts of the device. It’s worth going into more detail here, because in the first case, the financial costs will be 5-10 times higher (it all depends on the car model). To independently restore the shock absorber with complete disassembly, you must purchase a repair kit.
To disassemble the product, unscrew the fastening nut and pull out the piston. Further:
- replace the compression valve, which is installed by pressing in by hand;
- install the piston and guide bushing;
- fill in the oil (you can use the old one if it is clean and transparent) - hydraulic fluid for automatic transmission, power steering or the Russian product AZh-12T.
Press the rod into the cylinder and fill in 200-250 ml of liquid. Next, slowly insert the cylinder while simultaneously pulling out the rod so that the oil penetrates into the cavity and does not leak out. When the cylinder is fully inserted, pull the rod out and put it back in several times to allow the oil to completely fill the body. Then tighten the nut and pump the shock absorber again 4-5 times.
We recommend: Paint over a scratch on your car with your own hands - from minor defects to deep chips
On a two-pipe device, all of the above restoration procedures must be carried out by putting the upper pipe on the lower one. As you do this, push it down while holding the rod in place. Next you need to bleed the device and tighten the nut.
Features of installing shock absorbers on the VAZ2108-15
All operations to restore performance are no different from those described above. But before installation, the shock absorbers must be well pumped (this also applies to new products), otherwise they will not work fully. How to do it?
Bleeding the oil shock absorber
- place the device with the rod down and press the rod until it stops;
- hold the shock absorber in this position for a couple of seconds;
- Without releasing the rod, turn the part over and hold it in a compressed position for 5-6 seconds so that the air comes out;
- extend the rod completely, pause for 2-3 seconds and repeat the operation 5-6 times.
Bleeding the gas shock absorber
- turn the product upside down;
- slowly press the rod in and leave the part in this position for 5-6 seconds;
- turn the product over and hold for 5-6 seconds;
- extend the rod all the way;
- turn the shock absorber over and repeat the procedure 3-4 times.
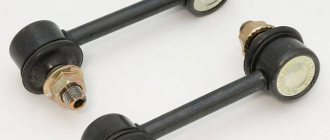
Ford Focus 2 replacement of stabilizer link - the whole point
Knocks, clicks and rumbles of Ford Focus 2 and their prerequisites, how to check, detailed videos
The other day I was digging up another topic about difficulties with suspensions, slats, etc. A detailed article about choosing rear stabilizer struts for a Ford Focus 2. What are the best stabilizer struts for a Ford Focus 2. Article numbers of original spare parts and analogues. I didn’t find Focus specifically, but the list of problems with knocks and clicks was headed by it specifically as follows:
- Knock in the front suspension of Ford Focus 2
- Knock in the rear suspension of Ford Focus 2
- Knock control rack Ford Focus 2
- Knock in front right Ford Focus 2
- Knock when shifting gears Ford Focus 2
- Ford Focus 2 crunching sound when turning the steering wheel
- Clicking sound in the front suspension when moving backwards Ford Focus 2
- Crunch in the front suspension of Ford Focus 2
The main indicators of the need for urgent repairs
Many car owners believe that until knocking appears in the suspension, there is no need to worry about the struts. But as practice shows, the first signs of shock absorber wear can be noticed much earlier. During comprehensive maintenance at a good service center, technicians identify problems with the chassis.
The main wear indicators are as follows:
Oil streaks, even old and dried ones, are visible on the body of the product;
The shock absorber rod does not fit into the body smoothly, there is deformation;
when the car rocks, characteristic knocking sounds occur in extreme positions;
vehicle stability at high speed decreases.
Problems associated with these suspension elements can be determined both by complaints from the car owner and by diagnosing the chassis. It is better to make a replacement immediately after problems are discovered. In this case, you will not have to eliminate unexpected troubles that arose during the operation of the car.
Carrying out dismantling work
To repair or restore the shock absorber struts, you need to remove them from the car. Traditionally, this does not cause difficulties, but in rare cases it is necessary to resort to extreme measures, using gas cutters or grinders.
In less extreme situations, everything can be done with mechanical cleaning of all kinds of contaminants. In most cases, using WD-40 helps. After soaking for half an hour, you can start working.
There are some recommendations that will help you carry out work faster and safer:
- the side of the car where dismantling operations are expected is jacked up and also secured under the bottom and sills (for example, stumps) to protect against accidental shifting;
- comfortable access to the operation area will be provided after removing the wheel from this side;
- It is worth considering that the upper mounting point is located in the trunk or under the hood.
Motorists repairing front-wheel drive cars will have more work. This is due to the specifics of the design. The type of rack used by the automaker also influences the duration and complexity of the operations.
Considerable effort has to be expended when working with collapsible structures. To dismantle it, you have to unscrew the hub fastenings and remove the strut directly with the hub.
Non-separable units are easier to deal with. Before rebuilding the shock absorber, it must be removed. At the bottom it is placed in a cup in which fastening is carried out with one or a pair of bolts. Unscrewing one or two nuts is almost always enough to remove it from the top mount.
In what cases will replacement be required?
You can install new suspension elements in several cases:
- The installed shock absorbers are damaged or too worn. These parts do not last forever and, like consumables, have a limited service life. You can ride on old shock absorbers, but it is recommended to install new ones.
- Not happy with the stiffness of the suspension. If you want the smoothest and most comfortable ride possible, or for the suspension to cope more effectively with hitting potholes, then purchasing new shock absorbers is the solution.
- Additional increase in the cost of the car. This is a minor but important factor. With such modernization, you can safely increase the cost of the car, especially if you have installed branded shock absorber models that are much superior to standard ones.
Only professional diagnosticians can say reliably about the need to replace shock absorbers. Drivers can only use garage diagnostic methods and monitor the car’s behavior on the road. We will talk about this in more detail below.
Important points when replacing suspension springs
When repairing the front suspension, you need to take into account the specifics of replacing the front springs: if you do not follow some rules, complications may arise in the future, for example, you will have to re-do the work or make another purchase. Characteristic specifics of this repair:
- The front springs should be replaced in pairs and try to match them according to stiffness and height. Almost all parts are marked with a paint mark; it is necessary that the paint color of both springs matches;
- The service life of the spring largely depends on the performance of the bump stop and shock absorber, so the condition of these parts also needs to be monitored. If the bump stop is missing or is in poor condition, it will not be able to soften the impact, for example, if a wheel falls into a hole, the spring may break;
- When purchasing spare parts, you should not buy the cheapest parts; defects often come across here. It's better to spend a little more money, but you won't have to redo the work in the future. The most ideal option is to purchase original spare parts, or if you buy non-original ones, then from a well-known manufacturer with a good reputation;
- When removing and installing a spring, it is necessary to use ties; all traditional methods of tightening spring coils often lead to injury.
Ties must also be purchased of high quality, and it is better to try not to use Chinese tools at all. With Chinese ties, the threads quickly pull out, and the metal is of such poor quality that the special device may simply not be able to withstand compression of the coils, and the spring will fly off to the side. What the consequences may be is clear without further ado; you should take care of your health and take care of your safety.
Signs of a faulty front strut
Road safety is one of the important criteria that should concern every road user. Therefore, after the planned mileage of the products declared by the manufacturer, you need to go to a service center to inspect the vehicle and make a decision on replacing parts of the suspension system.
But there are cases when unscheduled intervention by specialists is required:
- A characteristic knocking sound while driving. It is more clearly audible when passing a speed bump.
- The car "floats". When driving in one direction, it moves to the side. The driver, literally, has to catch the road, constantly steering.
- When the car turns and/or brakes, the body sways.
- There is a high level of roll and instability when driving on a winding road.
- When driving on a poorly paved road, you can clearly hear a knocking sound in the car's suspension system.
There is another way to check: while driving along a straight section of a road with good coverage, you need to let go of the steering wheel
If the car moves to the side, you need to pay attention to the front elements and perform diagnostics. If a set of diagnostic measures reveals a “disease” of a node element, it will need to be replaced
Or: drive the car into a viewing hole and shake the car with a partner. You can immediately hear where the extraneous sound is coming from.
Garage diagnostic methods
Without special equipment, it's difficult to pinpoint the problem, but drivers can check their shock absorbers in several ways that don't require special tools or money. The first and most accessible method is visual inspection. Make sure that there are no oil leaks on the shock absorbers and that all boots are completely intact. You can wipe the structure and look at its condition after 1-2 days of driving. If the oil appears again, the seal is broken and repair or replacement is required. Additionally, examine the wear of the tires. The appearance of an uneven “pattern” of wear most often indicates problems with the suspension.
The second method known in driving circles is rocking the car. Its essence is quite simple: you need to swing the car from one corner and monitor the reaction. If the car swings by inertia for too long or, conversely, stops almost immediately, then this is definitely a problem with the shock absorber. This way the driver will be able to determine in which specific direction the part failed. Pay attention to unusual knocking, clicking, grinding or clattering noises.
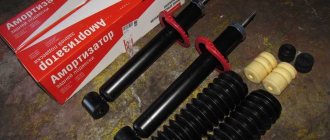
Which shock absorbers to choose
The best option would be to install the factory model of shock absorbers that was on the car before. They are guaranteed to be compatible with the car's structure and will feel the same as the old ones. To do this, you need to find the article number for Ford Focus 2 shock absorbers. The right original strut is designated in the catalog under number 1619269, and the left one - 1619274. The price varies from 6 to 8 thousand rubles. After restyling, improved models were added to the standard racks. They have article numbers 1619281 and 1619283 for the right and left, respectively. The price of these shock absorbers is 6-9 thousand rubles.
| Brand | Catalog number |
| Kayaba | 334838 |
| Hola | SH22033G |
| Profit | 20041037 |
| Japan Parts | MM00231 |
| Patron | PSA334838 |
And for the left side:
| Brand | Catalog number |
| Kayaba | 334839 |
| Patron | PSA334839 |
| Quinton Hazell | 178963 |
| Japan Parts | MM00230 |
| Lynxauto | G32513 |
The cost of analogues, as a rule, does not exceed 3-4 thousand rubles per piece. Before purchasing, be sure to check the compatibility of the selected shock absorbers with your car. Carefully inspect the packaging and labeling of the products. All inscriptions and drawings must be clear, without streaks. Which front shock absorbers to choose (original or compatible) is up to you to decide.
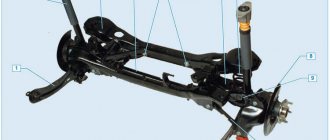
Replacing rear shock absorbers Ford Focus
Having replaced the front shock absorbers on the Ford Focus, it’s time to tackle the rear ones. Also see related articles on replacing front shock absorbers and rear shock absorbers on a VAZ 2107, and also how to change shock absorbers on a Lada Priora.
Faulty rear shock absorbers Ford Focus
– this is not only the discomfort of passengers, but also traffic safety. Reduced spring stiffness and ineffective shock absorber operation lead to the rear axle skidding when cornering at relatively low speeds. An increase in the braking distance, which is inevitable due to suspension defects, can also cause an emergency.
Reliable diagnostics of Ford Focus rear shock absorbers
carried out only at the service station.
However, it will not be difficult for an experienced driver to determine the malfunction by changing the behavior of the Ford Focus
on the road. An oil film around the shock absorber is a sure sign of a hydraulic fluid leak.
The aviation principle of proactive replacement of parts whose theoretical life is close to the limit will help you drive with shock absorbers that are always in good working order.
. new shock absorbers is a simple solution. Read the material on the page https://www.autodela.ru/main/top/test/amort_3, look into your own wallet, and buy! The increased cost of gas shock absorbers is justified by the comfort of movement and high reliability of the device.
Replacing the rear shock absorbers of a Ford Focus
with your own hands, do not forget to replace all the rubber bushings, liners and gaskets included in the shock absorber kit with new ones!
To replace Ford rear struts
Focus required:
— lifting and safety devices (jack, blocks, etc.);
— open-end, box and socket wrenches;
— an adjustable wrench or pliers;
1. In the luggage compartment of a Ford Focus
bend and fix the side of the upholstery to provide access to the upper mount of the rear shock absorber.
2. Using a 13 mm spanner and pliers (pliers, adjustable wrench), unscrew the nut from the shock absorber rod. Remove the support washer from the rod along with the rubber lining (top cushion).
On second and third generation Ford
Focus
, the upper part of the rear shock absorber is connected to the body via a cast support. To remove the top support you will need a 14 mm wrench.
3. Raise the car, secure it with blocks and stands, and remove the wheel. Using a spanner wrench or a 15 mm socket, remove the bolt securing the lower part of the shock absorber to the Ford Focus
. This unit should be treated with WD-40 in advance.
4. Take out the back shock absorber strut ford focus
from the body opening. If it is necessary to remove rubber goods (bushings, rubber bands, gaskets), disassemble the device.
When assembling the rear struts of a Ford Focus
should be equipped with new rubber products! Installation of used bushings, cushions, gaskets, and buffers is allowed only if they are slightly worn.
Ford Focus rear shock absorber installation:
1. Insert the assembled shock absorber into the body opening, attach the lower part to the rear suspension arm, but do not tighten the shock absorber mounting bolt. At the same time, the extended shock absorber rod of the first Ford Focus
should be inserted into the hole intended for it.
2. In Ford
Focus
of the second and third modifications, screw the upper shock absorber support to the body using two bolts with a head size of 14 mm.
In the first Ford Focus
– mount a support washer with a cushion on the rod protruding into the luggage compartment, screw on the nut. The tightening torque of the shock absorber rod nut should not exceed 18 Newton meters. The rod must be kept from turning!
3. Tighten the lower shock absorber mounting bolt. The final tightening of the bolt is carried out after mounting the wheel and removing the lifting devices.
Replacing the left and right rear shock absorbers on a car is carried out simultaneously.
Required tools for DIY replacement
For the replacement to be successful, you must prepare the following tools in advance.
Table - Tools required to replace the front strut
| Name | Note |
| Key | “at 13”, “at 15”, “at 17”, “at 19” |
| Hexagons | Kit |
| Star | TORX |
| Screwdriver | With flat and cross blade |
| Hammer | Medium weight |
| Chisel | Small |
| Puller | For springs |
| Penetrating lubricant | For example, WD-40 |
| Metal brush and rags | To clean dirt |
| Metal file | In case of excessive sticking of threaded connections |
| Jack | To lift the car |
| Balloon wrench | For removing and installing wheels |
Symptoms of a problem
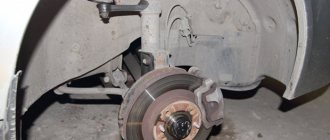
It is quite simple to determine that a Ford Focus 2 car needs to replace the rear shock absorbers. Since the elements dampen vibrations, in the event of a malfunction all impacts will be made directly on the suspension. In this case, the driver will hear a characteristic thud in the rear of the cabin. What is remarkable is that these blows are practically inaudible on the street. But you can feel it inside immediately after you start moving. The knocking is so loud that even good music cannot interrupt it. Therefore, every car owner will hear this symptom.
Additionally, the shock absorber may leak. This occurs due to a breakdown of the valve in the cylinder. At the same time, oil streaks are clearly visible on its outer side. Similar signs of a faulty Ford Focus shock absorber are shown in the photo below.
Tools and materials
Replacing the rear shock absorbers of Ford Focus 2 is carried out by specialists from service centers and service stations on lifts. You can replace failed sets yourself at the inspection pit.
In the latter case, there is an opportunity to assert oneself and save money, but there is no guarantee of quality. Therefore, the owner himself determines his choice.
To replace the rear shock absorbers on a Ford Focus 2, in addition to new devices, you will need a set of tools:
- Shoes that fix the wheels.
- Screwdriver Set.
- Several jacks of different designs: “frog” and “trapezoid”.
- Safety supports for jacks.
- Spring ties.
- Set of wrenches.
- For processing nuts and bolts, use WD-40.
Symptoms indicating the need to replace front shock absorbers
When do you need to replace the front and rear shock absorbers? Much depends on the quality of the road surface, the condition of the road surface and the driving style of the sedan.
We are talking about the actual mileage of the front pair of struts being 60 thousand km. Replacing the rear shock absorbers of a Ford Focus 2 is not carried out as often as the front design.
Before replacing the Ford Focus 2 shock absorber struts, you need to check their condition. Today we will not dwell in detail on each verification method. Let’s just name the most effective of them:
- Visual inspection of the kit on a lift or inspection pit. We identify possible places of darkening: traces of oil drips. We wrote about this earlier.
- An old way to determine the condition of a shock-absorbing element: rocking the car.
- Determination of controllability when driving: a kind of test. The car can be driven from side to side at a speed of 80 km/h, as well as on flat sections of the highway at a lower speed.
- A set of diagnostic measures on the stand with assessment of the damping properties of each element separately. After testing on a vibration stand, the computer program produces the results of measuring axial vibrations.
It is important to contact the service center specialists to undergo diagnostics and replace faulty structures if leaks are detected and vehicle controllability is reduced.
Reasons for failure of the Ford Focus 2 shock absorber
Failure may result from:
- Poor quality stem material.
- Low quality oil seal.
- Violation of the installation and technological process at the service center.
- Leakage of working fluid from shock-absorbing structures.
- Boot failure.
- Constant loads associated with driving on bad roads.
This is not a complete list of problems that every driver may encounter. A sign of wear on the rear shock absorber support of a Ford Focus 2 can be considered a dull impact on the car body at the moment of hitting a road bump.
Analogs of Focus 2 shock absorbers
Ford Focus 2 is equipped with analog shock absorbers. We are talking about the popular brand Kayaba (KYB). The rear shock absorber struts of the Focus 2 are rigid with improved handling.
The ideal option is to install budget products from Belarusian manufacturers Fenox. At a relatively low cost, they have very decent characteristics. Those who prefer a comfortable ride are advised to install rear shock absorbers on Ford Sachs (SACHS). Take front shock absorbers for Focus, 2 included. The cost is around 7 thousand rubles. Their article number is 1919323.
German Bilstein suspension parts are considered a worthy alternative to original products. You can safely install Monroe and Koni kits.
Replacement rear strut shock absorbers for the second Focus.
Replacement of struts is carried out after the car has driven 90-100 thousand km. In this case, the manufacturer's recommendations are taken into account.
Preliminary preparation for replacement
When replacing a shock absorber strut, the following items may additionally be required:
- front bumper;
- anther;
- upper spring seal;
- shock absorber supports;
- rear bumper;
- support bearings;
- lower spring seal.