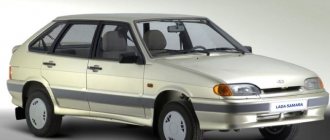
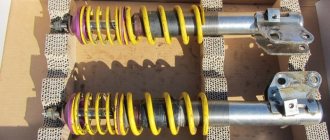
The design of the front suspension of the VAZ 2114 car consists of the following components:
- Subframe, support bearing;
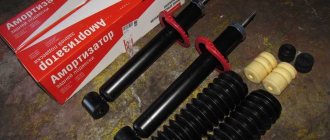
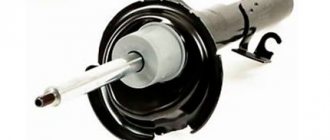
- Oil type shock absorber, spring;
- Stabilizer's pole;
- Silent blocks, rubber bushings.
During the operation of the car, parts wear out and become unusable. VAZ 2114 needs preventative maintenance and major repairs.
The process of replacing suspension elements is not complicated, and the operating principle is intuitive. We carry out restoration work on our own; there is no need to contact a workshop.
Originals, analogues, article number, price of stabilizer strut for VAZ 2114
Technical data: length 200 x width 28 mm x diameter 10 mm;
| vendor code | Price, rub.) | vendor code | Price, rub.) |
| Original front | |||
| 2108-2906050 | From 750 | 2108-2906055 | From 750 |
| Front analogues | |||
| SCT TS 597 | From 450 – 500 | QML AA1910 | From 450 – 500 |
| Herzog HL | —/— | Trialli SP | —/— |
| Ruville 9172 | —/— | Patron PS4 | —/— |
| Vortex 98564 | —/— | Vortex 98788 | —/— |
Before purchasing, check the compatibility of the spare part catalog number with your car model.
Useful tips
Replacing struts is far from the most difficult procedure when repairing a car. However, it is important to take into account and observe certain nuances so that the quality of the work done is maximum.
Integrity check
Therefore, stick to a few tips.
- Before installing new parts, be sure to wash them using regular kerosene and the almighty product called WD40. The presence of oil in the latter will ensure better performance and mobility of parts.
- When purchasing racks and accessories for them, be sure to check their condition and quality directly on site. Do not throw away receipts in case you suddenly discover a defect or defect already at the beginning of car repair.
- After replacing the struts, tighten the fastening nuts, but do not tighten them. Only when the car is removed from the jack can they be tightened fully and firmly as permissible.
- Check the car periodically and do a wheel alignment. This is an effective method for extending the life of racks. Plus the car will move noticeably better.
- If possible, take the car to a car service center where there is a special stand. It allows you to obtain a diagram of the performance characteristics of the racks. Such a service costs little, and if you change the racks from specialists, they can even carry out diagnostics for free.
Stages of diagnostics of VAZ 2114
We carry out diagnostics, assess the condition of the machine, and identify breakdowns. The visual inspection process is not complicated; we carry it out on our own.
- We place the VAZ 2114 on the inspection hole, provide priority safety measures, squeeze the parking brake;
- Jack up the side, unscrew the bolts, remove the wheel;
- Using mechanical force on the rack, we check for the presence of play and knocking. We evaluate the condition of the rubber bushings, the degree of deformation of the metal washers;
- At the same time, we inspect the suspension arm, brake circuit, disc, and pads. We complete the diagnostics by checking the tightness of the shock absorber cylinder and the integrity of the spring;
Based on the data obtained, we calculate the number of necessary spare parts, rubber bushings, and other consumables.
Replacement
Before you get started, we recommend watching a video on how to make the replacement. This is a useful lesson that will provide the necessary knowledge and concepts about the location of certain components of the unit.
Removed suspension element
But let’s say right away that the lack of at least basic experience in car repair means that you should not start replenishing your own knowledge base with such a process as replacing these parts. It is better to entrust this issue to specialists.
If you decide to do everything yourself, then follow the specified algorithm. This will allow the replacement to be completed efficiently and without unnecessary manipulation.
- Place the car on a flat area, preferably with a hole. Loosen the bolts on the front wheels. Be sure to turn on the handbrake and secure the wheels with chocks. You need to think about safety first.
- Use a jack to lift the front of the car, then remove the wheel. Please note, when changing the front suspension elements, it is better to do this on two wheels at once, even if one of the struts is in satisfactory condition.
- Lift the hood and look for the bolts that secure the struts to the body. Look for them on the left and right, near the windshield.
- There is a plastic cap on the glass that needs to be removed. To do this, use a simple flathead screwdriver. The plastic element is pryed off and thus easily removed.
- Unscrew the mounting nuts holding the rack on top of the body.
- A brake hose with a bracket is attached to the rack. This element is also removable.
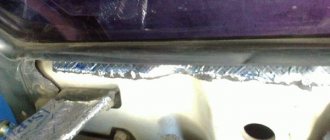
- Using a wire brush, be sure to clean all the fastening elements of the struts to the body and chassis of the car.
- Now take the pliers in your hands and use them to unscrew the nut. The one that holds the tie rod end joint to the A-pillar.
- A puller removes the hinge from the shock-absorbing strut arm. If this is your first time changing them and no one has removed them before, be sure to tighten the nut a few turns, which will protect the threads.
- Near the place where the fist is attached to the stand, there are nuts that should be removed. Just first mark where the adjusting bolts are located. This way you won’t have to go to a wheel alignment after replacing suspension elements.
- Using a hammer, knock out the bolts that hold the element and the fist. The nodes release, allowing you to pull your fist down and reach the worn post.
- Place the new part, then proceed to reassemble the unit in the reverse order. During the procedure, do not forget to check other components for defects, malfunctions, oil leaks, and so on.
When the procedure is completed, put on the wheels, but do not tighten the bolts tightly. By lowering the car from the jack, you can fully fix the bolts
This is an important rule that, unfortunately, many people forget.
Replacing the front struts is not the most difficult procedure, but it requires observance of a sequence of actions, accuracy and regularity.
Replacing stabilizer struts on a VAZ 2114
Experts recommend replacing suspension elements in pairs. It is highly undesirable to leave worn parts in their original places without attention, since repair work will soon be repeated.
- We install the car on the inspection hole, install the shoes to avoid any arbitrary rollback, squeeze the hand brake;
- Jack up the side, unscrew the bolts, remove the wheel;
- Using a “17” wrench, we unscrew the rack mount from under the hole, use a metal spacer to knock out the bolt, and knock down the rack;
- Lubricate the bolt with graphite grease, having previously cleaned it of rust and deposits;
- We carry out troubleshooting of adjacent mechanisms, parts, levers. If there is no damage, install a new rack, fix it with a bolt, and tighten the nut.
By analogy, we carry out work on the opposite side.
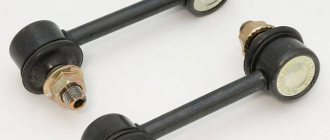
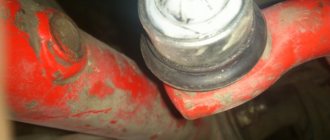
If defects are detected in the lateral stability link bushings, they must also be replaced. The process of installing new ones is not at all complicated; you can do it yourself.
- After removing the wheel, unscrew the stabilizer bar, suspension arm, and ball joint pin. On each side, the rod is fixed with a rubber bushing and a metal plate at the base. We unscrew the two bolts to “14”, replace the bushing, and assemble the structure.
- After the repair is completed, we visit a service station to restore the wheel alignment angle. The degree of tread wear, fuel consumption, and acceleration dynamics depend on the accuracy of the angle.
Often the cause of the knock is the ball joint. As the pin wears out, free play develops inside. Each time you enter a hole, there is an impact on the metal surfaces of the parts.
The defect is eliminated by replacing the ball joint assembly. To do this, jack up the side, unscrew the bolts, and remove the wheel. Using a “14” wrench, unscrew the fastening of the ball joint pin. We substitute a wooden spacer and knock the tip out of its seat. Unscrew the remaining two bolts securing the ball joint.
We troubleshoot the steering knuckle, clean the seat, and fix the ball joint. We assemble the remaining structural elements and check the functionality of the system.
Replacement
If you decide to actually install units from Priora, you should take into account the fact that the thickness differs from the standard design by 4 millimeters. Original eggs for the fourteenth
Original eggs for the fourteenth
Plus, the sizes of the brackets used differ. Therefore, with such modifications, experts recommend simultaneously replacing the stabilizer struts themselves, brackets and cushions. In total, purchasing such a kit will cost you no more than 2.5 thousand rubles.
Devices from Priora
The work itself is carried out as follows.
- Raise the front of the body using a jack.
- Place bricks under the body, first turning on the handbrake and placing stops under the rear wheels.
- Remove the strut nuts from the left and right wheels.
- Now the bracket fixing nuts are removed from both sides.
- The entire kit should be dismantled together, assembled, after which the spare parts from the “fourteenth” are put somewhere aside.
- Next, you need to slightly modify the elements that you borrowed from Priora.
- Restyle the rod, since different sizes are provided in the engine compartment of the two models.
- If you don’t modify the stabilizer from Priora, they will rest against the tunnel of your VAZ 2114. And there are pipes for the exhaust system, and you shouldn’t forget about the gearshift lever linkage. If this point is not improved, the new stabilization racks will quickly fail.
- Compare two elements from two cars. The arched gadfly of the rod from the “donor” is corrected with a heavy hammer.
- You will need an extra pair of hands to put the modified part into place.
- The nuts for attaching the brackets should be tightened until the gap in the cushion cuts disappears.
- The brackets of the racks themselves are mounted in the same way. Full tightening should be performed with a force of 44-53 Nm in relation to the nut, and no more than 13-16 Nm in relation to the bracket.
Practice shows that “Prior” stabilization racks behave excellently when installed on a VAZ 2114. Here it is imperative to use only serviceable, new elements, and also follow the sequence of operations.
It is not difficult to do the work yourself, but it is necessary to clearly refine the elements and also use the appropriate fasteners. Otherwise, the task is not difficult, which is why many owners of the “fourteenth” model prefer to do it themselves.
Rear suspension contour on a VAZ 2114
At the rear, the functions of the stabilizer are performed by a longitudinal beam, which is fixed on two pressed silent blocks. Systematic operation of the machine contributes to the wear of suspension elements and reduces the service life.
- To restore the functionality of the mechanism, we replace the silent blocks. The installation process is not complicated, we do it ourselves.
- After jacking up the car and removing the wheel, unscrew the bolts securing the beam to the base of the frame. We press out the silent blocks one by one, clean the seat, and press in new ones. We complete the installation.
- At the same time, we inspect adjacent parts and mechanisms for defects and damage. We replace elements with new ones as needed.
- The source of the knock is not always a worn silent block. Check the condition of the bushing on the lower shock absorber eye. The presence of free play is unacceptable, as well as cracks and tears in the rubber.
The replacement process is not complicated, but requires a vice to press out the bushing. We unscrew the upper and lower mounts of the rear shock absorber, having first compressed the spring several turns. We fix the shock absorber in a vice, press out the rubber bushing with a puller, and press in a new one. We assemble the parts in reverse order.
Replacement
To replace or partially repair you have to go through a rather labor-intensive path.
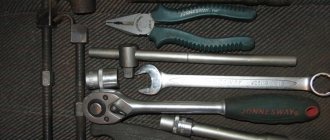
You will need the following set of tools and materials:
- Screwdriver Set;
- Set of wrenches;
- Jack;
- Partner.
Decide in advance whether you are going to change the entire assembly, or whether you want to change only the damaged elements of the rear pillar. The volume of your purchases depends on this.
You can start working. Based on our instructions and the video lessons provided, you will be able to replace the rear struts yourself.
- Turn the gearbox into first gear mode.
- Raise the rear wheels using a jack.
- Install supports, strengthening the reliability of fixing your car in a given position.
- Remove the racks. To do this, first go to the trunk, remove the decorative rubber plug, which is located on top of the rack mount. It is better to remove all unnecessary things from the trunk.
- Take a 17-size spanner and a 6-size open-end wrench. With their help, you can unscrew the nut with a spanner, and the open-end wrench will be useful for holding the shock-absorbing strut rod.
Removal process
- That's it, this allows you to remove the mounting nut, support washer, spring washer and top pad without any problems.
- Now we go under the car to finish what we started.
- Take a 19 mm wrench and remove the shock absorber mounting bolt to the rear beam. Remove it.
- In some cases, problems may arise with dismantling this bolt, since it simply sticks. To do this, pre-treat the bolt with the almighty WD40 and give it time to react.
- If even this method did not help, then you will have to take the guide and simply knock out the fastening element.
- Next, remove our shock absorber along with the spring.
- Do not forget that during such manipulations most often the spring gasket remains on the body. It sticks to the metal. Many people forget to take it out, which causes difficulties during reinstallation. Don't make this mistake.
- Clean all the seats to make it more convenient for you and make it all look more aesthetically pleasing. Plus, neatness never hurts to extend the service life of new spare parts.
- To make it more convenient for you, wrap the gasket on the new spring with electrical tape, or secure it with thin wire. This will prevent it from slipping when you begin installation.
- When putting the assembly back together with the new rear strut, be sure to make sure that the raised portion of the spring cup faces the direction of the wheel.
- Secure the lower end of the rack with a nut and bolt, but there is no need to tighten the fasteners just yet.
- Using the lever of your jack, raise and lower the rear of the car. This is necessary in order to eventually insert the shock absorber rod into the hole in the body of your nine.
- With the spring in place, pull the shock absorber rod out to its full length.
- Insert the rod into the lower ear and secure with a bolt.
- Place a jack under the beam and begin manipulating the lifting mechanism.
- At the same time, the spring will begin to compress, and the rod will move towards the glass.
- You or your assistant must be alert in the car in order to have time to pry the rod with a screwdriver and ensure it is directed in the right direction.
- Once the rod is in place, the work can be considered almost complete.
- Fix the rod, not forgetting to insert the cushion, washer and engraver. All this is securely fixed.
- Now you can lower the car onto its own wheels and fully tighten the bolt of the lower shock absorber mounting.
Reassembly stage
Changing rear strut assemblies is easier and faster than dismantling, disassembling the old strut, looking for defects in it and replacing individual damaged components. But this requires less financial costs.
Changing racks is not that difficult, even if you have little experience in such matters. But if there are none, be sure to contact trusted car services. Do not risk your own car, otherwise subsequent repairs will be even more difficult and expensive.
Loading …
Tips for caring for VAZ 2114 suspension
- Use the services of official service stations, where they provide a quality guarantee for the work performed;
- Before purchasing parts, check that the catalog numbers match. Do not give in to provocations, do not buy components at unusually low prices. Cheapness is a sign of a fake;
- Do not violate the technical inspection deadlines. The average service life of suspension elements is 55 – 60 thousand km. Mandatory maintenance every 15,000 km;
- When ordering paid services from a service station, check whether the service workers have entered the data into the service book.
An increase in service life is also positively influenced by a moderate driving style, high-quality road surface, and high-quality components.
Scheduled maintenance of the VAZ 2114 car after 15,000 km, replacement of front suspension elements and silent blocks no earlier than after 50,000 km.
It’s better to buy high-quality struts once and drive 60,000 km on them than to buy cheap ones twice and drive them for 40,000 km.
How to change
Replacing stabilizer struts on a VAZ 2114 does not take much time. If a car enthusiast has already done this on other VAZ models, it will be even easier to figure it out. The traffic stabilization system on the VAZ 2114 was borrowed from Priora. The stabilizer struts can be used the same as usual.
Searched device
To replace, you will need to place the car on a jack, making sure to set the handbrake. Use the wrench to reach the rack and unscrew it. Often the part is repaired, if, of course, repair is possible. As mentioned earlier, you can replace the grease under the boot, but this is not always possible. It should be noted that repaired struts can last for some time if the driver does not yet have the opportunity to purchase new ones. In place of the old rack, a new one is installed using the same algorithm in reverse order.
Selection of racks
Set of spare parts from SS20
Before you start replacing the stabilizer struts on a VAZ 2114, you need to decide what exactly you will replace the failed units with. Today the range is quite extensive, but we offer you five of the most optimal solutions.
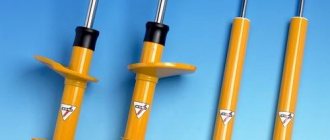
- Standard factory racks. The option is not bad only because of its accessibility. They are installed from the factory, but reliable service lasts literally the first 20 thousand kilometers, and if you try, all 30 thousand. After this you definitely need to change it.
- Racks installed on Priora. These are more modern devices that make the behavior of the fourteenth model more rigid compared to the sensations of driving a Priora with similar struts. Quite reliable, efficient, but do not have sound insulation. Because of this, problems arise with the bump stop.
- SS20. Modernized Priora oil struts, which have lost their main disadvantages. The only drawback is the lack of a support in the kit, so you will have to buy it separately. Moreover, take a support only from the same manufacturer.
- Plaza. Such racks are divided into Sport, Comfort and Super Sport. Good for everyone except sensitivity to frost. To eliminate this drawback, manufacturers began to use winter low. But this created another problem - the oil leaks after 20-25 thousand kilometers. If you live in a region without harsh winters, these elements are ideal for you. More precisely, your VAZ 2114.
- Kayaba. The best that exists today for the VAZ 2114. Unfortunately, their popularity became the main problem, as many underground companies began to counterfeit spare parts. Available in several types, suitable for drivers with different driving styles. They do not leak, serve for a long time and reliably.
Causes of failure
The desire to replace stabilizer links arises mainly due to the failure of the old ones. As practice shows, these elements, borrowed from Priora, work better than those native to the VAZ 2114.
Therefore, many specialists in the modification of domestic cars, as well as ordinary owners of the “fourteenth” model who have tried this method, agree on the correctness of replacing the original struts with “Prior” ones.
There can be many reasons why racks fail. The most common of them is the poor quality of the road surface on which we have to drive our cars.
The best way to determine a breakdown is to carry out diagnostics.
Troubleshooting
If the stabilizer bar on a car fails, you will hear a characteristic knock, and the car itself will begin to move to the side when moving in a straight line.
It is also worth paying attention to strong swaying when entering turns.
Many have now noticed that we voiced signs similar to bushing failure. Indeed, the symptoms are quite similar, so for your own confidence we recommend conducting a diagnosis.
Checking the condition
Checking the condition of the stabilizer struts is carried out in two ways.
- Professional. To do this, you will need a reliable service center that has the appropriate diagnostic equipment. The accuracy of identifying a breakdown is high, but the price of the service is not low.
- Independent. To do this you will need your own garage and a little time. Turn the wheel as far to the right and left as possible. If knocking or play occurs, the stabilizer struts should be replaced. There is a second method of checking - using an inspection hole. You should unscrew the bottom nut and release the strut. If the hinge moves freely, the stabilizer link must be replaced.
Such modernization of the front suspension often becomes the basis for tuning the VAZ 2114. This is one of those models from a domestic manufacturer that is perfectly suited for tuning. Moreover, both external and technical.
By installing Priora stabilizer struts, you can increase body rigidity and slightly raise the front end. The sensations on the road will be different; even an inexperienced driver will feel it. The bottom line is that the new elements improve maneuverability and safety.
Price issue
More precisely the cost of the racks. For car owners, the amount spent on repairs plays a big role. After all, the VAZ 2114 is far from the most expensive car, and therefore its owners are certainly not millionaires.
Kayaba (KYB) racks are the most expensive. The front ones will cost you at least 2,000 rubles, and the rear ones start at 3,000 rubles.
The anti-roll bar is an incredibly important element of the entire vehicle suspension. Due to these devices, car roll is minimized when cornering. As a result, the quality of handling improves and the car becomes more obedient.
Plus, these stabilizer links improve driving safety and also improve the performance of your suspension.
Today we will talk about how you can install a stabilizer on a VAZ 2114, borrowed from a newer model from AvtoVAZ - Priora.
Searched device
Repairs on discontinued vehicles
First, let's look at how to replace the front struts of a VAZ 2109 according to detailed instructions. When carrying out this procedure we will need:
- special key for holding the rod;
- set of spanners;
- universal puller for pressing out fingers;
- special threaded ties for springs.
Also read about replacing rear springs and how to change brake pads.
Well, let's get started.
- In the engine compartment, unscrew the nut for the upper fastening of the rod, holding the rod with a special wrench, and then unscrew the three support nuts. Then loosen the wheel mount.
- We jack up the side to be repaired and remove the wheel.
- Next, you need to turn to the steering rod: having pulled out the cotter pin, unscrew the nut securing the steering rod joint to the lever of our part. Using a universal puller, squeeze the finger out of the assembly lever.
- We release the brake hose from the mount so that it is not damaged during repairs. Then, having unscrewed the two bolts, we dismantle the brake caliper and move it to the side.
- After unscrewing the fastening of the ball joint, disconnect the ball joint.
- We unscrew the hub nut, now you can pull out the CV joint, and at the same time our defective part assembled with the steering knuckle will be released. If a complete replacement of each strut is required, you will have to unscrew the camber bolts from the steering knuckle eye to free the knuckle. But more often there is a need to update some elements.
Therefore, the assembly can simply be disassembled without removing the cam, in order to avoid installing wheel camber.
- To disassemble the unit and then change the elements, we install universal couplers on the spring, then compress the spring, after which we dismantle the support bearing and install a new one in its place.
- Next, remove the spring support and remove the spring without loosening the special ties.
- Now you can replace the shock absorber cartridge if the entire assembly is dismountable.
- Assembly is carried out in reverse order.
Next, we will consider a method that makes it easier to dismantle the strut, but without the fist, immediately replace it as an assembly, after which you will need to do a wheel alignment. To study this method, we will simply describe how the front struts of a VAZ 2110 are replaced, that is, of a similar design, in a different way. Although you will need the same tools, however, instead of a universal finger puller, if you don’t have one, you can use:
To change one of the front struts of the VAZ 2110 in a different way, we start from point 3 of the previous instructions.
- Having pulled out the cotter pin and unscrewed the nut, press out the pin as follows. Having inserted the end of the mounting blade between the steering rod and the lever of the defective part for expansion, we strike the end of the lever with a hammer.
- The bracket that secures our unit to the steering knuckle eye has an adjusting bolt, which is responsible for the wheel camber. There is an option to put a mark on the bolt in order to at least approximately maintain the camber, but this will not help much.
- We disconnect the brake hose from our defective assembly unit.
- Unscrew the adjusting bolt, as well as the lower bracket bolt. That's it, calmly remove the assembly to the light, after which it can be replaced as an assembly.
You can do the same on the Lada Samara. The fact is that the replacement of the front struts of the VAZ 2114 is carried out entirely according to the procedure already given, as they say, one to one, since the structure of the unit is identical to the “tenth”.