Hello drivers. Yesterday I promised to tell you in more detail how I changed the suspension. If you promised, then you have to fulfill it, otherwise you’re not a man.)))
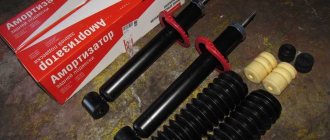
To replace, we will need: (2 pieces each) shock absorbers (I took SaAZ oil), springs (technospring -50), buffers, rubber protection, cups, washers, rings for the top of the springs, bushings and rubber rings (4 pieces).
Tools: 19mm socket, wrench, tube, it is also possible to use a ratchet. I personally unscrewed it with a wheel wrench, then used a ratchet. They tightened it with a wrench and a balloon (they inserted one into the other, there was no pipe). You will also need a wrench for 19, 17 (preferably an in-depth socket), 13 or a socket for 13 and a removable wrench (it costs 200 rubles) (in place of the puller, you can try using an open-end wrench for 6 or something similar, this was recommended, I haven’t tried it myself do that)
, jack.
Let's begin. First of all, we install wheel chocks, bricks, beams, in short, whoever is good at what and who can find what. Then we loosen the wheel bolts and raise the car. They lifted it, unscrewed the wheel, placed it under the center of the car (this is from experience, I’ve already dropped it from a jack
).
Then we take a 19mm wrench, install it on the nut, a wrench with a 19mm head and a pipe, install it on the bolt and start unscrewing.
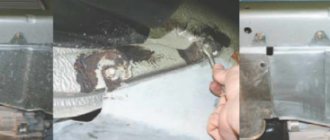
Then we open the trunk, remove the shelf and side plastics (to do this, lower the rear seat). Using a Phillips screwdriver, I used a flat one, we unscrew everything. We remove the upholstery and rubber bands from the glasses.
We take a removable key. I had a shortage of keys, so I had to be smart. The puller consists of two keys, 1 for the rod, 2 for the nut. I took a wrench for the rod and a ratchet with a 13mm head. I put one on top of the other. Then I took the carob 17, there was no other one, and unscrewed the shock absorber from above. Once unscrewed, the shock absorber will most likely fall off on its own along with the spring. Because If you remove the wheel, it will be easier to get it out and install a new one.
By analogy, we assemble a shock absorber. Buffer, protection, cup, bushing, rubber ring, spring and put another ring on the spring. Let's go put it on, but don't forget to take the ring out of the glass under the car! I pulled it out with the same flat screwdriver. screwdriver
How to check the rear struts for functionality on a VAZ 2114, 2115, 2109, 2108.
Unlike the front struts, the rear struts don’t fail as often, but it does happen. Usually in such cases a knock is heard when driving over bumps from the rear of the car. How can you understand that it is the rack that is knocking? There are three ways to check:
- Inspection of the rack.
- Rocking the car.
- The feeling of driving a car.
Inspection of the knocking rack.
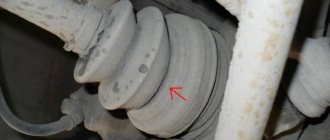
By lifting the car on a lift, you can see the rack and what condition it is in. If the stand is damp (moistened with oil), this means it’s time to change it. In such cases, they say that the stand has leaked. You can also look at the strut rod. It should be free of burrs and scratches. If the strut rod is damaged, the strut also needs to be replaced.
Rocking the car.
Approach alternately from the left and right sides of the rear of the car and begin to press on it from above, as if rocking it. Five compressions and releases will be enough. After the last release, the machine should not continue to rock.
The feeling of driving with faulty struts.
You can understand that your shock absorbers are faulty while driving the car. When driving on the highway, notice whether the car continues to rock after passing a section of the road laid by the wave. If the car continues to rock, the shock absorbers should be replaced.
Selecting new parts
It is not difficult to purchase a rear shock absorber for a VAZ 2112; there is a fairly large selection at any auto store. The question is what type of rack to choose. There are 2 types of them:
- conventional hydraulic (oil);
- gas-oil (gas).
Parts of the first type are cheaper and handle road unevenness much more smoothly. When the car is operated without special loads and with a quiet driving style, oil shock-absorbing elements can last quite a long time, provided that you do not come across a fake. Gas-oil shock absorbers are more expensive and behave more rigidly, which improves car handling and is a definite plus for an aggressive driving style. In addition, they last longer when used under increased loads.
To avoid purchasing low-quality products from unknown manufacturers, you should choose products from brands that have proven themselves on the roads of Russia:
At the same time, it is necessary to take into account that products of these brands are most often counterfeited in underground workshops. Therefore, it is better to buy parts from official sales representatives of these manufacturers. The same applies to VAZ 2110 springs, which sometimes change due to shrinkage from loads.
If there is an obvious malfunction of one of the shock absorbers, it is recommended to replace both elements.
There is no point in changing them one by one; you will only waste money and time on replacement. Using an old rack together with a new one will cause rapid wear of the latter. A “bad” part will handle irregularities much worse than a new one, which will put a double load on it. An exception is a situation where, for various reasons, a new shock absorber installed recently has failed. Then it makes sense to replace only it.
How to remove rear shock absorbers on VAZ 2114, 2115, 2109, 2108.
Begin dismantling the rear shock absorber by removing the plastic plugs located in the trunk.
Having removed the plastic, we will see the nuts screwed onto the shock absorber rod. We unscrew them with a special key. If it is not there, then we use a 17 socket wrench and a 6 wrench or an adjustable wrench.
Having unscrewed the top nut, remove the washer and cushion that stood between the nut and the body.
Before unscrewing the lower shock absorber mounting bolt, lift the wheel on a jack. The racks can be removed very easily if the bolts securing the rack to the beam can be unscrewed without any problems.
What to do if the shock absorber bolt is soured.
Removing the struts can be complicated by souring of the bolts with silent blocks. If you encounter such a problem, then you will not be able to remove the shock absorber without a grinder.
Just carefully file off the head of the bolt and knock it out with a hammer.
If the bolts are not soured.
If the bolts securing the rack to the beam have not soured, you are very lucky. Simply unscrew them and remove the stand from the eye.
Ready! Let's move on to installing the new part.
How to install a rear pillar on a VAZ 2114, 2115, 2109, 2108.
Rack assembly process:
- We pump up the rack.
- We put on a duster.
- We put the bump stop on the rack rod.
- We place a washer with a cushion on the rod.
- We put on a spring with a pillow attached to it.
- We put the stand in place by screwing the top first and then the bottom.
The process of installing a rear shock absorber is not complicated, but everything has its own subtleties.
This is interesting: Replacing front shock absorbers for Ford Focus 2
First of all, we pump the racks before installation. Usually the instructions for bleeding come with the strut, but if there is none, just squeeze the strut rod 5 times until the end and remove it. and do not turn it over after pumping (after pumping, the stand should always be in a vertical position).
One more important detail. If the washers that secure the strut rod with the body are installed incorrectly, we will get a creaking of the rear strut of the VAZ 2114. In order to prevent creaking in the strut , it is necessary to install the lower washer with the cup down, and the upper one, on the contrary, with the cup up. In this case, there will be no creaking in the rear of the car .
The spacer must be between the car body and the spring. To install it without problems, tape it with molar tape. You need to use masking tape; in extreme cases, you can use electrical tape. When using simple tape, it can make extraneous sounds on bumps.
I hope I have described all possible difficulties and ways to eliminate them. If you encounter any problem or solution that is not in this article, leave it in the comments.
Rear shock absorber replacement process
Original rear shock absorber strut manufactured by AvtoVAZ
The procedure for replacing rear shock absorber struts on a VAZ-2114 is quite simple if you follow all the instructions and recommendations.
The main thing is a safety measure, since one awkward movement or not securely fixed car will lead to it jumping off and causing injury.
In order to replace the racks you will need a set of keys and sockets.
Go!
So, let's consider the sequence of actions aimed at replacing this element:
- We jack up the rear of the car and put a stop so that it does not accidentally jump off.
- Remove the rear wheel.
Rear wheel removed
Unscrew the mount like this!
Lower shock absorber mounting bolt
Using a socket and a wrench, remove the lower shock absorber mount
After the fasteners are unscrewed, remove the shock absorber
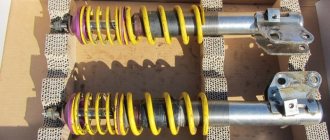
Using a special tool we tighten the springs
Removing the upper strut support
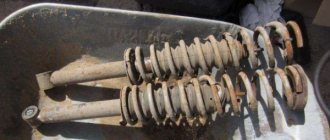
The shock absorber is new, but the spring is old
Selection of racks
The choice of rear pillars should be approached carefully, since they bear the load when transporting goods, as well as absorbing poor road surfaces, which are quite common in the vastness of the country.
Original
Analogs
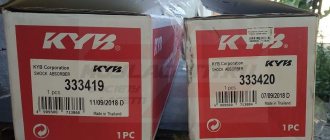
Monroe shock absorber strut
Shock absorber strut manufactured by Kayaba
Do I need to change the spring?
A spring is a very durable element, but with prolonged use it can become unusable. Cracks appear, elasticity and length decrease. Diagnosing the condition is very simple:
- Visually inspect the springs for cracks and deformations. If they occur, then the springs must be replaced.
- Apply a load of 325 kg*s (or 3188 N). On export models of the car, the length will be 182 mm. For those produced for the domestic market, the length should be more than 201 mm. If less, then the spring must be replaced.
The springs that were installed on the VAZ-2115 are marked in the form of the letters A and B. The former are capable of working with higher loads. Be sure to install new springs with the same class.
conclusions
Replacing the rear shock absorber struts on a VAZ-2114 is quite easy. It is worth noting that with the growth of counterfeits in the automotive market, the choice of parts should be approached quite carefully, especially checking the presence of original packaging, holograms, certificates, and quality marks.
It is worth remembering that a low-quality spare part will not last as long as the original one, even if it is an analogue. The racks manufactured by Kayaba are noted for their special quality among motorists.
It’s interesting how you removed the rear strut, and in the end you post a photo of the front strut with the support bearing. Oh yes Kulibins.
We arm ourselves with tools and spare parts.
You can't do without tools and spare parts. Replacing the rear struts of a VAZ 2114 will require the following “arsenal”:
- new shock absorbers;
- jack;
- a set of keys. 17 and 19 mm are especially useful;
- special keys for fixing and removing wheels;
- vice and puller;
- hammer and pliers.
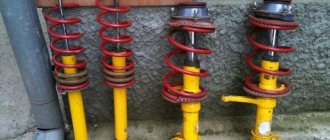
The choice of racks deserves special attention. Their varieties:
- Oily. Traditional option. Soft and comfortable. Suitable for a quiet ride;
- Gas. Tough and expensive. Not suitable for every occasion;
- Gas-oil. A kind of compromise between the previous options. Very common.
The choice depends entirely on the preferences of the owner and the size of his wallet. Armed with everything you need, you can proceed to directly replacing the rear struts.
Step-by-step instruction.
Doing it yourself will work out cheaper. The sequence is as follows:
- We prepare the place and tools. The surface on which the car is located must be level. A pit is desirable, but not required. Without it, work will be carried out in a lying position. To be on the safe side, install wheel chocks or chocks on the front wheels. To be sure, you can even turn up the speed;
- Loosen and remove the wheel bolts. A 19mm wrench is required. Before direct repairs, all nuts can be treated with penetrating lubricant (WD-40, by the way, here are the recipes) - this saves time and effort;
- We put a jack and lift the rear part of the VAZ 2114, after which we remove the wheels. We work with the jack carefully and carefully!;
- Open the trunk and remove everything unnecessary. There is a rubber plug “hiding” under the shelf - remove it with a screwdriver. Behind the plug there is a rod with a tightened nut. You can unscrew it with a 17 mm L-shaped key and a special key for fixing the rod. If there is no key, then pliers will do; Next, remove the support washer (using a magnetic handle)
- We unscrew the nut securing the shock absorber to the beam; you will need two 19mm open-end wrenches. Remove the bolt that secures the strut to the beam. If that doesn’t work, knock it out with a smaller bolt. Carefully remove the shock absorber from its seat and remove the entire rack (it may fall, be sure to support it).
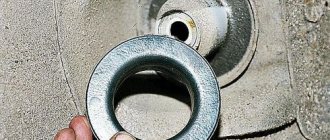
- Important: do not forget to remove the stuck insulating gasket (this often happens) from the inside of the glass, which is placed on the spring (see photo).
- We remove the spring, remove the spacer sleeve and shock absorber cushion. Remove the cover from the casing. Remove the compression stroke buffer (bump stop) from the rod.
- After this, we take a new rack with the rod fully extended (otherwise nothing will work) and put the casing, bump stop, cover, cushion and bushing on it. The spring and gasket are installed last. Advice: before installation, you should “bleed” the shock absorbers, as this greatly increases their efficiency and service life. “Pumping” is carried out by turning the structure over. At the same time, the oil spreads throughout the spare part;
- We install the new structure in reverse order. This can be difficult. There are situations when the stand simply “does not want to climb” into its rightful place. This can be corrected by lifting the beam with a jack;
- We secure the rod with a nut and secure it with a gasket. Tighten all the nuts;
- We put the wheels in their place and remove the jacks;
- We repeat the above steps on the other side.
That's all. The withdrawal procedure was successful. Every step is important - there is no point in skipping even one. There are some removal features that you should become familiar with.
Order of Operations
Removing old shock absorbers and installing rear struts of the VAZ 2114 and other models can be done without an inspection hole or overpass - just jack up the car. But before you lift the car, you need to remove the assembly plugs located in the trunk. So:
- You need to remove the trunk shelf, bend back the upholstery and use a screwdriver to pull out the plug. The rod nuts are located under them; they need to be unscrewed and the washer and plate removed.
Now you need to jack up the car. This is necessary so that the lower rack lock is accessible. This bolt is most often tight, so it is better to pre-coat it with a special lubricant. If after this you cannot unscrew the fastener, you need to knock it out with a smaller bolt.
Now you can remove the stand, be sure to support it - it may fall. It's easier to do this if you move the end towards the rear of the car
Note! After dismantling the stand, a rubber gasket remains in the glass. It needs to be removed because the material has lost its elasticity
A new spacer must be installed, which is purchased separately from the assembly.
Now you need to remove the spacer sleeve, shock absorber cushion and bushing, remove the cover from the casing, and remove the bump stop from the rod.
You can begin installing the new unit. The rod element must be fully extended. We install the bushing, cover, its cover, and bump stop on the rack. The spacer and spring are assembled after all other parts. On a note! It is advisable to bleed the shock absorbers before assembly. This will increase their functionality and service life. The procedure is performed by turning the device over. This will allow the oil to spread evenly throughout the entire assembly.
Installation is performed in reverse order.
Then all the above operations are repeated on the other side of the machine. Difficulties may arise during assembly:
- if the unit does not want to be placed in its normal place, you can use the jack beam;
- if the old parts have lost their integrity, they need to be replaced, if they are in order, wipe them with kerosene;
- if the support bearing comes out separately during dismantling, this is normal;
- to install the spacer without any problems, you need to glue it to the spring with masking tape;
- Some experts believe that when final tightening the fasteners, you first need to remove the car from the jack.
The sequential replacement of the rear struts of the VAZ 2114 can be seen in this video:
Useful tips.
- Before direct installation, we carefully inspect the purchased parts and treat them with kerosene. Broken and unusable elements are not needed for repairs;
- A number of professionals believe that the final tightening of bolts and nuts does not require the participation of a jack;
- The struts can be checked using the wheel alignment method. This method increases the service life and increases the comfort of the trip;
- There are special stands where you can check the result of the replacement. The price of the service is small. At the same time, one’s own skill and skill is tested;
- Don't worry if the support bearing doesn't come out with the strut when you remove it.
Popular question: how often do parts need to be replaced? There is no clear answer. Vehicle operating conditions, quality of spare parts and personal skills are key success factors. If a car owner likes to “pick up” potholes and pits, then the time for repairs will inevitably approach. It is also obvious that if there are “symptoms” of a malfunction (dull knocks, fluid leakage or spring deformation), then there is no need to hesitate.
The process is simple. You just need to know clearly what and when to do. A competent selection of tools and spare parts is half the battle, and step-by-step instructions that allow you to carry out repairs yourself will help you complete what you started. Take care of yourself and your car, because health and life are the most valuable things we have.
Let's summarize
As you can see, the procedure is not complicated, you just need to know what and how to do. For a beginner, the event will take up to 4 hours, but if you have the skills, you can complete it in 1.4-2 hours. It is advisable to check the results of work performed for the first time using the wheel alignment method or go to a car service center and use a special stand. The price of the service is affordable, but you will be convinced of your competence as a repairman. There is no definite answer to how regularly rear struts require replacement - it all depends on the quality of spare parts, intensity and care of operation, and driving style.
Replacing the rear pillar of a VAZ 2114
The tool you will need for the job.
We fold back the rear seat and remove the rear parcel shelf. To do this, disconnect the four pistons securing the rear parcel shelf.
Using a utility knife, carefully cut the upholstery. Use a screwdriver to pry up and remove the protective cap of the upper mount of the trunk post.
Take a puller for the rear pillar. If it is missing, you can use regular keys, provided that you secure the shock absorber rod from turning.
Using the “17” and “22” keys, unscrew the rod nut.
Using a wheel wrench “17” we remove the four bolts of the front wheel. Remove the wheel.
Using a 19mm wrench, unscrew the nut of the lower shock absorber mounting.
... and remove the bolt.
Having pushed the shock absorber rod down, remove it from the rear wheel well.
We take out the spring with a protective cover, cover and compression buffer.
When installing the cover on the casing, thread it onto the cover flange.
We insert the new shock absorber cover into the new boot.
We assemble the rack in the reverse order of disassembly. We install the compression stroke buffer on the shock absorber rod.
We replace the torn or lost elasticity cushion with a new one and install it on the shock absorber rod.
We insert the shock absorber into the niche. First, attach a nut to the rod.
Pull down the fastening of the suspension arm bracket and install the shock absorber using a pry bar.
Insert the shock absorber mounting bolt.
We unscrew the nut from the shock absorber rod, install the support washer together with the new shock absorber rod mounting pad.
We lower the car to the ground, rocking it several times, and tighten the nut of the upper shock absorber mounting to the beam with the appropriate torque.
A rear strut is a subassembly of a vehicle's rear suspension that provides stability and the ability to withstand external loads, especially during sharp turns. From a physical point of view, the strut device is designed to work in compression and expansion, dampening fluctuations in the load of the car body on the car suspension.
This photo report shows how the rear shock absorber strut of a VAZ 2114 is replaced; owners of other front-wheel drive cars of the Samara and Samara 2 families will also find it useful.
Suspension device
How to make a do-it-yourself air suspension for a gazelle and a VAZ.
The car’s suspension plays the role of an intermediary between the body and the wheels. A common type of independent suspension installed on passenger cars is MacPherson strut.
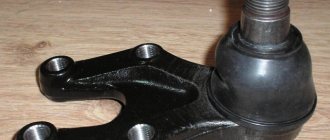
Front suspension of VAZ 2110: 1 — ball joint; 2 - hub; 3 — brake disc; 4 — protective casing; 5 — rotary lever; 6 — lower support cup; 7 — suspension spring; 8 — protective cover of the telescopic stand; 9- compression buffer; 10 — upper support cup; 11 — upper support bearing; 12 — upper support of the rack; 13 — rod nut; 14 - rod; 15 — compression buffer support; 16 — telescopic stand; 17 - nut; 18 - eccentric bolt; 19 — steering knuckle; 20 — front wheel drive shaft; 21—protected hinge cover; 22 - outer shaft joint; 23 - lower arm.
Comprises:
- subframe - the main load-bearing element attached to the body through silent blocks (reduce noise and vibration);
- transverse arms of the right and left wheels - are connected by means of rubber bushings to the subframe;
- steering knuckles, the lower part connected by a ball joint to the wishbone, the upper part to the shock absorber strut;
- shock absorber struts, including hydraulic, telescopic shock absorbers, coil springs, located in niches along the front fenders;
- anti-roll bar, which reduces the lateral roll of the car.
Possible malfunctions of the rear pillar and their causes
Noise and knocking in the car suspension. One of the possible breakdowns, indicated by noise in the suspension, could be:
- wear of the rubber bushings of the rear struts (rubber bands);
- breakage or settling of the strut spring;
- weakening or wear of the shock absorber eye bushings.
The car begins to drive sideways on the road - at speed the car deviates from the “course”, as a result, the driver needs to constantly direct the car, keeping the steering wheel at the ready. Possible reasons for this phenomenon:
- “breakdown” of the suspension due to the destruction of the compression stroke buffer;
- rear suspension overload;
- settlement or breakage of one of the suspension springs;
- displacement of the rear axle due to wear of the bushings of the suspension arms or deformation of the arms themselves.
Frequent breakdowns of the rear suspension . The causes are:
- failure of shock absorbers;
- upset or spring breakage.