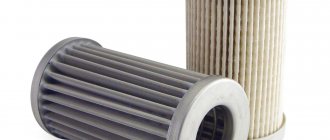
The fuel filter in a car serves to clean the fuel from mechanical impurities and protects the fuel system elements from clogging. Clogging of parts leads to interruptions in engine operation or to its complete stop. In some cases, as a result of dirt clogging the system elements, repairs may be required, which leads to labor and material costs. And in any case, it causes a lot of trouble for the vehicle owner.
Fuel filter
Where are the purifiers located?
The location of fuel filters on VAZ models depends on the engine. On injection and carburetor systems they are located in different places.
Filter location on carburetor internal combustion engines
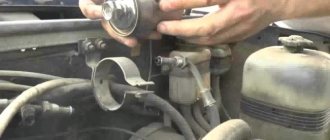
On carburetor VAZs, the fuel purifier is located under the hood. It is installed under the brake reservoir (main), secured with 2 clamps.
The filter for carburetor VAZs is located under the brake cylinder
Location of the cleaner on the injector
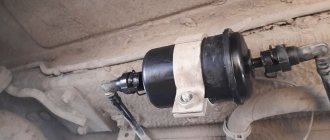
On a VAZ with an injection system, the FTO is installed under the car, at the rear near the muffler. It is mounted in the form of a cartridge in the fuel line. To inspect or dismantle it, you have to lift the car onto an overpass or pit.
Safety
Regardless of the type of engine on your VAZ 2109, the procedure for replacing the fuel cleaning device must be carried out in compliance with certain safety measures.
- Do not smoke under any circumstances while repairing the fuel system. Be patient. We do not recommend going outside to smoke. Your clothes may be oily or saturated with fuel. The slightest ember and problems cannot be avoided.
- Always keep a fire extinguisher near your car. When changing the fuel cleaner, place it next to you. A useful measure that has saved more than one person and saved more than one car.
- Avoid contact of fuel with eyes. It is best to work with safety glasses.
- Work on the fuel system only in well-ventilated areas. If repairs are being carried out in winter, it is better to dress warmly and open the garage doors.
- Do not change the filter outside during extreme heat. Even high air temperatures and direct rays of the sun can become a source of fire.
- You can work on the fuel system only when the engine has completely cooled down.
It will be useful: Reasons for the movement of the starter if the engine refuses to start
A fire extinguisher is a must have at hand. According to the operating manual, on injection VAZ 2109 the fuel purifier should be changed once every 20 thousand kilometers. In fact, given the operating conditions, this period should be halved. As for the carburetor, it is recommended to change the filter every 10 thousand kilometers. In practice - about 7 thousand kilometers.
Replacing this device is a fairly simple task that even a beginner can handle. The most important point is compliance with safety measures.
Preliminary stage
1.Relieve the pressure in the fuel system. This can be done by pressing the nipple under the black cap on the left side of the engine compartment for a few seconds. Don't forget to place a small container, as gasoline will leak out. (1-1, 1-2)
2. A similar result can be achieved in another way. To do this, remove the rear seat and see a small hatch under the seal. We unscrew 2 screws with a Phillips screwdriver, remove the cover and disconnect the terminal located under it.
We start the car and let the gasoline in the fuel line be used up.
3. Disconnect the battery terminal.
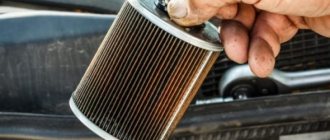
4. Raise the car and find the fuel filter under the bottom on the trunk side.
We clean off all the dirt with a metal brush and spray it on the threaded joints.
Payment via PayPal
After selecting payment via PayPal, the PayPal payment system will launch, where you need to select the payment method: bank card or PayPal account.
If you already have a PayPal account, then you need to log into it and make a payment.
If you do not have a PayPal account and you want to pay using a bank card via PayPal, you need to click on the “Create an Account” button - shown with an arrow in the picture.
PayPal will then prompt you to select your country and provide your credit card information.
After specifying the information required to make the payment, you must click on the “Pay Now” button.
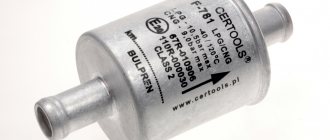
Instructions for replacing filter 21120-1117010 are presented below.
- Relieve pressure in the fuel circuit.
- Unscrew the fuel pipes.
Loosen the clamp.
Remove the filter.
- Check the O-rings and replace them if necessary.
- Install a new filter.
Step-by-step procedure for carrying out replacement work on a VAZ-2114
Before starting work on dismantling the fuel filter, it is necessary to relieve the pressure in the system. This must be done so that during removal it does not splash and flood everything around.
- To relieve pressure, first move back the rear seat, open the gas tank hatch and turn off the pump power supply.
The arrow marks the location of the pump under the rear seatRemoving the protective cover
Diagnosing the fuel pump
- Next, we start the car and leave it running until the engine stops working and stalls.
- After this, we try to start the car again to make sure that there is no fuel in the system.
- At this point, work on relieving the operating pressure in the system can be considered completed.
We recommend: Do-it-yourself replacement of starter bushings on VAZ cars
Alternative way to relieve pressure
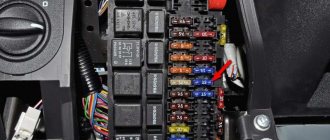
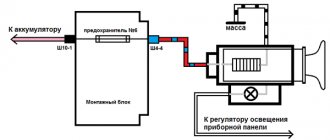
If you do not feel confident in the correctness of such a procedure, you can remove the fuse from the block, located there under the marking F3 , which is responsible for powering the fuel pump.
The fuse box under the hood is marked with an arrow.
When the fuse is removed, start the engine and also wait until all the fuel is gone. The main thing is, after completing all the work, do not forget to put this fuse back in place.
Dismantling process
As mentioned above, depending on the type of engine, the method of fixing the filter differs from each other.
Engine capacity 1.6
So, if you are the owner of a 1.6- liter engine, it is enough to just press the clamps of the fuel pipes with a little force and remove them from the place of fixation.
Engine capacity 1.5
And if you have 1.5 -liter engine, then you need to do the following:
- Carefully apply lubricant to all fixing parts to make them easier to dismantle.
- Next, remove the fitting from the fuel line drive using keys “17” and “19”.
The nuts to be unscrewed are indicated by arrows.
- During these actions, it is necessary to secure the connection tightly to avoid scrolling.
- Leave the remaining gasoline that will spill out during dismantling to drain into a container.
- In exactly the same way, remove the retainer from the reverse side and remove any remaining fuel.
- When the filter does not hold anything, remove all the fuel supply pipes from it and loosen the housing clamp using a “10” wrench.
This nut usually comes off easily.
- Remove the old filter.
The process of installing a new fuel filter (there are nuances)
- Before you begin installing the filter, take care to install sealing rings on the pipes, which you should wipe in advance with a dry rag to remove any remaining fuel and other liquids.
The ring is indicated by a red arrow.
- Reinstallation is carried out strictly in the reverse order of removal, paying only attention to how the arrow indicates the direction of movement of gasoline along the highway. On cars with a volume of 1.5, from right to left in relation to the side of the car, and on 1.6 vice versa.
- After you have installed and secured the new filter in place, connected all the fuel supply wires, you need to turn the ignition key and wait until fuel is pumped into the engine.
- Before starting the engine, this procedure must be done 3-4 times so that the entire filter cavity is filled and displaces all available air.
- After this, start the engine and let it idle while inspecting the filter connections for leaks. And if such are found, you need to turn off the engine and secure the connections as tightly as possible.
Popular breakdowns
Problems with the fuel pump can occur for several reasons. Therefore, your first priority is to determine the source of the problem. These may be:
- Fuel pump fuse;
- Fuel pump relay;
- Pump weight;
- Contacts;
- The pump itself.
If one of these elements fails, it can stop the normal functionality of the entire module.
Let us consider the situations with each of the specified elements of the fuel module in more detail.
Pressure
What exactly is a fuel pump? This is an element of the fuel system that allows fuel to pass through due to pressure. Therefore, if you take pressure measurements, you can get answers to many questions.
Let's give an example of normal pressure readings when checking in certain modes.
Contacts
The fuel pump includes three wiring:
- Plus (positive);
- Minus (negative);
- Fuel level indicator.
So, failure of the pump may occur due to a simple violation of the integrity of the wires. So if the pressure check shows normal, then we definitely examine the condition of the wiring.
To check, you will need a 12V lamp, which is attached to the external connectors of the pump with positive and negative contacts. Turn the ignition key. If the lamp blinks, contact is present. In this case, you will have to check the condition of the internal contacts.
If the pressure and wiring are normal, let's try to check the serviceability of the motor. It is this element that is responsible for moving fuel through the system.
- To check it, you will need the same 12V lamp;
- Attach it to any motor terminal;
- Turn the ignition key;
- If the lamp blinks, you will have to get rid of the motor and buy a new one.
Don't jump to conclusions. Before checking, look at the condition of the terminals and motor wiring.
Fuel pump weight
The contacts are fine, but the fuel level sensor may provide incorrect information. In this case, you definitely need to check the weight of the pump responsible for dispersing the fuel.
It often turns out that after prolonged use or driving on difficult road sections, the mass simply loses its fastening strength. Accordingly, if the mass falls off, the pump will not be able to work.
The mass is attached to the pump under the dashboard in the area of the hand brake. Therefore, when the driver turns on the handbrake, there is a possibility of hitting the ground contact, which is why it will fall off.
Putting the mass back in place is not that difficult. The problem is caused by the path to it. You'll have to:
- Get to the bottom through the interior;
- Remove the plastic under the handbrake;
- Remove the floor covering;
- Remove the grounding contacts;
- Clean;
- Secure it to the fuel pump as firmly as possible.
Relay
The fuel pump relay is located exactly where the ground is. Therefore, there should be no problems with the search.
With an ideally working fuel supply system, when the ignition is turned on, the relay instantly creates pressure inside the system, and then turns off.
If this process is disrupted, you will have to:
- Lift the front facing panel, which covers the contacts of the audio system and air conditioning;
- Take a look from the front passenger side;
- Find three relays;
- The lowest one is our desired pump relay;
- Turn the ignition key;
- If you hear a characteristic click from the relay, it is working properly;
- If there is no click, check the contacts. The reason is either them or a failed relay.
Fuse
All that remains is to check the condition of the fuse. This stage will make sure who the real culprit of the problems is - the pump itself or its fuse.
- Getting to the fuse is as easy as getting to the relay - through the hood or from the inside. The first option is preferable.
- Raise the hood and look in the area near the windshield.
- There is a dark-colored box located directly on the electronic engine control unit.
- Open the box and look inside for the topmost fuse.
- It has a current strength of 15A, as well as an inscription in English - Fuel Pump, that is, a fuel pump.
- Examine its external condition by removing it from the box.
- If the contacts are intact, then everything with the fuse is normal.
- If burnt contacts are clearly visible, consider purchasing a new device. Its price is affordable, so finding and replacing should not be a problem.
FUEL FILTER ON THE VAZ 2114 MODEL
The fuel filter is a filter element in a housing and is installed directly into the fuel line. The element itself can be fine or coarse; in many cars, two filter elements are installed at once. Two elements are necessarily present in cars with a diesel engine, since low-quality diesel fuel has a very detrimental effect on engine parts. And the high-pressure fuel pump does not tolerate dirt and can fail.
Injection gasoline engines are more demanding on fuel quality than carburetor engines. And since the fourteenth VAZ model is equipped with an internal combustion engine (ICE) with a distributed injection fuel system (injector), the requirements for fuel quality for the vehicle’s internal combustion engine are high.
LOCATION
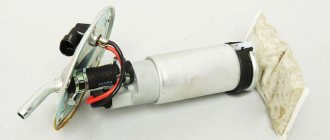
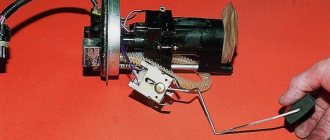
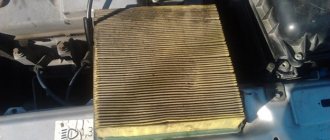
The VAZ 2114 has two filters installed - for coarse cleaning there is a mesh that is installed on the submersible fuel pump (the pump is located inside the gas tank), for fine cleaning there is a special filter in a metal case, it is located in the gasoline line of a front-wheel drive VAZ car.
To find out where the fine fuel filter is located, you need to look under the car. The filter is located under the rear trunk of the car, between the fuel tank and the rear of the muffler. Its location can be easily determined by the fuel pipes leading to it. The fuel filter is attached to the VAZ 2114 using a metal clamp, which in turn is connected to the bottom of the car. It is not difficult to get to the filter element, but it is convenient to change it on a pit or lift.
Filter-located-under-trunk
VARIETIES
As is known, the VAZ 2114 model (similar to it VAZ 2113 and VAZ 2115) was equipped with an internal combustion engine of 1.5 and 1.6 liters. Therefore, filters have different designs depending on the type of fastening of the fuel pipes.
For cars with an engine capacity of 1.5 liters, the filters have threaded fittings; with a volume of 1.6 liters, the fuel line elements are secured using specific clamps (clips). The parts are not interchangeable with each other, and therefore, before replacing, you need to make sure what type of element is needed acquire.
The cost of a fuel filter depends on the manufacturer of the product and the region in which the part is purchased. The price can range from 150 to 600 rubles. Inexpensive filters are from MANNOL, Nevsky, Citron, Ekofil, LAAZ, AvtoVAZ. Products from FRAM, BOSCH, FINWHALE, MANN are considered more expensive (but also of higher quality).
REPLACEMENT FREQUENCY AND SIGNS OF CLOGGING
The manufacturer recommends replacing the VAZ 2114 fuel filter after 30 thousand kilometers. How long to actually change it is another question. The quality of Russian gasoline often forces replacements to be made much more often. On average, it is recommended to change the filter element every 20 thousand km. They also change the filter if it becomes clogged prematurely. Signs of a clogged fuel filter indicate that the element is inoperative:
- The car loses power and does not develop speed, although the engine runs stably at idle;
- The VAZ 2114 jerks when driving, sometimes even stalls;
- When driving at any speed, the engine chokes, “sneezes,” and periodic pops occur in the intake manifold;
- The car practically does not go uphill;
- The car starts and immediately stalls;
- And finally, the car cannot be started at all (gasoline does not enter the engine).
We protect nature and the environment
When replacing the fuel filter, pay special attention to ensure that gasoline does not come into contact with the soil, plants, or water. Gasoline is poison! Therefore, if it gets into the soil or water bodies, it negatively affects human life, the symbiosis of adjacent varieties of plants and insects, as well as animals.
Sometimes to change the fine filter due to problems with the engine. Jerking while driving and unstable idle speed may indicate critical contamination of the fuel filter.
What fuel filters are installed on VAZ 2109/2114/2115 cars
VAZ cars of the listed models are equipped with filters designed for various power plants. They are divided into two types: for coarse cleaning (mesh in the fuel pump) and fine cleaning FTO (separate filter).
The VAZ coarse filter is located inside the fuel pump
Filters intended for carburetor systems are made of durable and transparent material, usually plastic. The transparency of the case allows you to monitor the state of cleanliness and promptly change consumables. These models are capable of cleaning fuel in a zone of 15–20 microns. One of these materials is placed inside them: felt, felt or paper.
For injection systems of VAZ cars, cleaning of a much higher level is required. Therefore, the filters for injection “nines”, VAZ 2114 and 2115 are different. They are made of stainless steel and are installed separately.
For rough cleaning, plate-slit, mesh and belt are used, which trap debris found in the fuel. On the contrary, PTO uses elements made of porous materials.
Which ones are better
Fuel filters, especially for engines with injectors, must have the required cleaning quality. Therefore, the best cleaner can be called the one whose throughput is at least 5–7 microns (injector) and 15 microns (carburetor). In addition, it should not fail in the case of a pressure of 3-5 bar.
It is also recommended to pay attention when choosing the method of fastening the fuel system pipes. There are models with hexagonal locking and models with snap fastening. The latter are more convenient in terms of replacement.
Approximate cost of replacing fuel filters
Replacement takes approximately 30–50 minutes, depending on the part model. In this regard, the cost of the procedure at a service station also varies, which is calculated according to the amount of time spent.
In fact, it is recommended to initially negotiate with the service center employee about the cost of the procedure, agree on the time, etc. As a rule, the replacement price starts from 700 rubles and does not cross the line of 1000–1200 rubles.
The price of the VAZ fuel filter itself does not exceed 200–600 rubles.
Reasons for replacement
There are several main reasons why car owners have to periodically or unplannedly change the fuel filter.
You can determine that you purchased a bad or counterfeit fuel filter based on several signs:
- Engine power has dropped;
- The engine pulls poorly;
- RPM drops;
- The engine suddenly stalls after turning on the ignition, etc.
Replacement on the injector
A fuel filter is a device that is responsible for the quality of fuel flowing from the tank to the engine.
The device is located between the engine and the pump and adjusts the composition of the fuel, filtering out debris and impurities. If for one reason or another the filter no longer performs its functions properly, it should be replaced immediately.
To change the device to a VAZ 2109 injector, follow the algorithm.
- Make sure the engine is completely cool. You cannot work on a hot engine.
- Drain all gasoline from the system.
- Check if a fire extinguisher or other fire extinguishing equipment is available.
- Explore the work area. It should not contain anything that could even theoretically cause a fire.
- Raise the hood, remove the negative from the battery.
- Remove the clamp from the fuel inlet and outlet hoses.
- Disconnect all hoses going to the filter. Be sure to lift them up or even plug them with something at hand. Otherwise, the remaining fuel will spill onto the power unit and the floor.
- Take the new filter in your hands and check where the marks are located indicating the connection of the inlet and outlet hoses. Just don't confuse them.
- Before connecting the pipes, check that all the gasoline has actually come out of them.
- Connect the hoses to the new filter device.
- Put on new clamps. They are mostly disposable, so it is better to replace them with new ones every time you change the filter.
- Check the assembly for leaks.
- Replace the negative terminal of the battery, close the hood and turn on the ignition.
- Make sure your fuel injection engine is working properly.
Replacement on the carburetor
If you are lucky enough to own a VAZ 2109 with a carburetor engine, the procedure for replacing the fuel filter will be slightly different.
The instructions look like this:
- Loosen the mounting clamp on the engine side;
- Disconnect the hose from the fuel cleaner. Most likely, a small amount of fuel will remain in the pipes, so be careful;
- Loosen the clamp and remove the hose from the tank side;
- Armed with a new fuel purifier, check the direction of the arrow on the device. It must coincide with the direction of fuel movement - towards the pump;
- Tighten the mounting clamps;
- Pump some gasoline into the fuel cleaner as it is dry at this point. This is done by the fuel pump. Press its lever a couple of times, after which the filter will begin to fill with fuel;
- Start the car and check for any signs of fuel leakage.
Main stage
1. Using two keys (17 and 19), unscrew the fitting nuts on both sides of the filter.
Or, if the fastening is on wire clips, press the fasteners.
In both cases, it is necessary to place a container for residual fuel to avoid getting it on clothes, body or floor.
2. Unscrew the nut of the fuel filter mounting bracket.
3. We take out the used element and replace it with a new one. At the same time, we take into account the direction of movement of fuel in the system. The arrow on the filter body will tell you how to do this correctly. Sometimes there are additional inscriptions in (input) and out (output).
Tighten the fastening clamp nut.
4. Check the degree of wear of the O-rings. If necessary, we replace them too. (9)
5.Connect the pipes. We tighten the nuts on the fittings or clamp the clamps.
At this point, the work on installing the fuel filter on the VAZ-2114 can be considered complete, and as you can see for yourself, there is nothing complicated in such work. The main thing is to follow our instructions exactly.
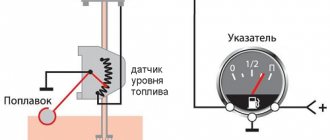
Adjusting the fuel level in the float chamber
Maintaining a normal level of gasoline in the float chamber is an important condition; if it is not met, malfunctions in the operation of the car occur:
- if the level is below normal, the engine does not have enough speed, power decreases, and gasoline consumption increases;
- if it is higher than required, fuel consumption also increases, and even more.
Setting the fuel level for the VAZ-2108-09-099 is quite simple, and in this case it is not at all necessary to remove the carburetor. The procedure for adjusting the position of the floats is as follows:
- remove the KVF assembly with the filter element;
- disconnect the choke cable, fuel hoses, EMG power cable;
- unscrew the five screws securing the carburetor cover;
- turn the lid over, take a drill with a thickness of 1 to 2 mm and take a measurement between the gasket and the lower surface of the floats - this distance should be exactly within these limits, and the same.
You can also measure the fuel level, but before carrying out such a procedure, it is necessary for the engine to idle for several minutes. The distance from the upper edge of the housing to the surface of the gasoline is measured; according to factory conditions, it should be 25-26 mm. Another way is to measure the distance from the gasket to the top edge of the floats with a caliper; it is 34 mm (with the cover upside down).