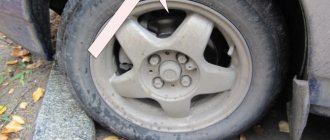
One of the signs that it is time to change the front struts is a knocking sound on the car body while driving on rough roads. This means that the shock absorber struts have exhausted their service life, which is designed for an average of 50,000 kilometers.
Tools needed to replace front struts:
- Key to "13"
- Key to "19"
We remove the rack. Option 1:
- Loosen the top nut of the stem and unscrew the three nuts located on the top glass in sequence.
- Dismantle the hub, remove the steering rod (together with the tips).
- After this, remove the shock absorber strut.
We remove the rack. Option 2:
- Mark the starting position of the adjusting bolt, tighten the upper nut first, then the lower one.
- Remove the bolts.
- Move the steering knuckle and release the shock absorber strut.
- After this, all that remains is to unscrew the bolts at the top and pull out the stand.
Further actions:
Install the spring clamps and disassemble the shock absorber strut. If necessary, replace worn-out parts of the rack and install the rack back, following the reverse sequence of actions.
The process of replacing the front struts in VAZ 2110, 2111 and 2112 cars is practically no different and takes a maximum of 40-50 minutes.
Choosing which ones to buy
It is impossible to say with absolute certainty which front struts are best to choose for a VAZ 2110. How to change the inner CV joint boot on a Ford Focus 2 1.8 and 2.0 manual transmission. How to change discs and pads on a Peugeot 308, video and brake pads on a Peugeot. Some choose factory ones because they are not hard enough for them, others prefer analogues for their softer and more comfortable behavior.
Some people really want to install a sports version of the struts , since they are stiffer and the springs are very thick.
Sports
The choice is between oil and gas (gas-oil, actually). The first ones are more affordable from a financial point of view, but they do not have such a wide temperature range, which is why the springs become stiffer in winter.
Gas analogues have a more complex design, higher cost, but a good indicator of “tenacity”.
Among the manufacturers, in addition to CC20, the following manufacturing companies can be distinguished:
All of them have approximately the same devices, so there shouldn’t be any problems with selecting suitable parts.
Disassembly
2. Clamp the front pillar in a vice, as shown in the photo.
Warning. Be careful! A compressed spring has great force and when the tie breaks, it straightens out and can cause injury.
3. Install the tie springs on opposite sides and tighten the front strut spring evenly, without distortions, until the load is removed from the upper spring cup.
4. Using a slotted screwdriver, remove the rubber plug from the hole in the housing of the upper support of the front pillar.
5. Install the device on the nut and shock absorber rod.
6. While holding the shock absorber rod from turning with a 17 mm wrench, use a 27 mm wrench to unscrew its nut.
7. Remove the nut and washer from the shock absorber rod.
8. Remove the upper support from the rack.
9. Remove the upper support of the front strut spring.
10. Remove the suspension spring (without removing the tie from it).
11. Remove the compression bumper and the front shock absorber boot.
Choose what to buy
It is impossible to say unambiguously which racks on the front panel are best suited for the VAZ 2110. Some choose the factory because they are not rigid enough for them, others prefer analogues for a softer and more comfortable behavior.
Someone even wants to create their own “ten”, a sports version of the strut , since they are the stiffest and the springs are as thick as possible.
Kinds of sports
The choice between oil and gas (actually gas). The former is more financially feasible, but they don't have as wide a temperature range, making the shocks stiffer in the winter.
Gas analogues have a more complex design, a high price, but an excellent indicator of “perseverance”.
Among the manufacturers, in addition to CC20, the following production companies can be distinguished:
They all have approximately the same devices, so there are no problems with selecting suitable parts.
Selection of new parts
Before changing the racks on the VAZ “tenth” model, you must first purchase new elements. It can be quite difficult to choose them from a wide range of products from different manufacturers offered by car dealerships. You are unlikely to find inexpensive parts of good quality; what is offered for sale under the VAZ brand will last half as long as factory shock absorbers. Hence the recommendation: consider options from famous brands, provided that they are not fake:
- Monroe;
- Kayaba;
- Sachs;
- Bilstein.
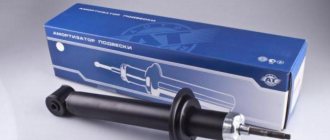
Among the Russian manufacturers, the products of the Samara SS 20 plant have performed well; reviews from car enthusiasts about them are generally positive. When you plan to replace front shock absorbers, in addition to choosing a manufacturer, you need to think about the type of struts. There are traditional oil and gas-oil models, and the latter are significantly more expensive and a little tougher. But they behave confidently on the road and last longer. Oil models run smoother and are more suitable for those who like a comfortable ride.
Front strut replacement tool
In order for the work to be completed successfully and quickly, you need to prepare some tools:
- A set of keys or socket heads with a diameter from “10” to “27”.
- Collar.
- Jack.
- Wheel chocks.
- WD-40 lubricant.
When the tool is ready, you can start working.
Preparatory work
Before you begin directly to work, you need to prepare your workplace and car.
- First of all, place the car on a flat surface.
- For maximum reliability, we place wheel chocks under the rear wheels.
- We tear off all the bolts securing the front wheels.
Broken nuts are easier to unscrew later.
We recommend: Check engine light on Ford Focus 2, how to fix it?
Step-by-step process for replacing front struts
We have already written in more detail about replacing rear shock absorber struts.
If you only have one rack out of order, you will still have to change a couple anyway, so the order in which the work is performed does not matter.
- First of all, we lift the hood and, using a special device for fixing the rod and key at “19”, engage the nut securing the support to the rack and turn it. When the fastening becomes loose, do not unscrew it completely.
When removing the nut, you must use a special wrench.
A similar key is easy to find in stores.
- Using a key set to “13”, unscrew the 3 bolts that are located on the upper glass.
The bolts are marked with arrows.
- Next, we use a jack to hang the wheel and fix it in this position.
The process has begun! We remember about safety. The rear wheels are locked with a handbrake, or better yet, with bars
- We remove the brake hose, which is attached to the strut knuckle itself, from the place of fixation and remove it in any direction.
- We inspect all connections, including the steering tip, steering knuckle and the rack itself for signs of corrosion; it is best to treat these places with lubricant. This is done so that all soured parts can be easily torn off.
- After a short amount of time until the lubricant penetrates into all deep places, you can continue working.
- Having disconnected the cotter pin and unscrewed the nut from the steering end using a pry bar and a hammer, we remove it from the place of fixation.
When the rods are loosened, leave the nuts in place.
- Using the heads at “17” and “19” we begin to unscrew the two bolts that secure the strut to the steering knuckle.
The bolts are marked with arrows.
- When the nuts are unscrewed, problems may arise with further dismantling of the main bolts. Since they stick strongly, they may need to be exposed to excessive amounts of lubricant or liquid wrench. In order to knock them out of their seats, you can use a bolt with a smaller diameter.
- If all fastening elements are unscrewed, all that remains is to completely unscrew all three bolts located on the upper cup.
- Until the strut is disconnected from the steering knuckle, do not completely unscrew one of the three bolts on the cup. And we turn it completely only when the stand is in the hands and completely under control.
The stand has been removed. We carry out a visual inspection of the steering tip and ball joint
- The racks should be disassembled first, starting with the ties. The springs should be tightened carefully, eliminating the possibility of their breaking.
It is necessary to tighten the springs until they release the upper cup.
- If the stand no longer rests against the support, this will mean that it is already under sufficient tension.
- Now you can dismantle the support fastening nut and, accordingly, the support itself.
- When the support is dismantled, remove the spring itself.
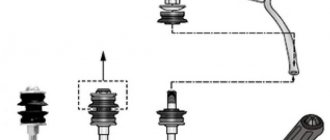
- Now all that remains is to remove the boot and bump stop from the strut rod. (Although you don’t have to do this if all the spare parts are new).
The order of work in the illustration.
At this stage, work on dismantling the front pillar of the VAZ-2112 can be considered complete.
Assembly procedure
- First of all, we install the boot and bumper on the new rack.
Installation is carried out in the reverse order of removal. - If you plan to install sound insulators, we will install them.
Sound insulators are ready for installation
- We put on the spring. Please note that its main part must fit exactly into a special recess located on the rack cartridge.
- Using a new support and support bearing, you need to fix it on the rod itself using a nut.
- Make sure that the part of the spring on top is always in place where it is fixed and that there are no distortions or bevels.
- When everything has been diagnosed, you can remove all the ties and begin installing it on the car.
Let's try it on, admire it and install it
- Next, we carry out all the work in exactly the reverse order, starting with the cup nuts in the engine compartment.
- When fixing the strut to the steering knuckle, it is best to use new bolts of the same diameter with completely new nuts.
Please note that after carrying out this work, it is necessary to visit a car service center to carry out wheel alignment work on the car.
Let's get started
First, we fix the car on the hand brake or put stops under the rear wheels. Next, open the hood and unscrew the nut securing the support to the shock absorber strut. Please note that the stem itself can rotate. To fix it, you need a key size 9. Next, you need to remove the wheel bolts and hang the front part of the car on a jack (on the right or left side, depending on which rack will be changed first). We take the wheel out and apply Liquid Key lubricant to the nuts securing the strut to the steering knuckle.
Additional recommendations
Before you begin assembling all the components of the VAZ-2112, you should perform several additional manipulations:
- treat all insert elements with kerosene;
- Before direct installation, carefully inspect each element, even a new one, to ensure its integrity and quality;
- The final fixation of the mounting bolts should be carried out after the jack has been removed;
- After assembling all components, it is recommended to carry out a special wheel alignment check.
We recommend: Installing electronic ignition on a VAZ 2107 carburetor
Replacement
Having decided on the choice of racks, collect a set of tools that you will need when replacing them:
- Slotted screwdrivers;
- Key for holding the shock absorber rod;
- Open-end and ring wrenches sizes 6-22;
- Heads for 12-22;
- Ball pin remover for control rod ends;
- Device for compressing springs on the front struts;
- The all-powerful solvent WD40.
We begin the actual replacement process.
- Unscrew the nut that secures the upper shock absorber mounts to the body cup (in the engine compartment).
- Release the upper supports.
- Remove the outer control rod ends. This is where you will need your special puller.
- Remove the bolts that secure the lower part of the strut from the steering knuckle.
- Remove the stand .
- Disassemble and reassemble it.
- Perform the reassembly process.
We should talk about disassembly and assembly in more detail:
- Start by removing the top stem nut. This can only be done with a specialized key for 6;
- Armed with another device to hold the strut spring, release the rod of your shock absorber;
- Next, the upper support is released, which is held on by three nuts on top of the body cup;
- Be sure to disconnect the outer tie rod end from your strut before working on the lower mount;
- It’s not uncommon for a ball pin to become stuck, so be sure to use a remover or a product for all occasions - WD40;
- Once the stand is free, remove it. Replace with a new one and perform the process of reassembling the element. Video about how to change the windshield on a Ford Focus 3. How to change a Ford Focus. Be careful with the front pillar boot of your VAZ 2110. How to change the heater radiator on a Ford Focus, no. The video shows how to change the front shock absorber strut on a VAZ 2110, 2111, 2112 with your own hands. Try not to damage the component. If it is in poor condition, it is recommended to replace it immediately;
- There should also be no problems with the front strut
- Be sure to adjust the wheel alignment after you have made certain adjustments to the suspension design.
We recommend: Wipers for Renault Megane 2
It is noteworthy that replacing the rear struts does not have any effect on the wheel alignment, but when changing the front shock absorbers, significant changes can occur.
Stories from our readers
“Fucking basin. "
Hi all! My name is Mikhail, now I’ll tell you a story about how I managed to exchange my two-wheeler for a 2010 Camry. It all started with the fact that I began to be wildly irritated by the breakdowns of the two-wheeler, it seemed like nothing serious was broken, but damn it, there were so many little things that really started to irritate me. This is where the idea arose that it was time to change the car to a foreign car. The choice fell on the melting Camry of the tenth years.
Yes, I had matured morally, but financially I just couldn’t handle it. I’ll say right away that I am against loans and taking a car, especially not a new one, on credit is unreasonable. My salary is 24k a month, so collecting 600-700 thousand is almost impossible for me. I started looking for different ways to make money on the Internet. You can’t imagine how many scams there are, what I haven’t tried: sports betting, network marketing, and even the volcano casino, where I successfully lost about 10 thousand ((The only direction in which it seemed to me that I could make money was currency trading on the stock exchange, they call it Forex. But when I started delving into it, I realized that it was very difficult for me. I continued to dig further and came across binary options. The essence is the same as in Forex, but it’s much easier to understand. I started reading forums, studying trading strategies. I tried it on a demo account, then opened a real account. To be honest, I didn’t manage to start earning money right away, until I understood all the mechanics of options, I lost about 3,000 rubles, but as it turned out, it was a precious experience. Now I earn 5-7 thousand rubles a day. I managed to get the car buy after half a year, but in my opinion this is a good result, and it’s not about the car, my life has changed, I naturally quit my job, I have more free time for myself and my family. You’ll laugh, but I work directly on the phone)) If If you want to change your life like me, then here’s what I advise you to do right now: 1. Register on the site 2. Practice on a Demo account (it’s free). 3. As soon as you get something on the Demo account, top up your REAL ACCOUNT and go to REAL MONEY! I also advise you to download the application to your phone, it’s much more convenient to work from your phone. Download here.
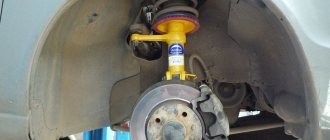
- We move the steering knuckle away from the rack, trying not to pull on the brake hose.
- Unscrew the nuts securing the upper support using a 13mm wrench.
- Remove the shock absorber strut.
We determine that the element did not fire
There are several signs by which a malfunction can be identified:
- The body is amplified by vibrating on the ridge on the side of the damaged shock absorber;
- Feels in the steering wheel;
- The braking distance becomes longer;
- When turning, the car enters;
- Traces of oil stains;
- When driving in a straight line, the car drifts away;
- There is a knocking and extraneous noise in the rack.
Device diagram
If you do not repair the front struts at a service station on time or with your own hands, this can lead to dire consequences:
- The supporting bearings will collapse;
- Tires will wear unevenly, jump, and form bumps on the rubber surface;
- The supporting bearings will not pass;
- The braking distance will be longer, which is dangerous on any part of the road;
- The brake pads will be damaged and their service life will be significantly reduced.
There are two main ways to test items to see if they are faulty. One is a professional, the other is a craft, but also quite effective.
- Special table for shaking. It is driven by the car and the computer calculates the efficiency of the shock absorbers. It should be noted that new racks may show a result of about 75%!, but this is quite normal. If the percentage is less than 50, then it's time to change the part.
- Manual rotation. You need to take the front part of the car, behind its wing, and start swinging. Try to achieve the maximum amplitude that allows you to bear your body weight. In any case, ask a friend to help. The point is that after swinging, suddenly remove your hands and look at the car. If it immediately returns to its original position and does not wobble anymore, then everything will be fine. If you detect even a slight hesitation, you can assume that the struts should preferably be replaced in the near future.
Replacing front struts, supports and springs VAZ 2110, 2112, Lada Kalina, Granta, Priora, 2109 Video guide on how to independently replace front struts, supports and springs on front-wheel drive cars.
Replacing front struts, supports and springs VAZ 2110, 2112, Lada Kalina, Granta, Priora, 2109 Video guide on how to independently replace front struts, supports and springs on front-wheel drive cars.
Symptoms of breakdowns
Since the strut is a suspension element, if it malfunctions, you will immediately notice problems with its operation. So, the main symptom is an increased knocking sound in the front of the car. It can occur at different speeds. If you hear a crunch (and not a dull thud), it means that the front strut bearing on the VAZ-2110 has become unusable. The support element may wear out faster than the shock absorber itself. The reason for this is the constant shock of the suspension when driving on uneven roads. The support bearing does not have any damper, and all loads that the rack could not absorb are fully transferred to it. Note that the crunching noise initially occurs only when turning the steering wheel.
What happens if you don't change the racks?
If you continue driving without replacing the struts, you will have to repair the entire suspension
Below we will describe to you several reasons that directly indicate what will happen to the car if the front struts are not repaired in time:
- During the first 2-3 thousand kilometers with faulty shock absorbers, the support bearings on the front struts can be broken.
- When the struts are faulty, wheel balancing is also disrupted over time and tires begin to wear unevenly, and hub bearings break.
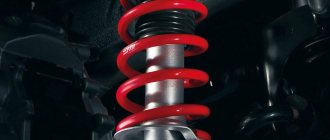
Braking
Braking demonstration on new and old struts
- Since the braking distance becomes longer and increases, this directly affects the safety of the vehicle. Since even one extra meter of braking distance can lead to a traffic accident.
- Braking on faulty struts leads to a decrease in the service life of the brake pads, as well as their uneven wear. As you might guess, this directly depends on traffic safety.
All these malfunctions can significantly damage the condition of the entire front suspension system as a whole, and this can already hit the overall budget. However, there are ways in which you can reliably determine the working condition of your shock absorbers.
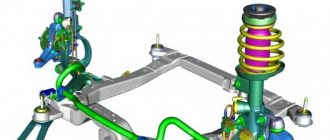
How VAZ 2110, 2111, 2112 shock absorbers are arranged + diagram
The design has both advantages and disadvantages. The main advantage is fairly high levels of comfort and controllability at low production costs. In addition, MacPherson has a compact design, which makes it possible to reduce the size of the front part of passenger cars. The main feature is the absence of an upper suspension arm. The elastic element (spring) and the shock absorber are combined on one axis, which is rotary. The upper part of the strut rests on a reinforced bowl in the wing mudguard using a slewing bearing.