The gearbox in a car (hereinafter referred to as the gearbox) is designed to change and transform due to the influence (switching) of the engine gear ratio. It allows you to change the rate of acceleration, increase speed characteristics at different speeds and makes the wheels rotate at different speeds. Sometimes every driver, while operating a car, has been faced with the question of servicing or repairing the gearbox on a VAZ 2114. Someone began to notice problems in this unit, others are interested in its uninterrupted and long service, since this element is one of the main ones in the overall structure of the car.
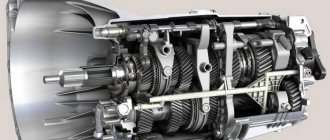
VAZ 2114 gearbox device
TYPES OF GEAR SHIFT BOXES (SPEEDS)
Currently, there are 3 types of gearboxes in cars:
- mechanical, speeds are switched manually using a special lever;
- automatic, in which the gear change occurs without external influence, but only when the gas or brake pedals are pressed. Reverse gear in such cars is activated manually.
- mixed (variable). In this type, the gearbox operates in automatic mode, but under certain conditions it can be briefly switched to manual control.
The most popular because of maintenance, ease of replacing parts and inexpensive repairs is the manual gearbox. It is divided into 3 subtypes: 4-speed, 5-speed and 6-speed. Five speeds for the gearbox are familiar and are the most common.
Disassembly
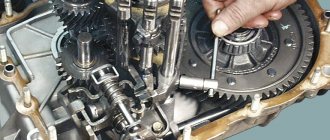
Having removed the gearbox, you can proceed directly to the main thing - disassembly. This will allow you to change damaged elements as you work, identify existing faults and solve problems on your own.
- Clean and thoroughly wash all external surfaces of the gearbox.
- Place the box in a vertical position and remove the back cover.
- Remove the clutch cable bracket, then use a rubber hammer to knock the rear cover off the gearbox.
- Remove the old gasket. She will be replaced.
- Engage any of the two gears - 3 or 4.
- Unscrew the bolt that holds 5th gear, then turn it on.
- Simultaneously turning on the indicated speeds will allow you to fix the shaft and prevent it from turning.
- Unscrew the nut on the secondary shaft, and then on the primary one.
- Remove the 5th speed synchronizer along with the fork.
- Remove the fork from the coupling. Remove the synchronizer as carefully as possible. If you allow the clutch to move away from the hub, the spring-loaded balls that secure the synchronizer will simply fall apart.
- Remove the 5th speed synchronizer locking ring.
- Remove the 5th speed driven gear from the output shaft.
- Remove the thrust ring located on the needle bearing.
- Remove the needle bearing itself from the 5th speed gear.
- Remove the drive gear from the drive shaft and remove the bearing plate.
- Now the needle bearing bushings should be removed from the secondary shaft, and the thrust washer should also be removed.
Jewelry work
- Take out the ring that secures the input shaft bearing, and then a similar ring for the secondary shaft.
- Unscrew the locking plug and remove the ball and locking spring. Next you can get a couple more clamps.
- Remove the rear engine mount.
- Unscrew the reverse gear lock plug, tilt the box and thus remove the lock ball and spring.
- Remove the clutch housing and gearbox housing mounting bolts.
- Acting as carefully as possible, separate the two units. To do this, there are grooves in the crankcases into which the ends of a screwdriver are inserted. By shaking, you can disconnect the elements without any problems.
- Remove the gearbox housing.
- Unscrew the bolt securing the 1st and 2nd speed shift fork.
- Remove the fork and stem.
- Unscrew the bolt securing the 3rd and 4th speed forks.
- Separate the rod head from engagement with the lever, remove it along with the fork from your gearbox.
When disassembling the box into parts, be sure to pay attention to the condition of the elements. If you detect faults in time and replace gearbox components, you can get by with inexpensive but very effective self-repair
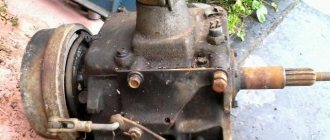
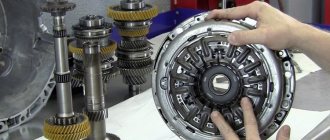
Disassembled gearbox
What to pay attention to
So, following the instructions, we disassemble the gearbox of your VAZ 2109
Along the way, we pay attention to the following points:
- Bearings. When they wear out, a noise from the box occurs. Plus, worn bearings negatively affect the condition of other gearbox elements;
- Synchronizers and sealing washers. If their condition leaves much to be desired, then the gears shifted poorly precisely because of them. Replace them;
- Clutch system, cotters, coupling hub clamps. All this must be replaced separately if there are signs of wear or defects;
- Blocking rings, synchronizers. If there are chips or nicks, don’t even think about alternative solutions, replace them immediately;
- Bearing tracks. Over time they wear out. If signs of wear are found, perform a complete replacement. In this state, they were only a short time away from breaking;
- Gap between gears and locking rings. Normally it is no less than 0.6 mm. In case of deviations, there is only one solution - replacing the rings;
- Retaining rings. If elasticity is lost, these elements must be changed, since they will no longer be able to perform their functions.
When assembling the gearbox, do not forget to lubricate the new gaskets with a layer of lithol. And when pressing the oil seals, do it with the working edge inward. The metal clip should be located on the outside.
https://youtube.com/watch?v=cgCFhYP17
During the process of reassembling the gearbox, all rubbing components should be treated with oil, and do not forget about the sealant for connecting the clutch housings and gearbox. Doing everything yourself is quite possible.
FEATURES OF MANUAL TRANSMISSION VAZ 2114
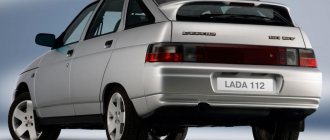
On domestic cars, namely the VAZ 2114, the gearbox is manual with 5 speeds. The VAZ 2114 is a very popular model among Russian car enthusiasts, especially among young people, due to its reasonable price and the ability to independently repair almost all components and parts, which reduces the time and financial costs of servicing the car.
It is easier to find and repair any fault in the VAZ 2114 gearbox at the initial stage than to replace it in full with a new spare part in the future.
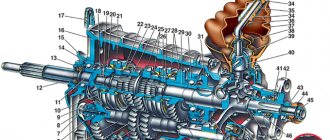
Before considering the symptoms of breakdowns, you first need to look at what the gearbox on the VAZ 2114 consists of. This will simplify the accurate “diagnosis” of the malfunction. The VAZ 2114 gearbox diagram is located below.
Gearbox faults
The main symptoms of a faulty manual gearbox in a car are:
- When switching, the gear is not fixed, but jumps out. The reason is the wear of the fastenings (teeth) of the gears and clutch. It often occurs if switching is done without observing the speed mode. To fix it, you need to replace the damaged parts. Spontaneous gear shifting can also be caused by wear, delamination and cracks in the rubber of the rear support. This also requires replacement.
- To change the gear lever, force is required. In this case, this is a weakening of the attachment teeth to the hinge or deformation of the reaction rod, as well as cracks in the plastic parts in the box drive.
- The transmission begins to make noise in neutral gear. This may be a consequence of both low oil level and its quality (viscosity). The same symptom occurs when the upper bearing on the input shaft wears out. To eliminate it, it is necessary to diagnose the gearbox, and also replace or add oil to the gearbox.
- There is a crunching sound when shifting the gear lever. This happens when the synchronizer wears out. If you miss the initial stage, then with further use you will have to change, in addition to the synchronizer, the entire gear block.
- If the transmission is noisy when moving in gear, then there are several possible reasons. The problem may be in both the upper and lower bearings. In addition to noise, the lever may jam, and then you cannot do without diagnosing the gearbox.
- If you hear a knocking noise in a certain gear without and with a load, then the drive gear of that gear is broken. Here you need to repair the VAZ 2114 gearbox yourself.
- When the gear is engaged, a cracking sound is heard, then the synchronizer locking ring is probably worn out or the pinion axis needs to be changed. Requires urgent diagnosis and can be eliminated when the gearbox is overhauled.
- The visible cause of a gearbox malfunction or its imminent breakdown may be an oil leak from under the gearbox. There can be many reasons for this and diagnosis is indispensable.
When establishing the cause, it is necessary to decide whether the VAZ 2114 gearbox can be repaired and how the gearbox is overhauled. In order to go through all the elements of this complex mechanism yourself, you must first carefully remove and remove it from under the hood. A large number of videos and photos on detailed maintenance of the box and its complete disassembly can be found on the World Wide Web on the Internet, but if you do not have the skills of a mechanic, or are not familiar with the structure of all spare parts and do not know their names, then try to fix the problem yourself It's not even worth it. In the future, this can lead to unpredictable consequences and even more expensive repairs or complete replacement.
Device
To understand the essence of repairing, disassembling and assembling a gearbox, first of all you need to get acquainted with its structure. In the case of the VAZ 2109, the box structure is as follows:
- On the input shaft there is a block of drive gears that are in constant mesh with the driven gears of the gears when moving forward;
- The second shaft has driven gears with needle bearings. There is also a pair of synchronizers located there;
- The secondary shaft is created together with the drive gear of the main transmission;
- The driven gear of the main gear is attached to the flange of the two-pinion differential box;
- Differential bearings are always mounted with interference, which is adjusted by selecting rings of different thicknesses.
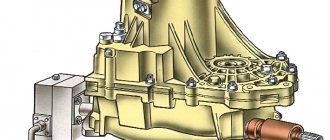
Checkpoint diagram
DIAGNOSTICS, REPAIR AND REPLACEMENT
As we can see, it is not easy for a novice driver to even determine the malfunction of a manual gearbox. Repair or refurbishment is even more difficult. And if the fault is not corrected in time, the result can be disastrous - you will need to replace it with a new manual transmission. And then the answer to the question: “How much does a new gearbox cost for a VAZ 2114?” will bring some annoyance, since the cost of the newest spare part in 2015 prices starts from 15,500 rubles, excluding installation. Of course, you can entrust the installation to a neighbor who knows about cars or do it yourself, then the new box will not be covered by the factory warranty. In such cases, it is better to conclude an agreement and use the services of an official dealer.
Repair of VAZ 2114 gearbox
But replacing an old gearbox with a new one is rarely required. Yes, and they bring things like a new gearbox, usually on order and with full prepayment. In other cases, it is easier to repair worn or broken spare parts. It should be noted that it is not easy even for a professional driver to independently diagnose a malfunction without special diagnostic equipment and a lift. How much it costs to repair a gearbox on a VAZ 2114, as well as car diagnostics, will be told to you at any car service center, dealership, or car workshop. The price list depends on the place of residence, the professionalism of the craftsmen, and the contract. But the financial resources spent on finding out the cause will save you time and nerves in troubleshooting.
Some companies involved in the repair of automotive equipment offer, instead of a new gearbox, to install a repaired (restored) gearbox that has been completely rebuilt. You should not refuse this option, because in this case, along with replacing the manual transmission, you will also be offered a guarantee for the installed unit. At the same time, savings from purchasing a new unit can be up to 70%. Reliable companies value their reputation, so they are interested in good recommendations, as well as in further servicing of their equipment.
Malfunctions and reasons for their occurrence
Resetting gears (shifting does not result in a gear change)
Speed slippage is a sign of worn gears and couplings. Most often this is due to a violation of the gear shift order or incorrect position of the traction protective cover.
Sticking (stiff movement) of the shift lever
The malfunction may be caused by wear of the plastic parts of the drive, reaction rod, or damage to the hinge teeth of the lever fixation.
Oil leaks
If you can find the source of the leak visually, it is better to eliminate the cause immediately. The cause of leaks, when the source of the leak could not be detected, may be worn shafts and seals, depressurization, damage to the seal, or play in the box shaft.
Rumble
The hum usually occurs in neutral gear. Most often it is associated with a lack of oil in the unit or its poor quality. If the oil level is normal, the problem is most often a worn front shaft bearing.
Crunch
If a crunching noise occurs, the synchronizers should be replaced as soon as possible. If this is not done in time, the gear unit will completely fail. The condition of the clutch basket, in which the teeth “fly out” over time, can also cause crunching.
Knock
The appearance of a knock is caused by damage to the drive gear of the transmission on which it occurs. Also, knocking can be caused by damage to the solenoid, sagging of the gearbox valve, or incorrect distance between the clutch packs and the brakes.
VAZ 2114 gearbox gears
HOW TO EXTEND THE SERVICE LIFE OF A TRANSMISSION ON A VAZ 2114?
You can do without involving an auto specialist if you operate (use) the gearbox correctly, since it is designed for a long service life. The owner of a passenger car only needs to monitor the oil level; if it is low, it must be topped up. Sometimes it is worth changing the oil completely. The main parameters for replacement are specified in the technical passport of the vehicle, but it is better to do this every 60-80 thousand km. mileage
The rapid wear of the VAZ 2114 manual transmission components is affected by the driver’s aggressive driving and frequent and abrupt shifting of the gear lever.
As we see, it is quite possible to extend its “life” with your own efforts and attentive attitude to the iron horse, and who, where will serve you and in what ways depends only on the owner.
General symptoms
Symptoms are manifested by seven signs, which include:
Each of the listed symptoms has its own etymology and an exact picture of its manifestation, which objectively characterizes the root cause of the malfunction.
Crunch in the gearbox
This type of repair requires disassembling the gearbox structure.
The main reasons, a sign of which is a crunching noise during gear shifting:
Knocking at the checkpoint
The sounds of gearbox tapping are ambiguous due to their multiplicity. Therefore, the picture of the malfunction is accurately established by diagnosing the vehicle.
The box starts knocking if:
Oil leakage
If there is an oil leak, the repair task is facilitated by the ability to determine the location of the leak, but most often in practice this is impossible to determine.
Faults that cause oil leakage are the following:
Speeds are flying out
This kind of phenomenon occurs during gear shifting. The main reason for the appearance of such a malfunction is wear of the teeth on the gears and coupling. A factor contributing to the development of weakening speed control is a violation of the rules of gear shifting technique, which occurs when the speed limit is not observed. Replacing the gears of the specified parts eliminates the described problem.
The handle is tight
Factors under the influence of which the movement of the handle is difficult are damage to the locking teeth of the lever itself, wear of the jet thrust, and violation of the integrity of the gearbox drive parts.
The box is humming
This sound appears mainly during neutral transmission. The main reason is the low quality of lubricants. Therefore, the first action that must be performed when this type of technical problem occurs is to check and, if necessary, add oil. If the box continues to hum, then it is necessary to perform diagnostics, since the bearing on the input shaft may be worn out.
Noise in the CP
The box begins to make noise when the oil level is insufficient. This situation can be resolved by adding oil. If the noise does not stop, then it is caused by wear of the seals and mechanisms. This can be eliminated by installing new parts to replace worn ones.
Upon completion of the process of identifying the malfunction, its cause and source, as well as the factors influencing the occurrence of malfunction of the gearbox, it is necessary to become familiar with its structure and the structural features of the mechanism.
VAZ 2114 gearbox device and diagram
Gearbox VAZ 2114 - what is it?
The VAZ 2114/2115 car is easy to maintain and is equipped with a reliable engine and transmission. The gearbox on the VAZ 2114/2115 ensures optimal operation of the power unit. The original VAZ 2115 or 2114 gearbox is almost 2 times more expensive than used options.
Design features of the gearbox
The VAZ 2114 (restyling of the VAZ 2109), which is equipped with a manual transmission, is well distributed on the domestic automobile market. The peculiarity of this device is that it copes well with the loads placed on it.
Periodically, the box on the VAZ 2114 needs to be serviced. The VAZ gearbox includes the following main elements:
- crankcase;
- back cover;
- gear links/numbers;
- differential;
- shafts;
- gears.
Checkpoint diagram
Manual transmission is divided into the following types:
- 4-speed;
- 5-speed;
- 6-speed.
Each of these types of boxes has different supports, and drain plugs are installed in different compartments.
Selecting gearbox oil
It is worth checking the oil level periodically and adding it if necessary. A complete oil change may be necessary when the car has crossed the 60,000 km threshold.
It should be noted that premature wear of mechanical components on the VAZ 2114 occurs as a result of aggressive driving or abrupt shifting of the gear lever.
The gearbox for this version of the car will work perfectly with GL-4 class mineral oil. It helps to extend the working life of the box. Options in demand: 75W90, 80w85, 85w90. When choosing a lubricant for a transmission, you must always take into account the conditions in which the car will be operated and pay attention to the viscosity of the transmission oil.
The need for repair and restoration work
The VAZ 2114 gearbox is subject to repair. As a rule, this procedure includes the installation of new gears and bearings.
Repair of the VAZ 2114 gearbox is advisable if the following manifestations begin to be observed:
- stiffness when manually shifting gears;
- the appearance of a knock when changing gears or in a specific gear;
- if the synchronizer breaks down, a characteristic crunch may occur;
- if lubricants have lost their properties, then this causes an increasing hum (usually in neutral).
If any of these manifestations occur, it is recommended to contact a service center for diagnostics of the entire automotive system.
Basic steps for removing the gearbox
How to remove the gearbox on a VAZ 2114? To begin dismantling the box yourself, the driver must arm himself with screwdrivers, spanners, and WD-40 liquid.
Steps to dismantle the gearbox:
- The VAZ must be placed on the overpass.
- It is necessary to disconnect the battery and remove it.
- The oil is drained from the box.
- Removing the starter, protective jacket, connecting cable.
- The wiring present on the cruise control sensor and reverse sensor must be disconnected.
- It is necessary to remove the jet rod fixed on the bolts.
- Removing the wheel drive.
- Removing the nuts that secure the power plant supports.
- The lower mount of the box to the motor should be disconnected.
- The power unit must be hung using a wooden block of appropriate size; a traverse will also do.
- Unscrew the nuts and bolts securing the engine mounts to the body and gearbox.
- Next, carefully slide the box along the guides.
The process of dismantling the gearbox takes about 5 hours. Assembly proceeds in reverse order.
Thus, in order to extend the working capacity of the gearbox installed on a VAZ, the owner of the vehicle must undergo maintenance and change the oil in a timely manner. It is recommended to give preference to synthetic oil options. If necessary, you can dismantle the gearbox yourself, following all the steps.
Transmissions can be mechanical, robotic, variator, or automatic. The VAZ 2114 2113 2115 is equipped with a 5-speed manual transmission with a rocker drive. In principle, the box remained from the same “eight”, but with a different main pair.
Tools, materials and supplies necessary for removing and disassembling the gearbox
Before starting actions to remove, disassemble and repair (or replace) the gearbox, it is necessary to prepare the following tools, materials and means, as well as equipment:
- Tools: sets of keys and screwdrivers;
- Consumables: rags, board;
- Means: WD-40 liquid (designed to make it easier to unscrew parts), also known as WD-40 rust converter for dismantling work; a container with a volume of approximately 5 liters (required when draining the transmission oil used in the box); new oil for the gearbox (this is not necessary, but if the oil was changed a long time ago before the repair work was carried out, then this should be done during the repair of the gearbox);
- Suspended equipment suitable for lifting (car lift, jack).
The equipment will not be needed if the vehicle is placed on a pit or overpass during repairs.
Main couple
The main pair is the main shaft (main gear). The main pair serves to reduce the speed transmitted from the engine. On average, the main pair reduces the number of revolutions by 4 times: the engine spins 4 thousand revolutions - the main pair 1 thousand revolutions. The main pair as standard has a gear ratio: 3.7. By changing the main pair, you can significantly change the dynamics of the car. Depending on the size of the main pair, you can change the length of all gears, hence the maximum speed and acceleration. (By the way, the “nine” has a 3.9 main pair, due to this it has a lower maximum speed, but is faster at acceleration).
Below are three graphs by which you can compare the speed at 5500 rpm of an engine with different main pairs. (Calculations are based on r15 wheels with a 195/50 profile - the same as r14 with a standard VAZ profile 175/65 or 180/60).
Gear operation algorithm
Thanks to these parts, torque is received and transmitted from the engine flywheel further to the wheels. Each gear has a different number of teeth and gear ratio. With each subsequent transmission it decreases.
Thus, the lower the gear ratio, the higher the wheel speed. In this case, the torque decreases. That is, the most high-torque gears can be called first and reverse gears.
Gear ratios (row)
These are the gears of each gear, which also have their own size.
They characterize the speed of the car in one gear or another. The standard VAZ uses the following numbers:
| Gearbox ratios: | |
| I | 3,636 |
| II | 1,95 |
| III | 1,357 |
| IV | 0,941 |
| V | 0,784 |
| reverse | 3,53 |
Above are the specifications with standard parameters.
The standard series on 2114 is far from ideal. The first gear is too short, the second is too long. Due to this, there is a sharp drop in dynamics when switching from first to second. Not only is there a failure, but when switching sharply, the second speed synchronizer slowly dies.
Therefore, there are sports series where the gap between 1st and 2nd is removed, and not only: sports series are selected according to the type of engine. It could just be a good city engine, or a sports engine, or tailored for 402-meter racing. There are also “turbo” gears designed for a turbo engine.
Gear Features
The highest torque of the car is at first speed. It is not difficult for the engine to rotate the wheels, but the speed of the car will not exceed 40 kilometers per hour. When such a speed is reached, the tachometer needle is usually in the red scale. Therefore, for further movement it is necessary to switch to a weaker but faster gear. Then to the third, quadruple and so on. All switching must be done sequentially. The engine power is not enough to confidently accelerate the car at 20 kilometers in 3rd gear. Unless, of course, it's a 5.0-liter V-8.
In our case, this is a VAZ 14th model, and for normal acceleration dynamics you need to sequentially switch speeds, reducing the gear ratio. The fastest is “fifth”. The load on the engine is minimal here, hence the low fuel consumption. If a car spends 11-13 liters in the city, then on the highway this figure will not exceed seven. But this transmission has one drawback. It has virtually no torque. It will take a long time for the engine to gain speed further. Therefore, when overtaking, it is better to use a “reduced” speed, in our case it is “straight”, fourth speed.
Gearbox configurations
Below are the most successful gearbox configurations depending on the engine. For a more detailed selection, you can use a calculator on the Internet.
- The most suitable gearbox configuration for a civilian naturally aspirated engine: 18 row gearbox + main pair 3.9.
- The most suitable gearbox for a sports naturally aspirated engine: 7th row gearbox + main pair 4.3.
- The most suitable gearbox configuration for a turbo civilian engine: row 104 + main pair 3.5.
The differential is two-satellite, the tension is adjusted by different thicknesses of the adjusting ring.
Sports cars often use a differential lock.
A differential lock is a mechanism that locks the differential so that both wheels rotate evenly. Initially, locking was used on SUVs to ensure that the front and rear axles rotated evenly.
In our case, screw locks are especially popular, because they are easily installed in the gearbox, increase cross-country ability on wet roads, and provide an advantage during acceleration due to uniform constant rotation of the wheels.
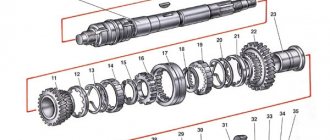
Repair of the secondary shaft (Part I)
Secondary shaft of the gearbox: 1 – secondary shaft;
2 – 4th gear gear; 3 – gear III gear; 4 – 2nd gear gear; 5 – 1st gear gear; 6 – main gear drive gear; 7 – inner ring of the front shaft bearing; 8 – synchronizer of 1st and 2nd gears with a gear ring for reverse gear; 9 – synchronizer for 3rd and 4th gears; 10 – rear shaft bearing 1. With slight force, clamp the shaft into a vice with pads on soft metal jaws.
2. Using two mounting paddles, press down the output shaft rear bearing.
4. ...4th gear driven gear...
5. ...4th gear needle bearing and mark it.
Be sure to label the needle bearings and bushings according to the gear number. When assembling, they must be installed in the same places. The most convenient way is to insert the corresponding needle bearing and (where available) bushing into the gear...
...and tie them with rope or wire.
6. Remove the spacer ring.
7. Using two mounting blades, move the 3rd and 4th gear synchronizer through the 3rd gear gear from the shaft splines.
8. Remove the 4th gear needle bearing bushing.
9. Remove the 3rd and 4th gear synchronizer with the 4th gear blocking ring.
10. Mark the locking ring relative to the synchronizer clutch.
Be sure to mark the locking rings in relation to the coupling. During operation, the teeth of the rings are worn in to the teeth of the coupling, so during assembly it is necessary to install the rings in the same position. If you do not intend to disassemble the synchronizer, tie it with rope or wire to prevent it from falling apart.
11. Remove the blocking ring of the 3rd gear and mark it relative to the synchronizer clutch.
12. Remove the 3rd gear gear.
13. Remove the 3rd gear needle bearing and mark it.
14. Remove the retaining ring of the thrust half-rings...
15. ...and two persistent half rings.
16. Remove the locking ball from the hole on the shaft.
17. Remove the 2nd gear.
18. Remove the 2nd gear needle bearing and mark it.
19. Remove the snap ring.
20. Place the 1st gear gear shaft on the jaws of the vice and, using a wooden mallet on the end of the shaft, press the 1st and 2nd gear synchronizer off the shaft splines.
Source
Backstage
On modern cars, including the new Grants, Kalinas, and Priors, gearboxes with cable drive gears are installed, making gear shifting easy and precise. In Samara: 2114 -2113-2115 the gear drive is carried out not by a cable, but by a rocker.
Backstage
The slide is a development from the 80s, so the gears may not engage the first time, may not engage well, etc.
On sports tuned cars they often install a “short-throw” rocker.
The essence of the short-throw shifter is that the path of the gearshift lever from neutral to gear becomes shorter than it was before. Simply put: the gears are easier to engage, the lever travel is shorter, which gives a significant advantage when shifting.
Gear selection mechanism VAZ 2109 repair
Downloads 1998Average speed 4351 Kb/s
To perform repairs associated with the dismantling and subsequent replacement of the mechanism, prepare a standard set of tools and perform the following sequence of actions:
After removing the decorative tunnel located between the front seats, remove the gear shift mechanism. The mechanism must be replaced if there are signs of wear, distortions, loose bushings and other defects.
The levers can be replaced separately. To do this, remove the locking ring from the axis of the locking bracket and pull the axis out of the body, after which we remove the spring.
We unscrew the nut securing the lever axis, and then pull it out of the housing along with the spring. Replace it.
At this point, the work on removing and repairing the gear selection mechanism on the VAZ 21099 is completed. Lubricate it with clean grease, then install in reverse order.
Diagram of the gearshift mechanism of the VAZ 2109 gearbox: 1 2 3 4 5 6 7 then remove the gearshift lever and remove the spring. Reassemble the gearshift mechanism in reverse order.
Replacing the cabin filter Lada Kalina
Replacing front brake pads Ford Focus 2
Replacing front brake pads on a Chevrolet Cruze
Changing engine oil Opel Vectra S
Gear shift mechanism VAZ 2109
Stages of assembling the secondary shaft of the VAZ 2109
2014-2015 All rights reserved. Illegal copying is prohibited.
Good day, guys! Here I encountered such a problem. The spring of the gear selection mechanism in the VAZ 2109 gearbox burst. At the weekend I planned to change the clutch and immediately break the box to change this spring. But the problem is that I can’t find such a spring anywhere here. I even looked at the existential show and it simply wasn’t there. Changing the entire mechanism, which costs from 1650 rubles, somehow feels like a toad... because of a part that costs 15-20 rubles...
That's the crux of the matter, maybe these springs can be replaced with some analogues. Which ones are easier to find here? Tell me, who has encountered this?
Review of the gearbox
VAZ front-wheel drive gearboxes have the same problems. They all howl and make noise; the gears have significant play between them, which causes jerking when releasing the gas while moving in gear. As mentioned above, the first gear is too short, and the second is too long, which causes a dip during acceleration and increases wear. Installing a different row of gears may solve the problem of failure, but all sports rows have more noise during operation than a regular gearbox, which is not particularly quiet in operation anyway.
New or refurbished old?
If replacing the gearbox cannot be avoided, it is worth considering one very attractive option - installing a rebuilt gearbox. To do this, companies purchase old, damaged boxes, restore them to the highest possible quality and offer installation with a guarantee.
Disassembled gearbox
As practice shows, such gearboxes are approximately 30-70% cheaper than purchasing a new gearbox.
There is only one important condition for successful savings on such significant repairs. It must be a reliable, proven company. Such companies value their own reputation, so they do not deal with fakes or low-quality repairs. In order to receive positive customer feedback and attract new customers, they simply must do everything well, conscientiously. That’s why today there are fly-by-night companies and companies where, over the years of work, they have established themselves as a reliable and responsible specialist in repairing and replacing gearboxes. You yourself understand perfectly well who you need to contact if you have problems with your box.
How to remove a gearbox with your own hands
The VAZ 2114 and other models of the LADA SAMARA family range are equipped with a five-speed gearbox combined with a differential and final drive. In principle, the gearbox of the VAZ 2114 is no different from the VAZ 2108. The only thing is that the VAZ 2108 does not have a dipstick, and acceleration on it is faster.
It may be necessary to remove the box to replace the clutch or its bearings or repair the gearbox.
Prevention and care
The most important factor influencing the condition of the gearbox is monitoring the level and condition of the oil.
It is advisable to check the oil level once every three weeks. Use a dipstick to check.
It is recommended to change the oil to mineral grade GL4 or 75W90. If you fill in high-quality oil and follow the switching rules, then repair of the gearbox, as a rule, is not required. If the oil level is low, the upper fifth gear will experience increased stress and may fail.
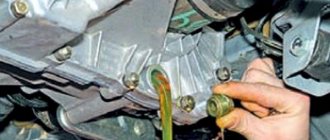
Change of oil
If an oil change is required, after installation on the overpass (above the inspection hole), the following work is carried out:
- The cap is removed and cleaned.
- The breather and outlet openings are cleaned with a brush.
- Place a container for used oil and unscrew the dipstick.
- The old oil is drained. The box is washed to remove any remaining old oil.
- The plug at the bottom is screwed on. New oil is poured through the dipstick hole.
- The dipstick is returned to its place and the cap is screwed on.
Changing the oil in the VAZ 2114 gearbox
How to remove?
To remove the gearbox you will need:
- set of keys;
- screwdrivers;
- assistant;
- WD-40;
- board or other hanging equipment.
Disconnect the terminals from the battery and remove it. Drain the oil (How to drain the oil from the gearbox?) and remove the starter (How to remove the starter on a VAZ 2114?). As you work, if you cannot unscrew any fastener or bolt, do not forget to use WD-40.
- We place the car on the overpass (pit) and remove the crankcase protection by unscrewing 3 fasteners.
- Remove the clutch cable from the release fork. Then we pull it out of the bracket on the box.
For the purpose of complete understanding for the reader, the slides refer to points 3-19 in order except for the 14th, where you need to hang the engine.
- Remove the wiring block from the speed sensor (DS), secured with a spring. Therefore, to remove it, we compress the element.
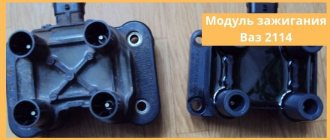
- We unscrew bolt No. 1 securing the ignition module bracket to our gearbox, No. 2 and 3, shown in the figure.
- We climb under the car and find the wiring block for the reverse sensor. Disconnect.
- Unscrew the 2 bolts securing the torque arm to the box.
- Loosen the gearbox shift rod clamp. We take it out from the gear selection rod hinge, pushing it back.
- We remove the wheel drives. We tie the plug inserted in place of one of the drives with a rope or wire so that it does not fall out during dismantling of the gearbox. The right drive does not need to be completely removed. We disconnect the element from the box and hang it in the body, first moving it to the side.
- So that the gearbox can be removed without additional difficulties, unscrew the two bolts of the left ball joint from the steering knuckle.
- Unscrew the lower right mount of the gearbox to the engine (in figure No. 1). The support bracket (No. 2 in the figure) must be removed from the stud.
- If necessary, just loosen the fastening of the element.
- Unscrew the 3 bolts and remove the cover (No. 1) of the clutch housing (No. 2).
- Unscrew the bolt of the lower left gearbox mounting.
- We hang the engine using a board or other device.
- Unscrew the nut securing the left power unit support (from the bottom of the car).
- Remove the fastening elements of the rear support of the power unit to the body.
- We unscrew the bolts securing the rear support to the gearbox, holding the nuts from turning with a second wrench, and remove it.
- By inserting a screwdriver between the clutch housing and the cylinder block, we move the gearbox off the guide bushings. At the same time, be sure to hold the part.
- We move the gearbox as far back as possible, passing the rear cover of the box over the front suspension brace. The input shaft should disengage from the clutch. If this fails, push the engine to the side. Lowering the front end of the box, remove it from under the car.
Dismantling
To dismantle the box, we recommend that you rely on the instructions, strictly follow the sequence and reinforce your skills with visual videos.
- Disconnect the negative terminal from the battery and drain the oil from the gearbox system.
- Unscrew the bolts that hold the crankcase guard in place and remove it.
- Disconnect the ground (wire) from the clutch housing.
- At the end of the clutch cable, loosen the tension on the nuts slightly.
- Remove the cable end from the clutch lever.
- Disconnect the block from the traction relay.
- Disconnect the wire going to the starter traction relay.
- Dismantle the starter itself directly.
- Disconnect the drive rod from the joint tip. We are talking about traction, which switches gears.
- Disconnect the cable from the car's speedometer drive.
- Unscrew the tie rod ball joint.
- Remove and press the steering rod hinge pin out of the strut swing arm.
- The shank of the inner CV joint of the front wheel drive should be pressed out and moved to the side.
- Disconnect the second CV joint.
- Remove the clutch housing shield.
- Release the gearbox from the fasteners holding it to the engine.
- Remove the box.
Carefully remove the gearbox
Be sure to move it horizontally away from the motor before directly removing the box. Then disengage the input shaft. Be careful not to damage the clutch spring petals.
How to get rid of a rattling gearshift knob
VAZ 2114, like any other car, has its weak points. One of these places is the gearbox lever, namely the rattling of the gearbox lever at high speeds and more. You can easily get rid of this problem. The fact is that the bushing of the lever and rod comes into contact with the metal, and this annoying rattling appears.
Do not confuse rattling with vibration of the gearshift handle - these are completely different diseases, the latter of which can be treated in much more expensive ways.
- First, lift the gearshift knob cover.
- Take the key set to “13” and unscrew the nut, as shown in the figure, and remove the bolt.
- We disconnect the rod and the lever.
- We take out that same bushing.
- We disassemble the bushing down to the metal base.
- We measure 3 mm from the edge of the sleeve and draw a border (You can wrap it with electrical tape as in the picture).
- We saw off or grind to the marked place.
- Lubricate the bushings and plastic removable bushings with CV joint.
- Reassemble in reverse order and look at the result.
Sources
- vaz-2114-lada.ru/2014/05/korobka-peredach-kpp
- vaz-2114-lada.ru/2012/08/drebezzhit-ruchka-kpp/
- vaz-2114-lada.ru/2013/01/kak-snyat-korobku-peredach/
- vazzz.ru/kpp-vaz-2114-ustrojstvo-shema/
- nadomkrat.ru/ustroistvo-avtomobiley/transmissiya/remont-i-obsluzhivanie-kpp-vaz-2114
- drive2.ru/l/541704641067353653/
- autovaz-2114.ru/transmission/kpp-vaz-2114-ustrojstvo-neispravnosti-snyatie-korobki-peredach-svoimi-silami/
Failures that do not require removal of the gearbox
If the reverse gear does not engage, then it is not necessary to remove the box: it does not have a synchronizer installed, the problem can be solved more simply. Before making a decision, you need to check the universal joint and the linkage, as the problem may be caused by a loose clamp. Another reason could be that the mechanism is blocked.
To check, remove the lever between the seats and visually assess whether there is a problem. The same operation must be performed if there is a crunching sound when engaging 2nd gear, since the most likely cause of the malfunction may be a worn synchronizer, which in the Lada Samara family of cars is not very durable.
Do I need to remove the gearbox if the gearshift lever rattles? This question worries many, but most often, removing the gearbox will not be necessary to fix the problem. An unpleasant sound occurs when the bushing that connects the rod and rod touches the wings of the latter. The metal bushing rattles due to frequent impacts on the metal of the wings. The defect of the VAZ 2114 manufacturer can be easily eliminated with your own hands.
According to reviews from car owners, this simple step eliminates the rattling of the gearshift lever. Handle vibration disappears. It will move stiffly, but it will gradually loosen and work easier.