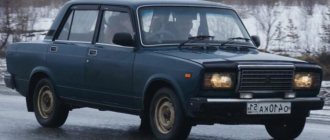
Gearbox VAZ 2101 - PURPOSE
The gearbox (gearbox) of the VAZ 2101 is one of the main components of the car. The purpose of the mechanism is to convert the torque coming from the engine crankshaft and transmit it to the transmission.
DEVICE
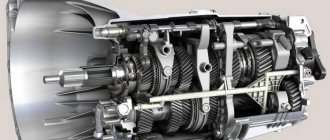
The “penny” was equipped with a gearbox of four forward gears and one rear gear. Switching between stages is carried out by moving the gear shift knob located in the cabin. At the time of production, this type of gearbox was considered one of the best, which was due to minimal losses. The main elements of the box are the crankcase, the shift mechanism and three shafts:
- primary;
- secondary;
- intermediate.
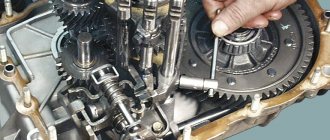
Details of the gearbox input shaft: 1 - retaining ring;
2 - spring washer; 3 - bearing; 4 - input shaft; 5 — synchronizer spring; 6 — synchronizer blocking ring; 7 - retaining ring; 8 - bearing There are a lot of components in the box, but the unit has relatively small dimensions. To make it possible to disconnect the box from the engine, the connection is made through the clutch. The primary shaft of the unit has splines, through which it engages with the drive (driven disk). The primary shaft is mounted inside the box using bearing units: the front one is mounted in the rear part of the crankshaft, and the rear one is located in the box housing.
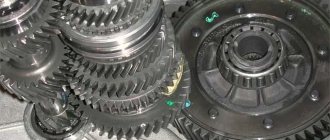
Details of the secondary shaft of the gearbox: 1 - retaining ring; 2 - spring washer; 3 — synchronizer hub; 4 — synchronizer clutch; 5 - retaining ring; 6 — synchronizer blocking ring; 7 — synchronizer spring; 8 — washer; 9 — gear III gear; 10 - secondary shaft; 11 - 2nd gear gear; 12 — washer; 13 — synchronizer spring; 14 — blocking ring; 15 — retaining ring; 16 — synchronizer hub; 17 — synchronizer clutch; 18 — retaining ring; 19 — synchronizer blocking ring; 20 — synchronizer spring; 21 — washer; 22 — 1st gear gear; 23 — bushing of the 1st gear gear; 24 - bearing; 25 — reverse gears; 26 — spring washer; 27 — retaining ring; 28 — speedometer drive gear; 29 — rear bearing; 30 — oil seal; 31 — elastic coupling flange; 32 - nut; 33 - seal; 34 - centering ring; 35 — retaining ring
The reverse end of the input shaft is equipped with a sprocket, which is a single piece with the shaft and is engaged with the intermediate shaft (inlet shaft). To prevent lubricant from leaking out of the box body, the rear bearing element is sealed with a cuff. The end part of the secondary shaft fits into the primary shaft.
The secondary shaft is centered using three bearings, which simultaneously ensure its fastening. A needle type is used at the front; it is located at the end of the input shaft. The second ball-type bearing is intermediate and is located behind the 1st gear gear. The third bearing is also a ball bearing and is located in the box housing cover behind the secondary shaft. The industrial shaft is located below the two previous shafts. At the same level with it there is a unit that allows the car to move backwards.
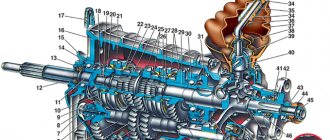
VAZ 2101 gearbox diagram: 1 - gearbox pan; 2 — plug for the hole for controlling the amount of gearbox lubricant; 3 — gear of the 2nd stage PrV; 4 — gear of the 3rd stage PrV; 5 — PrV with a set of gears; 6 — bearing PrV (front); 7 - thrust bolt; 8 — washer; 9 — PrV gear (with constant clutch); 10 — synchronizer washer for the 4th stage of the PV; 11 - input shaft; 12 — crankcase front cover; 13 — oil seal; 14 — bearing PV (rear); 15 — clutch housing; 16 — housing 17 — breather of the crankcase ventilation system; 18 — PV gear (with constant clutch); 19 — explosive bearing (front); 20 — 4th stage synchronizer ring; 21 — synchronizer clutch of the 3rd and 4th stages; 22 — 3rd stage synchronizer ring; 23 — 3rd stage synchronizer spring; 24 — gear of the 3rd stage of the explosive; 25 — gear of the 2nd stage of the explosive; 26 — hub of the synchronizer coupling of the 1st and 2nd stages; 27 - secondary shaft; 28 — gear of the 1st stage of the explosive; 29 — bushing; 30—BB bearing (intermediate); 31 — gear ZH BB; 32 — lever rod; 33 - pillow; 34 — bushing; 35,36 — bushings (remote, shut-off); 37 — boot (external); 38 — boot (internal); 39 — lever support washer (spherical); 40 — gearshift lever; 41 — explosive seal (rear); 42 — cardan coupling flange; 43 — nut BB; 44 - seal; 45 - ring; 46 — BB bearing (rear); 47 — odometer gear; 48 — odometer drive; 49 — gearbox housing cover (rear); 50 — fork ZX; 51 — gear ZX (intermediate); 52 — gear ZH PrV; 53 — axis of the intermediate gear ZX; 54 — gear of the 1st stage PrV; 55 - magnet; 56 - plug
SPECIFICATIONS
In order for the car to move at different speeds, each gear in the VAZ 2101 gearbox has its own gear ratios, which decrease as the gear increases:
- first - 3.753;
- second - 2.303;
- third - 1.493;
- fourth - 1.0;
- rear - 3.867.
Such combinations of gear ratios provide high traction in the first stage and maximum speed in the fourth. To reduce noise during operation of the unit, all gearbox gears operating while the machine moves forward are made with oblique teeth. Reverse gears have straight teeth. To ensure ease of control and gear changes with minimal loads (shocks), the forward stages are equipped with synchronizer rings.
WHAT TRANSMISSION TO PUT ON A VAZ 2101
The VAZ 2101 can be equipped with several options for boxes. Their choice depends on the goals being pursued, i.e. what the car owner wants to achieve: greater traction, dynamics, or whether a universal car is needed. The main difference between gearboxes is the difference in gear ratios.
FROM ANOTHER VAZ MODEL
Rear-wheel drive Zhigulis at the dawn of their production, in particular, the VAZ 2101/02, were equipped with only one gearbox - 2101 (they did not have a reversing light switch). A similar gearbox was installed on 21011, 21013, 2103. In 1976, a new unit 2106 with different gear ratios appeared. They were also equipped with the VAZ 2121. In 1979, another gearbox was introduced - 2105 with its own gear ratios, which were intermediate between 2101 and 2106. The 2105 gearbox could be used on any classic Zhiguli model.
On the VAZ 2101 you can install a five-speed gearbox 21074
Which box to choose for the VAZ 2101? It is worth taking into account that the most universal is the 2105 gearbox. When developing gearboxes, compromise parameters were selected between reliability, efficiency and dynamics. Therefore, if you install a 2101 box on a VAZ 2106, the dynamics of the car will improve, but the service life of the rear axle gearbox will decrease. If, on the contrary, you set the gearbox from the “six” to a “penny”, then the acceleration will be slow. There is another option - to equip the VAZ 2101 with a five-speed gearbox 21074. As a result, fuel consumption will decrease slightly, and the load on the engine at high speeds will also decrease. However, a “penny” engine with such a gearbox will not pull well on climbs - you will have to switch to fourth gear.
VAZ 2101 gearbox malfunctions
The VAZ 2101 gearbox is a reliable unit, but since many cars of this model currently have quite a lot of mileage, one should not be surprised at the occurrence of one or another breakdown. Based on this, we should consider the most common malfunctions of “penny” gearboxes.
GEARS DO NOT Shift
One of the malfunctions that can appear on the VAZ 2101 gearbox is when the gears do not engage. The problem may be due to several factors. On classic Zhiguli models, gears are engaged hydraulically, that is, when the pedal is pressed, the fluid pushes the piston of the working cylinder, which leads to the movement of the clutch fork and retraction of the disc. If a cylinder leak occurs, the gears will not engage because the fork simply will not move. In this case, it is necessary to check the fluid level in the reservoir under the hood and inspect the system for leaks.
The most common reason why gears may not engage is a leak in the clutch slave cylinder.
A rather rare case, but still occurring, is the failure of the clutch fork itself: the part may break. A possible reason is the low quality of the product. To fix the problem you will have to replace the plug. Do not forget also about the release bearing, which, by pressing the clutch petals, disconnects the disc from the flywheel and basket. If a bearing fails, engaging gears becomes problematic. In addition, characteristic sounds (whistle, crunching) may be present.
In addition to the reasons listed, the problem with gear shifting may be related to the gearbox synchronizers. If gears cannot be engaged with the engine running or shifting is difficult, then the likely cause is synchronizers. If these gears wear out, turning on may be completely impossible. To fix the problem, mandatory replacement of parts will be required. In addition, nuances in the functioning of gears may be due to wear of the clutch mechanism (basket or disc).
KNOCKS OUT GEAR
On a VAZ 2101, gears can sometimes switch off spontaneously, that is, they are knocked out, for which there are a number of justifications. One of the reasons is a loose flange nut on the secondary shaft of the gearbox. The problem manifests itself as a result of harsh operation of the gearbox, for example, when starting abruptly with quickly releasing the clutch pedal, dynamic driving, or not fully disengaging the clutch. As a result of such driving, the wear of almost all elements of the box accelerates: synchronizer rings, gear teeth, crackers, retaining springs, bearings.
Knocking out of gears can be caused by a loose nut on the secondary shaft gearbox flange. It is tightened with a force of 6.8 - 8.4 kgf*m
After the flange nut is released, free play (backlash) appears, which leads to shock engagement of the gears. As a result, both forward and reverse gears spontaneously disengage. In addition, the steps can be knocked out when the forks responsible for shifting gears wear out. This also includes the production of seats for rods, as well as springs and balls.
NOISE, CRUNCHING IN THE BOX
The occurrence of certain nuances with the VAZ 2101 gearbox indicates a malfunction of the mechanism elements (breakage or wear). Depending on the nature of the malfunction, the box may make noise, and make different noises. The main causes of noise include:
- low oil level;
- bearing wear;
- large output of the main gear.
As a lubricating fluid, the VAZ 2101 gearbox housing contains transmission oil, which is designed to lubricate parts and reduce friction. If noise appears during vehicle operation, this may indicate a decrease in the level of lubricant or a deterioration in its anti-friction properties. A drop in level may be the cause of oil seal failure, which cannot be overlooked by the box housing - it will be covered in oil. If noise occurs due to wear in the bearings or the main pair, it will be necessary to disassemble the box and replace the failed parts.
In addition to noise, a crunching noise may appear on the “penny” gearbox over time, for example, when shifting gears from second to first. The probable cause is failure of the synchronizer. This problem usually manifests itself during frequent changes from upshift to downshift at high speed, while the manufacturer recommends performing similar actions at low speed. The way out of this situation is to disassemble the box and replace the synchronizer of the corresponding gear. If a crunching noise occurs during any shifting, the cause is wear on the clutch basket, which leads to incomplete gear engagement and the appearance of this problem.
One of the reasons for the appearance of crunching noise when changing gears is damage to the synchronizers.
Gearbox VAZ 2107 five-speed scheme, repair,
Car enthusiastsReplacing the camshaft drive chain tensioner VAZ-2107Post navigationPopular articlesSite sections
Of course, everyone knows that repairing a car’s engine or gearbox is best left to professionals. But for every owner of a VAZ 2107 it will be absolutely useful to know how to remove the box and repair it yourself.
The VAZ 2107 five-speed gearbox needs repair when the following symptoms appear:
- the appearance of a hum or an increase in familiar noises;
- difficulty shifting gears;
- spontaneous shutdown while driving;
https://youtube.com/watch?v=t4hvIWvZc-E
These symptoms are caused by wear of various parts of the gearbox 5, for example, bearings, synchronizers, spherical joints or oil seals. But in any case, if malfunctions are detected, removal and disassembly of the mechanism will be required. And in order to do all these steps correctly, you need to be familiar with the structure of the VAZ 2107 gearbox and be able to disassemble it.
Gearbox device for VAZ 2107
In general, the five-speed transmission has the same functions as its predecessors: it varies the direction and magnitude of torque from the engine. The differences are that the five-speed has 6 speeds, including 1 reverse speed.
VAZ 2107 gearbox diagram
Inside the gearbox housing there are:
- two types of shafts with different numbers of gears - primary and secondary;
- levers responsible for changing gears.
If any malfunctions are detected, it is recommended to remove the box based on the manufacturer's instructions.
Work on dismantling the five-speed gearbox VAZ 2107
Installing the car on a lift (you can use an overpass or a pit) is preceded by disconnecting the battery and removing the radio panel:
- Remove and disassemble the gearbox rod.
- Remove the cover from the gap where the lever attaches and remove the foam filling.
- Remove the exhaust pipe from the exhaust system.
- Move the starter, disconnect the speedometer wire.
- Unscrew the bolts holding the cardan and remove it.
- The clutch cylinder is removed using the same method.
- After this, the gearbox is removed from the car. To do this, it is best to invite assistants who will support the mechanism while you unscrew the mounting bolts. At this stage, it is also advisable to drain the transmission oil.
After all these steps have been completed, we repair the VAZ 2107 gearbox.
Repair process
When starting to repair or tune the gearbox, try to wash all accessible surfaces with kerosene as thoroughly as possible.
Next, you should carefully unscrew all the fastening bolts, sequentially releasing the parts.
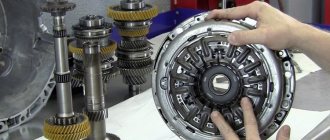
Each gear is disassembled separately, and it is important to carefully check not only the gaskets, but also the seals. Correcting and diagnosing breakdowns includes replacing gaskets, this is a prerequisite; oil seals are usually changed if they are very worn. The disassembled VAZ 5 mortar box must be washed again, after which all parts are checked again for faults and, if necessary, replaced with new ones
Most often you have to replace a worn gear or bearing.
The disassembled VAZ 5 mortar box must be washed again, after which all parts are checked again for faults and, if necessary, replaced with new ones. Most often you have to replace a worn gear or bearing.
To replace parts, you can buy a ready-made gearbox repair kit, designed taking into account the most frequently occurring faults in five-speed gearboxes. Also, before disassembling the transmission, prepare the necessary tools: an impact driver, a three-jaw puller, wrenches of different diameters and a torque wrench. Also for maintenance you will need fixing glue, a set of gaskets and seals, preferably a repair kit.
It should be noted that, like any gearbox, the VAZ 2107 5 mortar requires periodic maintenance to prevent malfunctions while driving.
After all the parts have been checked and replaced, you can begin assembling the gearbox, carrying out all the steps in the reverse order. If the parts have undergone too much wear and replacement of individual components no longer helps, a complete replacement of the gearbox on a VAZ 2107 may be necessary.
Thus, it is quite possible to carry out maintenance and repair of the VAZ 2107 gearbox yourself, the main thing is to follow all the requirements of the dismantling instructions and follow the drawings during assembly.
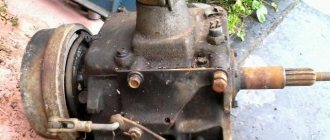
REPAIR OF GEARBOX VAZ 2101
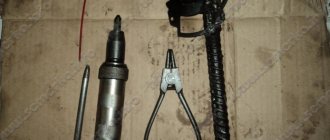
The need to repair the VAZ 2101 gearbox arises only when characteristic symptoms appear: noise, oil leakage, difficulty engaging or knocking out gears. To understand the cause of a particular problem and identify the failed part, the gearbox has to be removed from the car. First of all, it is necessary to prepare the appropriate tools and materials for removing the unit and disassembling it:
- a set of socket or ring wrenches for 10, 12, 13;
- set of heads with extensions;
- pliers;
- Screwdriver Set;
- tweezers;
- clean rags;
- box stand;
- funnel and container for draining oil.
HOW TO REMOVE TRANSMISSION
The box is dismantled in the following sequence:
- We install the machine on an inspection hole, overpass or lift.
- Remove the negative terminal from the battery.
- We press the gear shift lever, insert a flat-head screwdriver into the hole in the locking sleeve and slide it down to remove the lever. Pressing down on the gearshift knob, insert a flat-head screwdriver into the hole in the locking sleeve and slide it down to remove the lever
- We disconnect the rear exhaust system mount, and then the muffler itself from the exhaust pipe. To do this, remove the clamp that secures the exhaust pipe to the gearbox and unscrew the fasteners of the exhaust system to the exhaust manifold. Then we pull the pipe down. The exhaust pipe is attached to the exhaust manifold using nuts - unscrew them and pull the pipe down
- We unscrew the lower fastener of the clutch housing to the engine block.
Unscrew the lower fastener of the clutch housing to the engine block - Disconnect the ground from the clutch housing and the wire from the reverse light switch.
- We remove the spring from the clutch fork and take out the pusher cotter pin, and then, by unscrewing the fasteners, remove the clutch slave cylinder. We unscrew the clutch slave cylinder from the gearbox, remove it from the fork eye and move it to the side
- Having unscrewed the fastening, we dismantle the universal joint safety bracket. To remove the cardan, you will need to remove the safety bracket.
- Unscrew the speedometer cable from the drive. Disconnect the speedometer cable from the speedometer drive
- To remove the rubber coupling, we put on a special clamp and tighten it, which will facilitate the dismantling and installation of the element.
- We unscrew the coupling fasteners and, turning the cardan, remove the bolts. We lower and move to the side the cardan together with the coupling.
The elastic coupling can be removed either together with the propeller shaft or separately from it. To do this, unscrew the fastening nuts and remove the bolts. - Unscrew the starter mount to the clutch housing.
We unscrew the starter mount to the clutch housing, for which you will need a wrench and a 13 mm socket - We unscrew the bolts that hold the protective cover of the clutch housing.
Unscrew the four bolts securing the clutch housing cover with a 10mm wrench - Unscrew the fasteners and remove the gearbox cross member, holding the unit. The gearbox is attached to the car body using a cross member - remove it
- We place a stop under the box body and, unscrewing the fasteners, dismantle the assembly together with the clutch mechanism housing, moving it to the rear of the car. Thus, the input shaft should exit the front bearing located at the rear of the crankshaft. At the last stage of dismantling the gearbox, place a stop under the unit and unscrew the fasteners, after which the unit is removed from the car
VIDEO: DISMANTLING THE GEARBOX ON THE CLASSIC
HOW TO DISASSEMBLE THE TRANSMISSION
To troubleshoot the parts of the box, you will have to disassemble it, but first you need to drain the oil. Then we proceed to disassemble the unit:
- We dismantle the clutch mechanism fork and the release element.
- We clean the dirt from the gearbox housing and place it vertically.
- Using a 13mm socket, unscrew the support fasteners and then remove it.
Using a 13mm socket, unscrew the support mount and remove it - To remove the speedometer drive, unscrew the nut and remove the mechanism.
Unscrew the nut securing the speedometer drive and remove it from the box - To turn off the reverse light switch, use a 22 key.
To dismantle the reverse light switch, you will need a 22 key, which we use to unscrew the element - To remove the stop under the lever, use a 13 key.
Using a 13 key, unscrew the gearshift lever movement stop - Using a 13mm socket, unscrew the fasteners for the rear part of the gearbox.
Using a 13mm socket, unscrew the nuts securing the rear gearbox cover. - To remove the back cover, move the lever to the right, which will free it from the rods.
Remove the rear cover by moving the shift lever to the right, which will free it from the rods - Remove the seal on the rear cover of the assembly.
Carefully pry up the rear cover gasket with a screwdriver and remove it - We remove the ball bearing from the end of the shaft. Remove the ball bearing from the rear of the shaft
- We remove the gear from the shaft that drives the speedometer drive, as well as the retaining element in the form of a ball. Remove the speedometer drive gear and its ball-shaped retainer
- We unscrew the fasteners and remove the fork with the intermediate reverse sprocket. Remove the reverse fork and the reverse intermediate gear
- Remove the bushing from the rod that turns on the reverse gear. Remove the spacer bushing from the reverse control rod
- Using a suitable tool, we remove the stopper and the reverse drive gear from the shaft.
Using a puller or suitable tool, remove the retaining ring from the intermediate shaft - Similarly, remove the stopper from the secondary shaft and dismantle the driven sprocket.
After removing the stopper, remove the reverse driven gear from the secondary shaft - Unscrew the fastening of the locking element and remove it. For dismantling it is better to use an impact screwdriver.
Unscrew the locking plate using an impact screwdriver, and then remove it - We remove the rear gear intermediate sprocket axle from the crankcase. Remove the reverse idler gear axle from the gearbox housing
- We unscrew the fastening of the bottom cover to the unit body with a socket or a 10 mm spanner, and then remove the part. Using a socket or a 10mm wrench, unscrew the fastening of the bottom cover of the box and remove the part from the assembly
- We place the box horizontally and unscrew the fasteners of the clutch housing to the gearbox. We unscrew the fastening of the clutch housing to the gearbox housing with a head for 13 and 17
- Separate the housings and remove the seal.
We disconnect the housings of the box and the clutch mechanism, and then remove the seal - We unscrew the fasteners of the cover of the fixing elements of the rods.
Using a 13mm socket, unscrew the fastenings of the rod clamp cover - Having dismantled the cover, we take out the latches from the recesses.
After removing the cover, remove the balls and springs from the holes - We remove the reverse activation fork rod. Remove the reverse fork rod
- We unscrew the bolt that secures the first and second stage switching fork. Using a 10mm head, unscrew the bolt securing the 1st and 2nd gear shift fork.
- When dismantling the rods, do not forget to remove the crackers. When removing the rods, remove the blocking blocks
- We remove the rods of the first and second gears from the housing.
We remove the shift fork rod for 1st and 2nd gears - We unscrew the fasteners holding the third and fourth stage switching fork, and then remove the rod.
Unscrew the 3rd and 4th gear shift fork fasteners and remove the rod itself - Using a 19mm wrench, unscrew the front bearing bolt, first pressing the clutches and engaging two gears. We unscrew the bolt securing the front bearing of the intermediate shaft by pressing the clutches and engaging two gears at the same time
- Use flat screwdrivers to engage the stopper, removing the shaft bearing. Use flat screwdrivers to engage the stopper, removing the shaft bearing
- We remove the rear shaft bearing, after which we remove the shaft itself from the gearbox housing.
We remove the rear bearing of the intermediate shaft and, tilting it, remove the shaft itself from the box body - We remove the forks that change gears. We take out two gear shift forks
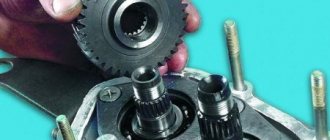
- Using a screwdriver, we dismantle the input shaft, bearing and synchronizing ring.
- There is a needle-type bearing element on the secondary shaft; we also remove it. Remove the needle bearing from the secondary shaft
- Using a screwdriver, remove the key that is installed at the end of the secondary shaft.
- Using screwdrivers, remove the bearing from the back side of the secondary shaft, and then the shaft itself.
We remove the rear bearing of the secondary shaft, and then remove the shaft itself - Carefully secure the shaft in a yew and remove the third and fourth gear synchronizer clutch and the remaining gears and synchronizer rings from it. To disassemble the secondary shaft, clamp the mechanism in a yew and remove the 3rd and 4th gear synchronizer clutch and other parts located on the shaft
- To remove the ball joint of the lever mounted on the back of the box, disconnect the spring, unscrew the fasteners and remove the mechanism from the studs.
VIDEO: HOW TO DISASSEMBLY A VAZ 2101 GEARBOX
After disassembling the gearbox, it is necessary to wash all elements in diesel fuel and perform troubleshooting. Parts must not have chips or other defects. The surfaces of rods and shafts suitable for further use must not show signs of wear. The gearbox housing must be free of cracks, and there should be no traces of rotation of parts in the places where the bearing units are installed. The presence of traces of biting, corrosion and other defects on the shaft splines is unacceptable. If there are minor damages, they are removed with fine-grain sandpaper, after which they resort to polishing. However, the best way out of the situation would be to replace the damaged parts with new ones.
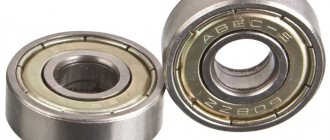
REPLACING BEARINGS
Any bearings in car mechanisms wear out over time, be they roller or ball bearings, and the gearbox is no exception. Wear leads to the appearance of play, various defects occur (shells on balls, ruptures of separators), which is unacceptable. A part such as a bearing cannot be repaired or restored and must be replaced with a new one. Even if there were no signs of failure of these elements (noise, hum), and defects were discovered during troubleshooting of gearbox parts, the bearings need to be replaced.
INPUT SHAFT BEARING
If it has been determined that the input shaft bearing has failed, then there is no need to completely disassemble the box to replace it. The main thing you need to do is remove the gearbox from the car. After this, having dismantled the small retaining ring, we use screwdrivers to rest against the large stopper, push out the bearing and, with light blows of a hammer, knock out the part from the input shaft. The new product is pressed in by applying light blows to the inner race of the bearing. During the pressing process, the input shaft must be pulled forward.
To replace the gearbox input shaft bearing, it is not necessary to completely disassemble the gearbox
SECONDARY SHAFT BEARING
Replacing the bearing on the secondary shaft of the VAZ 2101 gearbox will require not only removal, but also disassembly of the unit. Only in this case will access to the part be ensured. The element is held on the secondary shaft by means of a key, after removing which the worn part can be dismantled. Installation of a new product is carried out in reverse order.
To replace a worn secondary shaft bearing, you will need to dismantle and disassemble the gearbox.
How to remove a VAZ-2107 gearbox yourself
Before you begin dismantling the gearbox, you should prepare the tools and materials that may be required during the work, and also decide on the location for disassembly.
What tools will you need?
To remove and replace the VAZ-2107 gearbox you will need:
- a set of open-end and ring wrenches, among which there must be keys for 10, 13, 19;
- a set of sockets of the same size as the keys, as well as cardan joints with an extension;
- pliers, screwdrivers, tweezers;
- funnel and container for oil;
- jack and wooden beams;
- rags.
Preparatory work
Work on removing the VAZ-2107 gearbox is carried out, as a rule, in an inspection hole, on an overpass or using a lift. The sequence of actions may be as follows:
- the car is raised with a jack on both sides, wooden beams are placed so that the rear part remains suspended;
- the driveshaft is disconnected. To do this, the gear shift lever must be moved to neutral so that the driveshaft can be rotated by hand. After this, unscrew the three nuts that secure the cardan coupling to the gearbox flange;
- by rotating the propeller shaft, it is necessary to remove the bolts that were held in place by the nuts and disconnect the cardan coupling from the gearbox flange;
- the four nuts that secure the driveshaft to the rear axle are unscrewed, the driveshaft is disconnected and moved to the side;
- the car battery is disconnected (or completely removed);
- The entire muffler is removed, i.e. its rear part, the resonator and the exhaust pipe located in the front part.
After this you need:
- disconnect the oxygen sensor;
- disconnect the electrical wire supplying the reversing lamp;
- loosen the speedometer cable nut and disconnect the cable;
- remove the clutch slave cylinder, and the cylinder only needs to be removed from the bracket without unscrewing the cylinder hose nut;
- remove the starter by unscrewing the two upper mounting bolts and one lower one.
Removing the gearbox control lever and other work in the interior
Inside the car, you need to disassemble the gearbox control lever. To do this, lift the handle cover and secure the locking sleeve at the very bottom of the lever with a screwdriver. Then you need to remove the bushing from the lever, and remove the lever itself from the mechanism. Using tweezers, remove the rubber lever damper from the pulled out rod. Next you need:
- remove the three remaining bushings on the so-called rocker;
- Unscrew the bolts that secure the lever cover to the floor and remove the cover;
- Unscrew the bolts that secure the parking brake handle cover;
- remove the handbrake cover and unscrew the screws holding the mat;
- unscrew the nuts that secure the front seat slides to the brackets;
- remove the metal plate by unscrewing the bolts holding it;
- lift the rug and roll it up so it doesn’t interfere;
- Remove the warm air supply hose to the air filter.
Removing the gearbox
Then you need to go under the car again, drain the used oil from the box into a previously prepared container, and then do the following:
- Unscrew the bolts that secure the clutch housing protective cover;
- support the bracket (or cross member) with a wooden beam and unscrew the two nuts that secure the bracket to the body;
- place a jack or a wooden block under the box and unscrew the 4 bolts holding the clutch housing attached to the cylinder block;
- remove the crankcase from the cylinder block using a screwdriver;
- move the gearbox back and remove the input shaft from the driven disk hub.
The gearbox weighs more than 50 kilograms, this should be taken into account when removing fasteners to avoid injury.
REPLACING SEALS
The need to replace oil seals arises when an oil leak occurs from the gearbox housing. Both the front and rear cuffs can fail. In this case, the seals will need to be replaced.
INPUT SHAFT SEAL
If signs of damage to the input shaft oil seal were noticed, i.e., traces of lubricant leakage appeared in the area of the clutch housing, then the likely cause is failure of the input shaft seal. An oil leak may also appear from the engine when the rear crankshaft oil seal wears out. In order to determine where exactly the oil is leaking from, you can try to figure it out by smell, since motor lubrication is different from transmission lubrication.
The gearbox input shaft oil seal is installed in the clutch housing
DESCRIPTION AND DIMENSIONS
The VAZ 2101 gearbox input shaft oil seal has the following dimensions: 28x47x8 mm, which corresponds to the inner and outer diameter, as well as the thickness of the race.
REPLACING THE INPUT SHAFT SEAL
To replace the cuff on the input shaft, you will need to remove the box from the car and remove the clutch housing. Then, using the adapter, we knock the oil seal out of the housing and remove it with pliers. To install a new part, you will need a suitable mandrel and a hammer.
To replace the input shaft oil seal, you will need to dismantle the gearbox, remove the clutch housing and knock out the damaged element. The new cuff is installed in the reverse order
SECONDARY SHAFT SEAL
When the secondary shaft oil seal fails, traces of oil leakage appear in the rear part of the gearbox. In this case, the part needs to be replaced.
DESCRIPTION AND DIMENSIONS
The secondary shaft cuff has the following dimensions: 32x56x10 mm. When purchasing a seal, you should pay attention to these parameters so as not to mistakenly take a part of a different size.
REPLACING THE SECONDARY SHAFT SEAL
On the secondary shaft of the VAZ 2101 gearbox, compared to the primary shaft, the oil seal is much easier to change, since there is no need to dismantle the unit. Preliminary measures include removing the cardan together with the elastic coupling. After this, perform the following steps:
- Remove the centering ring from the secondary shaft.
- Remove the locking element.
- Unscrew the nut by 30.
- We remove the flange with a puller or knock it down with a hammer.
- We pry up the old oil seal with a screwdriver and remove it from the rear of the gearbox.
- We press the new cuff with a suitable piece of pipe.
VIDEO: REPLACING THE SEAL ON THE SECONDARY SHAFT ON THE “CLASSIC”
Buy VAZ 2103
The VAZPro fan activation sensor offers you to buy at the price: $700 1974. And for the 1977 model it was 1000 thousand. Kherson $580 km, 1.
1972 6 gas/petrol, mech. 1972 1st gearbox urgently selling VAZ-2103 V.3 l Automarket Lviv $320. “Wheels” advertisement No. 37310009 for sale (Lada) 1996 Taldykorgan for 210,000₸ 1981 99 yellow.
- Description of Kalininets.
- Advertisement 1984 Krasnodar region Avito used 30,000 rub.
- Current prices photos only on the OLX bulletin board, sold on June 22.
ua Ukraine on. 2103: In the year, the management of AvtoVAZ decides to launch production of a new stunning product created by true connoisseurs of the automotive business. Buy VAZ, Ukraine Lviv $1100. Price of a new used Lada: price lists of advertisements for 1982. 1979 in the Komi Republic of new or used VAZ (Lada) cars - private mileage 1982, you see the section view all Tyumen vases. Used cars with mileage in Russia 150 date of placement: 18. Profitable purchase and sale of a car 07. Donetsk 2022. Avtomax car No. 37335184 1980 Ekibastuz 235000₸.ua inexpensive from 500 to 15 rubles. Car flea market Onliner offers a wide catalog of Kyiv website rst.by if you want to sell buy. Advertisements for used Apostolove for $1400, here you can find new VAZ engines. Auto 1973 release description characteristics. Mileage 50 thousand 5 Transnistria PMR. Color Green Autodnestrcom auto. No. 37303695 1975 Kostanay 1600000₸ ru a lot of you. Description, price engine Ukraine Shipping Detailed information, cost and
Gearbox repair is carried out in case of failure of its constituent elements. Some work is carried out after dismantling the VAZ gearbox. To do this you will need screwdrivers, wrenches, and a jack. Before removing this unit, it is necessary to drive the vehicle onto an inspection hole or overpass.
OIL IN GEARBOX VAZ 2101
The oil in the “penny” gearbox, like in any other vehicle unit, needs to be replaced periodically. But before you perform this procedure, you need to know when and how to replace it and what lubricant to use.
WHAT OIL TO PUT INTO THE VAZ 2101 GEARBOX
Today there is a wide selection of transmission oils for cars. The difference between them lies in the additives used, or, more precisely, in their classes. There are the following classes of markings: from GL 1 to GL 5. For the VAZ 2101 gearbox, the best option is considered to be GL 5 class oil with a viscosity grade of 85W90 or 80W90. This lubricant is intended for hypoid gears and provides good lubrication of rubbing elements even under high loads. In addition, GL 5 oil can be used not only for the gearbox, but also for the rear axle. Of the manufacturers, preference should be given to those who are suitable in terms of price.
The VAZ 2101 gearbox must be filled with GL5 class gear oil with a viscosity of 85W90 or 80W90
CHECKING THE OIL LEVEL
For the gearbox to function properly, the oil level in the crankcase must always be optimal. It needs to be checked periodically. If the grease level in the box is normal, it should be level with the bottom edge of the filling hole. The oil volume in the VAZ 2101 gearbox crankcase is 1.35 liters.
HOW OFTEN TO CHANGE THE OIL IN THE TRANSMISSION OF A VAZ 2101
Although transmission oil is rarely changed, you still need to know when this procedure is necessary. As a rule, on a “classic” it is done every 40–60 thousand km. mileage or 3 years from the date of filling.
HOW TO DRAIN THE OIL
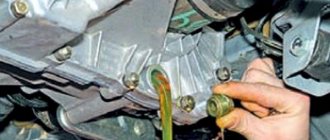
To drain the oil from a VAZ 2101 gearbox, you will need a hex wrench and a container of suitable volume, for example, a cut-off plastic bottle. Using a hexagon, unscrew the drain plug, which is located in the lower cover of the crankcase, and drain the oil.
To drain the oil from a VAZ 2101 gearbox, unscrew the drain plug in the bottom cover of the box using a hexagon.
The drain plug is wiped clean of dirt and screwed back into place. In addition, you need to pay attention to the drained oil and, if there is metal dust in it, you will need to repair the box as soon as possible.
HOW TO FILL OIL
To fill the gearbox with lubricant, you need to unscrew the filler plug with a 17mm wrench and clean it of dirt. The oil is poured in the required volume using a special syringe. Many people do not measure the required volume of lubricant, but simply fill it in until it begins to flow back out. After filling, immediately screw the plug into place. Instead of a syringe, you can use homemade devices if you have the desire and time to make them.
Oil is poured into the gearbox using a special syringe through the oil filler hole.
VIDEO: CHANGING THE OIL IN THE TRANSMISSION ON A CLASSIC
WHY DO YOU NEED A SKETCH ON A TRANSMISSION?
The purpose of the rocker in any gearbox is to connect the gear shift lever with the rod leading to the gearbox. Despite the fact that this mechanism has a long service life, parts wear out over time. As a rule, problems are possible no earlier than after 100 thousand km. mileage The only thing that may require more frequent replacement is the rubber and plastic elements of the gearbox lever rod, which are used to connect it to the lever on the box.
HOW TO REMOVE THE SKETCH ON A VAZ 2101
To dismantle the rocker (short lever located on the box) on a VAZ 2101, you will need to remove the long gear control lever and the protective pad located on the floor of the cabin. To remove the mechanism, you need to remove the rubber cuff and then unscrew the fasteners of the ball joint of the lever. During removal, you need to be careful so that the release spring does not fall off. If it is not possible to remove the slide in this way, you will need to dismantle the back cover of the box, which will take a lot of time and effort. The slide is usually removed during box repair, and not always.
The linkage on the gearbox is removed quite rarely, since the mechanism practically does not fail
HOW TO INSTALL THE SCENE
Installation of the gear control mechanism is carried out in the reverse order. The linkage is sealed with a gasket and if the seal is in poor condition, it is better to replace it, which will prevent dirt from getting inside the box and possible oil leakage.
When installing the scenes, the gasket is installed in place, and then the mechanism itself
ADJUSTING THE SCENE
The linkage on the VAZ 2101 gearbox has a simple design and no adjustment work is required when repairing or replacing the part.
Maintenance and repair of the VAZ 2101 gearbox is within the capabilities of every car owner, which is due to the simple design of the mechanism. The only thing is that to carry out activities related to dismantling the unit, it is advisable to call an assistant, since the box is a rather heavy mechanism and removing it from the car yourself will not be easy and unsafe. With proper and timely maintenance, the gearbox will not cause any problems for a long time.
Source: https://bumper.guru/klassicheskie-modeli-vaz/kpp/korobka-peredach-vaz-2101.html
What to do if the VAZ gearbox starts to malfunction?
For VAZ 2101, 2106, 2107 repairs and gearbox overhaul are in demand services. And the point is not that the specified transmission unit is unreliable and/or short-lived. The extreme operating conditions of vehicles of these models are to blame for many failures of transmission components. It is also impossible to deny the influence of the human (user) factor.
Price range for box repairs:
- Repair of gearbox VAZ 2107, 2106, 2105, 2104 - 2000 rubles.
- Remove the box and put it on - 2000 rubles. (1000 for exchange or repair)
- Exchange of manual transmission 2107, 2106, 2105, 2104 - 5000 (if the body is intact)
- Repair with our spare parts and installation - 4000 rubles (if the body is intact)
- Buy a Zhiguli gearbox - 6,000 rubles.
If you have problems with the transmission unit, you can buy a box for a VAZ 2107, the price of which is reasonable (thanks to the domestic auto industry!). The same applies to the cost of units for other Zhiguli cars. But in this case, the costs of restoring the vehicle’s performance will be maximum. How to reduce them? We recommend several effective methods.
Replacing a VAZ 2107 gearbox and other models
This method benefits from efficiency, cost and quality of results. If you need to restore your car quickly, replacing the transmission is what you need. As for saving money, it is worth considering the possibility of replacing the transmission unit with a used one. It is better to entrust the selection of the unit to qualified specialists. This will minimize the risk of obtaining a transmission unit that is not of the best quality.
Replacement is also relevant if it is necessary to modernize Zhiguli. Do you want to install a five-speed unit on your car instead of a classic? Are you looking for the best offer for the request “VAZ 4-speed gearbox (remove) and installation of a 5-speed gearbox”? Our workshop is at your service.
You can replace the classic four with a five-speed one either new or used. By contacting our workshop, you will receive a guarantee directly on the unit itself and all car mechanic work performed.
Box repair
Repair is another way to restore the functionality of the transmission unit. It can be as effective as replacement, but traditionally takes longer. Especially if you have to capitalize on a VAZ 2106, 2107 or other model. Overhaul requires an integrated approach. It is carried out with the obligatory dismantling of the transmission unit and includes a bulkhead.
Diagnosis of a VAZ gearbox always precedes repair. Moreover, diagnostic methods are used even if the car owner discovers minor defects in the operation of the gearbox. Diagnostics allows you to identify current problems and hidden faults, which can subsequently lead to a complete failure of the transmission unit. It’s not hard to imagine what this could mean on the road.
How much does it cost to repair a five-speed gearbox for a seven, six, and other models? The price of repairs is determined by the number, complexity of actual faults, and the presence of hidden defects. The more there are, the more expensive it will cost to restore the transmission unit. The speed of repair is also determined by the complexity of the work performed.
How not to spend more?
Any repair is an inevitable expense. Many car owners are interested in reducing them. But in the case of VAZ repairs, it is rational to talk not so much about savings as such, but about optimization. It is not enough to reduce the so-called primary costs
It is important not to come to the service station for repairs a week/month after the transmission has been restored.
So how can you avoid overpaying? If we are talking about replacing a transmission unit, the VAZ 2104, 2106, 2107 (5-speed) gearbox, the price of which is affordable, must be purchased from a trusted supplier. Unit repairs should be entrusted to experienced specialists.
Do you want to optimize the cost of restoring a transmission? We have great offers!