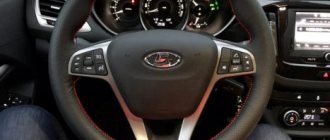
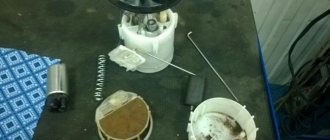
The Lada Vesta car in the “Lux” and “Comfort Multimedia” configurations is equipped with a steering wheel that can perform several different functions. Vesta received a unique multifunction steering wheel as the first car at AvtoVAZ. This solution is convenient for driving a car. It improves driving comfort. Buyers who decide to purchase an inexpensive car can separately buy and connect the “snail” with their own hands.
The main advantage of the multifunction steering wheel on Vesta is its practicality. The music control buttons on the steering wheel and cruise control are in a convenient location. As a result, the driver is less distracted from driving, and music while driving does not interfere with traffic safety.
Connecting cruise control keys
To connect the cruise control keys, follow the procedure.
Subsequence
Route three wires to the computer through the window above the pedals (the source is located in the engine compartment) and connect to the block. Study the diagram according to which the wires for the buttons are led from the electronic unit. The snail with wires for the buttons has blocks from which the wires should lead to the corresponding blocks on the electronic unit.
| Block on the snail |
Block on the electronic unit
Using the installed keys, you can turn cruise control on and off, or turn it off for a certain time interval.
Connecting buttons to the radio
Connecting the buttons on the steering wheel begins with completing the wired cruise control system with the radio wiring. Connect the wiring to the multimedia device into the blue connector. To avoid mistakes, study the wiring diagrams.
If a new radio was installed during operation, you will need an adapter for the specific type of audio system.
After connecting, test the functionality of the new functions. As a result of a correctly completed connection, the keys will highlight and select the operating modes of the radio:
- switching music files;
— selection of menu items;
— selection of file storage media;
- Instant volume mute.
Cost of steering wheel with buttons
The price for the model with buttons depends on the store. Most Lada Vesta car owners purchase products with keys in virtual stores. The order is placed for article number 8450006832. The cost ranges from 5000 to 7000. If the vehicle owner needs an airbag, the price increases by another 1000-15000. For leather covering you will have to pay another 2000-2500 rubles.
To save money, you can use an overlay with keys on a standard steering wheel. This option is more difficult to connect and difficult to find, since it is not popular.
Connecting a steering wheel with buttons
So, a block with wires is already connected to the steering wheel, so maintaining a given speed and the limiter will work immediately after installing the multi-steering wheel ( left button panel ).
To activate control of the radio or multimedia system ( right button panel ), you will have to modify the design. We add 5 wires to the block (which already has wires for cruise control), and put a miniISO block on the other end and insert it into the radio (how to remove it).
Wiring diagrams for the Vesta multifunction steering wheel (radio control):
As a result, using the buttons on Vesta’s steering wheel, it will be possible to control the radio, cruise control and speed limiter, and the button backlight will also work.
The only difference from the standard implementation is that there will be no indication of cruise control operation on the instrument cluster. To do this you need to flash it. By the way, during the panel test, pay attention to the cruise control indicators (icons in the speedometer well at about 140 and 160 km/h); if they are on, then the firmware is correct.
Here is the cruise control indication on Vesta, which has a multifunction steering wheel from the factory:
Let us remind you that the “Multimedia” option package includes not only a multifunction steering wheel, but also a rear view camera. We looked at how to connect a camera to a multimedia system earlier. By the way, another way to modify Vesta is to install fog lights.
The multi-steering wheel on the Lada Vesta car ensures comfortable movement in the car. In addition, the steering wheel is an element of the interior, a lever for controlling the behavior of the car and additional options. The Lada Vesta multifunctional steering wheel, also known as the multifunction steering wheel, is present in the top-end and luxury configurations of the Lada Vesta. In other variations, its capabilities do not go beyond the standard. Finishing materials are not of high quality. But it can be connected using a special adapter for the multifunction steering wheel.
Installing a multifunction steering wheel on a Lada Vesta car is possible, even if it is not included in the factory equipment. This function allows you to put buttons on the steering wheel, increasing the level of safety while driving, since climate control and the operating mode of the multimedia system are adjusted using the keys on the steering wheel. You can change the covering materials (braid, leather trim, trim - also known as a cover) yourself if you know the size and diameter of the Lada Vesta steering wheel. You can also do heating. The heated steering wheel function on the Lada Vesta is especially pleasant on frosty days in winter. After reconstruction, you will get a multifunctional unit. Read the article to the end and master all these repair skills!
Instructions for other configurations of Lada Vesta where there are no gray wires
This connection option is more complicated, since the connection to control the multimedia device is carried out independently. You will need a bundle of three wires and an additional block for the cochlea. Dismantle the old model and replace it with a new one. Wires are pulled from the audio system and connected to the steering connector. A pre-prepared bundle of three wires is supplied from the electronic control unit to the audio system. Together with the multimedia wires, it is connected to the steering block.
Why do you need a multifunction steering wheel?
Control buttons on the steering wheel spokes provide the driver with better control over the road - to switch modes while driving, there is no need to be distracted by the touch display of a multimedia device or standard keys of other devices. At the same time, both hands are constantly on the steering wheel, which plays an important role for safety. In cars with automatic transmission, gear shifting can also be displayed on the multifunction steering wheel. Functional buttons are located on the right and left spokes - to issue any command, just use your thumb.
An example of the layout and purpose of buttons on the left spoke of the multi steering wheel
- Manual mode of automatic transmission - downshift.
- Turn up the volume.
- Search for a radio station back.
- Decrease volume.
- Smartphone (speakerphone).
- Search for a radio station ahead.
- Connecting a microphone, controlling audio system speakers.
An example of the layout and purpose of buttons on the right spoke of the multi steering wheel
- Manual mode of automatic transmission - overdrive.
- Enabling the menu of the head unit (radio, on-board computer).
- Selecting items from the menu.
- Closing the menu.
- Turn off the head unit.
- Selecting a section in the menu.
- Exit/back.
How to remove the steering wheel
It's not difficult to remove. It is enough to study the sequence of events and strictly follow them. The main condition is that the ignition is turned off.
Sequence of actions for removing the old steering wheel
- We insert metal rods into the holes on the sides of the steering wheel and press on them;
- The base of the pillow rises, which makes it possible to carefully remove it;
- After removing the cushion, it is possible to unscrew the central fixing screw using an extension and a bit. The wheelbase is in a straight position;
- After removing the bolt, pull it towards you without any effort;
- Lead the steering wiring through the central hole;
- Remove the fuse (red on the right side) and install it in the center of the circulation device.
The new Lada Vesta multifunction steering wheel is installed in the reverse order.
Audio mode
The audio player window is intuitive. All audio files are played on 6 speakers, the sound of the acoustics is at a decent level. You can adjust the sound using the equalizer (there are 6 pre-programmed settings for Jazz, Rock, Voice, etc.).
It is possible to listen to music via Bluetooth from your phone. One drawback worth noting here is that information about the file being played is not displayed on the MMC screen.
Requirements for MP3 files with constant or variable bitrate:
- 32-320 kbit/s at sampling rates of 32000 Hz, 44100 Hz and 48000 Hz for MPEG-1 Layer 3;
- 16-160 kbit/s at sampling rates of 16000 Hz, 22050 Hz and 24000 Hz for MPEG-2 Layer 3;
- 8-160 kbit/s at sampling rates 8000 Hz and 11025 Hz for MPEG-2.5 Layer 3.
Requirements for WMA files with constant bitrate and bit rate:
10-320 kbps, with variable bitrate and bit rate 32-192 kbps, and sampling rates 8/11.025/16/22.050/32/44.1/48 kHz.
Requirements for WAV files:
8/16/24 bit resolution with 44.1 kHz sampling rate.
Requirements for FLAC files:
with a sampling rate of 44.1 kHz.
Braid
The steering wheel is covered with high quality leather. A leather version of the Lada Vesta steering wheel is installed on luxury and top-end trim levels of the car. This finish looks very elegant, sophisticated, and increases the operating comfort of the steering wheel. In the economical configuration, the steering wheel pad is made of more modest materials. Vesta owners are improving the finishing quality of the control wheel. You can purchase and change the braid yourself. In addition to the finishing itself, the kit contains everything you need for replacement: threads, glue, knife, leather trim, plastic clamps for fixing, instructions. The cover for the Lada Vesta multi steering wheel is selected by color and depends on the interior trim.
Steering wheel for VAZ 2110 and its catalog numbers
- The steering wheel catalog number is 1118-3402010;
- Cover catalog number - 1118-3402050;
- The upper casing has a catalog number - 2110-3403070-30;
- The lower casing has a catalog number - 2110-3403072-30.
Steering wheel kit for VAZ 2110: steering wheel with signal cover, covers
View of the steering wheel of a VAZ 2110 from the back
View of the steering signal contact group on a VAZ 2110 car
Steering wheel catalog number 1118-3402010
Front steering wheel cover
Front steering wheel cover from the back side
Cover number in catalog 1118-3402050
The upper casing has catalog number 2110-3403070-30
The lower casing has catalog number 2110-3403072-30
The lower casing has catalog number 2110-3403072-30
Steering wheel
Signal cover
Assembled steering wheel with all plastic
View of the steering wheel installed on a VAZ 2110 car
View of the steering wheel installed on a VAZ 2110 car
View of the steering wheel installed on a VAZ 2110 car
View of the steering wheel installed on a VAZ 2110 car
View of the steering wheel installed on a VAZ 2110 car
Lada Vesta steering wheel reupholstery
Many owners of basic cars do the reupholstery of the Lada Vesta steering wheel with their own hands. The leather version looks solid.
To install a braid made of high-quality, expensive material, you will first need to remove the steering wheel.
See the sequence of actions above.
- If control keys are present, remove them.
- The braid is applied so that the seams match each other exactly.
- Along with the braid, the set contains clamps. They fix the position of the braid. Mark the position of the recesses.
- Using the knife included in the kit, easily make indentations on the surface. The recess size is 3-4 mm. Same depth. Several such slits are required to remove all the edges of the braid.
- Check the alignment of the joints again.
- Apply the adhesive composition to the back surface of the steering spokes, and in the same area on the inner surface of the leather braid.
- After 5-10 minutes we glue the surfaces. Using the same method, we connect all parts of the leather braid.
- Take a piece of thread from the kit no longer than 80 cm. Wind the thread into the groove of the seam. Thread will be needed to fasten the lower steering parts.
- Then a piece of thread 1-1.3 m long is required. It is needed to sew together the most voluminous section - the upper part from one iron rod to another.
- Use a needle to thread the thread through the holes, removing it to the front surface.
- Burn the ends of the thread with fire.
- Hold the ends of the braid with your hands and adjust the tension with a thread.
- Use a small screwdriver or knitting needle to secure the thread in each stitch of the selected stitch.
- Having stitched to the edge of the second metal rod, secure the thread in the same way.
- When the entire braid is stitched, tuck the edges of the material into the prepared holes.
Do-it-yourself reupholstery is not a complicated, but labor-intensive process that cannot be rushed and requires care.
How to make a heated steering wheel on a Lada Vesta
The need for a heated steering wheel function is especially felt in cold winter weather. The warm surface will warm your hands, which is very pleasant in the cold. To make the steering wheel heated, follow the procedure:
- Remove the steering wheel;
- Use wire as a heating element. You can use copper, chrome. Diameter 0.3-0.4 mm;
- Make a bundle of 4 pieces of wire;
- Make two entrance holes;
- Wrap the wire around the surface of the control wheel (you can only wrap it on its upper part - this will heat up faster and more efficiently);
- Make small slits on the back surface so that the wire threads cut into them and subsequently do not move or unwind;
- Connect the wire harness to the power supply (you can use a sound signal - it is suitable for power);
- Select the heating on/off button;
- Install it on the side from which it is more convenient to press;
- Fold the wiring, install the airbag, install the steering wheel;
- Test the installed function. Normally, after 1.5-3 minutes the surface will not be cold; after another 1.5-2 minutes it will be noticeably warm.
Types of VW Jetta multifunction steering wheel
Today, the manufacturer Volkswagen and other companies that produce original products for VW Jetta cars are ready to offer three types of multifunction steering wheels for purchase and installation:
- Budget class is the most inexpensive steering wheel, which is installed mainly on economy class cars. It has only one button, designed to control the MP3 system. Of course, one function is not enough. They are made from inexpensive material.
- Middle class - installed on mid-level cars. This steering wheel is equipped with many more functions, such as control of the on-board computer, telephone, stability control, speed control, music, and in addition there is a Bluetooth button. They are covered with the highest quality leather. Since the leather itself is poorly processed, the product will quickly become unusable, which is unacceptable for a premium sedan.
- Top class - the name speaks for itself, this steering wheel has many functions to make the driver comfortable while driving. The steering wheel has functions such as speed control, Bluetooth, control of the on-board computer, side mirrors, suspension and many others. Some have seat heating controls. These steering wheels are covered in high quality leather and have wood inserts. Naturally, high-end R-Line is installed on expensive and luxury cars.
However, if you are a sophisticated car enthusiast and want to transform your car from the inside, then the R-Line leather version is what you need . Next, we will look at what types of leather steering wheels there are.
Adjusting the steering wheel of Lada Vesta
Adjustable steering wheel - the ability to choose a comfortable position for the driver. After installing the multi steering wheel, you need to adjust the tilt angle. There is a handle under the steering wheel that needs to be pulled towards you and locked in the middle position. Without using force, find a comfortable position relative to yourself and vertically. After this, set the handle to its initial position.
The Lada Vesta car in the “Lux” and “Comfort Multimedia” configurations is equipped with a steering wheel that can perform several different functions. Vesta received a unique multifunction steering wheel as the first car at AvtoVAZ. This solution is convenient for driving a car. It improves driving comfort. Buyers who decide to purchase an inexpensive car can buy a Lada Vesta multifunction steering wheel separately and connect the “snail” with their own hands.
The main advantage of the multifunction steering wheel on Vesta is its practicality. The multifunction steering wheel buttons, steering wheel music controls and cruise control are in a convenient location. As a result, the driver is less distracted from driving, and music while driving does not interfere with traffic safety.
Varieties
How to make a multifunction steering wheel with your own hands? To answer this question, you must first understand what type of rudders these are. In fact, there are only two main varieties:
- The buttons are located in the rim;
- The buttons are located in the center.
These are the main layout options. To choose a specific method, you need to take into account your preferences, as well as the availability of a suitable steering wheel for the conversion. Also immediately imagine what you would like to connect to such control. Please note that the more devices you connect to the steering wheel, the more difficult it will be to make a normal control panel.
Multifunction steering wheel buttons on Vesta
Additional buttons on the steering wheel of the Lada Vesta make it possible to control the music system and cruise control. The music on the steering wheel is controlled by buttons located to the left and right of the horn button. On the left there is a cruise control unit that allows you to perform the following actions:
- Enable – disable cruise control.
- Speed limit - on and off.
- Increase or decrease cruise control speed.
- Suspension of cruise control, speed limit.
- Setting the stored speed.
Lada Vesta is the first AvtoVAZ car to have a multifunction steering wheel installed.
The music unit is located on the right side of the steering wheel, and can allow manipulation, including downloading music from the steering wheel. Although this is a joke, there is no such function...
- Select the playback source - music while driving.
- Mute. The multifunction steering wheel buttons allow you to quickly turn off music playback, and then turn it back on at the same volume as it was.
- Navigation through the music menu.
- Receive a call from your phone, hang up the call.
- Adjust the volume – loud music while driving is not always useful, so you can turn the volume down or up.
- Switch music tracks. When music is playing, the girl driving, especially the blonde one, can easily turn on a different song.
In addition to the listed functions, the Vesta multifunction steering wheel has a built-in airbag. There is also a standard beep. Unfortunately, you won’t be able to download music while driving on Vesta. Such a function is not provided here.
How to make a multifunction steering wheel for a VAZ 2110 (music control)
The question “how to control the radio on the steering wheel of a VAZ 2110” can be approached from different angles. Simply attach the remote control to the steering wheel rim or install it inside the steering wheel. In addition, you can modify the remote control for better signal response. Let's look at how to make a VAZ 2110 multifunction steering wheel with your own hands.
If you don’t have a multi-function steering wheel, then controlling music inside the car is not very convenient; you have to take your eyes off the road to reach the radio with your hand. Of course, many people can switch the music or turn up the volume by touch, but this article is not about them?
To make a simple multifunction steering wheel that will only have radio control buttons, you need a remote control.
It doesn’t matter which one, the remote control that came with the radio or a purchased universal remote control, the meaning of installing it is still the same.
The operating principle of the audio remote control is similar to the TV remote control. That is, an IR signal receiver is installed on the radio, and an IR LED is installed on the remote control, which sends this IR signal.
Accordingly, the problems are the same:
- The IR LED on the remote control should be aimed approximately towards the receiver
- Change batteries in the remote control
For convenient and trouble-free use of such a multi-function steering wheel, you need to take into account these 2 important points when installing the remote control for the radio in the steering wheel.
It would probably be stupid to switch the music while turning, so it’s worth considering controlling the car radio with the steering wheel in a straight position.
Refinement of the car radio remote control
Make the IR signal of the remote control better
, Can:
- Inside the remote control itself, just bend it towards the radio
- Install IR LEDs of higher power (diameter), for example from TV
- Replace the IR signal amplifier transistor with a more powerful one
- Move the IR LEDs from the remote control using wires to a place more convenient for signal transmission
- Install additional IR LEDs
Installing the radio remote control in the steering wheel of a VAZ 2110
The easiest way to do
radio control on the VAZ 2110 steering wheel
This is to install the remote control on the steering wheel rim using the standard mount from the kit or using a special bracket. Such a remote control will work, but not everyone is satisfied with the quality of the buttons. Switching melodies and adjusting the volume from the steering wheel remote control does not always happen.
In addition, some still want to build the radio remote control into the steering wheel.
The placement of the remote control itself in the steering wheel of the ten immediately raises the question “Where?” Indeed, there are dozens of places in the steering wheel for placing radio control buttons.
However, there are still ways:
Installing radio control buttons with steering wheel pad
:
You will need:
- Plastic trim (for example, a pillar between the windshield and the door)
- Microswitches (buttons)
- Wiring
- Bread board
- Tester, multimeter
- Soldering iron
Connecting the buttons:
- We disassemble the remote control and see pads with two contacts under the buttons.
- We call all the contacts and look for common ones using the tester, for example it turned out like this:
- Volume Up 1 and 5, Volume Down 1 and 3, LEFT 2 and 3, RIGHT 4 and 2..
- We solder the wires to these contacts, and then glue them so that they do not fall off over time
- We solder the buttons to the board and connect the found common contacts and solder the wiring from the remote control to what we got.
- We check the work.
Making a housing for the buttons: You can make a cover from any suitable material, for example from a cover on a stand.
We cut holes in the cover to the size of the standard rubber buttons on the remote control and insert them.
Fixed the remote control board on the back side with glue
It turns out that the rubber buttons press on the switches (purchased), and they close the contacts.
Place the assembled trim on the steering wheel.
In addition to this fairly simple method, there is another method to make controlling music in the car more convenient. Chinese products:
Modification of the VAZ 2110 steering wheel, installation of music control panel buttons
:
Required:
- Magnetic panels (2 pieces on the radio market)
- LEDs and resistors
- Wires
- Stationery knife
- Epoxy adhesive
- putty
- Vinyl film (carbon)
- Soldering iron
Remove the buttons from the remote control that you are going to install in the steering wheel.
We cut holes in the steering wheel for the buttons and use epoxy and putty to make platforms.
We grind and smooth the whole thing, adjust it to size all the time, etc.
The process is quite long and takes more than one day.
After that, I covered the steering wheel parts with vinyl film.
I illuminated the radio control buttons using an additional ring, along which I swiped “+”.
This ring is approximately the same as for the signal. I attached two antennae (to ensure better contact between the rubbing parts) on the steering column casing, which are adjacent to this ring. Afterwards I lubricated everything with lithol.
“Minus” was taken from the signal.
The entire structure is prefabricated/dismountable, so that if something breaks, it can be easily replaced.
Installing a radio remote control in the steering wheel of a LADA Kalina
Dozens of people use a Kalina steering wheel, so I’m showing how you can modernize a Kalina steering wheel in terms of installing buttons in the central part of the steering wheel.
Unlike the VAZ 2110 steering wheel, the Kalina steering wheel has a lot of space where you can install the remote control buttons.
Let's disassemble the remote control.
We remove the central part of the Kalina steering wheel. It is held on by 4 pistons. Just gently pull the central steering wheel pad towards you.
Next, cut out holes in the steering wheel trim for the remote control buttons. This can be done with a utility knife, or you can drill holes with a drill and finish it with a file. If you have a joystick, then an even circle can be cut out with a double-edged compass from the front side (if the edges on the inside are not straight)
We insert the rubber buttons of the remote control into the steering wheel. Now, when you press the buttons on the remote control, a signal will be triggered (at the highest points it should not be triggered), so the signal in the part of the steering wheel where the buttons are installed must be turned off. To do this, remove the top part of the button, 4 latches at the bottom, and apply electrical tape to the signal contact points on the remote control side. Now the signal in this part of the steering wheel will not work.
If you place the radio control buttons as close to the steering wheel rim as possible, you will have to remove the upper springs.
We connect and secure our structure inside the steering wheel
It should be taken into account that batteries quickly run out at sub-zero temperatures, so it is better to take them to a place convenient for subsequent replacement.
Pioneer steering wheel with remote control. The control unit is divided into left and right parts.
Here is an example of a steering wheel with a radio control panel, as one unit.
Another example of a Kalina steering wheel with buttons, only the buttons are on the right side.
buy a button control panel (pioneer) in online stores (accessories category). The price of a pioneer button control panel is about 1100 rubles.
Conclusion
Steering wheel with radio remote control
the thing is very convenient. Do not forget that such modification of the steering wheel also increases your safety on the road, because now you will not need to be distracted to adjust the radio.
If you don’t like the appearance of the steering wheel after installing the remote control with standard mounts on the rim or the quality of the signal response is not as good as you would like, then you can mount the remote control into the steering wheel or install the IR LED in a more suitable place.
If your radio does not support IR remote controls, then you can run wires from the buttons on the steering wheel to the radio, following the example of a heated steering wheel. By the way, the multifunction steering wheel also implies the installation of cruise control.
| Does a Russian car need a multifunction steering wheel? |
Photo source:
Keywords:
xn--2111-43da1a8c.xn--p1ai
How to install multifunction steering wheel on Vesta
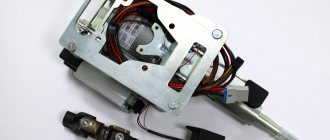
In addition to the steering wheel itself, you will need several small elements:
- A special blue mini-ISO connector labeled C3.
- The contact connector for the snail is BLS.
- 5 pieces of wire 3 meters long with a cross-sectional diameter of 0.5 mm. But it’s better to buy a ready-made wiring harness so that connecting the multifunction steering wheel is convenient.
Tools and materials required to connect the multifunction steering wheel to the radio:
- Insulating tape.
- Several types of screwdrivers, nails and knitting needles. Such a tool may be required to remove the airbag.
- Torx bit T50 (TORX). The multifunction steering wheel is secured with a bolt with the same type and size of head. It is difficult to unscrew the bolt with another wrench.
Installing a multifunction steering wheel on Vesta “Lux” configuration is more convenient. It has wires for connecting the cruise control system, a “snail” (a switch under the steering wheel with wires for the buttons). This is easy to check. You need to remove the top half of the steering wheel cover and see what's there.
You can install the multifunction steering wheel on Vesta only with the ignition switch turned off. In addition, it is recommended to disconnect the negative cable from the battery. Otherwise, you risk short circuiting the wiring.
How to install Vesta multifunction steering wheel of other configurations
In simple configurations of the Lada Vesta, the design will have to be modified more. You will have to connect the cruise control system yourself, as this is not provided in the packages. Additionally, you will need a set of three wires with a snail.
The Lada Vesta multi-steering wheel in such cases is installed in the following order:
- Remove the regular steering wheel from the car.
- Install the new Vesta multifunction steering wheel, being careful.
- Route the wiring harness.
- Connect it to the connector. All operations are carried out by analogy, as in the “Lux” configuration.
The three-wire harness is pulled through the technological hole, which is located above the pedals. The harness is routed to the electronic control unit. The electrical connection of the multifunction steering wheel must be made according to the diagram shown below.
Contact No. 11 of the block should receive 12 volts. Check this parameter using a voltmeter or multimeter.
The second end of the wiring harness is inserted into the block to connect the multi-steering wheel snail. This end of the harness runs along with the radio wiring.
How to connect to the “Lux” package
Connecting the multifunction steering wheel in the luxury version of Vesta is more convenient. This configuration is distinguished by the presence of gray wires in the existing wiring harnesses.
The steering wheel of the Lada Vesta is secured with great force, so it is recommended to remove it by rocking it to the sides, being careful.
The cochlea is connected in the following order:
- There are special holes on the sides of the steering wheel. Insert the rods into them and press.
- In this case, the airbag unit should rise. Pull it out, being careful not to damage the elements of the block.
- Disconnect all wires and remove the steering wheel. To do this, unscrew the central bolt and pull the steering wheel towards you. When pulling out the steering wheel, make sure that the wires pass through the hub hole and are not damaged.
- Installation is carried out in the reverse order of operations.
How to connect the multifunction steering wheel to the radio
The connection procedure is as follows:
- First, find the gray wires.
- Connect them to the steering wheel connector. This will enable the cruise control system to operate.
- Connection to the radio is made by adding 5 wires to the existing connector block using BLS terminals. The second end of the harness is equipped with a mini-ISO connector. It will be inserted into the radio socket.
Multi steering wheel diagram
The wiring harness must be connected according to the following diagram:
Now you need to check how the multifunction steering wheel works. The connection diagram must correspond to the indicated image. Then you need to carefully install the airbag. You can find out how to connect the multifunction steering wheel to the radio from the official repair manual for the car. A detailed description of the process is given there. As a result, the buttons should act according to the specified designations.
The multi-steering wheel Vesta sedan can be supplied from the factory in a hatchback or station wagon body. A feature of the circuit is that after its installation, the indication of cruise control operation may not work. The light on the instrument panel will not light up. This can be fixed by updating the unit's firmware. The cost of such work from an official dealer is about 500 rubles. In other services, the price of firmware may differ up or down.
To view the diagram in more detail on a large scale, download it and open it separately on your computer. To do this, right-click on the image and select “Save Image As”. Then select a save location, such as Desktop, and click Save. The Vesta multifunction steering wheel diagram will be saved as a separate image file.
How much does a multifunction steering wheel cost on a Lada Vesta?
The cost of such a mini steering wheel for Lada Vesta in different online stores may vary. You should be aware that the multifunction steering wheel, the price of which is from 5.5 to 6.5 thousand rubles, can be with or without an airbag. For this you will have to pay an extra couple of thousand rubles. If you want to reupholster the steering wheel with genuine leather, it will cost an additional 2 thousand rubles. You can buy the Lada Vesta multifunction steering wheel in many online stores, as well as in large auto markets.
If buying a multifunction steering wheel is an expensive pleasure for you, then an alternative option would be to install an overlay with buttons. Such a device is cheaper, but connecting a pseudo multifunction steering wheel to the radio will be difficult. Therefore, it is easier to buy a Vesta multifunction steering wheel than to install and connect the buttons yourself. By the way, if you decide to buy a multifunction steering wheel for Vesta, then write down the article number - 8450006832. This will make it easier to search in catalogs.
Firmware MMS Lada Vesta
Not all owners are suitable for the functions of the standard radio. To change some characteristics, the multimedia system of the Lada Vesta is reflashed. With the help of special software, drivers strive to expand and improve the functionality of the MMS so that they can:
- watch video while the car is moving;
- change menu design;
- display information from the on-board computer;
- expand the number of playable video formats;
- change the navigation system.
To flash the firmware, you can come to a car repair shop, order a set of programs from the developer and update the system manually or download installation files from the Internet. The last method is the cheapest, but there is a risk of downloading broken files. An attempt to read them will lead to incorrect operation or damage to the radio.
Step-by-step instructions for self-flashing from SD media:
- Write the software installation files to the media in unzipped form.
- Insert the SD media into the device and turn it on.
- Press “i” on the screen.
- In the window that opens, you need to activate four dots located in the corners of the rectangle with information. The top left corner is pressed first and then clockwise. Another menu will open.
- Sequentially press the Software, SW Upgrade, Upgrade buttons.
- Select Update OS.
The flashing scheme is given in general form; it may differ for different software developers. During the update, do not turn off the car or otherwise disconnect the radio from power. During the software rewrite process, the device will automatically reboot several times.
Needed or not
You can buy a multifunction steering wheel and install it on your Lada Vesta yourself. This will make your car much more comfortable and convenient. You don't have to reach for the stereo to change the song or adjust the cruise control. The difficult part in installing the multifunction steering wheel is strict adherence to the wiring diagram.
If your Vesta is not “Lux”, but a regular package, and there are no gray wires in it, then the likelihood of mixing up the connection is greater. Therefore, be more careful when connecting the Vesta multifunction steering wheel.
2 din connection via ISO connector
The connection diagram for a Chinese 2 din radio is described in detail in the operating instructions supplied with it from the manufacturer. To facilitate installation work, on the back panel of the player, as a rule, there is the necessary marking of all components and connections. Mostly, the difficulties for car enthusiasts who are faced with the installation of a standard or non-standard radio for the first time are caused by the correct connection of the car's electrical wiring to the receiver.
All work on connecting the car radio is carried out through the ISO connector, which consists of two plug boxes - A and B (each contains eight contact connections) or one combined box, where A is the plug for the power connections of the radio, B is responsible for the car acoustics.
The standard wire connection diagram (pinout) is as follows.
- Connector A. 1, 2 and 3 pins are not used.
- 4 - yellow power cable going to the car battery;
- 5 - blue wire, amplifiers and external antenna;
- 6 — orange cable, backlight;
- 7 - red - ignition;
- 6 - black. Weight.
- Block B. Everything here is also quite simple.
- Contacts 1 and 2 - purple, purple-black wire. Plus and minus of the right rear speaker (speakers);
- 3, 4. Gray. Gray-black. Plus or minus the front right column;
- 5, 6. White. White-black wire. Front left plus or minus;
- 7 and 8. Green and green-black wire. Rear left positive and negative contact.
When connecting a car radio, it is very important not to mix up the contact groups of wires. Since the sound quality of your equipment depends on them
And often the safety of the equipment itself.