The windshield of a car is replaced if it becomes scratched, scuffed or cracked. The process is not complicated, but requires knowledge of certain skills. Replacement of fixed body glazing for all Lada cars (Granta, Priora, Largus, Kalina, Niva 4x4, Vesta or XRAY) and foreign cars is similar, the only difference is in the requirements for glue.
Removing the windshield
You will need : a piece of string.
Procedure:
_x000D_
- _x000D_
- We place the string behind the edge of the glass and cut off part of the sealant, moving from side to side (with an assistant). _x000D_
- We pull one end of the string inside the cabin and continue to cut off the sealant around the perimeter of the windshield. _x000D_
- We remove the glass from the car. _x000D_
_x000D_
Place the string behind the edge of the glass and cut off part of the sealant. Pull one end of the string into the interior. Remove the windshield from the Lada car.
Windshield Installation
You will need : a sharp knife, a repair kit for gluing the windshield (read the instructions), a glue gun, a heated room (recommended air temperature 23°C, humidity 50%).
Procedure:
_x000D_
- _x000D_
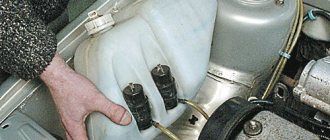
- We remove the remaining sealant; the permissible residual thickness at the seam is no more than 2 mm. _x000D_
- We degrease the painted edges of the windshield with an activator. _x000D_
- Degrease the edges of the body opening. _x000D_
_x000D_
We remove the remaining sealant from the body. We degrease the painted edges of the windshield with an activator. We degrease the edges of the body opening.
_x000D_
- _x000D_
- Apply glue around the perimeter of the glass, retreating 8-10 mm from the edge. The height of the layer should be 10-12 mm and the width no more than 8 mm. _x000D_
- We place the glass in the body opening using suction cups. There should be even gaps between the side edges of the glass. _x000D_
- Install the wedges from below so that the upper edge is pressed against the front side of the body roof. We press the glass to the body. _x000D_
_x000D_
Apply glue around the perimeter of the windshield Place the windshield in the body opening and install wedges at the bottom of the glass
To prevent the glass from “sliding down”, secure it with three pieces of adhesive tape to the body 250 - 300 mm long.
The entire process (removing and installing the windshield) is also shown in the video:
Stick madeleine (anti-creaking) on the glass seals
Another way to prevent scratches on Vesta glass is to stick madeleine on the seals. We cut the strips and glue them, retreating 1-2 mm from the top of the internal seal, as shown in the photo (do not forget to clean and degrease the surface):
We modify the outer glass seal in the same way. We glue the top part flush with the factory one, and place the bottom 3 mm below the velvet on the plastic so that the glass does not lift up the madeline when lifted.
From the fall of 2022, scratches on glass are not covered by warranty (information letter No. 76-17).
Categories of products that may be of interest to you based on the article “If the seals scratch the glass (there are squeaks) on Lada Vesta, Granta, Kalina”:
How does heated glass work?
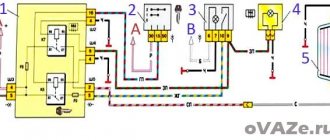
- Buttons distribute air flow.
- Starting the air conditioner.
- Air recirculation mode (intake from the cabin or outside).
- Temperature setting.
Vesta's heated windshield is similar in design to other cars. Its button is indicated in the picture in the center and surrounded by a red circle.
This system consists of several parts:
- switch in the cabin;
- in expensive versions of Vesta, a “Defrost Max” button is installed, which, together with heating, activates the air conditioner and maximum air pressure;
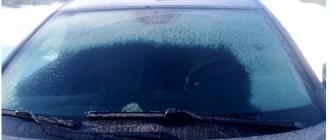
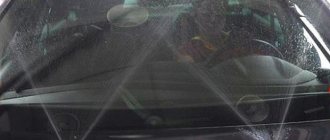
- heating filaments inside the windshield, they can only be seen in the sun;
- electrical wiring, relay, fuse link are located under the front panel.
Defrost Max button on the Lada Vesta “Lux” configuration
The “Defrost Max” button activates a relay that supplies current to the filament. As a result, the windshield heats up and thaws away ice and snow.
The system is configured in such a way that after a while the automation turns off the power so as not to waste extra energy.
How to turn on the heated glass on Vesta
There is no separate heating button on regular Vesta trim levels. The heated front window starts working from one button, which is responsible for heating the rear window and side mirrors.
The operation of the system depends on the ambient temperature. If the temperature outside is down to -10 degrees, then heating will quickly melt the icing on the glass. But if it gets colder, the efficiency decreases noticeably. The greater the temperature difference between the cabin and the outside air, the less power the windshield heating is turned on. This is done to prevent the glass from breaking.
To speed up the process of defrosting the windshield, additionally turn on the heater at the highest blowing speed. To prevent fogging, turn on the air conditioner additionally.
Attention! Do not rush to turn on the wipers - they may fail if they do not have time to thaw. Wait until the snow starts rolling down the glass, then you can turn them on.
What do the inscriptions on the glass mean - decoding
Special markings on the windows for Vesta will help you determine whether you have received the correct copy. This marking is divided into several types. The first one shows the name of the manufacturer, then comes the one that indicates which body type the part is suitable for:
- SD – sedan;
- UN – universal;
- HB – five-door hatchback;
- KP – coupe;
- GR - truck;
- VN – SUV;
- KB – convertible;
- PIC – pickup truck.
*D is the designation of the number of doors. For example, 4D is a sedan, 5D is a five-door hatchback.
This is followed by the series designation – SER.
- LVRUL - left-hand drive car;
- PRUL - right-hand drive car.
Next comes the color (shade) of the glass and sun protection coating:
- ZL – green (ZLZL – additionally with a green stripe; ZLGL – additionally with a blue stripe);
- SR - gray;
- PR – transparent (PRGL – additionally with a blue stripe; PRZL – additionally with a green stripe);
- BR – bronze;
- GL – blue;
- PR – dark.
- DD – rain sensor;
- TRIPL – triplex (three layers);
- OTKR – opening;
- DV – double;
- ST PAK – double-glazed window;
- EO – electric heating (heating);
- B/EO – without heating;
- STOP – installation of a brake light on the rear transparent shield;
- DZ – fog sensor.
The following designations may appear:
- Tinted – green athermal glass, additionally – heat-absorbing property;
- Lamisafe – multi-layer.
The manufacturer does not always indicate all the details in the labeling, but he must indicate the type of glass, additional functions and equipment.
If the heated windshield does not work
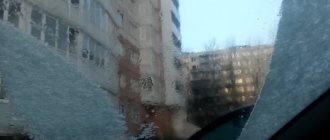
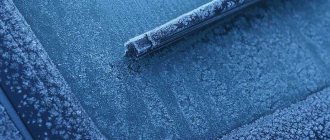
The effect of the option can be observed in cold weather with frozen glass. If after several minutes you do not see the result, then the glass heating is not working.
The Lada Vesta may have the following causes of malfunction:
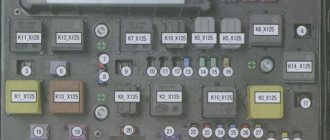
- The fuse has blown . Check the integrity of the fuse by its number and location according to the manual. Typically this is a 60 amp fuse number F75. If it is faulty, you will have to replace it with a new one.
- Individual sections of the filament have burned out . It happens that heating does not work completely, but in separate areas. At the same time, you can see on the glass where heating occurs and where it does not. In this case, the windshield will need to be replaced. But many drivers are in no hurry to do this. It's better to drive without heating than to pay for expensive glass. After all, there are no cracks, and nothing interferes with driving the car.
Basic faults
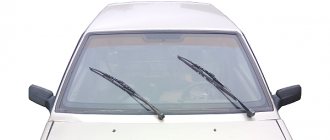
The first important malfunction is the incompatibility of the windshield with the windshield wipers. The standard wipers managed to cause a lot of trouble for the owners of the first Vestas.
- Firstly, they are quite short for a large transparent shield and do not cover its entire area, but only part of it.
- Secondly, the rubber on the wipers quickly hardens in sub-zero temperatures, which is why the area of contact with the windshield is sharply reduced to a minimum - the effectiveness of such work is extremely low.
The second problem is scratches on the side windows. The seals on the doors are very tight against the windows. When grains of sand, ordinary dust and dirt appear between them, vertical scratches appear on the sides. Replacing and slightly modifying the rubber seals on the doors can save you from this.
The problem with the windshield is not only due to chipping. If you hear a squeaking sound from the front, the culprit may be the upper rubber seal. If the interior seal is broken, the windshield will have to be replaced.
Which Vestas are heated?
The basic configuration is not equipped with this function. You will find Vesta's heated windshield starting with the "Comfort" version. The minimum price of such a car is 592,000 rubles, and it is constantly being adjusted. Compared to the basic configuration, the difference in cost is about 75 thousand rubles.
If you need this function, but don’t have enough money for an expensive package, you can do it differently. You can install the option after purchasing the car. It will be much cheaper, especially if you install it yourself.
The “luxury” configuration will have “Defrost Max” - the button discussed above. It simultaneously connects rear and front heating, as well as heated side mirrors, air conditioning and air supply.
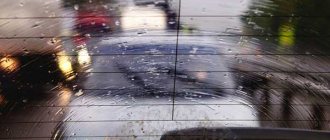
Probably everyone knows the morning winter symphonies of various sounds in the courtyards. First, the wipers break the snow crust and rake tons of snow with iron shovels, and then the sounds are born, thanks to other wipers - the ones that are stuck to the windshields of most cars parked in the yard. This is especially true when the temperature fluctuates near zero and the thawed water on car windows turns into ice. Until recently, this was the only method to prepare a car windshield for driving in the cold season.
Fortunately, engineers from automobile companies noticed this problem not long ago and provided an excellent way out of it - a heated windshield. This technology did not pass by the new Lada Vesta cars. In this article, we will look in detail at the question of how to turn on the heated windshield on Vesta, and also find out in which trim levels this option can be found.
1 — air flow distribution buttons, 2 — air conditioning button, 3 — recirculation mode button, 4 — air temperature adjustment handle.
Lada Vesta body parts
Products from the Dustershop77 range on the topic of the article:
| Name | Manufacturer | Price | Availability | Add to cart |
| V114-1420501 / LVE112802 | Radiator grill LADA Vesta (Luxe, Exclusive) | Pt GROUP | 9900 / 8600 rub. Discount: 5100 rub. | 1 |
| DC1266-8200257684 | Duster 10 - wing turn signal (L=R) original 8200257684 | Original | 600 / 400 rub. Discount: 300 rub. | 1 |
| V115-1430501-LVE112801 | Radiator grille LADA Vesta (Classic, Comfort) | Pt GROUP | 12000 / 10300 rub. Discount: 6600 rub. | 1 |
| V116-1500505 | Radiator grille LADA Xray | Pt GROUP | 7500 / 7000 rub. Discount: 4900 rub. | 1 |
| DC177-8200733848-BLACK | Internal handle left original 8200733848 black | Original | 1200 / 800 rub. Discount: 700 rub. | 2 |
| DC1715-489702120R | Steering column adjustment knob Renault Duster, Logan, Sandero, Lada Vesta, X-Ray original 489702120R | Original | 1500 / 1300 rub. Discount: 1000 rub. | 1 |
| DC2165-8200194580 | Duster 2011 - wing turn signal (L=R) original 8200194580 | Original | 550 / 400 rub. Discount: 300 rub. | 1 |
| DC1926-8450039478 | Plug for rear left outer door handle Vesta 8450039478 original | Original | 100 / 70 rub. Discount: 50 rub. | 2 |
How does the heated windshield work on Vesta?
The windshield heating device on the Lada Vesta is no different from similar installations on other cars. This node can be divided into several elements:
- A switch located inside the car.
- In expensive Vesta configurations there is a “Defrost MAX” button, which, in combination with heating, turns on the air conditioning and maximum heater fan speed.
- Transparent filaments located inside the windshield (between the layers). They directly carry out heating. If you carefully examine the glass in sunny weather or take a photo, you can see them.
- Wires, fuse and relay located under the dashboard.
When you press the button, the relay closes the “plus” to the contact of the grid of incandescent filaments, after which the windshield is heated by current. After some time, the electronic control unit automatically turns off the heating to avoid unnecessary energy consumption.
Activating hidden functions
DDT4all software is used, which transmits information from control units. Synchronization occurs when ELM327 is connected. This is a small adapter designed to work with the car system. Connection is made via Bluetooth or USB.
What is necessary
To scan a car you must perform the following operations:
- Python 2.7 and PyQt4 are installed (32/64 depending on the version of Python, depending on the version of Windows);
- install DDT4ALL (the program is constantly improving), unpack it to drive “C” in Python27\Scripts\ddt4all;
- install the latest DDT database and unpack it into the program installation folder;
- run ddt4all.py on the command line;
- In the main window, click search; after scanning is completed, blocks will be displayed on the left.
To install the software database, copy the special “ecus” directory from your database and move it to the root of the source code tree. After this, ddt4all.py is launched.
Connection and preparation for use
- You need to install DDT4ALL software on your computer, and connect the ELM327 transmitter to your car. In Vesta, the connector is located on the driver's side, closer to the door. It is located at the bottom of the dashboard.
- After starting the program, you need to select the COM port if the connection is via Bluetooth.
- Click “Connect”, after which a new window will open, where you need to click “Scan blocks” (button with a magnifying glass) and in the window that opens click “CAN”. You must wait while the program scans.
- After this, the blocks on the left side of the window are highlighted in green; below there will be a “Screens” menu, where the necessary actions are selected individually.
- Then, after selecting the required parameters, click the button with the image of Einstein on the top left (Expert mode) and click “Send”.
Launching the DDT4ALL program and working with it
Depending on the operating system, the application starts as follows:
- Application. Open “File” and click “Zip database”. Next you need to remove “ecus”.
- Terminal. Run “python parameters.py”, go to “zipconvert”. After that, move or delete "ecus".
- Linux. Write "python ddt4all.py".
- Windows. Run the file DDT4ALL.BAT.
Having written the “DDT2000 XML” file in the “JSON” format, it can then be edited. You can also create your own windows in the software, which will display ECU parameters.
How to use heating correctly
Unfortunately, the heated windshield of a Lada Vesta does not provide adaptability to the ambient temperature. Therefore, defrosting time varies depending on weather conditions. As the practice of using Lada Vesta cars shows, at temperatures just below zero, the snow begins to “slide” within 3 minutes. At -20 degrees, you can wipe off the thawed snow with your wipers in 5-10 minutes. At lower temperatures, the heating time will correspondingly increase.
Thanks for subscribing!
In order to significantly reduce the heating time, simultaneously with heating, turn on the stove fan to maximum power. To prevent the windows from fogging up, it is also recommended to turn on the air conditioning. Do not rush to use the wipers under any circumstances - if you turn them on too early, the wiper drive mechanisms may be damaged. Wait for the snow to move and then turn on the wipers.
Generator: Valeo brand, made in Türkiye
The generator of the same French brand Valeo, but already made in Turkey, confused us at first - instead of the usual orange transformer varnish, the windings are covered with protection that is not uniform in color. However, as they say, “the speed should not be affected.” But we consider the fact that the terminals from the winding were not soldered, but simply crimped, to be a disadvantage. Not durable.
In addition, dismantling the component (replacement) is extremely difficult due to its location. The generator is clamped by the air conditioning compressor from below and its tubes - from the end and from the top, and from the belt drive side, as well as the tension roller, by the wall of the engine compartment. As a result, when replacing the generator, you will have to remove the air conditioning compressor (if there is one, of course).
Which Vesta configurations include heated car glass?
Unfortunately, in the basic configuration of the Lada Vesta, you are unlikely to find such an option as a heated windshield. The minimum configuration that includes heating is Comfort. The cost of Vesta with a set of Comfort options is at least 592,000 rubles (at the end of March 2022). If you compare it with the base, the difference in price is a little more than 75,000 rubles.
If you fundamentally need this option, but there is no way to overpay almost a hundred thousand rubles, then you can install a heated windshield on your car in the future - it will cost much less, especially if you do this work yourself.
In Luxe trim levels you will receive the “Defrost MAX” button, which was already mentioned above. This button comprehensively launches all possible systems to speed up the heating of all windows and side mirrors of the car.