Good visibility is essential for safe vehicle operation. In the autumn-winter period, changes in air temperature cause the windows to fog up, and visibility through them deteriorates. The issue of glass transparency is especially relevant at night, when visibility is already poor.
An effective way to combat fogging of car windows is to heat them. The windshield is usually heated by directed flows of warm air. The rear window and door mirrors are usually heated electrically. Conductive tracks made of high-resistivity metal in the form of thin ribbons are applied to the surface of the glass on the side of the car interior. When electric current passes through them, thermal energy is released. The glass heats up and the water evaporates. After a few minutes the glass becomes transparent.
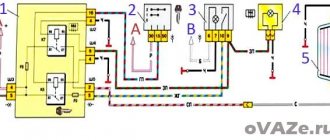
Design of the rear window heating system
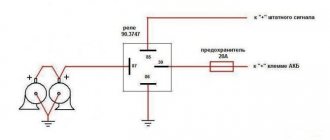
The system that helps clear the rear window of ice, snow or fog is not very complicated in design. The electrical circuit in general terms can be depicted as follows:
- C - generator.
- E230 - OZS system switch.
- J519 - on-board electrical network control unit.
- Z1 - heating element of the OZS system.
Although there may be some differences in different car models, nevertheless, if we consider it in detail, then in principle it includes the following main elements.
- Mounting block.
- Ignition switch.
- Heating switch ZS.
- Indicator lamp signaling the activation of the OZS.
- Heating element of the OZS system.
K6 - additional relay. K7 - OZS switching relay. A - connection to power systems.
In addition, the system has fuses, terminals and wires that connect all elements into a single whole.
When the ignition key is turned, the OZS is turned on by pressing a button, to which power is supplied through an additional relay K6. At the same time, the rear window heating relay K7 is activated, the heating element is connected and at the same time the control light comes on.
The design of the heating element on the rear window may also vary. In the standard version, it is a mesh of thin metal nickel threads, which are connected by two conductive busbars located on opposite sides. On one side, a 12V current is supplied to the bus, and on the other, the bus is shorted to ground. Such devices are attached to the glass using special glue.
On some car models, the heating element is applied to the glass using spraying, for example, aluminum. A thin film with good light transmission is attached on top of this coating using glue that conducts current.
Troubleshooting in the OZS system
If you find signs that the rear window heating is not working, you must carefully check the entire electrical circuit of the vehicle's EOS system.
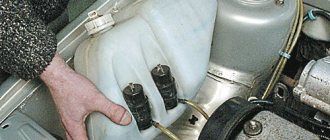
The first thing to check is the serviceability of the fuses. So, for example, on a VAZ-2110 these are rear window heating fuses F4 and F7, which are located in the mounting block. Their malfunction may occur due to a factory defect, short circuit or voltage surge in the on-board network. The faulty fuse needs to be replaced, for which it must be removed from the mounting block.
Next, you need to check the terminal connections in the OZS system. When operating a vehicle, all equipment is subject to strong vibrations. As a result, the contacts may be damaged or a terminal may become disconnected or loose.
The heated rear window relay must also be checked. Breakdown of the relay is possible when the wire in the working coil of this part breaks or due to burnt contacts, due to a manufacturing defect or short circuit. To check it, the relay must be removed and checked using a tester. If this part malfunctions, it needs to be replaced with a working spare part.
You should also check the rear window heating contact. A conductive element is attached to the rear window using glue, which is a contact to which an electric current is supplied through a wire, which is transmitted through this contact to the heating filaments.
In this place, the wiring may break or, due to the fact that the glue was of poor quality, the contact element may peel off from the glass.
Quite often, the failure of the rear window heating is caused by a break or damage to the threads in the heating element on the rear window. This is detected by visual inspection or instrumental analysis. Visually, only obvious damage to the thread can be detected by identifying a gap between the damaged ends.
It is possible that during some repair work on the car, mechanical damage was caused to the surface of the glass on which the heating element is attached using glue.
However, the main tool for diagnosing this malfunction is a voltmeter or ohmmeter.
They allow you to accurately identify an area with faulty threads, even if this break cannot be visually detected.
Signs of breakdown
You can understand that there are problems with heating by the following signs:
- The glass begins to sweat when the warning light does not work. The first thing you need to do is check what voltage and serviceability of the fuses
- The glass does not heat up when the control lamp is on. The reason may be due to lack of voltage
- Condensation appears in some places; this may be due to a broken thread. Can be restored through repairs, special varnishes
- Defrosting does not occur even though the system is working properly. This can happen if the glass is heavily iced and there is not enough voltage; you need to clean the ice yourself.
There can be many reasons for the breakdown, ranging from the switch to the wiring itself, which can only be repaired by disassembling the entire dashboard.
If the reason is a broken thread, you can try to restore it. There are many different ways to solve this problem, which look like this:
- To eliminate a break, up to one millimeter, you need to prepare a special adhesive composition, for example (Kontaktol, Elekont), a syringe, or a glass cleaner. Special glue is applied to the area where there is a break, and insulating tape is tightly applied on both sides.
- You can use soft soldering or resort to the option of galvanic application of the material. But this procedure is labor-intensive and difficult to carry out in garage conditions.
- If the width of the gap exceeds two millimeters, you need to use a tinned copper core with a cross-section of 0.2 millimeters. It is better to perform soldering with POS-61 solder, but do not tinning the thread.
This is interesting: Basic methods for replacing a license plate light bulb on a car
The procedure for repairing a faulty OZS system
Having determined the reason why the rear window heating does not work, you can begin to repair this system.
- If the fuses or relays of the OSZ system are faulty, then the faulty parts must be removed. Replacing them with new, functional ones is not difficult. The main thing is that they are installed as indicated by the on-board electrical system diagram.
- In the case where the culprit of the damage in the OZS system is the terminal connection, restoring the heated rear window is also not difficult. It is enough to clean the contacts in the terminals. The terminal box may need to be replaced, but this will not take much time either.
- If the glue that was used to attach the contact on the rear window turned out to be of poor quality and peeling occurred, then in this case you need to buy a new high-quality conductive glue. Remove the layer of old glue from the peeled contact using a napkin with an alcohol solution. Then apply a layer of new connector and glue the contact in place.
Purpose and design
The purpose of the rear window heater can be judged by the very name of the system - by heating it fights condensation that settles on the surface, the cause of which is the difference in temperature in the cabin and outside.
In the autumn-spring period, this condensation causes “fogging” (a water film is formed, which greatly limits visibility), and in winter it turns into ice and frost, through which it is generally impossible to see what is happening behind.
As for the side mirrors, they are located outside and should not “fog up” or freeze, since there is no temperature difference as such. But there are other reasons why a water film and frost form on the surface of the mirror, reducing visibility.
The design of any heater is very simple, and on all cars they are built according to the same principle. If we consider only the rear window, its heating system includes:
- Conductive threads and busbars applied to a transparent surface (from the inside);
- Heater power cables (powered from the on-board network);
- Protective elements (relay, fuse);
- Controls (power key with signal diode installed on the front panel).
The main working element in this chain is the threads running along the surface. They have a fairly high resistance, which ensures their heating when electric current passes through them.
The threads are connected to tires laid along the edges of the glass, together with them they form a grid corresponding to the size of the heated area. One of the buses is connected to the power circuit, and the second is connected to ground.
Heating system design
To understand how to restore the heated rear window, it is worth first studying the principle of operation of this system. Its purpose is to eliminate fogging and prevent drying out the air in the cabin. In winter, this function is indispensable, since the icing is evenly removed from the glass and at the moment when you already need to drive, the view is 100% free.
When it comes to the rear window, compact heating elements come into play, the source of which is the electrical network. Metal tracks are fixed on the glass surface from the interior side. These are numerous thin ribbons through which electricity passes, activating the process of heat generation. As a result, due to the heating of the glass, water evaporates and the surface becomes transparent within a couple of minutes.
How to find the location of a broken glass heating filament
Now let's talk about how to check where the rear window heating thread has broken. To do this, you will need a voltmeter or ohmmeter of your choice. Do the following:
- Inspect the rear window - sometimes the break is visible to the naked eye: the thread is interrupted and resumes after a few millimeters.
- Turn on the heating and see where the water drops have not dried. Take a magnifying glass and look at this area more closely.
- Let the heating function remain active. One metal rod of the voltmeter needs to be connected to the positive heating terminal, and the second should be drawn along the thread from the side of the clamp with the “-” sign. Keep an eye on the indicators: the break will be where 0 volts is displayed.
- Take an ohmmeter and attach one probe to the common wire (the negative of the battery is connected to it), and carefully lean the other one against the center of each thread in turn. The break is where the resistance jumps to 4-6 ohms.
This is interesting: How to reset the service interval for cars
Scheme of work
To know how to restore the heated rear window of a car and approach the repair with a high level of professionalism, study the principle of operation and the electrical wiring diagram. From the + terminal of the battery, power is sent to the ignition switch, then to the fuses and, lastly, to the controller. After this path it follows to the power contact of the relay. The vehicle body is connected to the negative terminal of the battery. Activation of the heater supplies voltage to the relay winding, then the power contacts are closed, and the relay terminals are also connected. The current flows through parallel-connected heater strips and then reaches the negative terminal through the body of the machine.
In some cases, a running motor acts as a factor predisposing to activation. This feature is due to the fact that the battery should not be discharged prematurely, and taking into account the characteristics of each car brand, the consumption volume of this system can be 10-25 A.
Sources of the problem
Since many drivers prefer to restore the heated rear window with their own hands, you need to know about repair options taking into account the source of the problem. There will be no obstacles to independently checking the functional components of the car if you have minimal skills in repairing automotive equipment.
System fuse
The safety element is the first thing that should attract your attention when a breakdown is detected, since the system will not work if it is burned out. The location of this element varies depending on the car model, so at this stage you will have to turn to the vehicle service book for help. Next, remove the fuse and make sure it is working. Repair of the rear window heating will be limited to replacing the burnt out element.
Features of the mirror heater device
Heated side mirrors are another system that affects driving safety, although not to such a significant extent as the counterpart for the rear window. Therefore, it is still considered an optional equipment, which is not found on all cars.
Note that this is not a separate system, but an additional one. In fact, it consists only of conductive strips applied to a special substrate, which is fixed to the inside of the mirror.
The subsystem is connected to the power supply circuit of the glass heating and they are switched on together.
The presence of a mirror heater makes it somewhat easier to identify the cause of the malfunction. Everything is very simple - if both devices do not work at the same time, the breakdown should be looked for in the fuses, relays and control key.
But when only one of the heaters does not work, the wiring to them and its connection points and conductive strips are checked.
Phased renovation
The first thing you need to do is diagnose it and purchase a repair kit. There may be several options for a repair kit, and the repair technology in each case is discussed below.
Finding a Cliff
In addition to visual diagnostics of the condition of the threads, there are several more methods that are more reliable and effective:
- Visual diagnostics require activating the heater when the rear window is foggy. Where the threads are broken, the surface will warm up almost instantly, while in other areas visibility will be problematic.
- Using a voltmeter requires activating the ignition and then turning on the heating system. One probe should lie on the vehicle ground, and the second near the center of the heating tape. First wrap the second probe with foil. The break will be localized in the area where the voltage rises to 12 V or drops to zero. Ideally, this parameter should not exceed 5 V.
- The second method of using a voltmeter involves fixing one probe to the positive terminal of the heater, and the second one must be moved along the negative terminal strip. The problem area will be where the voltage is zero.
- Using the ohmmeter requires activation of the kilo mode. The device must be analog, with an arrow. The probes should be located near the system terminals, which are located in opposite directions from each other. Use distilled water to wet the cotton wool, which must be smoothly passed over the tape. As soon as the needle of the device moves, you will be able to detect the cliff area.
Repair with conductive glue
Repair of the rear window heating threads can be carried out using conductive adhesive. It is designed for temperatures from -60 to +100 degrees. You should not choose kits with glue, which cost 150-200 rubles. Often they do not last long or may not be effective at all. A cost of 300-400 rubles would be optimal for such a set.
Work order:
- Please read the instructions included with the kit. You should have a clear understanding of the options for applying the composition and the speed of its complete drying.
- Prepare the problem surface. Soak a rag in the alcohol solution and wipe the area.
- Lightly sand the edges in the break area with grade-grade sandpaper. It is enough to simply remove plaque and carbon deposits in two movements.
- Use tape to cover the strips along the thickness of the sides. It should not overlap the thread, but also avoid going too far away from the tape. Focus specifically on the width of the thread.
- Proceed to apply conductive glue to the prepared area using a brush or syringe. The instructions will tell you how many layers to apply. The overlap on the working areas of the tape should be 1 cm to the left and right.
- Remove the tape and wait until the composition dries completely. This will not happen before 24 hours.
- Check the functionality of the system after drying.
In winter, on cars in which the air conditioning does not work well, the rear window defroster is a real salvation. Driving a car without being able to assess the situation behind you is extremely irresponsible, and it is not recommended to go to parking areas with ice on the rear window. Some drivers use a scraper to remove ice, but most car models have a rear window defogger that can eliminate the ice problem.
The rear window defroster is a very simple device that consists of a series of horizontal lines of electrically conductive material applied directly to the glass. Near the side edges of the glass, vertical conductor lines approach the threads, through which the current flows to the electrically conductive material. The simple design of the rear window heater suggests that there are not many reasons that can lead to its failure. Below we present the main reasons why the device may not work, as well as methods for repairing the rear window defroster.
Why do the heating, heater and wipers fail at the same time?
Separately, situations stand out when the stove, wipers, and heated rear window do not work. Sometimes, along with these systems, the washer also stops working.
A one-time failure of these devices causes a lot of problems; problems can occur periodically, but they affect the safety of the car. The peculiarity of this breakdown is that the operation of all components is tied to one fuse.
Ways to eliminate the defect:
- To quickly solve the problem, just replace the fuse;
- When examining a faulty unit, it is easy to notice burnt tracks, which can also be soldered.
Depending on the car model, the problem may lie in the ignition relay, which is typical for domestic cars. Sometimes the contacts come loose, but more often the relay needs to be replaced to restore functionality.
What to do if the threads break, how to determine the defect
If the rear window heating stops working, you need to inspect the device to understand the cause of the problem. Most often, the main problem is a violation of the integrity of the threads - the contact necessary for the passage of current and heating disappears.
Determining the location of the damage:
- When the glass fogs up, you need to turn on the heating, which will make it easy to identify non-working elements. It is noteworthy that the performance of the remaining components is not affected, since a parallel design is used.
- Having cleaned the surface, we proceed to inspection. If there is a significant gap, the defect is easy to detect.
- In case of invisible damage, use a magnifying glass or multimeter.
Diagnostics using a multimeter begins by connecting the clamp to the housing. Then, using the second tip, you can begin the process of searching for the damaged area.
When the heater is functioning, there should be a voltage of 12 V on the side bus. Otherwise, the relay is faulty or the contact is bad.
To find a break, you need to determine the resistance by checking the threads in the central part. There should be indicators of no more than 2–3 ohms. If a resistance of 6 ohms is detected, then there is a defect. Having identified the thread, you need to carefully check it, measuring every 1-2 cm.
When identifying the location of the break, the results before and after it will be very different.
Subtleties of heating system repair
Broken threads are the most common problem. Car owners often wonder why the rear window heating stopped working. The problem lies in the threads - they are quite fragile and easily damaged during active friction. To remove dirt, it is better to use a soft cloth and special products. If you have to work with a scraper, you need to do it carefully.
How to troubleshoot:
- Using a complex that includes a syringe and conductive paste, it is easy to restore the integrity of the area. It is enough to apply a thin line of the composition to the damaged area. Drying occurs within a few minutes, sometimes you need to wait a day - it all depends on the product. You need to turn on and check the functionality of the system after complete drying.
- Choosing a conductive adhesive is a more affordable solution. The glue must be applied in two layers. And between them it is advisable to lay copper wire with a diameter of 0.3 mm.
- Applying a mass of paint and non-ferrous metal shavings. The procedure is performed with the heating on. While covering the damaged area, a hissing may occur, which soon goes away. Drying time – 30 minutes. It is advisable to begin operation within an hour.
Attention:
In each case, you need to make a stencil, since the laid line must completely correspond to the width of the thread. Before applying the compounds, the surface must be degreased.
Another restoration method is soldering. This is the most reliable method, and if the damage is small, soldering is carried out quickly, without wire.
Carrying out work for more serious defects:
- wire with a cross section of 0.17 mm 2 is used;
- its length should be slightly larger than the damaged area;
- the edges need to be tinned;
- degrease the working surface;
- coat the thread with zinc chloride flux;
- Having completed the preparation, we begin to work, pressing and soldering the wire into the edges of the threads;
- 12 W power is used;
- When finished, you need to check the soldering area and clean the surface from flux residues;
- the treated area is covered with a heat-resistant adhesive composition.
It takes several hours to complete such work, after which the vehicle can be used safely.
Can the air conditioning system work for heating?
A properly functioning air conditioning system keeps your car comfortable during hot weather. However, even in winter the air conditioning must be turned on. During operation of the device, the moving elements are lubricated. By running the air conditioner during the cold season, you can quickly defog the windows.
When thinking about how an air conditioner works for heating, it is worth noting that in winter, when the air outside is cold, the system cannot start. But when you press the button for heating the mirrors or windshield, the system is activated and will act as a heater.
How it works:
- In the summer, when freon evaporates in the condenser, the outlet temperature is 10–12 degrees.
- When started in winter, the indicators remain unchanged, and this is enough for sweating and thawing.
If the car is equipped with a climate control system, all processes occur automatically, and there is no need to turn on the heated mirrors and windshield.
Broken rear window defroster threads
One of the most common malfunctions of this car component is a broken thread. Thin electrically conductive threads only need to be slightly touched for a rupture to occur, and this will lead to the rear window defroster no longer performing its intended functions. Most often, problem areas are diagnosed visually.
If you cannot detect visible breaks in the rear window defroster filaments, you can use diagnostic tools to troubleshoot the problem. Get a multimeter and use it to measure the voltage in all sections of each thread. For example, 5 conditional control points are taken on each thread. The negative probe of the multimeter is connected to ground, and the positive probe is connected to the test points of each thread. Moving the measuring probe from one end of the thread to the other, a voltage drop from 12 to 0 Volts should be observed on the device. If at one of the control points the voltage is higher or lower than normal, then you should take a closer look at this area, since there is an open circuit there.
Attention: Apply a sharp probe to the heater filaments carefully so as not to cause further damage.
Repair. A car enthusiast can easily fix such a malfunction on his own. Automotive stores sell a special kit designed to restore the rear window defogger pattern. The kit includes a stencil, conductive glue and a brush. The stencil is glued to both sides of the damaged area, after which conductive glue is applied to the problem area. Next, you need to wait until the composition dries (about 30 minutes) and remove the stencil.
Why doesn't the heated glass work?
- Safety and button. The simplest and most easily repaired breakdown is the fuse and the power button. It happens that the electric heating itself is absolutely fine, but the problem is a blown fuse or a non-working button. To check whether this is true or not, find in the fuse block the one that is responsible for the operation of this unit and check its serviceability. Pay attention to the power button, it is often illuminated; if the button does not light up, there may be a problem with it. Check the contacts and its serviceability.
- Wiring. Poor contact or poor wiring integrity is always the cause of device failure. Without power or in case of power failure, the electrical appliance will not work. Check the contacts and integrity of the wiring; a multimeter is suitable for this. We turn on the glass heating and measure the voltage at the wiring terminals. We connect one probe of the device to “+”, the second to ground, that is, “-“. If the device does not show voltage, the wiring is damaged. If the positive wire is intact, move one probe of the device to the “+” of the heater filament itself, glued to the glass, and the second to the “-“. It happens that the contacts oxidize or the connection is broken. In this case, there will be a potential difference between them, less than 12 V or completely absent.
- Damage to the heater filaments. In most cases, thread rupture occurs as a result of mechanical stress. This could be a blow, crack, chip, careless installation, or removal of the tint film. It is not difficult to understand where exactly the glass heating breaks; just turn on the heating and look at the glass. After the damaged area, the glass will remain the same as it was. If it was not possible to visually determine the location of the break, we again arm ourselves with a multimeter.
We check the voltage of the glass heating threads:
- Turn on the heated glass, then the multimeter, switch it to DC measurement mode.
- We connect the negative probe to ground, and use the positive probe to measure the voltage of the threads at different points. The heating filament itself is a regular resistor with a tape-type resistance, so the voltage will be different at different points. It is considered normal if at the very beginning of the thread, right next to the negative terminal (ground), the voltage is zero, and closer to the positive terminal it increases to 6-9-12V.
Thus, by moving the probe along the thread, you can easily detect a sharp drop in voltage, which will indicate a break at a given point. The process of restoring glass heating filaments is possible, so do not rush to change the glass because your electric heating does not work.
I recommend a video on how to repair electric heated glass
Text: Question Auto
Source: vopros-avto.ru
Rear window defroster fuse blown
If any electrical device on your car stops working, the first thing you need to do is check the fuses. Fuse failure can be caused by a temporary surge in current in the vehicle's on-board circuit or a more serious malfunction.
Repair. First, try simply changing the fuse and using the device normally. If the problem persists and the element fails again, determine the cause of the blown fuse and repair it.
Oxidation of contacts on heater connectors
The rear window defroster may stop working properly due to oxidation of the contact directly bonded to the glass. To detect this malfunction, you need to measure the voltage of the supply wire and make sure that it exceeds 11 Volts.
Repair. If the measurement results in a value less than 11 Volts, it is necessary to clean the contact from any oxidation that has formed. To clean the contact, you can use fine-grain sandpaper or a special rust remover.
Causes and troubleshooting of the heater
If the heating system does not turn on or operates intermittently, then you need to find out the reasons and take timely measures. In different situations the problem is solved in different ways.
Blown fuse
At the first sign of a breakdown, you need to check the fuse. Only after this, if necessary, the switch itself, relays, contacts, and electrical wiring are examined.
First you need to find the fuse itself and determine its integrity. If it is difficult to diagnose based on external signs, then it is better to replace it.
Faulty wiring
Failure of the wiring system in the absence of external damage is determined using a voltmeter or multifunction tester.
After turning on the heating, there should be a voltage at the terminals of at least 11 Volts.
Instead of special devices, you can use a car light bulb by connecting the wire and ground to the “+”. If it does not light up, then repair is required.
Contact fastenings are broken
Often, during operation, the terminals on the connectors become oxidized and do not conduct electricity. For diagnostics, it is necessary to measure the voltage directly at the contact glued to the glass.
If the voltage is below 11 Volts, you need to clean it with sandpaper or a special rust remover. In addition, the terminal connection contacts can be restored by soldering.