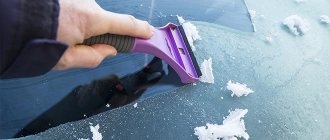
The night was dark and stormy. Snow completely covered the car to a height of several centimeters. It took several minutes to clear the snow, and by then the engine had warmed up enough for the remaining frost clinging to the inside of the windshield to melt, leaving tracks on the side windows. But the rear window defroster only thawed a thin strip at the top and bottom of the window, leaving a wide swath of glass frosted over and absolutely no visibility to the rear.
The worst that could happen is that the rear window defroster grille is completely non-functional, requiring you to either drive blind with no rear view (bad idea) or scrape snow and frost off the rear window with a trusty plastic scraper.
Danger!
Let's be clear: High resistance wire is applied primarily through paint onto glass. It is very easy to scratch or tear off, and will not work if the scratch breaks the integrity of the wire. This means that any heavy object (box, furniture) that someone placed in the car could scratch the wire. Even a credit card can rip it off. Don't pack the trunk with stuff or allow cargo to slide back in your minivan so that it touches the glass. If the glass has a defroster grill, the only thing that should touch the glass is a soft cloth dampened with glass cleaner. If you need to clean the rear window, rub gently and in the direction of the grille, not across it.
You don't need to replace the glass to make a repair. A complex rear window curve costs several thousand rubles, and a large illuminated glass on a hatchback, say, a Chevrolet Camaro, can easily add several thousand more. Add the cost of installation at the service - your insurance will definitely not cover all the costs.
Diagnostics and repair
Ways to find a problematic thread
It is not so difficult to make repairs and diagnostics with your own hands.
There are several options for checking it yourself:
- First of all, this is a visual check. If the car window fogs up, turn on the system. In the place where the break occurred, it will sweat almost immediately. At the same time, the rest of the surface will not heat up. This DIY diagnostic method is the easiest.
- Another option for checking it yourself is using a voltmeter. You need to activate the car’s ignition and, accordingly, the heating system with your own hands. One voltmeter probe must be placed on the ground of the vehicle, and the second is wrapped in food foil, after which it must be brought to the heating filament. When performing this procedure with your own hands, you will notice that the voltage level is no more than 5 volts. If this indicator drops to 0 or increases to 12, a break occurred at this point.
- Another do-it-yourself diagnostic option is with the same voltmeter. One voltmeter probe is connected to the positive side of the system, and the second must be moved along the filament, from the negative side. Where the break occurred, the voltage level will drop to zero, in which case repairs will be required.
- The last option for do-it-yourself diagnostics is using an ohmmeter. The probes of the device are connected to the minus and plus of the system. You need to take a piece of cotton wool and moisten it in distilled water, and then run it along the thread. When the ohmmeter needle starts moving, this will indicate a break.
DIY repair options
Applying restorative paste
How to repair a heated rear window at home? There are several ways:
- Using a repair kit. In practice, repair kits usually have the same characteristics - they usually allow you to restore up to 10 cm of damaged thread. Such repair kits include the threads themselves, as well as a can or tube with a special polymer resin. To repair, you need to accurately identify the location of the break, and then turn off the heating system. Next, you need to remove the protective film and apply a new thread to the damaged area. Using a brush, apply the polymer resin, repeat the application procedure after complete drying. Before using the system again, you must wait a day.
- For repairs, you can use conductive paste - a layer of the substance must be applied to the breakage site. It should be noted that when applying it is necessary to grab a few centimeters on each side and wait about a day after application. To make the paste dry faster, you can blow it with a hair dryer.
No heating
Imagine that the heater grill on your car doesn't work at all. Check the obvious first: is the fuse good? The heater grill draws a lot of current (10 to 20 amps), and if the fuse is not strong enough, it won't last long. If it doesn't look like the fuse is blown, check it with a voltmeter - the ignition is on and so is the heater. You should see 12 volts on both terminals.
Check for 12 volts at the grille terminals to see if the electrical circuits to the rear of the vehicle are intact.
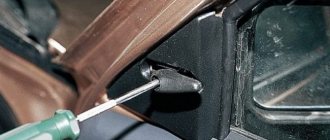
If the voltage is excellent, the problem is somewhere in the wiring or in the grille. Check the connection from the wire bundle to the grille. The terminals near the grille are easily damaged. Usually the contact that is attached to the glass breaks off. This will leave you with a loose wire that can't be reattached. Here you have two options: solder or glue.
If you know how to solder and have a high power soldering iron or soldering gun, solder the pin back. You will need a helper to hold the contact against the grid while you solder. There is usually a metal strip running across the glass underneath the silkscreen. Clean surfaces with alcohol and use rosin solder. Act quickly because excessive heat may crack the glass.
Experienced solders may want to solder the contact back onto the window.
If you're not sure if you know how to solder, or you're not ready to face the problem of cracked expensive glass, there is another way. The dealership and most department stores that sell auto parts can sell you a special conductive epoxy compound to reattach the contact.
Broken rear window defroster grille terminals can be repaired using conductive epoxy adhesive.
If it's winter, you'll have to work in a heated garage, and the car needs to sit there long enough to warm up to at least 16°C. Again, wipe the glass with rubbing alcohol. Apply adhesive tape so that the epoxy glue does not get on the glass. Mix a moderate amount of epoxy compound with hardener. Apply a little glue to the contact and press with a sharp object for 10 minutes or so to allow the epoxy to harden. You can use a wooden stick or wet your finger and spread the adhesive with the tip for a minute to make the repair area look nicer. Although the epoxy glue sets quickly, do not attempt to reattach the wires until 24 hours have passed at a temperature of about 16°C or more to allow the glue to fully cure. The repaired wire will never be as strong as the original one, so you need to be extra careful to avoid damaging it in the future.
Tips and tricks
After installing the system or repairing it, you need to know how to check the heated rear window. To do this, turn on the ignition and the heating itself for 5 minutes. Normally, all threads should heat up.
If this is not the case, then you should check the rear window heating filaments with a multimeter to identify damage to the integrity. The presence of breaks will indicate the need for replacement.
Finally, we note that when installing a heating system, one feature must be taken into account: in the dark, the mesh can be visible and can affect the quality of visibility through the rear window. Threads can reflect light, glare, etc. For this reason, you need to install the system carefully and use only materials suitable for this task.
What to do if your car windows sweat. Causes of car windows fogging up, solutions. How to prevent car windows from fogging up.
How to polish car headlights yourself: grinding headlights and polishing optics made of plastic and glass. How to polish headlights, subtleties and nuances. Recommendations.
Choosing wipers for a car: what types of windshield wiper blades there are, advantages and disadvantages. Selection of windshield wiper blades for cars, which ones are best to choose.
Car battery voltage: what it should be. How to check the battery charge with a multimeter, checking the battery with a load plug. Recommendations.
Selecting PTF for VAZ 2114 and 2115: how to choose VAZ fog lights (housing, type of lamp, standard or universal, etc.). Installation of fog lights VAZ 2114, 2115.
Checking a car generator: signs of generator malfunctions, causes of breakdowns. Diagnostics of the generator and relay regulator, checking the generator with a tester.
More serious problems
Is the fuse ok? The grille is intact and attached to the glass, but there is simply no defrosting effect? Look for a faulty switch, relay or breaker. To do this, you will need a schematic diagram or extensive experience in identifying wiring problems. Start at the fuse and follow the wire. If the switch is bad, you will be able to plug it in externally and get 12 volts from outside for diagnostic purposes. But you may have to replace the breaker - which may be built into a large electrical control box hidden under the dash. Check your vehicle's manufacturer's manual for more detailed steps. If you don't have one, you'll have to determine the problem the old way. Trace the path of current from the fuse to the switch, then to the breaker and back to the glass.
Remember, the breaker will turn off the current within 5-10 minutes, so you need to do your research within that time, or you will be looking for current when there shouldn't be any.
There will be a relay somewhere in the circuit to switch the high voltage current required for the grid to function. It may (or may not) be combined with a breaker. The procedure will be as follows: connect the relay outputs to an external source to check whether it is in working condition. You can either connect 12 volts to the relay coil to force it to retract, or bypass the relay with a heavy gauge wire to check if the grille wiring between the relay and the window is good. A separate relay won't cost much and can be purchased at many auto parts stores, but if it comes with a breaker you can pay up to RUB 4,000.
Don't try to circle the timer. Rear window defoggers consume a significant amount of electrical current - 10-20 amps, depending on consumption. Most modern cars have a breaker circuit to turn off the grille after enough time. There are two reasons for this. The first is to reduce the load on the generator, which (especially in winter) also supplies energy for the headlights, heater and windshield wipers. Add in the extra drain on the battery to start the car in cold weather, and the alternator may simply not have the power it needs to keep the battery charged.
The second reason is simpler - the grate can overheat if it heats up for too long. Imagine accidentally turning it on on a hot summer day during a long trip. The heat from the grill combined with the heat from the sun will cause the glass to crack or accelerate the wear of the window's rubber seals.
If you need to replace a breaker or switch, you will most likely have to go to the dealer for parts.
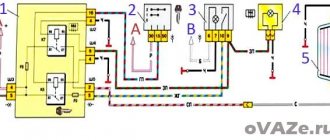
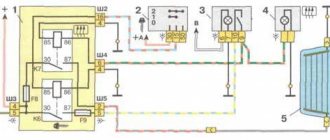
Operating principle of heating
The principle of operation of the heater is very simple - a conductive thread of strictly defined resistance is applied to the rear window, it heats up from the current passing through it. In this case, the supply voltage is provided by such components as wiring, a heater relay, a power button and a fuse (see VAZ 2110: how to replace fuses) A similar scheme is used on all VAZ cars (and on the vast majority of foreign cars), starting with the “classics” and ends with the latest models.
Finding the break point
Part of the car glass stops heating due to a broken thread, which you, for example, can touch with an abrasive while removing the adhesive from the tint film. Since the heating elements are thin and in certain lighting conditions are practically invisible. There are several ways to detect a break:
- On the glass that has already fogged up, turn on the heating (in some car models it is enough to start the engine). Make sure that the area of the break remains fogged, while the rest of the window becomes foggy.
Determining the location of the break
Finding a cliff is not difficult. The fog or frost around the thread will not disappear. That is why, in order to quickly find a damaged element, the threads are counted and then the damaged area is found. But sometimes the breaks are so insignificant that it is very difficult to notice them. Then you should use a voltmeter.
Due to the fact that one of the buses is connected to the car body, the negative wire of the multimeter is connected to the body. Next, the positive wire with the probe touches the first and second tires. On the first, the voltage is +12 V, and on the second – 0 V. If for some reason there is no access to the tires, then measurements can be taken where the threads come out from under the seal.