Modern engines are controlled electronically; the days of mechanical adjustment of ignition timing and idle speed have sunk into oblivion along with carburetors and distributors. The Chevrolet Niva car is no exception: despite the rather “old” engines (in terms of manufacturability), the electronic control unit (ECU) is responsible for all issues of forming the fuel mixture and timely spark in the cylinders.
To receive real-time information from all systems, the power plant is literally studded with all kinds of sensors. One of them is the Niva Chevrolet crankshaft sensor (DPKV), which is typical for many engines developed by the VAZ concern.
How does he work
In order for the ignition timing to work synchronously with the movement of the pistons in the cylinders, information about the position of the crankshaft at each moment of time is necessary. There is a rigid mechanical connection between the connecting rods and the crankshaft: to track them, it is enough to read the angle of deviation of the crankshaft axis from the zero point.
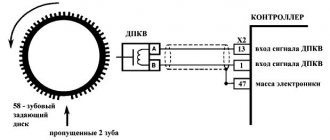
For this purpose, a gear (58 teeth) is placed on the timing belt drive pulley. They do not participate in the operation of the timing pulley and are intended only for the crankshaft position sensor (CPS).
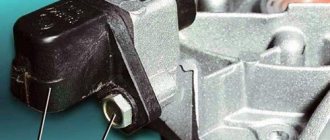
The position of these teeth is strictly calibrated relative to the entire timing system and piston connecting rods. The device itself is a Hall sensor with a permanent magnet that responds to the passage of a metal object in close proximity. That is, the rotation of the crankshaft with a gear generates a series of pulses on the sensor. As a result, the ECU receives data on the position of the pistons in real time.
Methods for diagnosing DPKV
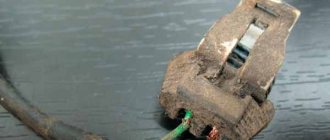
When determining the serviceability of the crankshaft position sensor, we are guided by the principle - from simple to complex. In other words, first an inspection, then checking the characteristics with instruments (ohmmeter, oscilloscope or computer). The absence of moving parts and the simplicity of the design of the element make it a fairly reliable part. Therefore, the crankshaft sensor in rare cases becomes unusable on its own. Most often, it receives mechanical damage during repair work under the hood of a car or as a result of foreign objects getting between the sensor and the gear wheel.
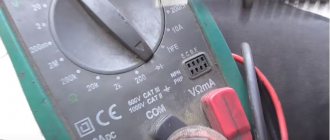
Before you begin diagnosing an electronic component, you need to note its original position on the motor. After dismantling, the device is checked for defects in external surfaces. If the DPKV is dirty or has corrosion on the contact group, then it must be cleaned with alcohol. If the inspection shows no defects, it can be diagnosed using special instruments. It is advisable to carry out the test using a multimeter, which can be switched to different modes.
Ohmmeter test method
This method is simple and accessible, but does not guarantee detection of a breakdown. It is used to measure the resistance of the coil. To do this, it is enough to simultaneously touch the coil terminals with the probes. The polarity of the touch is not important in this case.
The resistance value depends on the characteristics of the coil and is usually in the range of 500-700 Ohms. To determine the resistance value of your sensor model, you need to look in the description of the DPKV or search on the Internet.
The multimeter is used as follows:
- We set the measured parameter (resistance) in a range close to the measured value, but not lower.
- We touch the ends of the sensor with the probes and look at the readings.
If the indicators are close to the standard values, then the coil is working properly. The disadvantage of this method is that it does not always indicate a faulty crankshaft sensor. Therefore, it is advisable to check using other methods.
Checking inductance values
When excited, all coils display an inductance indicator, including the coil located in the crankshaft sensor housing. The diagnostic method boils down to measuring this indicator.
When checking inductance, you must have a megohmmeter, a network transformer, an inductance meter and a voltmeter. To determine the indicator, carry out the following steps:
- Use a multimeter to measure the inductance of the coil (standard values are in the region of 200-400 mH).
- Using a megohmmeter, measure the resistance of the insulating layer between the ends of the DPKV (the data should be above 0.5 MΩ).
- A network transformer is used to demagnetize the sensor coil (deviations indicate the need to replace the part).
Video: Checking DPKV, it couldn’t be simpler. Injector diagnostics.
Diagnostics using an oscilloscope
The most advanced and accurate method of determining the health of a part is checking with an oscilloscope. Diagnostic work is carried out with the power plant running.
You can also use an oscilloscope to check serviceability on a dismantled crankshaft sensor. This requires an electronic oscilloscope and special software. In this case, the check is carried out according to the algorithm:
- Probes must be connected to the terminals of the crankshaft position sensor;
- Launch the software;
- Move any metal object near the part.
If the sensor is working properly, a graph is constructed on the device screen based on the DPKV readings.
If the part reacts to the movement of a metal object, then it is working. But the result of checking it on a running internal combustion engine will be more accurate.
The simplest, most reliable and fastest way to determine the performance of the DPKV is to install a known-good synchronization sensor in place of the one being tested. And if the problems with the car disappear, then the conclusion is clear - the part is faulty and needs to be replaced.
When installing, you should take into account the correct installation: maintaining the required gap between the DPKV and the flywheel. You can find out this indicator from the instructions for the sensor or from the Internet, but on average it is 0.5-1.5 mm.
Source
What happens if the DPKV breaks down?
Signs of malfunction can be divided into two groups:
- The sensor has failed, so no pulses are received at all. In this case, the engine will simply stall, and you will not be able to start it until the breakdown is repaired. DPKV is the only sensor that, if it malfunctions, the internal combustion engine will not be able to operate even in emergency mode.
- The sensor malfunctions or provides incorrect information. The engine will start and run with obvious symptoms of a malfunction: loss of traction;
- power reduction;
- floating idle speed;
- The “Check Engine” warning light is on.
In addition, the engine may stall at any time for no apparent reason.
If you connect a car scanner to the OBD port, it will generate an error code 0335, which can be forcibly reset, but will appear again when the engine starts.
Signs of a failed DPKV
Crankshaft Position Sensor Here are some of the common symptoms that will help you determine if the QG18DE engine crankshaft sensor is damaged:
The check engine light comes on. The check engine light comes on for many reasons, including a malfunction of the DPKV. When the motor is running for a long time, the sensors stop working due to increased heat levels, causing the indicator to light up. Perform diagnostics to determine the cause of the check engine light.
Loss in acceleration. If you notice a loss of acceleration at high speed, this is due to a malfunction of the DPKV. The control unit does not receive the correct information due to a faulty sensor, which causes problems when synchronizing the systems. The fuel injection adjustment is disrupted, which leads to loss of acceleration.
Engine vibration. If the DPKV fails, the position of the crankshaft is not determined. This leads to strong engine vibration, reduced power and increased fuel consumption.
Increased gasoline consumption. Ignition timing and fuel injection are not performed efficiently, which leads to engine malfunction and increased gasoline consumption.
Difficulty starting the car. Difficulties in starting arise due to incorrect timing and adjustment of fuel injection; the engine will not start. However, the problem may be an electrical fault.
QG18DE engine misfires. The on-board computer does not receive information about the position of the piston, which leads to the cylinder misfiring. This is caused by a faulty DPCV or a damaged spark plug.
The engine stalls. In addition to problems with acceleration at high speed, if you notice that the engine stalls at low speed, then the problem is related to the crankshaft sensor, since the ignition timing is disrupted.
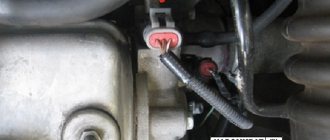
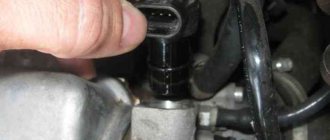
Where is the DPKV located, how to change it
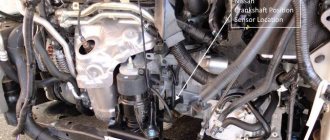
The sensor is located near the timing belt pulley on the generator side.
A corrugated cable is stretched to its connector, the location is open, accessible from the engine compartment. The sensor is attached with one bolt to the crankcase body. Before removal, you must carefully disconnect the connector; dismantling other components is not required.
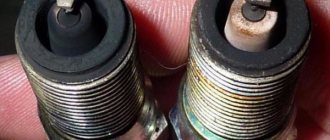
After removing the DPKV, you need to make sure that the contacts and the outside of the housing itself are clean. If necessary, clean and recheck the sensor.
If the symptoms do not disappear, the sensor must be replaced with a new one. The electronics inside the case cannot be restored.
An initial check is possible using a multimeter. A working sensor shows resistance at the contacts between 300 Ohm and 1 kOhm. When a metal object is brought to the end of the sensor, the resistance increases.
After installing the DPKV, no additional configuration is required. It is necessary to start the engine and let it idle for several minutes. Then the engine is turned off and started again. The sensor is calibrated by the ECU program automatically.
Chevrolet 3.1 V6 Crankshaft sensor location
Kyle Sunstrom
Thinkstock/Comstock/Getty Images
The crankshaft position sensor on the Chevrolet 3.1L V-6 engine is designed to determine the position of the crankshaft relative to the engine block and relay this information to the powertrain control module (PCM). The PCM uses this information to decide when to fire the spark plugs and adjust the ignition timing. To accurately determine the position of the crankshaft, the crankshaft sensor extends five inches into the cylinder block.
Step 1
Stop the engine and shift the vehicle's transmission into park or first gear (manual). Apply the emergency brake.
Step 2
Raise the front of the car using a car jack and support it with jack stands. Install wheel chocks behind the rear wheels.
Climb under the front of the car and look at the rear of the engine. The crankshaft position sensor is made of black plastic and has a two-wire connector attached to it. The sensor is located on the rear side of the cylinder block, halfway between the oil pan and the top of the block.
Things you'll need
- Car jack
- Jack stand
- Wheel chocks
More articles
.
Video on the topic
Good publicity
After the publication of my article on the topic of oil seals for the Niva, requests began pouring in to write the same regarding bearings and sensors for the 21214 engine, which is installed on Nivas, Niva-Ms, crocodiles and Shnivas. I’ll begin to slowly talk about “trouble-free” sensors, that is, those that you install and forget about for a very long time.
A few general words. Why did this question even arise? Let me give you an example: such garbage as a throttle position sensor (TPS). Since the electronics of our injector are taken entirely from their front-wheel drive counterparts, and their number is very large, a very large number of companies make spare parts for them, and there is no need to talk about the Chinese brothers at all. For some time I even saved up faulty TPS from different manufacturers in a box, after 7 I got lost and threw everything away)) While the factory supplies only two manufacturers.
Another example is the speed sensor. When it’s burned out, it happens that when driving through a puddle, the “check engine” lights up, or the engine simply starts to stall when coasting and nothing lights up. And when you reach the service level, like a wartime exterminator, suddenly the defect disappears. This means that water got inside the case and then also leaked out. So all is well......until the next puddle. One of the most basic sensors is the mass air flow sensor (MAF) , so a separate detailed article is devoted to it.
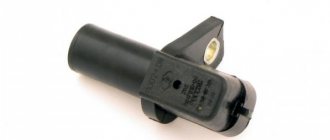
Crankshaft position sensor - DPKV
crankshaft position sensor
The task of this sensor is to read the revolutions of the engine crankshaft and whether it is spinning at all. Perhaps the only sensor that I recommend keeping in your car’s first aid kit (so as not to get lost) as a spare. This is the only sensor without which the injector will not start in principle. Without the rest, the engine will sneeze like a sick person, hiccup, fart, blink the check engine... but rattle. Which means it’s bad, but go. Without DC there will not even be signs of life. Therefore, we will consider it, in medical terms, as setting the heart rhythm. I’ll tell you a little secret, if you are leaving somewhere or leaving the car in a bad place, open the hood and slightly disconnect the DC connector. It is difficult to imagine a more effective anti-theft. The main thing is not to forget about it yourself))
How to Relearn the Procedure on a GMC After Replacing the Crankshaft Sensor
Kyle Sunstrom
The crankshaft sensor on GMC vehicles is synchronized with the powertrain control module or PCM. When the crank sensor is replaced, it must be re-synced with the PCM. Without resynchronization, the PCM cannot correctly determine the crankshaft position. The correct procedure for re-timing or re-learning the crankshaft position is called "CKP Variation Learning". The CKP Variation Learn procedure resets the position information in the PCM memory and replaces it with updated information from the new crankshaft sensor.
Step 1
Place the GMC transmission in park or first gear for a manual transmission. Apply the parking brake and leave the engine running.
Step 2
Insert the vehicle scan tool data connector into the vehicle diagnostic data port. This port is located under the dashboard on the driver's side of the vehicle, to the right of the steering column.
Step 3
Turn on the scan tool and select "PCM" from the main welcome menu. Select "Special Features" from the secondary screen, then select "CKP Variation Learn" from the Special Features menu.
Step 4
Allow the scan tool to perform the CKP variation learning procedure. This may take up to 10 minutes. Do not turn off the engine or disconnect the scan tool during this procedure.
Remove the diagnostic tool. Turn off the engine and then turn it on again. Make sure the engine runs smoothly.
Items you will need
- Automotive scanner with relearn capability
More articles
.
Throttle position sensor - TPS.
The function of this sensor is to provide information to the brain about the position of the gas pedal and the degree of throttle opening. The TPS contains electromechanical parts, that is, a potentiometer. This means that after some time it wears out and the sensor dies. In Russia there are about 10 companies producing this sensor. But I want to draw the reader’s attention to the so-called non-contact (inductive) TPS. It is made by one company, which used to be a “mailbox”. My experience has shown that the sensor in their “non-contact” design is virtually eternal. This is exactly what is shown in the photo.
Speed sensor – DS.
The brain uses the signal from the speed sensor to control the engine's idle speed. And support for “pickup” speed while the car is coasting. The actuator of this circuit is the idle air regulator, which controls the air supply bypassing the throttle valve. Enough theory, let's get closer to the people. In fakes based on this sensor, ahead of the original by an order of magnitude - the Chinese brothers. 8 out of 10 sensors that I held in my hands in stores and on the market were made in China. They work for three months, after which they announce their retirement as a “check engine.” What is the difference between the original and the pale one? In the photo, I indicated with arrows where the wires entering the connector are filled with varnish. The seam of the body, which consists of two parts, is also filled with varnish. Mao's heirs consider this unnecessary, and that is why the sensor dies after the onset of the first St. Petersburg slush.
Phase sensor - DF
It's also a camshaft sensor. The VAZ phase sensor is designed to determine the angular position of the camshaft. The main function is that when the engine is running, the phase sensor provides a pulse signal to the controller synchronizing fuel injection with the opening of the intake valves. Failure of the phase sensor switches the fuel supply to pairwise-parallel mode, which leads to a slight (up to 10%) increase in fuel consumption. And I’ll also add this “miracle of nature” is a headache and a source of a lot of errors, for example the famous 0301, 0302.... In my humble opinion, this is the same disgusting and abomination as the old-style hydraulic compensators. But what has grown has grown. (How to get rid of it forever, lambda, roll sensor - will be written in the article about chiptuning). The only normal manufacturer of this sensor is Avtovazagregat. The logo is visible in the photo.
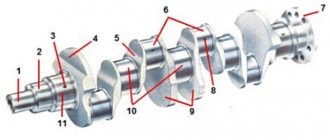
The crankshaft of a car is used to convert the translational motion of the pistons into rotational motion. On technical equipment with an electronic engine control system, a crankshaft position sensor (hereinafter referred to as CPPS) is installed. The controller is necessary to synchronize the ignition angle and the fuel system.
In the event of a malfunction of the equipment, a yellow indicator on the dashboard indicates the presence of a breakdown. The engine is unstable, idle speed is systematically reduced, power drops, and fuel consumption increases.
DTOZH
The coolant temperature controller is also considered an engine temperature sensor. This device is a resistor whose resistance value changes in accordance with the temperature of the consumable.
If you are wondering where the DTOZH is located, it is located on the coolant exhaust line, directly on the cylinder head. If the air temperature outside is negative, the resistance of the sensor will be increased - at 40 degrees below zero this figure will be about 100 kOhm.
When the motor warms up to operating temperature, the resistance will drop to 177 Ohms.
When the device fails, the dashboard will display incorrect readings regarding engine temperature. For example, the pointer needle may not rise at all, sometimes it stops in the middle of the scale.
To diagnose and replace the DTOZh, follow these steps:
- To begin, prepare a thermometer that can operate at high temperatures, a multimeter for testing, and a container of liquid that you will heat on the stove.
- Remove the sensor itself from the socket, having first disconnected the connector and placed a container under the location, since some of the antifreeze may come out during removal. Disconnect the connector and unscrew the device; temporarily install a plug in its place.
- Place the sensor in a container with water prepared in advance, only lower the part of the controller that was screwed into the cylinder head into the liquid. Measure the resistance and turn on the kitchen burner to heat the water.
- As the temperature increases, the resistance will drop. Measure this parameter several times at different temperatures, then compare the obtained data with the normalized ones indicated in the table in the service book. If the data is very different, replace the device with a new one.
Detonation
A knock sensor is used to detect vibrations or shocks present in the operation of a car engine. This device is mounted on the top of the block head, and the device is based on a special piezo plate used as a sensitive component.
If the sensor detects detonation while the car’s engine is running, then special pulses begin to form at its output, which will increase with the increase in detonation.
In accordance with these signals, the engine control unit automatically adjusts the ignition until the number of detonation flashes is reduced to a minimum.
If the controller breaks down, the engine will detonate, especially when the speed increases in a lower gear. If you check the ignition, you will find that everything is set correctly and there is no need to adjust the timing.
Replacement is simple:
- The power cable is disconnected from the regulator in the engine compartment.
- The device is removed from the landing site.
- A new controller is being installed.
Phase
camshaft position (camshaft position) or phase controller is a device used to determine the position of the camshaft. This controller ensures correct fuel injection into the injectors, so its operation is very important for the car.
The DPRV is located in the front of the cylinder head and if it fails, you can not only change it, but also try to clean it.
Failures may be indicated by symptoms such as difficulty starting the engine, increased fuel consumption, and decreased vehicle dynamics.
- Open the hood and disconnect the terminal from the battery.
- Using a 10mm wrench, unscrew the bolt securing the device.
- Remove the controller from its place and install a new one or clean the old sensor.
- Replace the bolt and tighten it, also reinstall the battery terminal.
Photo gallery “Changing DPRV”
Speeds
As the name suggests, the speed controller is used to determine the speed of the SUV. Various symptoms can indicate its breakdown, for example, a non-working sensor needle on the speedometer, its movement with jerks.
The sensor is located directly on the gearbox; you can check it using a tester:
- First, the controller is removed from its location; to do this, the car must be driven into a pit and the battery must be disconnected. The device is installed on the back cover of the transfer case; before removing, clean the controller from dirt.
- Disconnect the connector circuits connected to the device by pressing the plastic connector. Using a wrench, you need to unscrew the device and remove it.
- After this, you need to connect the positive probe of the tester to the pulse contact of the controller. Its negative contact should be connected to the Niva body.
- Then a tube should be installed on the controller shaft so that the sensor can be rotated.
- Then the tester must be configured to measure a small DC voltage.
- Start rotating the mechanism shaft. If during rotation the tester display shows the value of the induced voltage, and as the speed increases, this parameter increases, this indicates that the device is fully operational and does not need to be replaced (by REMONTYCA).
DPKV
The crankshaft sensor in Niva Chevy cars is a device that belongs to the inductive type and is responsible for injection. It is used to ensure synchronization of the operation of the regulator with the top dead center of cylinders 1 and 4. The device is located on the timing cover.
If the device fails, the driver will be faced with the problem of starting the power unit:
- To replace, locate the regulator and disconnect the cables connected to it.
- Remove the device from the seat by unscrewing it.
- Install the new controller and secure it. Check how the motor began to function.
Fuel level
The fuel level sensor is used to measure the volume of remaining fuel in the tank and display the corresponding parameters on the control panel in the cabin. This sensor is installed in the fuel pump, so to replace it the pump will have to be dismantled.
To check, you will need a tester; when diagnosing, you should be guided by the following parameters:
- if the gas tank is empty, then the resistance parameter will be about 250 Ohms (an error of 12 Ohms is allowed up or down);
- with a half-filled gas tank, the resistance will be approximately 66 Ohms (a deviation of 6 Ohms is possible);
- if the tank is full, then the resistance value will be 20 ohms (with a possible error of 3 ohms).
To change or check the device, do the following:
- First you need to remove the back seat. Once you do this, you will be able to see the hatch being secured with black Velcro. Use a slotted screwdriver to pry it up and pull it up.
- Then you need to relieve the pressure in the fuel system. Alternatively, the car can be left standing for several hours (minimum 4), this will lead to a decrease in pressure, or you can turn off the fuse that controls the operation of the fuel pump. Remove it while the engine is running and wait until the engine stops.
- After this, you need to disconnect the terminal from the fuel tank hatch and remove the orange fastener. You also need to remove the fasteners on the fuel pipes. Place a rag under them, as there will be some fuel left in them, and then pull the pipes up. Also remove the retaining ring - to do this, you need to rest against it with a chisel or screwdriver and tap with a hammer.
- After removing the ring, the fuel pump is removed, but you need to be careful not to damage the float. After removal, remove the brown connector and pull it down, after which you also need to remove the small black plug.
- To remove the sensor itself, pry it off with a flat-tip screwdriver and pull it down along the guides. Install the new controller and reassemble in reverse order. When the installation procedure is completed, connect all hoses and do not forget to replace the safety device. When the ignition is turned on, the pump should hum.
Description
Where is the DPKV located on a Niva Chevrolet: in the engine compartment, at the end of the engine, above the crankshaft pulley.
Access to the equipment for carrying out maintenance from below, having previously dismantled the metal protection of the oil pan.
DPKV transmits signals to the electronic control unit (ECU) in real time and also reports the direction and speed of the crankshaft.
Based on the data received, the ECU makes a decision to reduce or increase the frequency, enrich the fuel mixture, or change the ignition angle.
Note to the driver!!! Depending on the technical characteristics of the car, brand, modification, DPKV of magnetic, inductive type, Hall sensor, and optical controllers are preinstalled.
Causes of premature wear of the DPKV
- long-term operation without intermediate prevention;
- manufacturing defects;
- third-party mechanical damage;
- ingress of sand, dirt, metal shavings;
- sensor breakage due to crankshaft teeth;
- damage to the DPKV during repair work;
- short circuit in the on-board circuit.
Symptoms of DPKV malfunction
- Difficulty starting the engine “hot” or “cold”;
- When moving downhill, detonation occurs;
- Idle speed is unstable;
- Motor power decreases periodically;
- Acceleration dynamics are passive;
- Sudden engine stop.
However, these symptoms are signs of a number of other breakdowns. It is extremely important to conduct comprehensive diagnostics using digital equipment.
| Name / catalog item | Price in rubles |
| VAZ 21214-2123 OMEGA 173882 | From 350 |
| 2112-3847010 | From 350 |
| 21120-384701004 | From 350 |
| 21120-384701036 | From 350 |
Step-by-step instructions for self-diagnosis
To check the condition of the DPKV we need a multimeter. The measuring device is available to many car enthusiasts. If you don't have it, you can purchase it at any auto store. The price is affordable.
- From under the bottom of the car, disconnect the terminals from the sensor.
- We bring the limit switches to the contacts;
- Turn on the multimeter, set the position of the regulator to “resistance”;
- We carry out actual measurements;
- We compare the obtained data with standards. If the arrow tends to infinity, the controller is working. If it goes to “zero”, it’s a breakdown. Normally, readings should be 550-750 Ohms.
Depending on the diagnostic results, the technician makes a decision on the advisability of further operation of the equipment.
How to replace the Niva Chevrolet crankshaft sensor yourself
Required materials and tools:
- key to “10”;
- head, knob, knob extension;
- rags;
- additional lighting as needed;
- new DPKV;
- Phillips head screwdriver.
Regulations:
- place the car on the inspection channel;
- secure the wheels with wheel chocks;
- squeeze the parking brake;
- from under the bottom of the car, unscrew the six bolts that secure the metal protection of the oil pan;
- Using a screwdriver, carefully pry up the block with terminals, remove it, and move it to the side;
- Unscrew the screw - the retainer from the sensor;
- remove the controller;
- We carry out troubleshooting of the seat, wipe it, clean it from residual dust and dirt;
- insert a new controller;
- screw it in and assemble the structure in reverse order.
DIY replacement completed. For a detailed step-by-step guide, watch the video.
Recommendations for care and maintenance of the controller
- strictly comply with the car manufacturer's regulations;
- do not violate the terms of technical inspection, even when the factory warranty has expired;
- buy and install mainly original parts, the catalog numbers of which correspond to the factory markings;
- Carry out the installation work yourself if you have sufficient experience, otherwise use the services of professional workshops;
- Do not install parts or accessories from other technical equipment, even if they are similar in appearance. Full functionality is not always guaranteed.
The average service life of the DPKV is 80,000 km or more.
To synchronize the position of the shaft with the electronic unit, the design of the Niva Chevrolet car is equipped with a crankshaft position sensor. This device is located not far from the drive disk, and is located on the timing cover of the mechanism drive itself. This disc is a wheel with fifty-eight teeth, and to create a certain impulse between the TDC (top dead center) and the ECU, a couple of teeth are specially removed.
Due to the fact that the crankshaft rotates, the drive disk rotates. The position of the ECU shaft is determined due to the fact that during the rotation of the disk at the sensor, magnetic fields change, thereby forming an alternating current pulse.
What is a sensor
The cylinder block in the engine has a head containing 1-2 camshafts. Additional equipment in this part includes special blades, the main function of which is to control the intake and exhaust valves. The block also includes a crankshaft, due to which the camshaft itself begins to move.
Three elements may be involved in this process:
Operating principle
The rotation position of the camshaft in relation to the current crankshaft position is analyzed during operation of the engine ECU. This is necessary to determine the working cylinder. The camshaft position sensor is responsible for reporting such information. Thanks to the data obtained, the parameters for the further operation of the injectors and spark generation system are adjusted.
The performance of the sensor is influenced by several factors:
There are currently two types of sensors in cars. These are Hall sensors, or electromagnetic types. They are responsible for transmitting the signal to the internal combustion engine unit.
When inductive sensors operate, an alternating current signal is generated. Identification in this case is simplified; two wires are enough for it. In the case of a Hall sensor, creating a signal requires additional power. Therefore, most often there are three wires to the device
This is important to know when replacing the Niva Chevrolet camshaft sensor
Source
Symptoms of a problem
Sooner or later, the sensor becomes unusable, this leads to problems starting the Chevrolet Niva car, and sometimes even to the inability to stop the car while moving. The fuel supply and ignition timing depend on the position of the sensor.
- If while driving you notice a decrease in the dynamics of the car, this will indicate that this element is not corrected,
- This malfunction can also be indicated if the Check light comes on.
- In addition, a faulty sensor can be determined by the generator and timing drive.
- The revolutions go up and down and it all happens without your participation.
First of all, the position of the sensor is checked; the reason for checking may be the slightest resource cost. Also, using diagnostics, you can simply determine whether the device is fixed or not. Diagnostics means removing the product and reinstalling it; it will be in good working order if its values are approximately from 550 to 750 Ohms.
Removal, installation and inspection
Also, the first sign that it has failed is the occurrence of detonation under heavy loads on the engine itself, instability of idle speed, and a decrease in engine power. The state of the node can be understood in several ways. You just need to have the necessary equipment. If the necessary devices are available, we proceed to removing the element.
To remove it and check it, you need to do the following procedure:
- We remove the block with all the wires from it
- Unscrew the screw that secures the crankshaft sensor itself and remove it
- We check with a tester whether it is working or not
- We install the new element in place in the reverse order of removal.
By external signs you can determine the condition of the pads, the DPKV housing and whether the contacts are damaged. If no visual defects are detected, then we proceed to the inspection itself. It is carried out by means of ringing, and as mentioned above, the winding resistance should not exceed 759 Ohms, and not less than 550.
To summarize, we can conclude that this unit is the main one in the electronics, which is responsible for controlling the engine, since if it fails, then starting the engine will be impossible, so it is best to always carry it with you to insure yourself against such unpleasant consequences spare part. If you do diagnostics and subsequent replacement, it will not take you much time and effort. The main thing is to adhere to clear rules for installation and dismantling. To extend the service life of all important elements of the Chevrolet Niva engine, timely and proper care should be carried out, not only for this device, but also for other parts.