A dry and clean engine always pleases any car enthusiast. The first appearance of oil stains is alarming, but replacing the crankshaft oil seal most often solves the problem. The declared service life of the oil seals is 100-150 thousand km. mileage is not always developed in practice.
There are several reasons for the premature failure of crankshaft lip seals: the use of low-quality raw materials in the production of oil seals; engine operation at increased loads, overheating; untimely replacement of engine oil and filter, use of oils that do not meet the requirements.
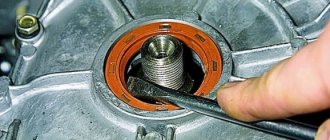
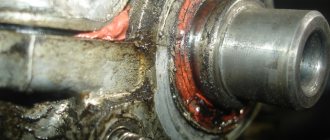
The oil seal was squeezed out and it began to leak - we begin to look for the cause
Any engine malfunction should be a signal for the driver to start searching for the location of the malfunction and the causes of its occurrence. The operation of crankshaft oil seals is not as simple as it seems. Sometimes it happens that a completely new part fails, and the replacement does not give the desired result.
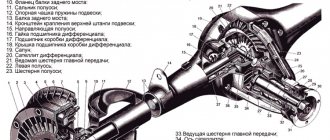
Regardless of the make of the car or modification of the engine, it certainly has a crankshaft, the ends of which at the front and rear are framed with special ring seals. They are called cuffs or seals. The purpose of these elastic rings in a solid cage is to protect the engine from oil loss and prevent dust and debris from entering the crankcase cavity. With the physical wear of parts, everything is more or less clear, but what to do if the crankshaft oil seal, which was installed relatively recently, is squeezed out? Before you undertake another labor-intensive repair, you should look for the cause of the breakdown.
The answer to the question of why the crankshaft oil seal squeezes out and leaks can be quickly found if you examine the crankcase exhaust system. Especially in winter, when a mixture of water condensate and frozen lubricant forms, the breather becomes clogged. In such conditions, the gases have nowhere to go, and the intracrankcase pressure increases. Gas, in search of an outlet, finds the weakest thing - the stuffing box. If this is not corrected, each new oil seal will be squeezed out.
Changing the lip seals yourself
Despite the apparent complexity of repair work, many problems even in the engine can be fixed by drivers themselves in their own garage. Replacing the crankshaft oil seal, both rear and front, is also a completely doable task. It is much easier and faster to change the oil seal in the front part of the engine, while the rear one is closed by the gearbox and clutch, and therefore there will be more work in this place.
Before replacing the crankshaft oil seal, you need to buy two oil seals. Experienced auto mechanics strongly recommend replacing both oil seals at the same time. The front one is slightly smaller in diameter than the back one. They are sold both as a set and separately. The engine must be washed, the car must be secured with a parking brake, and the battery must be disconnected.
Replacing the crankshaft oil seal at the front of the engine
The front oil seal can be changed quickly and easily. Depending on the vehicle model, the oil seal may be installed in the front cover of the cylinder block or the oil pump housing. You can remove the old oil seal and insert a new one without dismantling the supporting part, but it is better to carry out everything according to the instructions.
For VAZ classics, the order of work is as follows:
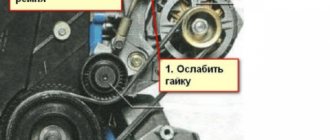
- the tension is released and the generator drive belt is removed;
- the pulley nut is unscrewed, the pulley is removed from the shaft;
- unscrew the bolts and nuts securing the crankcase cover with the oil seal (3 bolts are located in the lower part, holding the pan);
- for cars whose engine is located transversely, as in the VAZ 2110 and the like, it is necessary to dismantle the oil pump housing;
- if you have the crankcase cover and/or oil pump housing in your hands, then it immediately becomes clear how to change the crankshaft oil seal;
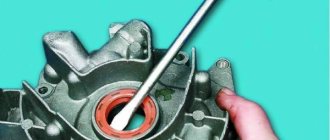
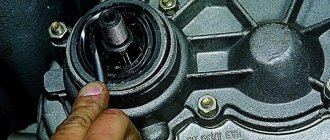
- using a screwdriver or other available tool, remove the old oil seal;
- a new one is pressed into its place through a mandrel of suitable diameter;
- the cover or pump housing is installed in its original place;
- The inside of the oil seal and the end of the shaft are lubricated with machine oil.
Crankshaft oil seal leaking: causes of wear, breakdown
Symptoms of the problem: oil leak in the engine compartment, increased oil consumption. You can often see grease flowing onto the ground under a stationary machine. Of course, constantly topping it up does not solve the problem - you need to change the seals themselves.
There are several reasons why a leak forms:
- improper installation of gaskets, resulting in the formation of cracks on their working surfaces;
- oil flows when the engine overheats frequently, with high pressure in the crankcase (in winter, when ice plugs form);
- natural, physical wear and tear of the material;
- mechanical damage, resulting in leakage;
- low-quality material (typical for domestic products).
High-quality crankshaft seals are made of fluorine rubber FPM or silicone. Regular nitrile butadiene rubber quickly burns out, falls apart and leaks.
Replacing the front crankshaft oil seal
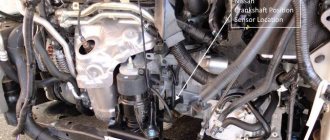
The front crankshaft seal is located on the engine cover or oil pump housing. Most often it is he who leaks. There are motors whose cover is integral with the oil pump.
On foreign car engines, the crankshaft gasket is covered by timing and generator pulleys. They need to be removed. Old Zhiguli engines are simpler; the timing chain is located inside the crankcase; only the generator pulley and belt need to be removed.
To eliminate oil leaks and replace the seal on engines with a timing belt with a gear drive, it is necessary to remove the gear wheels (pulleys): generator, belt. The belt itself is also removed.
Before this, they are set according to the marks corresponding to the location of the first cylinder at TDC (top dead center) in a compressed state. The marks - pulley and crankcase - must match. On other units, the mark on the camshaft wheel should be placed opposite the block connector and the engine head. This adjustment is necessary for the valve timing cycles to work correctly. It is enough to align only the camshaft roller according to the mark.
Next, you need to loosen the tension wheel and remove the belt. Then the gear is removed from the front section of the crankshaft. Use a special puller or two screwdrivers. In units with a chain, only the generator pulley needs to be removed.
After this, remove the old ring through which the oil flows using a special device. If it is not there, then you can dismantle the oil seal cover (or oil pump) on the engine block. This is where the seal is located. It is easier to remove it from the dismantled cover.
Replacing the rear crankshaft oil seal
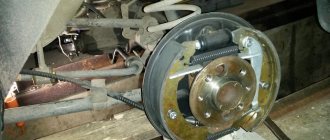
If an oil leak has formed through the rear crankshaft seal, then an inspection hole is needed, since it will be necessary to dismantle the drive elements or driveshaft on rear-wheel drive vehicles. Sometimes a leak in the crankshaft rear oil seal can be eliminated by placing the car on jacks or supports - this is unsafe and is strictly not recommended. You will also have to remove the heavy gearbox. After dismantling it, we also remove the clutch disc. Next comes the flywheel with casing.
When unscrewing the fastener, the flywheel is secured with a screwdriver to prevent it from spinning.
Then the cover is removed, along with the rear oil seal. Replacement is carried out as described above for the front seal. After this, all the parts are assembled in the reverse order: flywheel, clutch assembly, gearbox, drive (propeller shaft).
A useful video on replacing the rear oil seal can be found here:
Inspection to identify oil leaks
If there is a suspicion that the presented device is operating incorrectly, the driver will first need to determine which oil seal is leaking. If a flaw is observed in the rear of the engine, you need to conduct a visual inspection of the pan and gearbox unit. In order to determine whether there is a leak of working fluid, you need to drop a little water onto the pan and observe: if transformer oil is leaking, it will spread over the surface, motor oil will stick to a single drop.
This is interesting: Local car painting: 8 tips for self-repair
What is a crankshaft oil seal and how does it work?
During operation, all engine parts are fairly well washed with engine oil. Oil lubricates moving parts and reduces friction, extending the life of the mechanism. But what about the parts that come out? A striking example is the crankshaft, part of which is connected to the flywheel. After all, when such a part is brought out, oil can flow through the hole for the rotating shaft.
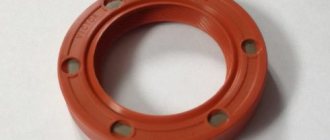
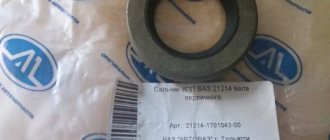
To prevent this from happening, to seal the hole under the shaft, the designers provided a part made of sealed material - the crankshaft oil seal. It is made of silicone or fluorine rubber and is an o-ring with a diameter equal to the diameter of the crankshaft (in the case of the rear oil seal, approximately 99 millimeters). These materials are heat-resistant, which allows the oil seal to be protected from the harmful thermal effects that occur during friction.
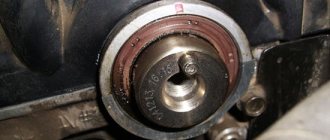
Special inscriptions are made on the outside of the seal. Basically, they talk about the direction of rotation of the crankshaft. This information allows you to correctly install the oil seal when replacing it.
Working principle of the crankshaft oil seal
The oil seal is installed in the place of the block where the crankshaft comes out. In classic cars, where the engine is installed along the hood space, and gas distribution occurs via a metal chain drive, the oil seal is installed in the crankshaft shield in front of the support bearing. Front-wheel drive engines or those with a rubber timing belt are installed in the block itself, since shields are not used on them. However, in both cases, the oil seal has the same purpose - to prevent oil leakage from the cylinder block.
Oil pressure is created inside the crankcase, which presses the oil seal against the parts being sealed. Thus, it ensures reliable sealing of the engine against lubricant leakage.
FakeHeader
Comments 61
This is an old fashioned method; bearings are usually removed this way.
You really messed with the seal, it’s a bit expensive, but what can’t be pulled out any other way?
for invention 5 for skill and ingenuity 5+!
Definitely bookmarked) well done) took note)
Well done, he made life easier for many people :))
And I like your way. I'll remember!
everything ingenious is simple, great!
This is how I remove the inner CV joints. Effective. It should be on the blog. In my case, instead of a pin, there is a roller with hooks on both sides and a piece of pipe on the outside. You have some great info!
Causes of crankshaft oil seal wear
How do you know when it's time to change the oil seal?
A high-quality oil seal made by a trusted manufacturer can seal the block for 150 thousand kilometers. However, there are a number of specific reasons why there is a risk of the part failing much earlier.
1. The oil and oil filter were not replaced in a timely manner. This is explained by the fact that when used oil is used, dust and dirt penetrate into the oil seal installation site, which scratch the surface that requires sealing. Thus, small scratches that appear during operation damage the edge of the oil seal during rotation and cause it to fail prematurely. Scratches can also occur due to poor quality repairs.
Why should you contact a car service?
If you decide to change the oil seal on the engine yourself or contact a garage technician, you should weigh the pros and cons. Incorrect installation or damage to a part during the process not only reduces its service life by half, but can also cause side effects in engine operation. Most often, the spare part is damaged during the installation process when, instead of special equipment, auxiliary tools are used to fit the seal into the socket. In the latter case, it is important to have experience and correctly calculate the effort.
Also, during amateur repairs, the edge of the sealing ring often bends when placed in the seat. The engine continues to leak and the new part must be replaced again.
Contacting the service will save you from the risk of misdiagnosing the problem and additional expenses. An oil seal leak is often confused with a failure of the oil filter, oil pressure sensor, or worn oil pump gasket. The car owner changes the oil seal, but the problem does not go away - because the cause is determined incorrectly. Only an experienced technician can quickly determine the real cause of the breakdown.
How to change crankshaft seals
Replacing the crankshaft oil seal can be divided into two stages. This is a replacement for the front oil seal located on the timing drive side. The second stage is considered to be the oil seal located on the gearbox side.
Video - Replacing the front crankshaft oil seal
There are two ways to replace the oil seal. The first one is quite primitive and invented by drivers who do not want to spend a lot of time on this procedure. The second method is prescribed by the manufacturer and is the most reliable, so we will consider only it.
Procedure:
1. Place the car on the pit and prevent any movement. Unscrew the engine protection and timing cover. Don't forget to disconnect the battery and drain the engine oil.
2. Unscrew the 6 bolts that protect the engine compartment on the right.
3. Loosen the generator belt tension and remove it.
4. Remove the right front wheel and engage the lowest gear. Using a 19mm wrench, loosen (in all cases it turns out to be “tear off”) the pulley mounting bolt. After this, unscrew the bolt and remove the crankshaft pulley. Be careful not to lose the crankshaft key, as without it further operation of the pulley will be problematic.
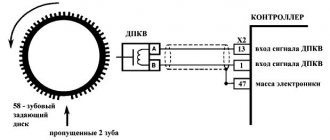
5. Set the piston of the very first cylinder to TDC. To check the position, use the mark in the engine flywheel hatch and the mark on the timing shaft. It is recommended to perform this action with the front wheel raised and in fifth gear.
6. Loosen the tension roller and then remove the timing belt.
7. Unscrew all bolts securing the lower clutch housing cover and remove it. Dismantle it together with the gasket.
8. Unscrew all the bolts (16 pieces) securing the engine crankcase cover and remove it. When assembling the units, it is recommended to replace the gasket.
9. Remove the oil receiver from the oil pump and main bearing. To do this, unscrew the mounting bolts by 10.
10. Using two screwdrivers, remove the toothed pulley from the shaft and unscrew all the oil pump mounting bolts. Thus, it turns out that the oil pump is removed along with the oil seal. The oil seal must be pulled out using any sharp object and, after lubricating the new oil seal, install it in place. Pressing is carried out using a mandrel or an old oil seal.
11. Reassemble the catch in the reverse order.
It is important to know
When dismantling, remember that the weight of the transmission can be several tens of kilograms and it will be difficult for one person to cope with the dismantling.
If possible, call an assistant. Also, oil will drip from the transmission because there are no sealing holes - this is normal. The gearbox is placed on a wooden surface. Do not place it on asphalt - this will damage important structural parts of the transmission. If the muffler pipe interferes with dismantling, first remove it out. When assembling exhaust system elements, it is better to install new gaskets (between the exhaust pipe and the catalyst, as well as the resonator).