We replace the secondary shaft oil seal if the oil level in the gearbox constantly drops, or if the rear part of the gearbox becomes oily.
We carry out the work on an inspection ditch or a lift.
We disconnect the cardan drive from the gearbox (see Replacing the cardan drive) and move it back.
For ease of operation, use a 13mm head to unscrew the two nuts securing the cross member to the body and lower the back of the box until it stops.
Using two 19mm wrenches, unscrew the three nuts securing the elastic coupling to the flange.
To make it easier to remove and install the clutch, you can put a special clamp on it or wrap it with tape (see Features of repairing a five-speed gearbox).
. remove the elastic coupling
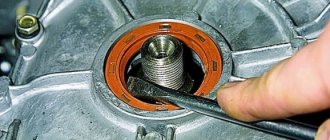
Remove the centering ring seal
Use a puller to remove the retaining ring from the secondary shaft.
Using the bolt in the elastic coupling flange as a lock, use a 30mm wrench to unscrew the nut securing it a few turns to move the centering ring.
Using two screwdrivers, remove the centering ring of the elastic coupling
Unscrew the nut and remove the spring washer.
. Use a puller to tighten the flange of the elastic coupling.
Using a screwdriver, remove the cuff of the secondary shaft. Before installation, lubricate the cuff with a thin layer of any lubricant.
We press the new cuff through a piece of pipe of a suitable diameter or through the old cuff. Install the removed parts in reverse order
When installing a new cuff, you can slightly underpress it, avoiding distortion (if necessary, placing spacers under it up to 1 mm thick) so that the edge of the cuff works along the unworn part of the shaft. In case of significant damage, replace the shafts and cuffs
Work diagram for replacing the input shaft oil seal
Let's look at the example of the popular Togliatti model VAZ-2107. VAZ 2107 belongs to the classic models of the plant, the family of which includes the following cars: VAZ 2101 ;02; 03; 04; 05 and 06. The gearboxes on all classic models are identical in terms of replacing the input shaft oil seal and differ only in the number of steps. These are 4 and 5 speed gearboxes, the differences being in the design of the rear cover and a different shape of the box cushion or, as it is also called, traverses.
Gearbox seal VAZ 2107 - description and purpose
An oil seal is a special seal in a vehicle that is necessary to seal gaps and cracks. For example, in a gearbox, the oil seal plays a vital role - it is fixed at the junction between the moving and stationary mechanisms, preventing oil from leaking out of the gearbox.
The oil seals in the VAZ 2107 gearbox are not made of rubber, as most drivers believe. In fact, this product is constantly in the transmission oil, and to keep production to a minimum, manufacturers make oil seals from CSP and NBR composite materials. At the same time, the gasket feels equally “good” at any temperature - from -45 to +130 degrees Celsius.
Box seal dimensions
The gearbox itself on the “seven” is designed for many years of service. However, the service life of the device directly depends on how often (and in a timely manner) the driver changes the seals. Indeed, during the operation of the machine, it is the oil seals and sealing joints that are the first to fail (tear, wear out, squeeze out). Therefore, timely replacement of the oil seal will help prevent expensive repairs of other gearbox mechanisms.
For proper replacement, you need to know the dimensions of the VAZ 2107 gearbox seals:
- The input shaft seals have a weight of 0.020 kg and dimensions of 28.0x47.0x8.0 mm.
- The secondary shaft seals weigh a little more - 0.028 kg and have the following dimensions - 55x55x10 mm.
Which ones are better
The main question for any VAZ 2107 driver when repairing the gearbox is: which oil seal is best to put on the shafts to avoid rapid wear? In fact, there is no universal option.
The standard equipment of the shafts involves the use of Vologda oil seals, but if necessary, you can install any others, even imported ones.
Industry leaders can be considered:
- OJSC "BalakovoRezinoTekhnika" (main materials of manufacture - composites and alloys);
- (the main manufacturing material is thermoplastic elastomers);
- (made from rubber compounds with various additives).
The most affordable oil seal for a box shaft costs 90 rubles; the more modern the manufacturing technology, the more expensive the product will be valued.
Photo gallery: selection of the best oil seals for the VAZ 2107 gearbox
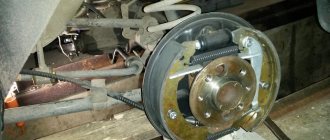
Rear axle
Replacing the rear axle oil seal on a VAZ 2107, as mentioned, is a very important procedure. The rear axle is a car unit that on a VAZ 2107 receives torque from the gearbox through the cardan (see VAZ 2107 repair of the cardan on your own). On rear-wheel drive vehicles, such as the VAZ 2107, the rear axle is its main chassis, without which it is impossible to imagine the vehicle moving. On the VAZ 2107, the rear axle is constantly subjected to high loads and a difficult task falls on the oil seal. Therefore, the driver needs to regularly replace them and try to install high-quality and reliable oil seals.
Types of rear axles
Now let's look at the types of rear axle assemblies, since you also need to know this when replacing the oil seal. The rear axle of the VAZ 2107 has three main types of assembly:
- with semi-balanced axle shafts;
- with independent suspension.
with completely unloaded axle shafts;
The VAZ 2107 uses a semi-balanced axle shaft, which transmits torque and receives its bending moments in horizontal and vertical positions. The rear axle of the VAZ 2107 is made of a solid beam with a ring-shaped part developed in the center. A beam is welded from two stamped steel halves. The oil filler hole is located in the middle part of the beam.
Kinematic diagram of the axle shaft
- The car is installed above the inspection hole. The plug on the rear axle is unscrewed, and the oil from the gearbox is drained into a previously prepared container. The cylindrical flange of the gearbox is wrapped with nylon thread, which is then attached to the dynamometer. The dynamometer is pulled down until the flange begins to rotate. The value observed on the dynamometer at the moment the rotation begins is stored or recorded.
This force is measured using a dynamometer
For this operation it is convenient to use a 27mm spanner.
The flange has been removed from the shank
This operation requires a tube and a hammer.
The flange is tightened with a torque wrench
Video: How to carry out work on a VAZ 2107
Signs of oil seal destruction
The seals are located directly on the shafts inside the box, so their wear can be visually determined only when disassembling the gearbox. However, any driver can quickly detect oil seal damage by eye, because there are obvious symptoms:
- Transmission oil leaks under the car.
- Constantly low oil level in the box.
- Problems with shifting gears while driving.
- Crunching and grinding in the gearbox when changing gears.
There are plenty of options. If there is an oil leak at the junction of the clutch bell and the engine, then it could be either the engine crankshaft rear oil seal or the gearbox input shaft oil seal. If there is a leak at the junction of the clutch bell and the gearbox body, the gasket is kaput. If it is wet at the rear end of the box - the gasket or oil seal of the secondary shaft
Electrician
https://www.vaz04.ru/forum/10–4458–1
It would seem how the performance of such a complex unit as a gearbox can depend on a small part. However, loss of tightness for the box is fraught with big problems, because even minor losses of transmission oil will immediately affect the lubrication of moving elements.
It is recommended to change the oil seals in the VAZ 2107 box every 60 - 80 thousand kilometers. The replacement is associated with an oil change, so it will be convenient for the driver to perform these works at the same time. Before this period, it is necessary to change the oil seal only when there are clear signs of its destruction.
Transmission malfunctions
The box on the seventh model Zhiguli is considered a reliable unit. If you maintain it regularly and treat it with care during operation, then repairs will not be needed for a long time. However, all components and parts are subject to wear. There are many reasons for this. In any case, if a malfunction is detected in the gearbox, it is necessary to carry out diagnostics and repairs.
Most malfunctions occur of the following types.
One of the gears does not engage
Without opening the box, we can assume that:
- the hinges and springs are worn out and need to be replaced, or better yet, a complete repair;
- on synchronizers, the rings have become unusable and need to be replaced;
- synchronizer spring burst, replace;
- The teeth on the transmission gears are worn, replace the gear.
Knocks out gear when driving
It happens that when you turn on a gear, it does not turn off randomly. Possible reasons:
- the lever hinge is jammed, inspect and clean;
- the clutch is faulty, it may not engage completely, adjust it, if the disc is worn, replace it;
- The shift lever is broken, replace it with a new one;
- Forks, shift gears are bent, replace with new ones.
Crunching and grinding in the box while driving
This problem appears for the following reasons:
- the bearings are worn out, they should be replaced, and at the same time check the seals;
- the teeth of the gears are worn out, in this case it is better to make a major repair;
- There is not enough or no lubricating fluid in the gearbox, find the leak and fix it, add oil.
Grease leaking from box
The gearbox is designed so that lubricant cannot leak out spontaneously. But if an oil stain has formed under the car, an inspection should be made and the leak eliminated.
The reason may be:
- wear of oil seals and sealing gaskets due to natural aging of rubber must be replaced with new ones;
- the fastenings of the covers on the box have become loose, tighten all the nuts and bolts completely;
- mechanical damage to the body or lids of the box; if the steel lid is damaged, it can be welded. If the crankcase is damaged, it is better to replace it, since it is cast from an aluminum alloy.
Input shaft oil seal
The input shaft oil seal is located directly on part of the input shaft and is in contact with the clutch housing. Therefore, to replace this product, you will need to remove the casing.
To work you will need to prepare:
- nut heads;
- hammer;
- puller;
- flat screwdriver;
- knife (they are most convenient for removing the old gasket);
- new oil seal;
- transmission oil;
- new input shaft seal.
The procedure for replacing the seal can be carried out either on the removed box or directly on the car. However, it is easier and faster to change the product on a dismantled gearbox:
- Disconnect the gear shift fork from the box.
- Remove the release bearing by clamping it with a puller.
- Unscrew the six nuts securing the clutch housing.
- Remove the casing from the box.
- Use the tip of a knife or screwdriver to pry up the old oil seal on the input shaft and remove it.
- It is good to clean the landing area so that there are no traces of the seal, spraying or oil leaks.
- Install a new oil seal, having previously lubricated it with transmission oil.
- Next, assemble the box in reverse order.
Video: replacement instructions
Pulling out the internal grenade from the gearbox. Video
Therefore, it is better not to try to tear the grenade out of the box by pulling the brake disc, but to insert a prybar under the grenade and a tube under the prybar, try to squeeze the grenade out of the box if it was squeezed out perfectly. It happens that a grenade cannot be squeezed out, then it is knocked down with hammer blows.
Photo. Removed grenade from the gearbox.
But before squeezing out the grenade, place a container to collect the oil; it can be made from an old canister by cutting a hole. If the oil in the box is normal, then it will definitely flow out of the box.
Photo. It is shown how you can use a pry bar to squeeze the oil seal out of the gearbox.
The grenade has been removed, squeeze out the old oil seal from the gearbox.
Photo. Grenade seal location.
Remove the old oil seal, wait until the oil is gone, and wipe the oil seal installation area clean with a cloth. For greater confidence, the new oil seal can be coated with sealants, and with light blows of a hammer on the oil seal circle, it can be seated in place.
Photo. Clogging of the oil seal into the gearbox.
The seal was hammered in, all that remained was to insert the grenade into place. Aim the grenade at the box and push it into place. Then assemble in reverse order.
What’s good is that when replacing the grenade oil seal this way, the alignment and camber of the wheel will not be disrupted, so you won’t have to adjust it.
Photo. The arrow shows the oil filler plug bolt into the gearbox.
All that remains is to add oil to the gearbox. To do this, you need to unscrew the bolt plug, which is good, the bolt plug is also the oil level in the gearbox, oil is poured into the gearbox until it flows from the oil filler hole, as little as it starts to flow out means this is the oil level in the gearbox.
Photo. The arrow shows a watering can with a tube for pouring oil into the box.
There are many different methods and devices for pouring oil into a gearbox. I use a simple watering can and a tube, put the watering can on the tube, and insert the tip of the tube into the oil fill hole in the gearbox. But this method is not very fast, since the oil is thick, but if there is no rush, you can wait a little while the oil fills the box. Usually a liter of oil is enough to top up.
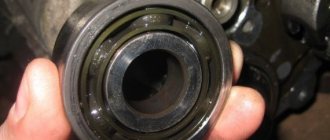
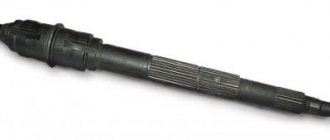
Secondary shaft oil seal
This gasket is located on the secondary shaft and disconnects it from the box flange. In this regard, replacing the secondary shaft oil seal proceeds according to a different scheme and is very different from working on the primary shaft.
To replace you will need:
- spanners;
- screwdriver with a flat thin blade;
- puller;
- pliers;
- transmission oil.
The work progresses according to the following algorithm on the removed gearbox:
- Firmly fix the box flange so that it does not move.
- Turn the nut securing it with a wrench.
- Using a screwdriver, carefully pry up the metal ring and pull it out from the secondary shaft.
- Place the puller against the end of the shaft.
- Press out the flange together with the fixing washer.
- Use pliers to grab the old oil seal.
- Clean the seating area and install a new oil seal.
- Next, assemble the structure in reverse order.
Video: operating instructions
Thus, replacing oil seals on a VAZ 2107 gearbox does not present any serious difficulties. However, inexperienced drivers are advised to seek help from professionals to avoid problems with the car, since working with the gearbox requires knowledge and experience.
How to make a replacement?
To start work, you should send the VAZ-2107 to the pit (otherwise you won’t be able to get to the parts). After this, you need to set the first gear to fix the crankshaft. Attention! The machine must be well secured with the parking brake. To replace the front crankshaft oil seal you will need:
Then everything is assembled in reverse order. The outer diameter of the oil seal is 4 mm, the outer diameter is 56 mm.
Replacing the secondary shaft oil seal of a VAZ 2107 gearbox
The need to replace the secondary shaft oil seal in the gearbox of a VAZ 2107 car arises when oil leakage is detected from the gearbox. The presence of oil drops on the gearbox housing is not allowed, but oil sweating is acceptable, which is not a sign of oil seal damage. To perform the work of replacing the oil seal in the gearbox, you will need a three-jaw puller and fixing glue.
Removing the gearbox seal of a VAZ 2107
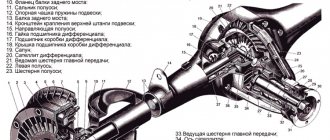
1. We install the VAZ 2107 car on an inspection hole or overpass (see “Preparation of the VAZ 2107 car for maintenance and repair”). 2. On VAZ 2107 cars with an injection system, remove the heat shield (see “Drivetrain - removal and installation”). 3. Disconnect the driveshaft from the rear axle gearbox and unscrew the two bolts securing the intermediate support of the driveshaft to the cross member (see “Driveshaft - removal and installation”). 4. Disconnect the elastic coupling of the cardan drive from the flange on the secondary shaft of the gearbox (see “Drivetrain - disassembly and assembly”) and move the cardan drive back. 5. Using pliers, remove the thrust ring.
6. Secure the elastic coupling flange from turning by inserting bolt A into its hole. Using a 30 mm wrench, unscrew the flange fastening nut and move the centering ring B of the elastic coupling along the shaft.
7. After tightening the nut a few turns, use two slotted screwdrivers to pry up the centering ring and remove it from the secondary shaft of the gearbox.
8. Unscrew the nut.
9. Remove the bolt from the flange hole. 10. Place the screw of the three-jaw puller against the end of the secondary shaft and press the flange off the shaft.
11. Remove the flange along with the washer.
12. Using sliding pliers, remove the damaged oil seal from the gearbox.
Installing the VAZ 2107 gearbox oil seal
Attention
Before installing the oil seal, check the condition of the inner cylindrical surface of the flange in contact with the oil seal.
There may be signs of corrosion and wear that should be removed by polishing. Before installation, lubricate the surfaces of the new oil seal with a thin layer of grease. 1. Press in the oil seal with a mandrel of suitable diameter.
For clarity, we show the following operation on a gearbox removed from a VAZ 2107 car. 2. Use a hammer to press the flange onto the shaft. Having installed the washer, apply fixing glue to the threaded surface of the shaft (according to the instructions for use) and tighten the nut.
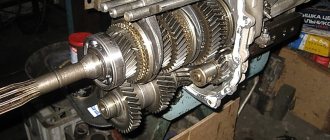
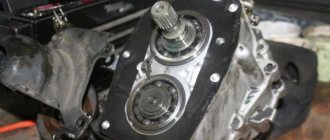
Disassembling the box
Increased noise of the gearbox can be caused by wear or failure of its shaft bearings, as well as significant wear of gears and synchronizers. To determine what is causing the increased noise, you will need to disassemble it.
This work is quite complex technologically, and if the car owner is not confident in his abilities, then it is better to contact a specialized service station, otherwise in the future, incorrect assembly can lead to more significant consequences, or to the fact that the gearbox will not work.
But, if you decided to repair the VAZ-2107 gearbox yourself, then this will require a set of keys and sockets, a powerful screwdriver, and pullers for removing bearings.
First of all, unscrew the nuts that secure the shift lever housing and remove the lever from the box.
Then the exhaust pipe mounting bracket is removed. After this, the bolts securing the rear and bottom covers of the box are unscrewed. This will be enough to visually determine the condition of the gears and synchronizers.
If significant wear is noticed, then most likely the reason for the increased noise in them. But it is also worth checking the box shafts for axial displacement. If there is one, then the bearings are also very worn and require replacement.
To carry out work to replace worn parts, a complete disassembly of the gearbox will be required. To do this, first remove the back cover by unscrewing the nut securing it, access to which is possible after removing the bottom cover.
https://www.youtube.com/watch?v=hqcrKAMxH0k
To make it easier to remove, you will need to move the 1st-2nd gear slider down. Then, lightly tapping the lid, remove it from the studs.
POPULAR WITH READERS: Replacing the timing chain of a VAZ 2107
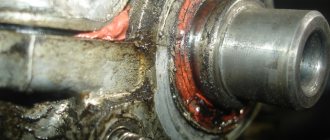
Using a puller, the bearing and the secondary shaft oil seal are carefully removed from the cover housing. If they show signs of noticeable wear, they are replaced with new ones.
Disassembly and reassembly of the gearbox if any malfunction is detected should be performed in the following sequence:
- de-energize the system by removing the negative contact from the battery;
- dismantle the radio panel;
- slightly move the locking sleeve down and remove it from the rod cavity;
- with a sharp movement we pull the rod out of the gear shift lever;
- remove the upper and lower bushings from the lever;
- dismantle the gearbox cover, which is fixed with four screws;
- remove the cover that protects the handbrake from dirt, and then unscrew all the fasteners located on the floor of the car;
- dismantle the hoses through which warm air is supplied to the air filter;
- move the starter forward a little, then unscrew the gearbox housing plug and drain the transmission oil;
- dismantle the muffler and disconnect the universal joint, the reverse switch and the speedometer cable, which connects the part to the gearbox;
- disassemble the clutch housing cover and the cardan drive;
- disconnect the last fastenings of the gearbox, move it back a little and remove it out.
If the user has never encountered the repair of such a complex unit, the procedure should be carefully prepared.
- Disassembly of the mechanism is carried out only after it has been completely cleaned of dirt.
- All the tools required for disassembly are pre-prepared - keys, squeezes, pliers, lock ring pullers. It is also advisable to have a separate container for storing small bolts, nuts, and washers.
- It is necessary to dismantle the mechanism parts by first treating the bolts with an anti-boiling agent.
- When disassembling, the units are folded in the dismantling sequence.
- Human memory is extremely unreliable - a photograph of a disassembled mechanism before its reassembly is the best reminder.
- All gaskets without exception must be replaced. Recycling of seals is strictly prohibited.
- No one has canceled the abundance of the cleaner. When washing the structure, you should not skimp on the cleaning material; the better you wash it, the more fun it will be.
- Assembly of the unit is carried out exclusively in the reverse order.
- If after installation there are excess parts left (which is not uncommon), the entire gearbox is completely rebuilt.
It is also necessary to maintain maximum cleanliness during work. Dust, metal shavings, or foreign objects can cause serious damage to the gears.
The meaning of the primary and secondary shaft oil seals
The direct and main purpose of these small parts is to reliably seal the metal parts and connections of the gearbox housing and other parts of the vehicle system to prevent transmission oil from leaking. Oil seals are made of durable polyurethane alloy using special compounds, since they are constantly in an aggressive environment. Oil is constantly present inside the parts, which negatively affects the condition of the part over a long period of time. Externally, these parts can be damaged as a result of mechanical stress due to breakdown or under the influence of an aggressive natural environment. The average resource or lifespan of units largely depends on operating conditions.
The manufacturer does not provide a specific guarantee for these parts; accordingly, it does not limit their service life; planned replacement is not required at certain mileages. However, in most cases, under normal operating conditions, the service life of the parts is sufficient for runs of up to 200 thousand kilometers. When used in harsh natural conditions, reliability decreases accordingly, and with it the service life of up to 100 thousand kilometers.
These parts are located at the junction of the transmission with the clutch in the case of the primary shaft, and the secondary one is located directly inside at the junction of the flange and the gearbox housing. Sealing of pipes and hoses, as well as metal parts, is achieved by tightly connecting two parts directly to the seals, which is a circle with several layers of polyurethane material. It is precisely because of the unsatisfactory condition of these small parts that transmission fluid often leaks outside the box. Therefore, responsible owners, when the first signs of malfunction appear, replace the part with a new one. Due to their simple design and the absence of any moving parts, these units cannot be repaired; they are simply replaced with new ones. However, their failure can cause major consequences in the form of failure of the entire gearbox as a result of oil “starvation”. Therefore, preventing the condition of oil seals is one of the important procedures in the daily maintenance of the VAZ 2107.
Dimensions of oil seals in the VAZ 2107 gearbox
To correctly replace VAZ 2107 gearbox seals, precise geometric dimensions are required, as well as the weight of the product. Otherwise, when installing other parts, the operation of the entire gearbox may be impaired, which may also lead to breakdown. The manufacturer has established clear dimensions for the VAZ 2107 gearbox seals; these parts must fit under them, regardless of the company that will produce them for installation on this model. For the secondary one, the length is 55 mm, the circumference height is also 55 mm, and the width/thickness is 10 mm. The secondary seal weighs 28g, although weight may vary by supplier and is not particularly significant.
Purpose of the gearbox oil seal
All classic Lada car models, up to VAZ-2108, have rear-wheel drive. Starting from VAZ 2108 and higher, cars are driven by front-wheel drive. Everyone knows that a gearbox is a device through which torque is increased with its further transmission from the cardan to the rear wheels. All parts of the rear axle operate predominantly in an oil environment, which has a positive effect on the following factors:
- The service life of rubbing parts increases due to reduced wear.
- The heat generated by gear friction is removed.
- The friction force is reduced.
- The gears are cleaned from metal dust and shavings that are formed when metal parts come into contact with each other.
Diagnostics of VAZ 2107 gearbox seals
A responsible car enthusiast, owning a domestic rear-wheel drive car, is obliged to constantly monitor the condition of many units and components. One of these are oil seals. There are simple but quite labor-intensive means of checking and preventing these parts. To do this, you need to lift the car on a lift or drive it into a pit and conduct a visual inspection of the box body. In the places where the seals meet the parts of the clutch or rod there should be no fogging in the form of oil stains or drips of this substance. Fogging at the place where the part is attached is the first sign of failure; even if there are small spots, it is necessary to replace it, since the leak will only increase in the future.
It is also necessary to wipe and clean the parts from dirt and dust and inspect them for cracks, which may subsequently leak.
The simplest method of prevention without using a lift is to periodically check the oil level in the crankcase using a dipstick.
In addition, one of the signs of failure of parts and the subsequent need to replace the seal of the VAZ 2107 five-speed gearbox is a crunching sound when shifting gears both down and up. Also, this situation may be accompanied by a parasitic hum, which is not inherent in this type of box. At the first signs of malfunctions, it is necessary to urgently carry out a visual inspection, either yourself or go to a specialized service.
Changing the front oil seal yourself
The first step is to disconnect the protection from the motor. We take an eight millimeter key. It is necessary to unscrew the front, rear and side screws. We remove the protection. If the car is fuel-injected, then removing the additional shield will not be too difficult.
Next, you need to remove the generator, which would make it easier to get to the pulley.
We unscrew the generator nut, then move the generator, the belt will relax and it will be easy to remove it.
Using a special wrench, unscrew the nut that secures the crankshaft and carefully remove the pulley.
This is where the seal itself is visible. It may have cuts or tears. Carefully remove it with a screwdriver and wipe the area. Lubricate the new oil seal with oil and place it in place. Using a hammer, carefully press the part into the lid.
The work of installing the new oil seal is completed. Then you need to install the pulley and belt. Next, we install the protection back.
- ratchet crank;
- set of heads;
- twelve hexagon;
- two slotted screwdrivers;
- hammer;
- jack;
- wheel bolt wrench;
- mandrel for installing the oil seal;
- penetrating lubricant;
- container for collecting oil;
- torque wrench;
- digital or mechanical scales;
- fresh oil to the rear axle.
- We drive the car into the pit and unscrew the propeller shaft mounting bolts, having previously made a mark on the flank of the cardan and gearbox. After unscrewing the cardan, we tie it with a wire so that it does not interfere.
Using a special wrench, we secure the flange from turning and, using a wrench or a twenty-seven socket, unscrew the nut. The key for fixing the flange is shown in the photo below. You can also screw two universal joint mounting bolts into the flange and insert a powerful screwdriver between the bolts.
Unscrew the plug and drain the oil from the rear axle.
We remove the flange from the slots and take out the thin ring behind it using two screwdrivers.
- Using two screwdrivers, remove the inner race of the bearing.
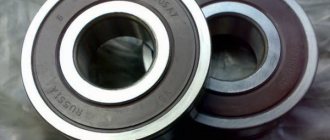
- We take out the spacer sleeve. This bushing is needed to create the correct tension in the bearings. Please note that the belt of the bushing you removed is barrel-shaped, but on the new bushing it is straight. At the moment of tightening, the belt is wrinkled and the correct tension is achieved. The photo below shows a new bushing and one that was already working.
- We install a new bushing, with the narrow side facing the trunk. We also install the ring.
- We hammer the oil seal into place using a mandrel.
The mandrel can be made from a piece of pipe of suitable diameter or from an old oil seal. As a last resort, the oil seal can be carefully seated with a hammer. Lubricate the sealing edge with fresh oil and place the flange on the splines. Make sure that the sealing lip of the oil seal does not curl up.
How to change the oil seal on a VAZ 2107 gearbox
The procedure for replacing the rear oil seal of a VAZ 2107 gearbox differs from that on the front part due to the design features of the fasteners, as well as the very location of the parts and their design. In general, both procedures are divided into several stages.
Replacing the input shaft oil seal in a VAZ 2107 gearbox
Replacing the front oil seal of a VAZ 2107 gearbox occurs in several stages:
- First you need to disconnect the parts of the clutch with which this part interacts by dismantling the clutch fork, housing and release bearing, which are secured with several bolts.
- Then it is necessary to dismantle the casing itself, thereby freeing up space for removing the oil seal itself.
- After this, you should remove the used part by removing it from the seat using a knife. The vacated seat must be carefully processed to remove any remaining waste oil from the part, as well as other contamination.
- A new unit is installed in its original location, lubricated with transmission oil, and the entire system is reassembled in the reverse order.
Replacing the secondary shaft oil seal in a VAZ 2107 gearbox
The secondary oil seal is changed in another way:
- Fix and dismantle the gearbox flange, since it is this part that is fixed to the secondary oil seal.
- After dismantling, it is necessary to press it out using a special puller and gain access to the oil seal itself.
- Next, use a screwdriver or other tool to remove the used part, and also treat the landing site.
- Install the new element and reassemble in reverse order.
The list of works includes the following actions:
- removing the locking sleeve from the plane of the assembly by inserting a screwdriver into the locking hole of the sleeve;
- dismantling the lever rod; dismantling the damper bushing; release the fixing bolts of the cover, which are located on the bottom of the car and remove the lever with the seal;
- disconnect the pipe from the exhaust system;
- dismantling the starter and gradually disconnecting the lamp wire (reverse);
- dismantling the cardan transmission and flexible shaft;
- releasing the clutch housing bolts using a socket wrench;
- disconnecting the clutch from the block;
- Carefully remove the PP box.
Disassembly of the box occurs in a strictly defined sequence.
Tips and recommendations for replacing the oil seal in a VAZ 2107 box
There are many manufacturers of spare parts for VAZ cars on the market. These are both domestic and foreign enterprises. A lot of these also produce seals. However, the negative side of diversity is the unstable quality of spare parts. There are frequent cases of defects, regardless of the country of origin. Therefore, responsible drivers should carefully examine the unit when purchasing it for quality of workmanship, the presence or absence of cracks.
In general, despite the low cost of the part itself, the installation process takes quite a lot of time, so the best option would be to purchase the part from the car manufacturer itself, which complies with the design dimensions, as well as the production technology of original spare parts.
Also, when installing new parts, it is always necessary to have a drain container on hand to remove excess parts of the transmission fluid, as well as new fluid for subsequent topping up.