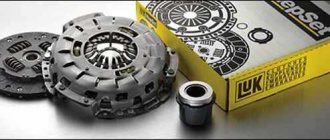
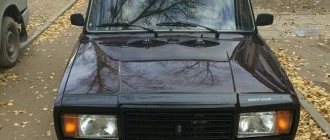
Many VAZ 2107 car owners carry out repair work on their car on their own. And the clutch mechanism is no exception. Although this task is labor-intensive and cannot be called simple, the owners of 2107 have long learned to do it on their own. Today we will tell you how to replace the clutch disc of a VAZ 2107: the video will be presented at the end of the material.
The clutch in a vehicle plays the role of ensuring smooth gear shifting by briefly disconnecting the VAZ engine from the transmission system. It is precisely because the car has a clutch that it can move off smoothly without overloading the engine and helping to increase the service life of most of its elements. This includes the gearbox itself.
VAZ 2107 car
How to center the clutch disc?
Ford Mondeo I 1993 - 1996
I want to change the clutch! How to center the clutch disc? I don't have the input shaft from the Ford box! What can you think of? Anyone who has encountered this, please tell me! Maybe something will work or something to do? Thank you.
There are several ways to center the clutch disc:
- Expose it to the eye. If you take your time and look carefully and thoughtfully, everything will work out. Accuracy is quite enough.
- If the eye is deceiving, then loosen the fastening of the basket so that the driven disk dangles freely in it. And when putting on the box, first we catch the driven disk with the input shaft, and then the KV bearing. Lastly, tighten the clutch basket bolts.
- Carve the wooden mandrel. Measure the inner diameter of the bearing in HF and the inner diameter of the spline in the driven disk and make a mandrel based on these dimensions.
For example, on a Ford Focus, alignment is done this way:
A “12” head is used (50 mm long and 17/15 mm in diameter).
The driven disk is centered along its splined hole and the hole in the crankshaft flange (under the shank of the gearbox input shaft).
When installed, the “basket” is centered on three pins pressed into the flywheel.
for repair Ford Mondeo I
Subscribe to our channel in Yandex.Zen
Even more useful tips in a convenient format
Clutch classifications
Clutch designs may vary. They differ in how they are controlled and in their structure.
Classification by control method:
- with mechanical drive;
- with hydraulic drive;
- with electric drive;
- with a combined drive (for example, hydromechanical drive).
In order for a mechanically driven clutch to work properly for as long as possible, you just need to smoothly press and release the clutch pedal.
Classification by type of friction:
- dry friction is when friction linings (discs) operate in air;
- wet friction is when the discs operate in an oil bath.
Classification by switching mode:
Classification by the number of slave disks:
Classification by type and location of pressure springs:
- several cylindrical pressure springs are located around the perimeter;
- The diaphragm pressure spring is located in the center.
Classification according to the number of torque transmission streams:
How to center the clutch disc?
I'll change the clutch. How to center a disk without a primary shaft? Thank you.
Replacing the clutch on Ford Mondeo cars is a pressing problem. Unfortunately, if you do not have a factory Ford shaft, this will not be easy. When replacing this mechanism, it is necessary to center the disk. Read about the ways in which this can be implemented in the article.
Methods for centering the clutch
The disc in the clutch mechanism can be centered using factory or improvised methods. To do this, it is not necessary to go to a service center or workshop. Below are the main calibration methods:
- Alignment can be done by eye. If you approach the issue thoughtfully and without haste, it is quite possible to set up a high-quality disc.
- If you are not confident in your own abilities, then loosen the clutch driven disc until it is “loose”. When assembling the mechanism, you should start with the driven disk, and then put on the KV bearing. The last step is to tighten all fasteners.
- Having made measurements of the bearing and spline in the disk in advance, you can make a mandrel from wood. This accuracy will be sufficient.
Let's look at alignment using the Ford Focus as an example. A 12 mm head is used, which is installed in the spline hole and in the crankshaft.
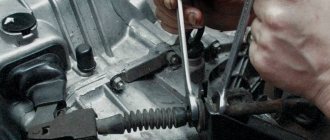
Replacing the clutch slave cylinder
First, we disconnect the cotter pin element, which drives the hydraulic drive mechanism itself, using pliers. We use them to remove the spring. We do not scroll the fitting hose completely.
Do-it-yourself engine repair - major restoration and maintenance of an internal combustion engine
DIY bumper: how to make a unique polymer bumper for a car at home (125 photos)
Do-it-yourself car painting - preparation for coating and the main stages of high-quality car painting (100 photos)
Using the 13th key, remove the 2 bolts from the crankcase. And only now we take out the pusher. Access to the cylinders is open. How to further replace the working clutch is shown in more detail in the video.
Clutch replacement process
The process of replacing the clutch disc is not very difficult, but requires careful attention to each step. Do not deviate from the following instructions:
- First, remove the front wheels and disconnect the battery. Also remove the air filter box and the plugs adjacent to the mass flow sensor;
- Disconnect the clutch cable. Also, the clutch fork must be disconnected;
- To gain full access to the gearbox, the engine protection is removed;
- Next, the starter is dismantled;
- Loosen the nuts on both hubs. Unscrew the left nut completely;
- Remove the gear shift actuator;
- Remove the engine mount from the box side;
- Drain the gearbox oil;
- Disconnect the inner CV joints with a pry bar;
- Disconnect the bolts securing the clutch basket to the flywheel and remove the complete set;
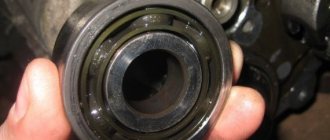
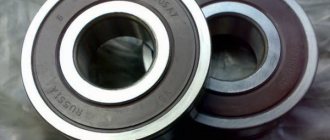
- With the basket removed, disconnect the release bearing and clean the input shaft from dirt;
- If necessary, replace the entire basket assembly. Reassemble all elements in reverse order.
Don't forget to fill the gearbox with new oil after assembly.
To save time and reduce the number of manipulations, you can replace the clutch without removing the box. At the stage of detaching the fastening bolts, it is enough to move the box to the left. This will be enough to replace the disk without removing it. Having studied the question of how to replace the clutch on a VAZ 2114 with your own hands, you can do the work of changing the disc yourself, but to adjust the cable it is better to turn to professionals. Incorrect adjustment can lead to the fact that when the gears are engaged, the rocker will jam and other problems may arise. Instructions with step-by-step adjustment can be found online.
When to adjust the clutch
Adjustments should be made according to a schedule or when some signs of a slight change in clutch operation appear.
Signs when it is necessary to diagnose the clutch:
- The idle speed of the clutch pedal has increased, which is why the gearbox shafts are not completely disengaged (the gearbox shaft receives rotation from the engine crankshaft flywheel).
- There were jerks and jerking of the car at the start.
- The clutch pedal (PS) does not immediately return to its original position.
- There is a brake fluid leak from the system. It can be solved by eliminating the leak, adding fluid and bleeding the clutch.
- Noise appeared when changing gearbox speeds.
To understand whether the clutch pedal needs to be adjusted, you can measure the distance with a ruler. The normal distance from the floor to the pedal is about 16 centimeters.
Adjustment Guide
The mechanical principle of the clutch is driven by a cable. By adjusting the cable, the pedal stroke length is adjusted. So:
- We find the corresponding cable under the hood, at its end we see a bolt with lock nut 1. Turn the adjusting nut 2 and set the pedal free play distance to 13 cm.
To increase the length of the idle stroke of the pedal, the nut must be tightened, and, accordingly, to reduce the length of the idle stroke of the pedal, it must be unscrewed.
- After adjusting the pedal distance, you need to press and release the pedal three times. Then, again measure the distance from the floor to the pedal. If the distance has changed, we adjust it again so that the distance is 12-13 centimes.
Setting the hydraulic clutch drive
The main problem in hydraulic systems is the formation of an air lock. The method for adjusting the clutch hydraulic drive is to set the required clearances between the rod and the piston of the master cylinder. The required distance between the friction ring of the pressure plate and the release bearing is also set.
- Remove the spring from the master cylinder bracket and fork.
- Measure the gap between the pusher and the release fork. The normal distance is 5 mm.
- Turn the adjusting nut on the rod and set the gap to 5 mm. 5 mm is the gap, that is, it is the free play of the fork.
There are drives of a different principle of operation, but in cars either hydraulic or mechanical clutch drives are installed. On VAZ 2101, 2102, 2103, 2104, 2105, 2106, 2107 cars there is a hydraulic clutch drive. On VAZ 2108, 2109, 21099, 2110, 2111, 2112, 2113, 2114, 2115 cars there is a mechanical drive.
Puller drawings. Repair equipment. Tool
Rear hub and brake disc remover.
A device for removing the CV joint from the gearbox.
Made from an old open-end wrench with a welded pipe.
A vodka cap is suitable, but other suitable containers can be used. The principle is shown in the figure. We apply oil and everything goes completely smoothly.
The puller consists of three parts. Moreover, different half rings are needed for the outer and inner CV joints.
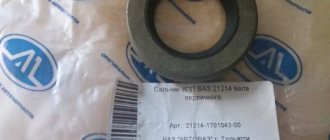
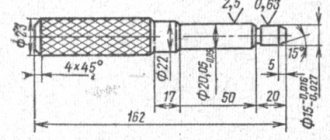
A set of mandrels for pressing oil seals into the gearbox.
Drawing of a mandrel for installing oil seals.
Device for grinding valves.
Device for grinding valves.
A device for grinding valves using an electric drill.
The device for grinding valves using a drill is a crank mechanism.
The procedure for assembling the device and the nature of the connection of its parts are given below.
The rotational motion from the electric drill is transmitted to the roller 1, disk 11 with the crank (pin) 12 and is converted into the rocking movement of the slide 4, which, in turn, is converted into the required rocking movement of the lever 9.
Lever 9 is connected to roller 7, which ensures the lapping movement. The connection of the roller 7 with the valve is carried out using a suction cup.
Valve grinding occurs as follows. We hold the drill with one hand, and with the other we hold on to body 5. There is no need to press the valve, the weight of the drill is enough. During operation, we gradually turn the device, moving the grinding zone. An external sign of the end of lapping is the receipt of an even, continuous matte or shiny strip 1.2 mm wide on the working surfaces of the valve and its seat.
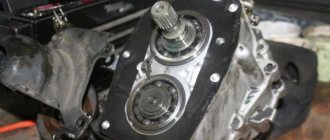
Removing the clutch
1.Hang it in front of the car, preferably higher on jacks on both sides.
- Unscrew and remove both front wheels and place them under the car for your safety.
- Remove the battery and air filter (required)
- Disconnect the clutch cable from the gearbox and remove it from the bracket (two 17 mm wrenches)
- Unscrew the bolts securing the ball joints to the steering knuckles (17 mm wrench);
- Loosen the rear mounting of the left trailing arm (24 mm socket);
- Unscrew the bolts securing the left extension bracket (17 mm head) and rotate the lever 90 degrees downwards;
- Disconnect the ground from the gearbox (if it is attached to it, use a 13 mm wrench);
- Unscrew the lower flywheel protection cover (10 mm wrench);
- Unscrew the left power unit support (two 17 mm keys);
- Unscrew the rear support of the power unit from the body (17 mm wrench) and the gear shift drive clamp (two 13 mm wrenches), remove the gear shift drive
- Unscrew three bolts and one nut securing the gearbox to the engine;
- Carefully, tilt the power unit, remove the gearbox from the engine and leave it hanging on the drives;
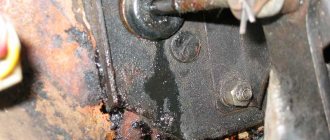
- Very carefully, using an 8 mm socket with sharp edges, unscrew the clutch basket;
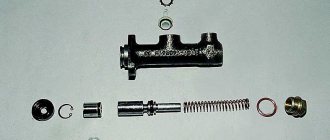
Changing cylinders
There is a reason to change the main cylindrical system if the functionality of the system does not improve after replacing the o-rings. Replacement with new clutch cylinders is installed when the brake fluid runs away even after replacing new cuffs.
Perform the process of removing the working cylinder and installing it according to the following diagram:
- We get rid of the spring near the pedal.
- We unscrew the two nuts that secure the cylinder to the gearbox;
- The process of unscrewing the rubber hose attached to the working cylinder is carried out by weight;
- We screw a new type cylinder to the hose to avoid leakage of the brake compound;
- We pump everything out of the cylinder, unscrew the fitting, close the hole;
- We unscrew the nuts that secure the master cylinder to the car body;
- To release the hinge connected to the pedal, you need to pull it towards you. Pull out the pin, this will release the cylinder from the pedal.
- Install the two cylinders in the same way as you disassembled them.
After replacing the cylinders, bleed the main clutch. When the air stops escaping, the cylinder is installed correctly.
Product delivery options
Note! Below are the shipping methods available specifically for this product. Payment options may vary depending on the shipping method. Detailed information can be found on the “Delivery and Payment” page.
Parcel by Russian Post
Available payment methods:
- Cash on delivery (payment upon receipt)
- Using cards Sberbank, VTB, Post Bank, Tinkoff
- Yandex money
- QIWI
- ROBOKASSA
Shipping throughout Russia. Delivery time is from 5 to 12 days.
Parcel by Russian Post 1st class
Available payment methods:
- Cash on delivery (payment upon receipt)
- Using cards Sberbank, VTB, Post Bank, Tinkoff
- Yandex money
- QIWI
- ROBOKASSA
Shipping throughout Russia. Delivery time is from 2 to 5 days. More expensive than regular delivery by Russian Post, approximately 50%. Parcel weight up to 2.5 kg
Express Parcel EMS
Available payment methods:
- Cash on delivery (payment upon receipt)
- Using cards Sberbank, VTB, Post Bank, Tinkoff
- Yandex money
- QIWI
- ROBOKASSA
Shipping throughout Russia. Delivery time is from 3 to 7 days. More expensive than regular delivery by Russian Post, approximately 100%.
Transport companies
Available payment methods:
- Using cards Sberbank, VTB, Post Bank, Tinkoff
- Yandex money
- QIWI
- ROBOKASSA
Delivery is possible to any locality where there is a representative office of the transport company. Delivery time is from 2 to 10 days. Sending large parcels is approximately 50% more profitable than by Russian Post.
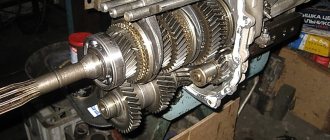
Replacing the clutch cable of VAZ 2113, 2114 and 2115
Another repair and restoration operation to restore the clutch’s functionality can be done with your own hands - replacing the cable. It is less labor intensive. Replacing the VAZ 2114 clutch cable is carried out in the following order:
ABOUT THE CLUTCH DEVICE
Its design on this car is similar to mechanisms 2113 and 2115. It is made of a dry, single-disc mechanism. It is produced with a device that dampens torsional vibrations, and also has a pressure spring. The VAZ 2114 clutch device is shown in the figure.
Clutch components
The VAZ 2114 clutch consists of (see picture):
- Cable with a casing;
- Cable tip (lower);
- Adjusting nut;
- Housing for attaching the shell to the gearbox;
- Separating washers;
- Nut for adjustments;
- Rubber protective shell;
- Cable lead;
- Shutdown plug;
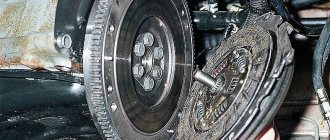
- Basket;
- Bolts securing the basket to the flywheel;
- Pressure disk;
- Flywheel;
- Driven disk;
- Gearbox input shaft;
- Shield;
- casing;
- Spring (pressure);
- "Squeeze";
- Pad;
- Release housing;
- Cable end;
- Cable thrust washer;
- Cable fastening unit;
- Pedal axle;
- Release spring;
- Off pedal.
As can be seen from the mechanism diagram, there are two working units, one of them will be the master, and the second will be the slave. The second includes a disk with linings riveted on both sides and damper springs installed. It is installed and moves along the splines that are present on all gearbox input shafts. When the pedal is pressed, the driven disk is pressed against the flywheel by the pressure disk.
The drive unit includes a pressure disc with a clutch housing, which is attached to the flywheel with six bolts. To center it, there are pins on the flywheel and guide holes in the housing. The clutch has a backlash-free design and is operated by a cable.
To turn it off, a clutch drive is installed, which operates by pressing the pedal. The cable is hingedly attached to it with its upper tip. The lower end of the cable also has a hinged connection with the shutdown fork. With its movement, the “cable” turns it, and it moves the “releaser”.