Hi all! Another experiment has come to an end. Last winter, I experimented with removing the gearshift lever linkage. www.drive2.ru/l/4751686/ The reason for this was excessive vibrations on the gearshift lever and clearly audible transmission noises.
The effect of removing the thrust was not bad, the lever dangled a little more when the engine jerked, but at the same time the shifts remained almost as clear as with jet thrust, vibrations were slightly reduced and these same noises completely disappeared. For half a year of such operation, the transmission has never been knocked out. In a word, everything was wonderful until summer came. In the cold season, the rubber on the engine mounts became dull and everything was fine, but in the summer, in the heat, the rubber on the engine mounts becomes much softer and the vibrations of the engine, and with it the gearshift lever, increase.
I decided to return the jet thrust back. In order not to saw or cook the old rod, I decided to buy a new one. Finding it turned out to be not so easy, the sellers looked at me like I was an idiot, like how did you break it?! They offered the assembled drawstring for 750 rubles, but naturally I didn’t want to overpay. As a result, I had to order, and a week later the cherished stick arrived. It cost 200 rubles.
How to remove the VAZ-2110 gearbox shift drive
Page 1 of 2
We remove the shift drive when repairing it and dismantling the gearbox.
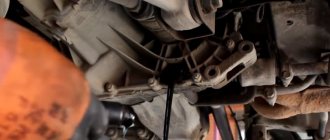
We carry out the work on an inspection ditch or a lift.
1. Using a 13mm socket, unscrew the two nuts securing the buffer bracket
2. and remove the bracket.
3. Using a socket and a 13mm wrench, unscrew the two bolts securing the torque rod to the race of the ball joint of the gear shift drive.
4. We move the jet thrust down.
5. Using two 13mm wrenches, loosen the coupling bolt of the torque clamp and move the clamp back.
6. Remove jet thrust.
7. If it is necessary to replace the thrust damper, use a “13” wrench to unscrew the nut securing the eyelet
8. Remove the eyelet with the damper.
9. The jet thrust damper can be replaced without removing the thrust itself. To do this, loosen the linkage clamp, and then use a 13mm wrench to unscrew the two bolts securing the damper bracket to the gearbox housing.
10. Remove the bracket with the damper, removing the splined shank of the eye from the hole in the rod.
Why do you need a gearbox slide?
In fact, most often the gearbox is in good condition, but the rocker may fail.
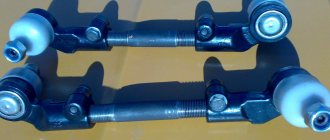
The drawstring is assembled.
You can replace the unit with a new one, or you can get by with proper adjustment of the rocker. Adjusting this element will help troubleshoot problems and make sure that the problem is related specifically to the gearbox linkage. It happens that a car owner simply begins to change one component after another without understanding the problem, wasting money and time to no avail.
The gearbox itself is designed to prevent gears from switching spontaneously . It happens that due to incorrect or erroneous adjustments, the entire transmission system begins to work incorrectly and may even fail. Therefore, you need to be able to adjust the gearbox rocker with your own hands, especially since this procedure is not complicated.
When does the rocker need adjustment?
Gear shift mechanism.
The procedure for adjusting the gearbox linkage is recommended in the following cases:
- After the transmission on the car has been replaced or removed.
- When loosening the fixing clamps.
- If the cardan was changed.
- If the link starts to rotate on its hinge.
Although visually it may seem that the rocker is in place, even the slightest movement of the rocker can lead to incorrect operation of the gearbox. It happens that it is enough to tighten the link to the cardan by 1 mm, after which all functions of the gearbox will be restored.
Jet thrust VAZ 2110 operating principle
Dear visitors of the site “Everything about cars”! We will be very grateful for your comments on the video clip “Jet thrust VAZ 2110 principle of operation”; registration is not required for this. We also ask you to let us know if you have any problems playing the video.
the man is handsome. as if he’s not being filmed on camera, but actually talking to the guys =DDDD . as if the guys were sitting in front of him and listening to him =DDD
11/15/2017 — 06:44 Suleman Huleman
How much did you pay for the car?
thank you, I won’t install it, I didn’t think it would ruin the box
Make a video about the location of the masses and all possible glitches due to the masses, twisted almost everything, I can’t understand where the dog is buried from the car, it’s giving an electric shock, the bsk shows that the light bulb has just burned out, other indicators do not show and half of the instrument panel lights are not working, the lamps are ok
09.15.2017 — 20:04 Nemoy, kz
Well, good, your opinion about the cardan is wrong. I've been racing with him for 2 years now, and everything is fine. There's just a little more vibration on the gearbox. Think about it yourself, how can you break the box with an ordinary cardan? ahahahahahahahah nonsense.
09.14.2017 — 15:25 komm18
You're a funny man:
09.13.2017 — 08:46 Alexey Sushka
Thank you, I also installed the Kalinovsky, vibrations and ringing appeared on the lever.. I decided to return it to my original one. Why eight?
08/24/2017 — 20:38 Jason Crow
The Kalinovsky cardan needs to be sawed off a little to shorten the rod, in the original they are not installed on the Kalina, in all the manuals they write on the net, I’ve been driving for 3 years with no problems. And when installing a Kalinovsky cardan, you also need to put a Kalinovsky boot on it, for some reason everyone forgets about this, of course you can do it with the original one, but with a Kalinovsky one it will be better.
Preparing to adjust the rocker
On an old car, it is better to lubricate the linkage mounting assembly with a penetrating compound in advance.
Before starting adjustment work, you need to prepare the place and carry out the following preparatory measures:
- The car needs to be parked in a pit.
- The handbrake must be tightened all the way.
- It is mandatory to install wheel chocks.
For a faster and better adjustment process, it is better to perform all work with an assistant. The process itself can occur in several ways.
First adjustment method
To adjust, you need to loosen the clamp connecting the rocker drive to the cardan.
This method is the simplest. In this case, the gearbox linkage is adjusted according to the reverse speed . First of all, you need to loosen the clamp, after which the reverse gear is engaged. Then you need to position the lever in the position you need. After this, the clamp is tightened and the operation of the entire mechanism is checked.
If you don't succeed the first time, you need to listen for knocks and crackles when switching . They must either decrease or increase. In accordance with this, you need to position the lever in the desired direction. If all manipulations do not lead to the desired effect, you need to resort to another adjustment method.
Second adjustment method
The gear shift lever should rest against the locking plate (in the photo it is made of light plastic).
This method is used if the first one did not lead to the desired results. When using it, you can more clearly position the gearshift lever. This method is as follows:
- The gearshift lever switches to first speed.
- The backstage clamp is completely loosened.
- Next, you need to turn the drive of the rocker itself counterclockwise until the lever rests against the reverse speed stop.
- The backstage clamp is tightened.
Tighten the clamp fastening nut, eliminating the shift of the rod during operation.
- The operation of the gearbox is checked.
It happens that some VAZ-2110 cars do not have a plastic limiter retainer, so the adjustment in this case is carried out not in first gear, but in neutral.
Third adjustment method
This method is quite complicated , as it involves calculating the depth of the gearbox linkage to the cardan. Due to this, the position of the lever in the neutral position can be accurately calculated and adjusted. It happens that if the calculation is not accurate enough, all manipulations only lead to the appearance of rattling when changing gears.
If adjustment by any of the above methods does not lead to the desired results, several options are possible to solve the problem:
- Carry out diagnostics at a service station to make sure that the problem is in the gearbox linkage.
- You can replace the gearbox linkage.
- You can contact specialists who will adjust the slide themselves.
Installation and modification of the gearbox control rod joint from Kalina in Lada Priora
1. Installation of the gearbox control rod joint from Kalina in Lada Priora
2. Refinement of the gearbox thrust joint in the Lada Priora
Installation of the gearbox control rod joint from Kalina in Lada Priora
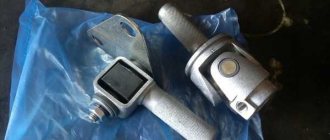
I looked closely for a long time, but couldn’t decide. And so, while at the car market, this device caught my eye again. Bought. Even during preliminary fitting, I discovered a strong play in the gearbox torque in the damping joint - that’s what rattled during acceleration. The reason is wear of the hinge bushings. At the same time, I also bought the torque rod joint assembly, because I couldn’t find any bushings separately. In general, for the future there are some thoughts on improving this hinge, because its design is moronic. But, more on that later.
Tie rod joints and gearbox control rod joints. Both are from viburnum. The seller was dumb, but I didn’t look. Then I had to change the Kalinovsky jet thrust joint to a ten-seater one, because the Kalinovsky one does not fit: it has a thicker shank and larger bushings.
There is no point in describing anything special. Everything has been chewed up for a long time. The tail of the Kalinokardanka is 2 cm longer than the native Priorovsky. The excess is sawed off with a grinder and that’s the end of it.
And here is the removed Prior’s hinge (aka tenth hinge). Has decent play in the longitudinal direction. This is a design feature.
After installing the Kalino cardan, the box was replaced. I never thought that installing this simple device could so improve the comfort of using a completely uncomfortable VAZ box. Surprisingly, for some reason the most painful first gear began to engage noticeably easier and more clearly. In short, a must-have for everyone, Prior.
Sahler gearshift knob.
To extend the life of the new handle, I decided to first pull a thick fabric skirt over the handle and only then installed a Sahler rubber boot on top. Let's see what comes of this.
Refinement of the gearbox thrust joint in the Lada Priora
This knot has been bothering me for a long time. If you shake it from the pit, it dangles all over. When the wear of the plastic bushings reaches a certain value, a rattling sound appears during acceleration, which is transmitted to the passenger compartment. This is all due to the stupid design of this hinge. The rubber damper dampens only strong shocks with high amplitude, and all the little things are well transmitted to the gearshift lever and into the passenger compartment through non-elastic plastic bushings, which. Moreover, for this reason, they break very quickly. I didn’t reinvent the wheel and purchased 2 rubber bushings from the 2108 valve cover.
Modification and removal of jet thrust of VAZ 2110, 2111, 2112 gearboxes
The content of the article:
1. Refinement of jet thrust of VAZ 2110, 2111, 2112 gearboxes
2. Removing jet thrust from VAZ 2110, 2111, 2112 gearboxes
Modification of jet thrust of VAZ 2110, 2111, 2112 gearboxes
I have long wanted to do something with the gearbox thrust. The idiotic design of this unit began to irritate me severely with creaks and backlashes.
The design is evil!
Recently, gear shifting has become slurred, I had to search and get into it, especially in 1st and 2nd gears. Shifts were accompanied by the creaking of this very rod, or more precisely, its hinge. Having accidentally stumbled upon a tuned jet thrust joint, I decided to look for it, but I couldn’t find it in our stores, and the price tag for it was too high ~ 400 rubles.
While I was looking for this hinge, I came across an alternative solution on the VAZ forum. Make a tuning joint like a silent block, from a standard eyelet and a Volgov rubber band.
To do this, we needed two front shock absorber rubber bands from Volga. The price is insignificant, about 20 rubles.
We unscrew the standard hinge; in my case, I had to unscrew the rod completely, along with the ball joint of the gearshift lever, otherwise the hinge rested on my pants and did not want to come off the pin.
We throw out the standard rubber band, turn the hinge eye 90 degrees and press the Volgov rubber band into it, it is too short, so we cut the second one in half and press it in next to it. The edges of the rubber bands should protrude a few millimeters from the eyelet.
old hinge
Ready product
Everything is ready, let's put everything back together.
Now all joints go through rubber, it will be quiet and soft.
I checked the operation of the unit; the rod moves freely in the vertical plane and will do its job accurately.
The impressions are only positive, the gears shift clearly and the annoying squeaking noise has completely disappeared.
2. Removing jet thrust from VAZ 2110, 2111, 2112 gearboxes
I decided to get rid of the gearbox pull. I returned to this problem after the gearshift lever, in which I had once filed a bushing, began to rattle again.
I thought for a long time about how I could calm the jet thrust without removing it, and some time ago I converted the jet thrust hinge into some kind of silent block. I was very pleased with the result of this modification, the creaking of the old joint disappeared and the gears began to fit noticeably better. But over time, I noticed an increase in vibrations on the gearshift lever and transmission noises appeared, the 3rd gear became especially audible, the sound resembled the work of worn gears or bearings. I tried to loosen the tightening on that same silent block, but nothing changed.
Having studied the unit in detail, I realized that no matter how you look at it, jet thrust will always be a source of noise and vibration.
It is attached directly to the engine and here you have the choice of either play of the standard joint and soft gear shifting, or a clamped connection with clear gear shifting and an abundance of vibrations.
After weighing all the pros and cons, I decided to completely get rid of jet propulsion.
You can’t just take jet thrust and throw it away. In this case, the gearbox ball joint cushion will remain loose, and the lever will dangle like a float in an ice hole, and sooner or later the ball joint itself will break.
The easiest way to secure the ball joint would be to cut off the part that holds it against jet thrust and weld it to the retaining bar.
But I wanted to keep the jet thrust intact, and I decided to try to cut off the platform from the old collapsed gearbox ball joint and weld it to the retaining bar.
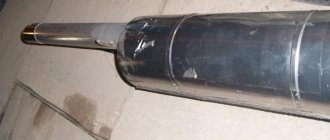
Old, broken gearshift lever ball joint
Cut the support
But this area turned out to be too thin and was burned through the welding.
In the end, we still had to cut off part of the jet thrust.
First, I lightly tacked the weld to fit the parts in place.
Then I brewed it for sure.
Ready product
Installation is standard and takes no more than five minutes.
The stray is in place
Results of jet thrust removal.
Due to the fact that the lever support is rigidly fixed to the body, switching remains as clear as with jet traction.
A miracle, of course, did not happen; the vibrations did not completely disappear, but they were significantly reduced. The transmission noises that I wrote about above have disappeared. Previously, you could really hear the gears in the gearbox turning and the crappy clutch bearing rustling (especially when it was cold), but now there is silence.
I shouldn't have any problems with knocking out gears, because... two additional supports are installed, one on the strut extension, the second directly on the gearbox.
Additional gearbox support
Of the minuses:
It seems that the lever has become a little more loose when accelerating and braking the engine. It seems that before it stood rooted to the spot, but now it follows the engine with an amplitude of up to two centimeters. In my opinion, this is not critical.
The worst thing is that the gearshift lever still rings at rpm above 4000. Sawing off the bushing helps only partially, over time the connection needs to be tightened, and the lever with the sawed-off bushing moves noticeably harder.
https://www.drive2.ru/l/4751686/
https://www.drive2.ru/l/3350393/
next article:
Installing bearings instead of the gearbox lever bushing on VAZ 2110, 2111, 2112
In an attempt to overcome the rattling of the gearbox lever, we will install a bearing instead of the gearbox lever bushing. The bushing, to put it mildly,
Rating 0.00 [0 Vote(s)]