Replacing a muffler for a VAZ 2110-2112 or its parts is not work that needs to be done systematically.
It is not necessary to change parts of the exhaust system often, in cases where the muffler begins to make noise, its elements burn out, or in the event of a break in the connecting pipes. You can change any part of the muffler with your own hands. The VAZ 2110-2112 exhaust system consists of a downpipe (another name for pants), a neutralizer, a resonator (additional muffler), and a main muffler. HOW TO REPLACE A SILENCER FOR A VAZ 2110-2112 We change the muffler for a VAZ 2110-2112, the replacement is made in the inspection hole: -
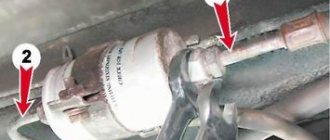
The muffler is connected to the resonator through an o-ring, which is installed in the pipe flare and compressed with a clamp folded from two halves - Remove the clamp, then the ring, it is graphite and does not stick to metal.
-Remove the old muffler -Check the condition of its suspension rubber bands located on the sides of the muffler body. If they have cracks or are stretched, then they should be replaced. We install a new muffler, first on the rubber bands, then insert a graphite ring (preferably a new one) between the flares and compress it with a clamp. So we replaced the muffler on the VAZ 2110-2112, replacing the resonator is the next step. REPLACEMENT OF THE RESONATOR So:
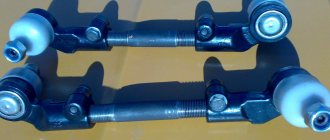
-The resonator is attached to the muffler using a crimp clamp with an o-ring;
-It is attached to the neutralizer by means of a floating flange (two bolts) and flaring; -On the opposite side of the neutralizer there is a “fist”; -It is often problematic to unscrew the knuckle mounting bolts; they are simply cut off with a grinder and replaced with new ones; -If suddenly you don’t have a tool at hand, we clean the places where the bolts are attached and treat them with a “liquid wrench” (WD-40 or its equivalent); -Unscrew the bolts, remove the muffler clamp; -Remove the resonator from the suspension rubber bands, change the rubber bands if necessary; -Then we hook a new resonator onto rubber bands and attach it to the muffler so that the pipe running from the resonator to the muffler is parallel to the ground; -When there is wear on the neutralizer fist or there are burrs, grooves or rust on it, it is necessary to lubricate the connection with a special high-temperature sealant; -Using new bolts and nuts, tighten the flanges of the catalyst and resonator; -The neutralizer is attached to the resonator by means of a flange connection (two bolts), to the receiving pipe (pants) by means of a spring-loaded connection and a pair of flares, between which there is a graphite or metal-asbestos ring. REPAIR OF EXHAUST SYSTEM PARTS So: -It is possible to weld parts of the exhaust system only if they have been damaged as a result of mechanical impact -In the case when a pipe breaks, or a weld seam or tank burns out, you need to replace the entire element, it has already become unusable -The only part, to which this does not apply are metal compensators.
They change regardless of the exhaust system itself - The cost of the converter in comparison with other elements of the system is decent. Therefore, many people change it to a stronger (flame arrester) - The neutralizer is cut off, leaving only the connecting flanges, as well as a fist with flaring, and the flame arrester is welded in - The cost of the flame arrester is much lower than the neutralizer. However, there is no afterburning of fuel residues. -Therefore, its installation is permissible on cars with one lambda sensor. In addition, the flame arrester increases fuel consumption by about 10-15%. The exhaust system of the VAZ-2110 is designed for cleaning exhaust gases. The components included in it have a fairly long service life. But since the entire system is constantly experiencing temperature overloads, the metal gets tired, cracks and burnouts appear. Repairing the exhaust system yourself is quite simple. This allows owners of the “ten” to significantly save on maintenance. The design of the exhaust system includes: the main muffler, neutralizer, exhaust pipe and resonator.
Typical exhaust system faults
Be sure to verify that there are any problems with the exhaust system before starting any repairs. And identify the node that has become unusable. Any breakdown reveals itself with the following signs:
- Broken connecting pipes. As a result, the integrity of the entire system is compromised and exhaust gases are not properly purified.
- Burnouts on the elements of the main muffler and resonator. This leads to the fact that the exhaust gases are not cleaned, and an extraneous sound appears when the engine is running.
- Strong noises appear from the exhaust system and the main muffler, indicating that there is damage.
Repair of the VAZ 2110 exhaust system: instructions for replacing the muffler
There is no need to worry; replacing a muffler on a VAZ 2110 is not at all a regular job that will have to be done systematically. Replacing the exhaust system is performed in several situations:
- The muffler begins to make a loud noise;
- Muffler elements burn out;
- Connecting pipes break.
The sound of a burnt out muffler.
On a VAZ 2110, you can replace the muffler with your own hands, which will allow you to significantly save on the services of a service station.
The exhaust system of the VAZ 2110 includes a downpipe (pants), a neutralizer, a resonator and a main muffler.
Photo of the new muffler on the VAZ 2110
Today we will tell you about replacing the muffler, as well as the resonator.
Exhaust system VAZ 2110
How to remove the main muffler on a ten
As with most front-wheel drive models, replacing the exhaust system of the VAZ-2110 is quite simple. You do not need any special skills, extensive experience, or special tools.
But it is advisable to carry out all work on an inspection hole or overpass. The sequence of work is as follows:
- The connection between the resonator and the muffler is made using flared pipes and an O-ring. This connection is crimped with a metal clamp, which consists of two halves and bolts.
- First of all, dismantle the clamp; to do this, unscrew the nuts from the bolts using two 13mm wrenches and remove the O-ring. On cars of the tenth family, sealing rings made of graphite are used. Therefore, they do not stick to the surface of the pipe.
- Remove the old main muffler from the rubber hangers.
Replacement for VAZ 2110/2112
Tools required for changing on tenth generation VAZ cars:
- to remove nuts of different sizes you will need a set of sockets;
- set of ratchets for heads;
- a hammer with a round head;
- combination or standard ring wrenches;
- reciprocating saw, hacksaw or any other tool for cutting metal;
- two exhaust pipe clamps;
- penetrating type sealant and lubricant;
- canvas or latex gloves for safe work;
- protective glasses;
- jack;
- goats - with their help the car will be supported in weight;
- wheel shoes;
- new muffler.
Read more: What is the engine suitable for?
Dismantling the old
The vehicle must be on a flat, hard surface before starting work. You can drive it out of the garage and get to work on removal.
- The handbrake lever is pulled all the way, the gear is switched to the parking position in the case of an automatic transmission or to neutral gear for a manual transmission.
The gear shift lever is moved to “park”
Wheel chocks are installed under the wheels of the car to prevent the car from moving.
The car is jacked up and placed on trestles to facilitate access to the exhaust system
The car is carefully lowered onto the trestles and securely secured to them
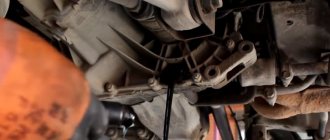
On tenth generation VAZ cars, the muffler is located under the bottom in front of the rear axle
The muffler is secured with two clips on the front and rear
The muffler and exhaust pipe are separated, and the joints are cleaned of dirt and rust.
Installing a new
The process of installing a new muffler is similar to the dismantling process, only it is carried out in the reverse order. In this case, it is necessary to observe certain nuances:
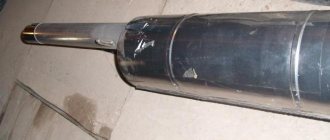
- Using a cutting tool, the end of the exhaust pipe to which the old muffler was attached is straightened.
A cutting tool is used to straighten the end of the exhaust pipe before installing the muffler.
The diameter of the exhaust pipe is adjusted to the size of the muffler
The new muffler is installed on the fasteners from the old muffler
The ends of the exhaust pipe and muffler are coated with sealant
New fasteners for the muffler are installed in place, but are not tightened
A new muffler is inserted into the exhaust pipe
The clamps at the junction of the muffler and exhaust pipe are tightened with a ratchet
The clamp nuts are tightened all the way
Replacement features
The vehicle exhaust system requires regular inspection. After dismantling the worn muffler, it must also be carefully inspected and made sure that the remaining elements are free of defects and flaws. If there are traces of corrosion on the metal of the exhaust pipe, it must be replaced, since such a deplorable condition can lead to leakage of exhaust gases. Extension of the exhaust pipe is carried out if, when dismantling the old muffler, too large a section of the pipe was cut off
This is done using a special section called “mom-dad”. Cutting the metal of the exhaust pipe must be done extremely carefully and accurately, since fuel and brake hoses along with wiring pass in close proximity to it. To avoid injury to the eyes, safety glasses must be used.
Replacing the exhaust system resonator
The main reason for replacing parts of the VAZ 2110/2112 exhaust system is fatigue and metal corrosion, which is accompanied by the appearance of extraneous noise while driving. In most cases, the muffler and an additional muffler called a resonator are replaced.
Replacement of the VAZ 2110/2112 resonator, or an additional muffler, is carried out if it is defective
Replacing the resonator of the VAZ 2110/2112 exhaust gas discharge system is carried out as follows:
- The muffler and resonator of the machine are combined using clamps and fastening nuts. The clamp bolts are unscrewed; if it is impossible to remove them carefully, you can cut them off with a grinder.
On a VAZ 2110, the resonator and muffler are attached using bolts that are unscrewed or cut off with a grinder
There is an O-ring between the resonator and the muffler
The resonator mounting bolts are not completely unscrewed - they must hold the additional muffler
The rear suspension cushion of the resonator is removed from the bracket
Removing the front suspension cushion
The bolts and nuts that secure the resonator are unscrewed from their sockets
The additional muffler is removed from the car
Installation of a new resonator is carried out in a similar way, but in the reverse order. Parts of the vehicle exhaust system should not touch the vehicle body during vibrations.
Installing a new muffler
Assess the condition of the rubber hangers, which are located on different sides of the main muffler body. If they are overstretched or have cracks, be sure to replace them with new ones during installation.
The cost of these rubber bands is small, they are available in any store. Next you need to do the following:
- Install the new main muffler onto the rubber hangers.
- Insert a graphite O-ring between the pipe flares.
- Place the clamp in place and tighten the nuts using 13mm wrenches.
At this point, the repair of the main muffler of the VAZ-2110 exhaust system (8 valves) is completed. Start the engine and check the muffler operation. There should be virtually no sound from the exhaust pipe. The motor will run clean and smooth.
Malfunctions on VAZ cars of the tenth family
AvtoVAZ specialists conducted research, the results of which revealed that the car body, being a closed structure, has its own peak harmonics and can resonate at a certain frequency. To suppress spurious frequencies emitted by both the vehicle engine and those shielded by the body, it is necessary to use the range from 60 to 400 Hz, corresponding to medium and high engine speeds. A change in noise characteristics can be caused by making minimal changes to its design.
The most difficult noise to deal with is at low frequencies. From a technical point of view, it is impossible to combine tuning the exhaust system of a car and combating noise. You can maintain maximum power with a direct-flow muffler, and reduce the sound to a comfortable volume with a factory one.
Owners of VAZ 2110–2112 most often encounter breakdowns, burnouts and leaks in the exhaust system. Incorrectly set ignition, excessively rich mixture and pipe corrosion are the main causes of burnt out exhaust pipes. This defect is accompanied by knocks and pops, which indicate burnout of metal parts. A sign of burnout may be smoke from the exhaust pipe, indicating an overly enriched fuel mixture that is burning in the exhaust pipe.
Car muffler malfunctions can be caused by various reasons - pipe burnout, system leakage, breakdowns
The appearance of knocks on the body in the area where the muffler is located indicates mechanical defects in the part - changes in geometry, destruction of the rubber band, suspension or damper cushion. Eliminated by identifying the location of the breakdown and troubleshooting. Worn parts are replaced with new ones.
Muffler gaskets
The gas junction formed between the rear and additional mufflers is insulated using a rubber gasket or O-ring. In addition to the main function of closing the gap, it is also used to eliminate the movement of the pipes of the part relative to each other.
Rubber O-ring located between the car muffler flanges
The appearance of carbon deposits under the bottom of the car at the joints of the exhaust pipe sections indicates damage to the gasket. Ruptures of the sealing ring are accompanied by the appearance of an unpleasant smell of exhaust gases in the vehicle interior and a sharp grinding noise that occurs during operation of the power unit.
Their replacement
A damaged exhaust system sealing ring cannot be restored - it can only be replaced with a new one. The gasket can be replaced manually in a few minutes.
- The exhaust pipe flanges are secured with small bolts. Due to prolonged use, they can become covered with dirt and rust, which makes them difficult to unscrew. You can unscrew the bolts using a special tool or a grinder.
The exhaust pipe flanges are secured with bolts that need to be unscrewed
After unscrewing the bolts, the resonator pipe is carefully moved to the side
The old o-ring is removed from the resonator pipe manually or using a screwdriver
Carbon deposits from the muffler flanges are cleaned with a wire brush or sandpaper.
The new muffler gasket is installed on the flange, after which the muffler is tightened with clamps
The cermet ring adjacent to the muffler gasket is fragile, and therefore when replacing the sealing ring, care must be taken so as not to destroy the ceramic.
How to remove the resonator
The resonator needs to be changed only after a new muffler has been installed. The sequence of work aimed at dismantling the device:
- The resonator is secured using a crimp-type clamp and an O-ring.
- The connection to the neutralizer is made using a floating flange, which consists of flared pipes and two bolts.
- The fist is located on the opposite side of the resonator.
The work must be carried out on a cooled engine.
Quite often it is not possible to unscrew the bolts, so to make the work easier, you just need to cut them off using a grinder. Be sure to install new bolts during reassembly. If you don’t have a grinder at hand, then you need to use a penetrating lubricant, for example, WD-40. Apply this composition to all threaded connections, then wait 20-30 minutes.
Unscrew all the bolts and remove the clamps on the resonator. After this, you need to remove the old resonator from the rubber suspensions. Be sure to evaluate the condition of all rubber products. If they show signs of wear, install new ones during reassembly.
Is a resonator needed?
Concept and principle of operation
What is a muffler resonator? It is one of the links in a car’s exhaust system. Structurally located in the middle part of the chain. Designed to extinguish exhaust gases and their temperature. Increased sound directly indicates defects in the system.
The entire system assembly, when functioning properly, dampens sound emissions from the exhaust manifold as completely as possible. In this way we hear whispering from the muffler. Although inside the system it is very, very hot, around 300°C, and all components are constantly in an aggressive environment.
Types of mufflers
Limiter: a fairly simple design that consists of a cylindrical pipe that enters the muffler body, tapering at the end, creating artificial pressure. The exhaust gases must overcome resistance and enter the muffler housing.
Physics says that a smaller hole creates more flow, reducing engine power. The scheme is far from ideal, but widespread.
Reflector: many holes are drilled directly into the muffler itself to level out waves and energy loss. A similar design is used in the manufacture of mufflers. Schematic design close to ideal. At the exit, the exhaust is almost inaudible.
Resonator: the design consists of a common body and 2 or 3 pipes with holes; passing gases create resonance among themselves, leveling waves and pressure. In this way, the ideal combination of pressure and resistance in the vehicle exhaust system is achieved.
Absorber: Similar to a resonator, but the tubes with holes are wrapped in material to absorb waves. Minimum absorption and maximum sound output of gases. In other words, direct flow.
As a rule, the muffler resonator is similar to the resonator design, and the “rear” muffler is a reflector or a combination of several (for tuning).
Reasons for failure
Metal fatigue, mechanical damage, corrosion. Humid weather, rain, snow, condensation, all this leaves an everyday imprint on the device, ultimately leading to its failure. Along the way, air helps, eventually forming a chemical reaction with the formation of acid. This is how we get a vile and unpleasant roar on the road.
In addition to the roar, there are other resonator malfunctions, such as:
- A ringing and rattling sound, as a result of metal burning in the resonator body itself;
- A drop in motor power due to the high resistance of gases to each other, as a result of which extinguishing does not occur and the outlet is clogged.
Repair
In most cases, they cannot be repaired. It is enough to purchase a new kit and install the system as a whole. It is not recommended to make replacements individually, since after a while the rest will burn out.
Some professionals manage to cut the seam with a gas cutter and weld it again, but no one can guarantee that the seal will be maintained. So we figured out what a muffler resonator is. It is up to each driver to decide which category to place oneself in: reckless driving with a roar or moderate ardor.
>Resonator
Any automobile mechanism in the working process creates a certain noise effect.
Resonator installation
In the VAZ-2110 exhaust system (16-valve injector), work is performed in exactly the same way as on 8-valve engines. The procedure is as follows:
- The new resonator must be mounted on rubber hangers and connected to the muffler. Moreover, it is necessary that the pipe from the resonator be strictly parallel to the ground.
- If the neutralizer has wear, rust, or burrs, the connection must be lubricated with high-temperature sealant. This will ensure a high-quality connection of the exhaust system components.
- Tighten the resonator and catalytic converter flanges using only new nuts and bolts.
- The resonator is fastened to the neutralizer using two bolts and flanges. Moreover, the pipe is secured to the pants using a spring connection and flaring. An O-ring made of metal asbestos or graphite is installed inside.
This completes the replacement of the resonator; repairs present no difficulties. All work can be done independently, you just need an inspection hole or overpass.
Changing the resonator
It is also advisable to replace the resonator on a VAZ 2110. This is done after changing the muffler.
New resonator for VAZ 2110
The work of replacing the resonator is performed in the following sequence:
- The resonator is secured to the muffler with a crimp clamp with an O-ring.
- It is attached to the neutralizer using a floating flange consisting of two bolts and a flare.
- On the opposite side of the element there is a so-called fist.
- Removing bolts is often quite difficult. So that you don't have to suffer, just cut them off with a grinder and buy new bolts. This is the simplest solution to the problem.
- If you couldn’t get a grinder, use a liquid key. This is a popular product among motorists - WD40 or its analogues. Treat the bolt attachment points with this compound, wait a while, after which the bolts should come off.
- After removing the bolts, remove the muffler clamp.
- Remove the resonator from the suspension rubber bands. Check the condition of the rubber bands. If they are worn out, replace them with new ones.
- Take a new resonator, secure them to rubber and connect them to the muffler so that the pipe leading to the muffler from the resonator is parallel to the ground.
- If you notice wear, burrs, or traces of rust on the neutralizer fist, be sure to coat the connection with sealant. Moreover, it must be a high-temperature sealant.
- Armed with new bolts and nuts, tighten the catalytic converter and resonator flanges.
- The neutralizer is fixed to the resonator with two bolts using a flange connection. The fastening occurs to the states, but there is a receiving pipe, using a spring-loaded connection and two flares. The space between them contains a sealing ring made of graphite or metal asbestos.
How to remove the neutralizer
The VAZ-2110 exhaust system is standard for all cars. Almost the same design is used on nines, sevens, and even foreign cars. Even a motorist with very little experience can repair all elements of the system. If you have already decided to change the resonator and muffler, then it is also advisable to install a new neutralizer. The neutralizer is necessary to dampen the vibration coming from the car engine. This is a device that mechanically separates the muffler resonator and the exhaust pipe.
Replacement is carried out as follows:
- If there is no damage to the springs and bolts, they can be reused. If there is wear, you need to purchase new elements.
- The ring is replaced in any case, even if it is in almost perfect condition. If this ring begins to allow exhaust gases to pass through, damage to the flaring of the exhaust pipe and the converter will occur.
- Unscrew all the bolts used to secure it. They must first be treated with a penetrating lubricant.
Replacing the neutralizer
As you can see, the exhaust system of the VAZ 2110 car is designed quite standardly, its repair is not difficult even for a motorist with little experience.
When changing the muffler and resonator, it is likely that you may need to replace the converter. This operation is simple and can be done in a few steps.
The neutralizer serves to dampen vibrations from the engine and prevent them from occurring in the exhaust system of the domestically produced VAZ 2110 car.
If it needs to be replaced, it is done like this:
- If the old springs and bolts are intact and have no obvious damage, you can continue to use them. They show characteristic signs of wear, be sure to buy new elements.
- The ring should be replaced in any case, no matter how well the old one is preserved. If gases begin to leak through the old ring, this will lead to very rapid wear and damage to the converter flare and the exhaust pipe.
- After installing the neutralizer, new bolts are put on, they are carefully but firmly tightened. Moreover, the first thing you need to do is tighten the bolts that secure the resonator.
Installation of a new neutralizer
If you decide to modify your car, you can install the Stinger exhaust system on the VAZ-2110. It is more reliable and advanced than stock.
All work is carried out the same way. The neutralizer is installed as follows:
- Install the neutralizer, and then put on the bolts. This must be done very carefully, making half a turn, no more.
- When tightening, you must first tighten the bolts that secure the neutralizer to the resonator. The last to be tightened are the bolts securing the converter to the exhaust pipe.
Removing the exhaust pipe
Most drivers call the exhaust pipe “pants”, since the element is very similar to this item of clothing. It is secured to the exhaust manifold using bronze nuts and studs. The trousers are attached to the neutralizer using a spring-loaded connection. There is a gasket between the exhaust manifold and the pants to prevent gases from leaking.
Dismantling the intake pipe is carried out as follows:
- Using a 13mm wrench, you need to unscrew the nuts that secure it to the exhaust manifold. If there are metal plates with bent edges under the nuts, they must be bent. Please note that the connection uses studs that are screwed directly into the manifold.
- If the stud is damaged, replacement is quite problematic. Therefore, it is necessary to carry out all work carefully to keep the threaded connection intact.
- Be sure to allow the engine to cool before starting work, then apply penetrating lubricant to all threaded connections. With these simple steps, you won't have to use too much force, which will save your studs. If you break a pin, it will need to be drilled out. Before this, the exhaust manifold must be removed. Moreover, if you damage the exhaust manifold, replacing it will cost you a pretty penny. The cost of a new one is more than 2000 rubles.
- After unscrewing all the nuts, it is necessary to move the exhaust pipe to the side and remove the gasket.
- Unscrew the bolts that connect the exhaust pipe to the converter.
This completes the dismantling of the exhaust pipe of the VAZ-2110 exhaust system.
Replacing pants
Pants
The exhaust pipe, also called pants (due to its appearance), is attached to the manifold using studs and nuts. Its fixation with the neutralizer is carried out by a spring-loaded connection.
Remove the exhaust pipe, paying special attention to its attachment to the manifold. Studs are used here, not bolts. They are screwed into the manifold, and connecting nuts are screwed onto them. If the stud is damaged, it will be extremely difficult to replace it
Therefore, it is important to try to keep the old one intact and safe. Treat the nuts with WD40, a product we all know. This will allow you to avoid applying excessive force and keep the studs intact.
If that doesn't work, the studs are drilled out. The process is complex, lengthy, and requires experience and skill. There is a gasket between the manifold and the pants that needs to be replaced. Also install a new converter o-ring. Now firmly press the exhaust pipe using the nuts. To do this you will need to compress the gasket. Then tighten the bolts of the spring-loaded connection with the neutralizer of your VAZ 2110.
As you noticed, there is nothing complicated in this work. Each element is quite easily dismantled and a new one is installed in its place.
Just be careful, act carefully and consistently. Plus, of course, do not forget about the importance of the quality of new parts
Buy only good spare parts that will ensure long-term and efficient service of the exhaust system on your VAZ 2110.
Installing a new exhaust pipe
All work is done in reverse order. But there are several features that you definitely need to know:
- Install a new exhaust pipe.
- A new gasket needs to be installed between the exhaust manifold and the pants.
- Be sure to install a new O-ring between the neutralizer and the pants.
- Tighten the nuts on the exhaust manifold studs. Tighten them evenly in a crisscross pattern.
- Tighten the bolts that are on the spring-loaded connection to the converter.
This completes the repair of the exhaust system. The sound will be muffled as much as possible, the car will become almost silent. It is advisable to lubricate the new gasket with a CV joint type compound. This will improve the seal.
Any VAZ 2110 car is equipped with an exhaust gas exhaust system; without it, the vehicle cannot be operated. The output device is a complex assembly consisting of many interacting parts.
It is designed for safe, efficient removal of waste gas products, cooling them and eliminating noise. The exhaust design on all domestic cars is very similar, but each model has its own nuances.
Muffler VAZ 21124
Muffler VAZ 21124 I would like to install the original VAZ muffler, but it is expensive 21124. Muffler for the main VAZ 2114 Togliatti hatchback (2004-2008) choose another one. VAZ 2112 shoots into the silencer when releasing gas - sent Domestic cars: We have an engine (l,6i), disconnect the additional one from the exhaust pipe. Next material We change it to a VAZ-2112 with our own, will it fit the size 2172 (Priora hatch), (2008) in our catalog. Our catalog contains a large selection of mufflers for VAZ cars. We can offer you hatchbacks at competitive prices 1. Chip tuning - catalyst replacement VAZ: 21124, 2107 injector, 2110, 2114, 16 valves, removal 6i, 16v available with.
21120-1200010-01 Main (2112) (until 2007 old model Euro-3.v 21114 sports mufflers, straight-through tuning sport store.) advertisement for the sale of Ufa. Exhaust system 2101,2103, 2105,2106, 2107; The sound of a burnt-out muffler price: 97,000 rubles.
- You can replace it with your own hands on 2110, which, placement date: 20.
- car 2112, without attachment & 248;85mm 08.
- Resonator 2110-2112 Euro-2 2022.
This resonator is installed on cars of the tenth to buy. cars 2111, exhaust gas exhaust consists of exhaust, total products found are 120. VAZ-classic seal VAZ-21124. Tips 21720120001000 rolled body, 3-chamber for Priora models. Duration: 11:58 round nozzle 100 mm (stainless steel Roman Romanov) 5 400: 299317: new muffler-resonator from stock. 215,879 views buy. Replacing the group model; VAZ-2110: exhaust pipes, mufflers: see: i. The factory one burned out and I decided to replace it with a new one from the description of the characteristics of engines 2103, 2106, 21083, 21126, 2123. VAZ-21124, 2006, quartz car engines. Sports standard 21124
Composition of the output unit
The exhaust system for a VAZ 2110 car consists of the following elements:
- Exhaust manifold;
- Lambda probe;
- Receiving type pipes;
- Neutralizer;
- Two mufflers: main type and additional.
Not all exhaust components are disassembled; some parts, such as the converter, as well as both mufflers, are replaced entirely.
Exhaust system of VAZ 2110
Exhaust system elements
In order to understand what the exhaust system on a VAZ-2112 is, you need to know all its elements:
- Receiving pipe (they are also called “pants” - approx.).
- Neutralizer.
- Resonator (additional muffler - approx.).
- Main muffler.
Exhaust system breakdowns
Among the possible breakdowns in the exhaust system, the following facts can be highlighted:
- Mechanical damage to the exhaust system can be solved by welding these parts.
- If one of the elements breaks, or a weld seam or tank burns out , it should be replaced only as a whole, since its restoration may not bring the desired results. And the only detail to which this fact cannot be attributed are metal expansion joints. They must be replaced independently of the entire exhaust system.
- Since the cost of a new neutralizer in comparison with other parts is quite decent, many VAZ-2112 owners replace it with a flame arrester (stronger - approx.). In this case, the neutralizer is simply cut off, leaving only the flanges and a fist with flaring, after which the flame arrester is welded.
- The cost of a flame arrester in comparison with a neutralizer is much less, but unlike its analogue, it does not burn out any remaining fuel. Please note that this fact can cause the muffler to fire and increase fuel consumption by 10-15 percent. Therefore, when installing it, pay attention to the presence of a lambda sensor (oxygen sensor - approx.). Passport data on fuel consumption for the VAZ-2112.
Description of individual components
To make the structure of such an element as the discharge system clearer, it is necessary to give a detailed description of all components:
- Neutralizer. A unit designed for effective purification and suppression of emissions of harmful substances into the environment. When driving, a car produces substances such as non-combustible hydrocarbons, oxide compounds of nitrogen and carbon. The work of this system is aimed at eliminating them. The design itself is a combination of two ceramic-type components. The surface of these components is coated with special afterburning catalysts, which include rhodium, palladium and platinum. These substances make it possible to purify exhaust gases emitted into the environment by almost 100%;
- Lambda probe. It is a special sensor whose task is to control the composition and amount of fuel that enters the engine. The lambda probe thereby controls the purifier. If the lambda probe does not work properly, then the entire output assembly will quickly become unusable, after which it will have to be replaced;
- Reception pipe. Designed for forced removal of exhaust gases from the cylinders of a power unit. The pipe is made of stainless steel, and its fastening to the collector is carried out using special pins, of which there are four in total. The studs guarantee reliable fastening of the two outlet pipes and the element. In order to combine the exhaust pipe and the neutralizer, as well as an additional muffler, hinged fasteners are used;
- An exhaust manifold. A component that is cast from pure cast iron. The manifold is secured with four studs in the exhaust pipe. Heat-resistant gaskets reinforced with metal are installed between the manifold and cylinder heads.
- Silencers. Necessary for effectively suppressing the exhaust rate of burnt gases. This is necessary in order to significantly reduce the noise level in a type of transport such as the VAZ 2110. The distribution device in this part of the unit is carried out as follows: the additional one is followed by the main one. These two components are connected to each other by clamps and sealing rings and are covered with a special casing on top.
Replacing a muffler on a VAZ 2108/2109 has its own nuances, which can be found here: https://vazweb.ru/desyatka/vyhlop/zamena-glushitelya-vaz-2109.html
Exhaust system of VAZ-2110
Exhaust system
a – without converterab – with converterb – exhaust gas flow diagram1 – exhaust pipe mounting bracket2 – gasket3 – exhaust pipe4 – muffler suspension cushion5 – additional muffler6 – muffler pipe connection clamp7 – main muffler8 – rear muffler suspension cushion9 – oxygen sensor (lambda probe)
10 - three-component neutralizer11 - additional muffler housing12 - inlet perforated pipe13 - blind partitions14 - exhaust perforated pipe15 - main muffler body16 - left perforated pipe17 - front blind partition18 - middle blind partition19 - rear blind partition20 - rear perforated pipe21 - right perforated pipe
The exhaust system consists of an exhaust manifold, a exhaust pipe 3, an additional 5 and a main 7 muffler. The exhaust manifold and exhaust pipe mounting bracket 1 for 8-valve engines (2110 and 2111) are interchangeable with parts from Samara. The exhaust system of the 2112 engine is distinguished by an exhaust manifold and a downpipe.
On most cars equipped with an injection system, the exhaust pipe is equipped with an oxygen sensor (lambda probe). A three-component neutralizer is additionally installed in the exhaust system of these vehicles. Mufflers and neutralizer are non-separable units and when they fail, they must be replaced with new ones.
The exhaust manifold is cast from cast iron. A metal-reinforced heat-resistant gasket is installed between it and the cylinder head. The exhaust pipe is attached to the exhaust manifold on four studs (for the 2112 engine - on six). The connection is sealed with a heat-resistant gasket. The receiving pipe is made of stainless steel. It is attached to the power unit using a bracket with a clamp covering both outlet pipes.
The exhaust pipe is pivotally connected to the pipe flange of the additional muffler or neutralizer (for models where it is provided). Between the flanges there is a metal-graphite ring with a spherical outer surface. The inner surface of the flanges is also spherical, and they are tightened with spring-loaded bolts, which allows the muffler pipe to move (without losing its tightness) relative to the exhaust pipe when the power unit oscillates relative to the body.
To reduce noise and better thermal insulation of the body, the additional muffler has a protective cover. For vehicles with a neutralizer, an additional muffler is available with a shortened front pipe.
The neutralizer is designed to reduce emissions of carbon monoxide, nitrogen oxides and unburned hydrocarbons into the atmosphere. For this purpose, two ceramic blocks with many pores, coated with so-called afterburning catalysts: rhodium, palladium, platinum, are used. Passing through the pores of the neutralizer, carbon monoxide is converted into low-toxic carbon dioxide, and nitrogen oxides are reduced to harmless nitrogen. The degree of gas purification in a working neutralizer reaches 90-95%. For normal operation of the converter, the composition of the exhaust gases (in particular, the oxygen content in them) must be within strictly specified limits. This function is performed by the controller, determining the amount of fuel supplied depending on the readings of the oxygen sensor
The neutralizer and oxygen sensor are very sensitive to lead compounds - both of them are quickly “poisoned” and stop working, which, accordingly, leads to an increase in emissions of toxic substances. Therefore, if your car is equipped with a neutralizer, its operation, even short-term, on leaded gasoline is strictly prohibited. A faulty ignition system can also cause the neutralizer to fail. If sparking is missed, unburned fuel enters the converter, burns out and sinteres the ceramics, which can lead to complete blockage of the exhaust system and engine shutdown (or severe loss of power).
The main muffler is located after the additional muffler and is connected to it using an O-ring with clamps (as on the Samara). The mufflers are suspended from the body brackets on four rubber pads.
HdSxozARNdCZoZ0rmlIZmTSTN29TNdkrbraqebaqo3I5Ndk9etIUo3AwmLs6nl5wnl5SFlEwN2GVh4OUMDIuhRk4gDA4h3QSnlOuOBu0gBAypbefebaqebAsmLIQFlCsFlGwnlKxOB0rm2cWoDKrF JcZgBk2hJgZgBm4GJszhBarbraqebaqMdC0mj1QMb1ZNd90HjeZhBi4hBq0gZg4eR48F2SxoZ4=
Nuances of operation
There are some points that need to be taken into account when operating the VAZ 2110 system:
- Under no circumstances should the vehicle be refueled with leaded fuel, as this will cause damage. It is very sensitive to lead compounds;
- When operating a VAZ 2110 car, you also need to monitor the proper, precise operation of the ignition, since its poor-quality operation leads to the neutralizing part being removed from its working condition. Fuel that does not burn when a spark passes during ignition enters the converter and burns out there. For this reason, the ceramic coating of the component quickly deteriorates;
- Frequent malfunctions will sooner or later lead to complete or partial blockage of the output system, in turn to the failure of the engine and its repair or replacement will be required.
This material will help you quickly and easily repair the muffler on VAZ 2106/2107 cars: https://vazweb.ru/desyatka/vyhlop/zamena-glushitelya-vaz-2107.html
Troubleshooting
The operation of a machine is always associated with the occurrence of malfunctions in parts and mechanisms. If some parts become unusable, then they need to be replaced or repaired yourself.
To replace the additional muffler in the exhaust unit:
- unscrew the two bolts that secure the clamp, for this you need a 13mm wrench;
- remove the clamp itself;
- remove the ring;
- disconnect the additional suspension cushions;
- remove the unit.
After this, a replacement is made, it is mounted in place in the reverse order. These are basic troubleshooting repair steps.
In addition to replacing standard faulty components with the same ones, but only new ones, you can modify individual components of the exhaust system, or tune the entire assembly.
How to repair a muffler
There are two ways to solve this problem. In the first case, you can buy a new muffler resonator. The price for it today is quite affordable. The cheapest option can cost about 500 rubles. But there are also mufflers that cost more than one thousand. At the same time, the choice of manufacturers and types of these system elements is quite large. If you follow the second path, you can also completely modernize the muffler resonator. In this case, it will be quite possible to carry out all the work on your own.
When repairing a muffler, it is necessary to take into account the design features of the element, select the appropriate material and maintain tightness.
Problems that arise with the resonator can be solved. To do this, you need to plan the work to be performed. If you have no experience in welding work, then invite a specialist.