Diagram of the fuel system of the 16-valve injection VAZ-2112
The fuel system is one of the most important components in any car. After all, without it it is simply impossible to imagine the full operation of the vehicle. And so that you can imagine what the fuel system on your VAZ-2112 consists of, below we will present you with its detailed diagram, with a detailed description of each of the main elements.
Symptoms of a problem
There are quite a lot of signs of RTD malfunctions and it is quite easy to confuse them with other problems, so before you start replacing, you need to check it, but this is discussed below.
One of the main and most obvious signs of a regulator malfunction is its jamming in the open position. For this reason, engine power drops noticeably. The engine may idle well, but the engine will not be able to develop high speeds due to lack of fuel pressure.
When starting the engine, whether cold or hot, you have to rotate the starter for a long time.
When the RTD is jammed in the closed position, excess pressure occurs, which can cause the fuel pump to fail. Excess pressure in the system leads to increased fuel consumption and incomplete combustion in the combustion chamber. The exhaust gases will have a distinct smell of gasoline with characteristic black smoke.
There are also other less noticeable signs of its malfunction:
- The internal combustion engine operates unevenly at idle and stalls;
- The required internal combustion engine power does not develop;
- The car jerks when driving;
You can learn more about the fuel system in our article.
Detailed diagram of the fuel system
Detailed diagram of the fuel system.
1 — nozzles; 2 — fitting plug for monitoring fuel pressure; 3 — injector ramp; 4 — bracket for fastening fuel pipes; 5 — fuel pressure regulator; 6 — adsorber with solenoid valve; 7 — hose for suction of gasoline vapors from the adsorber; 8 — throttle assembly; 9 - two-way valve; 10 - gravity valve; 11 - safety valve; 12 - separator; 13 — separator hose; 14 — fuel tank plug; 15 - filling pipe; 16 — filling pipe hose; 17 — fuel filter; 18 — fuel tank; 19 — electric fuel pump; 20 — fuel drain line; 21 - fuel supply line.
Below we will look at the main elements of the fuel system separately.
Fuel tank
Dismantled VAZ-2112 gas tank.
The filled gasoline is supplied from the tank, which is located in the rear of the car, in the area where the sofa is located . The tank is made of steel and assembled by welding two stamped parts. Gasoline is supplied to the tank through a special neck, from a gas-resistant hose made of rubber, secured together with clamps.
Gasoline pump
Fuel pump VAZ-2112 1139009
A gas pump is an electrical functional device, submersible, installed directly into the gas tank itself. This pump is started by a signal from the ECU controller, which is responsible for fuel injection, through a relay when the ignition is turned on. If the fuel pump doesn't pump, the engine won't start! The operating pressure of the pump is at least 2.8-3 bar (atmospheres - approx.). In order to get to it, just lift the rear sofa and unscrew the technical hatch.
Fine filter
The new filter is ready for installation.
From the fuel pump, through a flexible steel hose, gasoline passes under pressure to the fine filter. The filter is made of steel and cannot be disassembled. A special paper filter element is installed inside. On the housing cover there is a special arrow, created for visual indication during installation, showing the direction of movement of gasoline in the system.
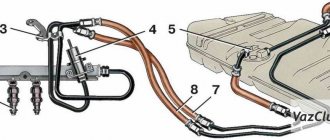
Fuel rail
Through steel fuel pipes, after filtration, gasoline passes directly to the fuel rail. It is designed to transfer gasoline to atomization and is mounted on the “outlet”. On one side of the fuel rail there is an RTD, on the other there is a fitting for controlling gasoline pressure. The pressure in the ramp in operating condition should be from 2.8 to 3.2 bar ( 2.8-3.2 atmospheres - approx.) - this indicator depends on the stabilization in the receiver, indicating constant differences in them. This is necessary in order to dose the optimal amount of gasoline into the injectors.
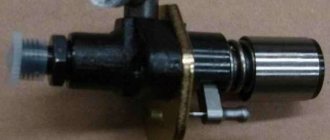
Fuel pressure control
Be careful when dismantling.
An RTD is a special device with a valve, assembled with a special diaphragm with a spring retainer. Under the influence of this element, the working position is in the locked type. It is also designed to divide the internal space of the regulator itself into two closed cavities - air and fuel.
The cavity for air is connected to the hose and receiver, and for fuel it is connected to the structure itself on the ramp.
During operation of the motor, the vacuum overcomes the resistance created by the spring and tries to tighten the diaphragm, thereby opening the valve. And from another position, at this time, gasoline presses on the diaphragm, also influencing the spring. As a result of this action, the valve opens slightly and part of the fuel flows back into the gas tank through the fuel line.
When the gas is pressed, the vacuum behind the throttle valve (throttle valve - approx.) becomes less, and the diaphragm, under the influence of a spring, closes the valve, increasing the fuel pressure. And if it is closed, the vacuum pulls the valve as far as possible - reducing fuel pressure.
The total pressure drop in the sensor is determined by the stiffness of the spring and the size of the hole. It cannot be adjusted, it is a non-separable element, and when it fails it must be replaced.
Injectors
Fuel rail with injectors
An injector is a special solenoid valve that is needed to transfer gasoline to the manifold when current is applied to it, and close under the influence of a return spring when the power is turned off. They are mounted in place of fixation through special rubber rings and held there with a metal bracket. It is controlled by the ECU from the injection system. If a break or short circuit occurs in the injection wiring, the injectors should be replaced.
Injection system
An injection system in which feedback is provided and a fuel evaporation trap is installed. It consists of an adsorber, a separator, connection hoses and valves mounted under the hood. Its action is as follows:
- Some of the fuel vapor that accumulates in the tank is condensed in the separator and then drained back into the tank. And the rest pass through two-way and gravity valves.
- A two-way valve prevents excessive decrease and increase in pressure inside the fuel tank, and a gravity valve prevents fuel from leaking out when the vehicle rolls over.
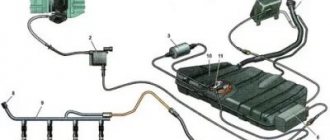
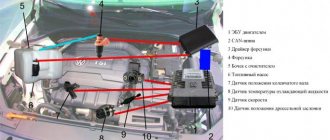
VAZ-21124 engine control circuit
Connection diagram of the VAZ-21124 engine control system with distributed fuel injection under Euro-2 toxicity standards (controller M7.9.7): 1 - ignition coils; 2 — nozzles; 3 - controller; 4 - main relay; 5 - fuse connected to the main relay; 6 — cooling system electric fan relay; 7 - fuse connected to the cooling system electric fan relay; 8 - electric fuel pump relay; 9 - fuse connected to the electric fuel pump relay; 10 — mass flow and air temperature sensor; 11 — throttle position sensor; 12 — coolant temperature sensor; 13 — solenoid valve for purge of the adsorber; 14 — oxygen sensor; 15 — knock sensor; 16 — crankshaft position sensor; 17 — idle speed regulator; 18 — immobilizer control unit; 19 — immobilizer status indicator; 20 - phase sensor; 21 — vehicle speed sensor; 22 — electric fuel pump module with fuel level sensor; 23 — oil pressure warning lamp sensor; 24 — coolant temperature indicator sensor; A - block connected to the wiring harness of the ABS cabin group; B — diagnostic block; B - block connected to the air conditioner wiring harness; G - to the “+” terminal of the battery; D — to the side door wiring harness block; E - block connected to the instrument panel wiring harness; G1, G2 - grounding points; I - the order of conditional numbering of plugs in the block of the immobilizer control unit; II - the order of conditional numbering of contacts in the diagnostic block.
Connection diagram of the VAZ-21124 engine control system with distributed fuel injection under Euro-3 toxicity standards (controller M7.9.7): 1 - ignition coils; 2 — nozzles; 3 - controller; 4 - main relay; 5 - fuse connected to the main relay; 6 — cooling system electric fan relay; 7 - fuse connected to the cooling system electric fan relay; 8 - electric fuel pump relay; 9 - fuse connected to the electric fuel pump relay; 10 — mass flow and air temperature sensor; 11 — rough road sensor; 12 — throttle position sensor; 13 — coolant temperature sensor; 14 — idle speed regulator; 15 — control oxygen sensor; 16 — diagnostic oxygen sensor; 17 — solenoid valve for purge of the adsorber; 18 — knock sensor; 19 — crankshaft position sensor; 20 — immobilizer control unit; 21 — immobilizer status indicator; 22 - phase sensor; 23 — vehicle speed sensor; 24 — electric fuel pump module with fuel level sensor; 25 — oil pressure warning lamp sensor; 26 — coolant temperature indicator sensor; A - block connected to the wiring harness of the ABS cabin group; B — diagnostic block; B - block connected to the air conditioner wiring harness; G - to the “+” terminal of the battery; D — to the side door wiring harness block; E - block connected to the instrument panel wiring harness; G1, G2 - grounding points; I - the order of conditional numbering of plugs in the block of the immobilizer control unit; II - the order of conditional numbering of contacts in the diagnostic block.
[custom_ads_shortcode3]
Fuel system diagram for VAZ-2112 injector 16 valves
The fuel hose of the Lada Priora is the main artery that ensures a reliable supply of gasoline to the internal combustion engine. The fuel system consists of several component hoses. Some of them are made of metal, others of plastic, and others of rubber of very low quality, which ultimately leads to significant wear of such products when exposed to sub-zero temperatures.
Unfortunately, it is impossible to completely avoid the use of elastic materials such as rubber. The thing is that the parts that are located on the engine are subject to some vibrations. In order for displacements to be damped, elastic materials are used when transferring fuel from one unit to another. A good example of this is the Priora’s rubber fuel hose.
What is a check valve
The check valve in the fuel system should only allow fuel to flow in one direction. This is the main purpose of OKDT. When the fuel pump is not working, the device automatically closes the return fuel line to prevent unused fuel from flowing into the tank.
When the valves are working properly, the pressure in the main pipes does not drop for a long time after the engine stops. The small part is calibrated. The design consists of several elements:
- housing with outputs;
- ball-type valve with a seat made of soft metal;
- membrane;
- spring.
Comment!
Improving the starting characteristics of the internal combustion engine is the main function of the exhaust valve. A working part installed in a certain location in the fuel line maintains the optimal value of the residual pressure.
It is not difficult to understand how a valve installed on a ramp works:
- When the fuel injection pump is running, OKDT does not interfere with the movement of fuel in the forward direction.
- When the fuel pump turns off (when the engine stops), a reverse flow of working fluid occurs in the line.
- The reverse flow of fuel creates pressure, which closes the valve.
- The fuel remains in the line, creating residual pressure.
The operation of the entire fuel system of the vehicle depends on the small device. If there is no residual pressure in the line, it must be created every time the engine is started. The driver is forced to spend extra time cranking the starter.
How to find your device
There are models in which the valve is mounted in the fuel rail housing. A common installation location is the section of the fuel line located between the injectors and the tank.
There are vehicles in which the part is mounted directly into the fuel pump housing. In modern cars equipped with a fuel preheating system, the OKDT housing is located before the preheater. The installation location depends on the make of the machine:
| Brand, model) | Where is OKDT installed? |
| Renault Magnum | In between the fuel pumps |
| Tatra | |
| KAMAZ 740 | |
| Magnum trucks | Before the heating system |
| VAZ 2114 | Gasoline pump |
| VAZ 2110 (16-valve model) |
Reference! In older cars, the fuel pump was installed on the cylinder block. It was equipped with a sealed exhaust valve to prevent unused fuel from flowing back into the tank.
Why is OKDT confused with RDT?
Many car enthusiasts consider the fuel pressure regulator (FPR) to be a check valve. In fact, these are parts of different design and purpose. RTD valves come in two types:
- modulated by atmospheric pressure;
- vacuum-modulated.
Reference! The purpose of the RTD is to maintain a certain level of pressure in the pipes. It is installed in the fuel lines of two types of engines - diesel and injection. The pressure regulator valve always operates in parallel with the OKDT.
In vehicles with “return”, the mounting area of the pressure control valve is located on the fuel rail. It is located between the fuel rail and the return line. If the return line is not included in the circuit, the part is installed in the fuel tank housing. The performance of the injectors and the stable operation of the engine depend on the proper operation of the device.
Cleaning Priora injectors
There are two options for washing injectors: with and without removing them from the car. The removed injectors are washed on special stands using ultrasound, under the influence of which even the oldest contaminants disappear. Ordinary drivers do not have such stands, so below we will consider a more popular option for washing injectors without removing them from the Priora. Here's what you'll need for this:
- liter of special flushing fluid;
- two automobile nipples;
- automobile fuel filter;
- a pair of metal clamps;
- a meter piece of rubber hose with a diameter of 12 mm;
- drill with 13 mm drill bit;
- electric pump;
- two liter plastic bottle.
Flushing sequence
- The bottom and cap are drilled into the plastic bottle. This is done with a “13” drill. Automotive nipples are inserted into the holes.
How to check and replace the VAZ 2110 regulator?
In order to independently check the pressure in the system, and therefore the correct operation of the regulator, you need to take a pressure gauge, the maximum pressure in which is up to 10 atmospheres. You should not use a device with a larger scale, as its readings will have a serious error. It connects between the fitting and the fuel pipe:
- first turn off and cool the engine;
- locate the fuel rail under the hood;
- remove the plug from the fuel pressure fitting;
- unscrew the fitting nipple using a spool valve;
- wipe the surfaces if fuel splashes appear under the influence of residual pressure;
- pull a hose with a diameter of up to 9 millimeters onto the fitting and secure it with a clamp;
- Connect the second hole of the hose to the pressure gauge.
Signs and Symptoms of a Malfunctioning Fuel Pressure Regulator
- the engine stalls at idle;
- engine power is greatly reduced;
- when accelerating, it is not possible to achieve normal dynamics;
- the car reacts poorly to pressing the gas pedal;
- fuel consumption suddenly increases greatly;
- the amount of carbon dioxide emissions increases;
- the crankshaft rotation speed changes.
All these problems arise due to the fact that the regulator becomes clogged or completely clogged over time. Another common cause of failure is weakening of the spring, leading to a strong decrease in pressure. In the absence of normal pressure, fuel supply decreases, power decreases and controllability deteriorates. Such problems are especially common on Ladas - Kalina and Priora, as well as on cars of the 2110, 2112, 2114, 2115 series.
To check the part, you need to carefully inspect it itself, the vacuum hose and all connections. Any leaks found must be corrected. It is also recommended to check the membrane. Disconnect the tube that goes from the RTD to the receiver and shake it. If no gasoline comes out from inside and there is no strong odor, then the membrane is in order.
RTD in diesel engines
Diesel vehicles running on the Common Rail system are also equipped with a pressure regulator. It fits into the fuel rail or is located on the high pressure fuel pump housing. The principle of operation is approximately the same. A special valve diverts unused fuel into the return line, preventing excessive loading.
In diesel engines, the regulator has a slightly different structure than in gasoline engines. It consists of a solenoid and a rod, which rests against a ball to shut off the return line. The design protects the engine from hydraulic vibrations and, as a result, from rapid wear.
Types of faults
Among the most common device breakdowns are the following:
- The valve does not hold pressure - gasoline circulates freely throughout the entire line, including the return line. In this case, the pressure in the ramp decreases significantly, and it may not be constant. When you increase the engine speed, it begins to stall - there is not enough pressure to carry out normal injection. The amount of gasoline inside the ramp is very small. There is a noticeable decrease in power; it takes longer to start the engine than during normal operation. The electric fuel pump will run longer than usual.
- The valve does not work at all (does not open at maximum pressure) - the excess does not go into the tank. The pressure in the fuel rail is too high, significant excess consumption of gasoline occurs, and the cylinders are flooded. This malfunction of the fuel pressure regulator on the VAZ-2110 cannot be eliminated, so you only need to change the device completely.
Modifications of the VAZ-2112 car
VAZ-21120 . Modification with a 16-valve injection engine with a volume of 1.5 liters and a power of 93 horsepower. 14-inch wheels were installed on the car. This modification has a problem with valves bending when the timing belt breaks. The problem can be solved by increasing the depth of the grooves in the piston bottoms.
VAZ-21121 . The car was equipped with a VAZ-21114 8-valve injection engine with a volume of 1.6 liters and a power of 81 horsepower.
VAZ-21122 . Budget modification with an 8-valve injection engine VAZ-2111. The car was produced without electric windows, the wheels were 13 inches in size, and the brakes were unventilated from a VAZ-2108 car.
VAZ-21123 Coupe . Three-door, five-seater hatchback. The only two doors for entering the car are 200 millimeters wider than those of the five-door hatchback, and they are mounted on new, durable hinges. The rear arches of the car have become wider. The engine was installed with a 16-valve injection engine with a volume of 1.6 liters and a power of 90 horsepower. The car was produced from 2002 to 2006 in small quantities, the reason for this was the high cost of the car.
VAZ-21124 . Modification with a 16-valve injection engine VAZ-21124 with a volume of 1.6 liters. Produced from 2004 to 2008. For this type of engine, the problem with valve bending was solved. To do this, the depth of the grooves in the piston heads was increased (up to 6.5 mm). In addition, the design of the cylinder block was changed to achieve a working volume of 1.6 liters, for which its height was increased by 2.3 mm, and the radius of the crankshaft was increased by 2.3 mm accordingly. There were also a number of other minor changes.
VAZ-21128 . The luxury version of the car, produced by Super-auto JSC, was equipped with a 16-valve VAZ-21128 engine with a volume of 1.8 liters and a power of 105 horsepower.
VAZ-2112-37 . A racing modification of the VAZ-2112, prepared for the “ring” in the Lada Cup qualifying group. The car was equipped with a 1.5-liter VAZ-2112 engine with a power of 100 horsepower. The racing car was equipped with a safety cage, an external aerodynamic kit and a front extension of the strut support cups.
VAZ-2112-90 Tarzan . All-wheel drive modification with a VAZ-2112 body on a frame chassis with transmission and suspension parts from a VAZ-21213 Niva. It was also equipped with a 1.7 or 1.8 liter engine from the Niva.
How to check the RTD of a VAZ 2110?
If you want to check the fuel pressure regulator 2110, you must first unscrew the special plug that closes the fitting for checking the pressure.
You should look for the fitting on the ramp block, from the end. After you have unscrewed the plug, you need to unscrew the spool from the fitting. Use the back of a metal tire cap for this.
After the completed operations, attach a pressure gauge to the fitting using a hose. You can take a regular pressure gauge that you use to measure tire pressure. Secure the ends of the hose with clamps. Now you can start checking - turn on the engine. We continue to check the pressure - it is necessary to disconnect the vacuum hose from the fuel pressure regulator. After removing the hose, the correct pressure gauge readings should be in the range of 0.2 - 0.7 cm 2. Other data indicates the need to replace the RTD.
Important nuances
There are a few things to keep in mind when cleaning your injectors. Here they are:
- You cannot save on flushing fluid. The injector is a very important part of the engine. And it is extremely sensitive to the quality of the flushing fluid. The optimal choice for washing Priora injectors is a product from Wynns, developed specifically for injection engines. The cost of a liter bottle is 700 rubles; The plastic bottle must be removed carefully after washing the Priora injectors.
Replacing injectors is a long procedure. Nevertheless, it is quite within the power of a novice driver if he has at least a vague understanding of the structure of an injection engine. When cleaning the injectors, the situation is much simpler: you just need to be able to use a drill and know where the main fuel hose is located.
How to check fuel rail pressure yourself
This procedure will require a pressure gauge, the maximum value of which is 7-10 atmospheres. It is not recommended to use a more powerful pressure gauge, since the error when measuring a small pressure will be too large.
Homemade device for measuring pressure in the fuel rail
You also need to have a hose with an internal diameter of 9 millimeters and tow used for plumbing work (it can be used to ensure a tight connection). After this, all joints should be strengthened with special clamps. If possible, you can facilitate and speed up this process by using a ready-made device for measuring pressure in the ramp
What are the consequences of malfunctions in the operation of RDTs?
Over time, the engine starts more and more poorly. Fuel begins to come out of the cracks, which leads to a strong increase in its consumption. When the pressure changes unevenly, the dynamics of movement are disrupted, surges occur, and the car jerks during acceleration.
Is it possible to repair a failed part? In most cases, no, you have to completely change it. Repair units are almost always non-separable. Some experts suggest repairing the component, but this is dangerous. It is better to buy a new regulator - fortunately, it is inexpensive.
Determining violations in the operation of RTDs is not a very difficult task, which can be handled independently. Remember that this part of the machine needs to be checked periodically. By detecting the problem in time, you will protect important car components from rapid wear.
Types, design and principle of operation of the injection pump bypass valve
First of all, it should be noted that today there are several types of valves that provide fuel bypass to the injection pump:
- Bypass (reducing) valve in multi-section pumps;
- Bypass (reducing) valve for regulating pressure inside the housing (at the inlet to the pump section of the fuel priming pump) in a distribution-type injection pump;
- Bypass throttling valve in distribution type pumps.
Each of the valves has its own design features and occupies a specific place in the high-pressure fuel pump.
Bypass valve in multi-section fuel injection pumps. This valve is installed in the front wall of the pump housing; it is connected to the fuel supply channels from the fuel priming pump to the discharge sections. Structurally, the valve is very simple: its basis is a body, inside of which there is a spring-loaded shut-off element in the form of a ball or disk. The housing can be of two types:
- Bolt. The valve is made in the form of a bolt, inside of which there is a shut-off element, and two or more holes are made on the walls to drain fuel into the return line. The bolt is screwed into the pump body; it holds the connecting nipple, to which the return line is connected;
- Union. The valve is made in the form of a fitting, inside of which there is a shut-off element. The fitting is screwed into the pump housing, and the return line is connected to the external thread.
This type of bypass valve works as follows. At low pressure in the supply line, the valve is closed due to spring force - fuel is supplied to the discharge sections. When the engine operating mode changes, the operation of the injection pump and the fuel priming pump also changes; at some point, the fuel pressure in the supply line increases, which can complicate the operation of the injection sections. When the threshold pressure is exceeded (which lies at the level of 58-80 kPa), the spring force is overcome and the valve opens - excess fuel is discharged into the tank through the return line. When the pressure drops, the valve closes again.
It should be noted that in multi-section pumps, the pressure reducing valve is mainly responsible for removing excess fuel, and air is removed from the system by a nozzle valve installed on the fine fuel filter.
Important nuances
There are a few things to keep in mind when cleaning your injectors. Here they are:
- You cannot save on flushing fluid. The injector is a very important part of the engine. And it is extremely sensitive to the quality of the flushing fluid. The optimal choice for washing Priora injectors is a product from Wynns, developed specifically for injection engines. The cost of a liter bottle is 700 rubles; The plastic bottle must be removed carefully after washing the Priora injectors.
Replacing injectors is a long procedure. Nevertheless, it is quite within the power of a novice driver if he has at least a vague understanding of the structure of an injection engine. When cleaning the injectors, the situation is much simpler: you just need to be able to use a drill and know where the main fuel hose is located.
Carburetor cars are slowly but surely becoming a thing of history. Float chambers and diffusers have been replaced by injectors and distributed fuel injection, the quality of which is controlled by the car’s on-board computer. On the one hand, injectors have made life much easier for motorists. On the other hand, even these reliable devices periodically fail. Fortunately, the driver can replace them with his own hands. The main thing is to know how it's done.
Checking the RTD
So, your sensor is already in order, but there is excessive fuel consumption and other problems indicating that the regulator is acting up. First of all, check it.
This is done like this:
- You need to unscrew the plug of the fitting responsible for controlling the fuel pressure. Look, if the seal ring is torn or simply no longer elastic, it (or even the entire plug) needs to be replaced;
- Unscrew the spool from the fitting, this is done in exactly the same way as in any tire;
- Using a tire pressure gauge secured with a clamp to the fitting, measure the pressure while the engine is running. It should be within normal limits;
- When disconnecting the vacuum hose of the regulator, the pressure should increase slightly (by 0.2 - 0.5 kgf/cm2). If this does not happen, then there is only one solution for your VAZ 2110 - you need to replace the RTD. On average, the price of a standard RTD fluctuates around 300 rubles; an analogue of the SOATE RTD costs about 600 rubles.