Sound insulation is an excellent tuning option that increases the acoustic comfort of your car. This is especially true for older cars, which for various reasons may not have sufficient sound insulation. For example, sound insulation of a VAZ 2110 car is often installed independently, since during the production of this model engineers did not pay enough attention to sound insulation of the interior.
The process is quite labor-intensive and takes at least one day, but the result will please any car owner. In this article we will look at such an action as soundproofing a VAZ 2110 with our own hands: we will describe recommendations for the selection of materials, tips for preparing for work, and the process of gluing the noise inside the cabin. Having completed work to improve the sound insulation of the car interior, you get both insulation from external sounds and improved sound quality of the acoustics in the cabin.
Soundproofing VAZ 2110 and practical guide
Soundproofing VAZ 2110
Sound insulation of the VAZ 2110 does not require any additional knowledge or skills; every motorist should objectively understand this. The exact sequence and accuracy of performing all stages of the instructions is important. The result depends on how well the noise insulation 2110 is done with your own hands in practice.
Shutdown
The last things you need to cover are the trunk lid, hood, and dashboard elements. Try to apply insulating material to all elements of the dashboard that may be sources of squeaks and extraneous noise. After gluing is completed, you need to assemble the entire interior, install the instrument panel, door trim, lay the carpet and install the seats.
The better the sound insulation of the car floor, the less vibration will be transmitted to the interior. After all the work carried out, comfort will be much higher, squeaks will disappear, and even the engine will start to run quieter (it feels like).
The standard sound insulation provided for the VAZ 2110 leaves much to be desired. No, it cannot be called terrible, but there is always something to strive for.
If you don’t like the level of silence inside the cabin of your own ten, then you can easily solve this problem on your own by carrying out sound insulation.
Preparing for Shumka
Which material is better to choose
There are two types of material
, which can be used to soundproof the engine shield:
- sheet (vibration-insulating, sound-absorbing and sound-proofing);
- mastic.
In the first case, we first use a vibration damper, and glue the soundproofing material as a second layer.
The mastic is intended for external treatment of the car. It reduces noise levels in the cabin from external sources. It is easier to apply mastic to hard-to-reach places.
Where to glue
Before you start work, be sure to familiarize yourself with the purpose of this or that material that will be involved in the soundproofing procedure of your car.
- Vibroplast will serve to cover exposed metal. The main function of a vibroplast is vibration damping.
- Izolon also has properties to dampen vibrations, but it is less effective compared to vibroplast. The structure of the material with closed cells will serve excellently as a second layer after vibroplast.
- Foam rubber is another layer that can be glued after vibroplast and isolon. The last layer will effectively absorb noise.
Do-it-yourself noise insulation
Method No. 1
(photo by trumka91, Lada Vesta car). The first layer is vibration-proof. We heat the material with a construction hair dryer and glue its motor shield end to end. Roll with a hard roller.
The second layer is sound-absorbing (choose a material that does not absorb moisture). We glue it with a continuous carpet. There should be no gaps.
Method No. 2
(VAZ 2111 car). We apply mastic with a plastic spatula to the engine shield, trying to get into the most inaccessible places. After treatment, the mastic must dry (up to 72 hours, see instructions for the mastic). The second layer can be used as a soundproofing material.
Let's sum it up
If the sound insulation of the VAZ is carried out correctly, the noise level should decrease by 40-55%. The sound of the running engine will not be heard as much, and you can completely forget about the noise of the wheels - especially when driving at speed. In addition, drivers who are not too lazy to do additional sound insulation claim that the car’s dynamics then improve.
Soundproofing of the VAZ-2107 can be done in a similar way. It is worth noting that the work is really worth spending time and energy on. This is especially useful if the machine is used constantly. Many car enthusiasts also soundproof the Priora. But we will talk about this in a separate article.
Source
Is there an effect
What does soundproofing a motor shield provide?
:
- Reduces engine noise.
- Reduces the level of vibrations on the body.
- Makes the engine shield stronger (the effect is similar to installing a bulkhead amplifier): less vibration on the steering wheel when driving, the steering wheel rotates more easily (on cars without ESD/power steering).
To reduce the noise level in the cabin by 2-4 dB (a difference of 1 dB is barely noticeable or not noticeable by ear at all), it is necessary to approach the sound insulation of the car comprehensively, work on all parts of the body (floor, doors, roof, trunk, dashboard, etc.). etc.), wheel arches and fender liners. Also, on LADA cars it would be a good idea to install additional door seals (instructions for XRAY, Vesta, Granta/Kalina/Priora, Largus and Lada 4x4).
Preparatory activities
Having disassembled the interior and purchased the required amount of materials, you can begin the initial stages of sound insulation.
- Carefully remove all dirt, dust, debris from the places where you plan to paste the sound insulation;
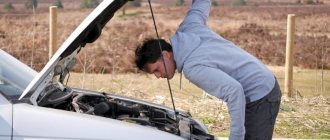
- In addition to the interior, you can install additional Shumka on the hood and trunk. To do this, the casing is removed and access to the metal is gained;
- Cleaned surfaces are treated with degreasers. White spirit is quite suitable. After processing, dry everything dry.
When working with substances such as white spirit, be sure to use a protective mask or respirator. Inhaling fumes can cause serious poisoning and more.
Pasting
- Work begins with gluing vibroplast. In order for the material to lie down and stick to the surface better, it should be heated. A hair dryer is best.
- After heating a sheet cut to the shape of a section of metal, apply it to the surface.
- Pay special attention to the front panel, behind which the engine is located. This is the source of the most noise. Therefore, start pasting from there.
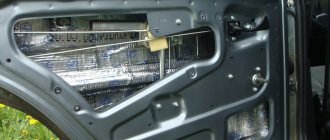
- Also carefully treat the front and rear doors with vibroplast, removing the trim from them, and the area where the muffler passes.
- Now let's move on to isolon. Depending on what you are going to soundproof, you may need about 6 sheets. After all, you can treat with Shumka not only the bottom of the cabin, trunk, hood and doors, but also the niche for the spare wheel, wheel arches, trunk floor, and roof.
- Areas such as the roof, arches, doors, and trunk are covered with isolon without the obligatory use of vibroplast. Although if you are doing work for yourself and for the long term, a vibroplast will not hurt.
- In areas where isolon is glued to open areas of metal, and not on top of vibroplast, use polyurethane foam. It securely holds the material, plus provides additional noise-absorbing properties.
- If you are soundproofing doors, then first there is a layer of vibroplast, and then isolon. You can't do without a double layer here.
- When disassembling the doors, you will see holes in the ends of the door. They are the sources of dust and dirt that penetrates under the casing. Therefore, we recommend treating them with noise and closing them.
- Izolon should be cut to the shape of sections of the door and other surfaces. The material is glued on top of the vibroplast using masking tape.
- For the casing pistons, you will need to make slits in the insulator. Make sure the pins go all the way in, otherwise the insulation will hang loose.
Trunk insulation
Foam rubber
Foam rubber does not need to be glued everywhere as a third layer. There are some nuances here, which we will tell you about.
- First of all, we use foam rubber, not homemade bitoplast. His turn will come;
- Foam rubber will be needed to soundproof the spare wheel niche;
- Don’t forget to cut out a section in the foam rubber so that the material does not cover your car’s body number;
- The same material is perfect for ceiling noise;
- Bitoplast will also serve well for making ceiling noise, then the noise protection will be generally excellent;
- Bitoplast is recommended for doors. It protects against excess noise and provides better sound from your car's speaker system;
- Both materials are glued, that is, foam rubber and homemade bitoplast, using polyurethane foam or liquid nails. Choose the option that you like best.
When choosing liquid nails for soundproofing installation, make sure that this composition can be used in conditions of high humidity, cold, heat, etc.
Hood noise
Self-soundproofing is a labor-intensive process and quite complicated in places. It is not at all necessary to try to isolate everything at once. Take it step by step, step by step. You can start with the hood, trunk, wheel arches.
But if you start disassembling the interior, then it is better to carry out full-scale sound insulation right away, so that later you do not have to repeat the procedures for dismantling the panel, door panels, seats, ceiling lining, etc.
When driving domestically produced cars, extraneous noise constantly penetrates into the cabin; in order to get rid of unpleasant sounds, you have to completely soundproof the car yourself.
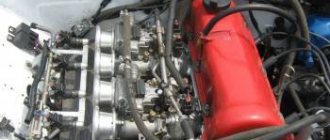
Sound insulation of the engine compartment shield.
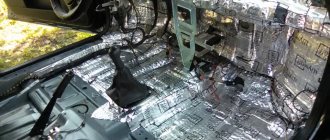
The idea of making noise in the salon had been spinning in my head for a very long time, but somehow there was no reason to do so. It all started when I was vacuuming the interior one day and looked under the carpet in the front passenger area... I saw WATER there. At the time this confused me greatly and never made me happy. In general, I decided to lift the carpet and dry it there. It was in the garage... Therefore, it was decided to remove the seat, since it was only there for 5 minutes. As a result, having removed the passenger seat and after a little consultation with a friend, the driver’s seat was also removed. Everything was dry there. And in front of us was a half-disassembled interior... What to do while the factory sound insulation and carpeting are drying? That’s actually the reason, without hesitation the following phrase was said: “Ahhh it wasn’t, let’s take off the torpedo and make noise =)” In general, this is where it all started. Work was in full swing.
The first layer was made of vibration - 2.3 mm, the second layer was used of splen 5 mm. The third layer was covered with factory sound insulation. Oh yes, the water under the passenger seat appeared due to the fact that in the summer, while driving through our endless nature, I came across a stone somewhere that tore through the bottom. There is a long dent and at the end a “ventilation” hole is punched into the interior =D. All this was naturally corrected. And on the interior side it is sealed with vibration; in addition to vibration-damping properties, it also has anti-corrosion properties.
Having seen that the stove on the tenth family was removed from the interior side, it was decided to remove it too, to replace the radiator and seal all the cracks. The stove was assembled using silicone, a new radiator was installed and it took its rightful place. The torpedo itself was also completely disassembled, all plastic connections were taped with anti-creaking, the air ducts were assembled without a single gap and sealed with thermal insulation, the air duct that goes to the rear passengers was plugged because I mostly ride either alone or with someone else, so that there would be no heat loss which we sometimes miss so much in the tenth family.
Next was the long installation of the torpedo and connecting the electrical wiring. And there was so much joy and delight when everything was finished =) On the very first day I drove the car, it was clear that I had not done all this in vain, the stove began to blow much better. Even from the small side ventilation holes that are directed towards the windshield, warm air began to flow.
Results of the work: The car has become quieter and warmer, the stove works as it should, the dashboard does not creak. It was then that the idea came up to ventilate the interior through the trunk. But that is another story. It was my first time working with materials, and I was not particularly strong theoretically in this matter. In the summer, I’ll probably remove the dashboard again - throw out the factory sound insulation, and instead glue it with a material similar to an accent but with a bitumen layer (Sound-absorbing material) And some photos =)
Main difficulties
If you have already disassembled the interior of the car, you may have noticed that in the VAZ 2110 this is done quite simply. Even if you are new to this business, relying on the instruction manual, the work will be completed quickly enough. Additionally, we advise you to rely on video lessons. They can highlight a lot of useful and important things.
The main difficulty when disassembling the interior, without which it will not be possible to carry out full sound insulation, is dismantling the dashboard.
The same instruction manual contains recommendations regarding dismantling the dashboard, so rely on it. Under no circumstances should you pull out all the cords, otherwise you will have problems later.
FakeHeader
Comments 22
I looked at the blog from the smartest commentators and it’s either simply written modestly or there’s nothing at all! but everyone knows!