It is not so difficult to do a major overhaul of a VAZ 2106 engine yourself; just basic knowledge about its design is enough. The engine is the “heart” of the car. If it starts to act up, then the whole car starts to malfunction. A major overhaul of the VAZ engine may be necessary due to careless operation of the car, namely:
- driving on rough terrain without asphalt roads;
- excessive loads;
- untimely oil change;
- motor oil is poured into the VAZ engine for the wrong purpose;
- the temperature regime is not maintained.
And these are not all the reasons that can lead to a major overhaul of a VAZ engine. To deal with the breakdown and more accurately determine its type, you should have special equipment on hand. Using it you can determine the size of the trouble. All components and assemblies can be diagnosed: ignition system, fuel supply system, compression measurement, etc.
Do-it-yourself engine repair on a VAZ 2106 - work order.
So, before you start overhauling the engine, you need to remove it to gain access to all damaged mechanisms. To repair an engine you will need the following tools and mechanisms:
- repair tools (keys, hammer, screwdriver and others);
- spare parts for the engine.
The engine disassembly procedure looks like this:
- Unscrew the bolt securing the frame, which is installed when removing the engine.
- Release the clamp and remove the fuel pump hose.
- Remove the pump by first unscrewing the nuts that secure it.
- Pull out the spacer. It is located under the fuel pump.
- Remove the layer that is located between the cylinder block and the spacer.
- Remove the spark plug wires.
- Remove the pressure plate.
- Disconnect the hose and vacuum regulator.
- Remove the ignition distributor.
- Unscrew the generator mounting nuts, remove the washers, belt and generator itself.
- After loosening the clamp, remove the intake manifold heating hose.
- Remove the coolant pump after unscrewing all the necessary bolts.
- Remove the carburetor hoses, the crankcase ventilation system and the vacuum supply hose to the ignition distributor regulator.
- Remove the ventilation system hose.
- Remove the axis of the intermediate lever of the carburetor throttle valve from the washer.
- Remove the throttle linkages.
- Remove the oil filter from the device being disassembled.
- Unscrew the nut securing the breather cap and remove it together with the oil level indicator.
- Remove the oil pressure sensor.
- Remove the crankshaft pulley by unscrewing the nut securing it to the engine block.
- Remove the bolts for securing the crankcase.
- Remove the cylinder block cover after removing the mounting nuts and bolts.
- Remove the cylinder head cover, as well as the plates, bracket with vacuum hose.
- Remove the gasket that is located above the cylinder head.
- Unscrew the fasteners and remove the chain tensioner.
- Turn the bolt holding the auxiliary drive shaft sprocket, thereby turning the crankshaft.
- Unscrew the camshaft sprocket mounting bolt.
- Remove the sprocket and camshaft timing chain.
- Remove the crankshaft sprocket.
- Remove the chain tensioner mounting bolt and shoe.
- Remove all nuts that hold the bearing housing in place.
- Unscrew the bolts securing the cylinder head and remove it from the engine.
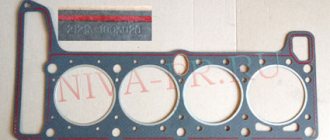
- Remove the cylinder head gasket.
- Remove the flywheel.
- Unscrew the fasteners and remove the front clutch housing cover.
- Tighten the last bolts that secure the oil pan and remove it.
- Release the rear oil seal holder.
- Remove the oil pump and pump gasket.
- Remove the accessory drive shaft.
- Using a screwdriver, remove the ignition distributor drive gear.
- Unscrew and remove the oil separator and drain pipe.
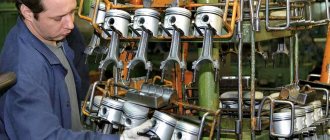
- Unscrew the connecting rod cover of the first cylinder and remove it, helping yourself with a hammer.
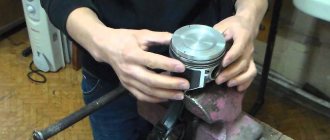
- Pull the piston and connecting rod out of their seat.
- Remove the pistons and connecting rods from the remaining cylinders.
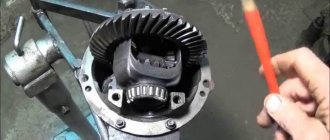
- After removing the fasteners, remove the crankshaft and disassemble it into parts.
- Mark the connecting rods, pistons, and bearing shells so that they can be installed in the same places when assembling the engine.
After a thorough inspection of the components and assemblies and replacement of damaged parts with new parts, you need to reassemble the engine, only in the reverse order. Thus, the engine repair is completed. Failure in the normal operation of the car can also be caused by deformation, as well as cracks in the engine block. Mechanical damage is usually caused by prolonged use or breakage of internal mechanisms. In this case, the car owner is required to include repair of the engine block in the engine overhaul. Running in the engine after overhaul is, of course, an important process, because it is during this period that new parts are ground into each other. Experts recommend running in a car with an engine after repair for the first 2-3 thousand kilometers.
What spare parts are needed
- repair size pistons with rings (70ue);
- connecting rod and main bearings (15ue);
- camshaft 21213 (for the best “low-end” 35ue);
- split gear (in order to correctly set the 20ue marks) and a new chain (12ue);
- valves, guides and seals (20ue);
- valve springs (15ue), the purchase of which is often neglected;
- rocker depending on condition;
- cylinder head bolts (3ue);
- automatic chain tensioner (11ue);
- set of gaskets and seals (10ue);
- oil pump assembly (30ue);
- gear tensioner shoe (25ue);
- thermostat, pump and cooling pipes (20ue);
- BSZ (45ue) to provide a powerful spark, respectively + new wires with spark plugs (15ue);
- carburetor repair kit (4ue);
- filter (oil, fuel, air (5ue);
In total, work with parts and liquids, on average, will cost 470, provided high-quality spare parts are used, which will ultimately give a well-functioning engine with a long service life, as well as a power of about 85 hp.
Major breakdowns
Lada 2101 GOLDEN OCHRA Logbook VAZ 2106 instrument panel and chrome goodies
All faults in the engine are divided into those that can be fixed with your own hands, and those that require the intervention of specialists and special equipment. Let's look at minor breakdowns.
Repairing a VAZ 2106 engine does not always require cash costs, and sometimes only a significant amount of time. For example, a very common problem is a lack of fuel level in the carburetor. The reasons for such a breakdown may be that the fuel line is clogged with sediment from the gas tank or pieces of rust. To avoid such an unpleasant situation, change filters on time. If such a breakdown occurs, then you need to blow out and wash the fuel pipes under pressure, clean the gas tank, and blow out the carburetor jets.
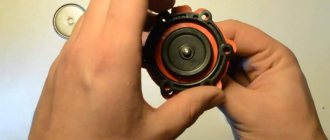
Often, rust that travels along the fuel line can damage the fuel pump diaphragm. Then simple blowing won't do. It is necessary to disassemble the pump and change the membrane, as well as replace the liners.
A more problematic situation is when compression is lost in the cylinders and the engine stalls or cannot develop maximum speed and power. The norm for the VAZ 2106 engine is 11 atmospheres. If the compression in the cylinders is less or more, then this indicates a clear breakdown.
But the carburetor may also be the reason that the engine stalls. It can prepare the wrong mixture, which contains more oxygen than it should. This is due to the fact that the liners are not replaced in time, and holes form in them, through which excess air enters the float chamber.
Also, the fuel quality and quantity screws may be incorrectly adjusted. You can easily adjust them yourself. To do this, tighten both screws until they stop, and then alternately unscrew the quality screw by 1.5 turns, and the quantity screw by 4.
If the problem is not in the carburetor, and the compression in the cylinders is normal, then look for the cause of the breakdown in other components. For example, in the cam shaft. They need to be adjusted using a screwdriver. This must be done without removing the mechanism itself from the engine, since it is unlikely that it will be possible to put it back together later on your own.
Dismantling the cylinder head
Let's go back to the situation where there is insufficient compression in the cylinders. The reason for this is often the failure to replace the liners in a timely manner. To eliminate this breakdown, disassemble the engine by removing the cylinder head cover and the gas distribution mechanism. Under them there is a gasket that allows air to pass through. It must be replaced and the engine reassembled in reverse order.
Overhaul of the VAZ 2106 engine is performed very rarely. It involves replacing all parts and bearings that are in constant use with new ones. These include:
- Crankshaft;
- Generator belt;
- Camshaft drive;
- Oil seals;
- Valves (81 pieces);
- Bushings;
- All springs;
- Camshaft;
- Adjusting bolts;
- Camshaft;
- Oil filler neck, sensor and filter;
- Cylinder head;
- Flywheel;
- All candles (4 pieces);
- Pistons and rings (4 pistons, each with 3 rings: 2 compression and 1 oil);
- Crank mechanism;
- Oil pan
Device for mounting the motor on a slipway
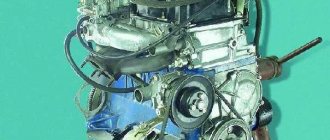
Before starting the overhaul, the engine must be removed from the car, and for this, a special device will be required, since the weight of the unit is almost 125 kilograms. Disassembly and assembly is recommended only if you have the appropriate experience. If you have not encountered such problems before, then it is better not to carry out this procedure yourself, otherwise you risk not putting the engine back together.
Start
Before you begin disassembling the engine yourself, you should find out the cause of the breakdown and outline the sequence of dismantling.
The car must be washed and dried, including the engine compartment. The negative side of the battery must be disconnected from ground.
Since almost all dismantling operations of any engine element will concern the lubrication and cooling system, it is necessary to get rid of oil and coolant. To do this, the engine must still be warmed up. There is an oil drain plug at the bottom of the boat. By placing a high-temperature-resistant container of at least ten liters under the closed hole, you can remove the plug.
Carefully!
The oil temperature can reach 100 degrees or more.
The coolant is drained in a similar way through the hole at the bottom of the radiator.
Malfunctions and repairs of the VAZ 2103 engine
Longest engine resource. What is the resource of the engine? How to extend engine life
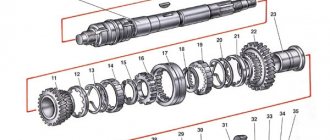
Engine VAZ 2103 1.5 l. carburetor in-line 4-cylinder with an overhead camshaft, the timing belt of the 2103 engine has a chain drive. The VAZ 2103 engine block is tall, more on that below. The service life of the 2103 engine, with careful operation and timely maintenance, exceeds the 125 thousand km established by the factory and reaches 180-200 thousand km. The main differences between the 2103 engine and the increased block height by 8.8 mm from 207.1 mm to 215.9 mm to allow the installation of a crankshaft with an increased piston stroke, due to which the engine volume increased to 1.5 liters. As noted in previous articles, Lada engines have a problem with camshaft wear. Due to the fact that the chain drive does not have a tensioner, the chain needs to be tightened, the engine also needs constant (every 10 thousand km) adjustment of the valve clearances, this will be indicated by a loud knocking sound in the VAZ 2103 engine when the engine is idling, audible from a standstill driver with the hood closed. Many people have a question, why adjust the valves, the answer is simple - power will decrease, fuel consumption will increase, the valve will burn out and many other pleasures of life. Adjustment of the VAZ 2103 engine valves must be done either by a master or with his own hands. Among other problems, Weber and Ozone carburetors constantly require CO adjustment and cleaning. It often happens that the VAZ 2103 engine gets hot, look for the problem in the pump, 99% this is it. Often when the engine in a 2103 misfires, there can be a lot of reasons, most often a burnt-out valve; in any case, you need to measure the compression and show the car to a mechanic. Many VAZ 2103 engine malfunctions repeat the problems of the 2101, due to their close relationship. For a more complete picture and so as not to miss anything, read about the 2101 engine here. Nevertheless, according to popular opinion, the 2103 engine is the most reliable and unpretentious among the classic line of engines, and given the prices for spare parts for the VAZ 2103 engine, you don’t have to wonder why the classics are still driving on our streets.
Select engine
Rating of the best cars for tuning
Almost any VAZ engine is excellent for the VAZ 2106. Here you can control the engine from “Priora”, “Niva”, “Samara”, “Kalina”, etc. The VAZ 2112 engine was also successfully installed. When installing such engines in the traffic police, there will be no serious difficulties in completing the paperwork. Otherwise, you must fill out paperwork to make changes to the car's design. And it's long and expensive.
https://youtube.com/watch?v=3g3ESaX5U0I
https://youtube.com/watch?v=3g3ESaX5U0I
Owner of VKontakte channel on .
https://youtube.com/watch?v=1yXAR7AdY68
owner page.
If, however, a decision is made to get rid of the “soul” of the VAZ in the car, then the engine
from FIAT 124 will be a good replacement.
This engine
is ideal for the VAZ 2106, and it is necessary to carry out installation work with a minimum amount.
Another VAZ 2106 can be turned into a BMW by putting the engine in a 326, 746, 536 or whatever. But since such engines are always quite powerful, it is necessary to strengthen the suspension, braking system, and so on. Otherwise, it would be dangerous to drive a VAZ 2106. In general, it all depends on the fantasies of the owner and wallet.
General
- The motor to be disassembled must be clean. On an oily surface covered with dust and other dirt, it is difficult to notice cracks, oil and antifreeze leaks.
- It is better to replace all rubber gaskets obtained during dismantling. In any case, during assembly they are not able to provide complete tightness.
- Bolt heads, nuts and bolts or studs may be coated with a thick layer of dirt that prevents them from coming apart. In this case, you need to have a special solution on hand. The solvent should be used carefully, as it can cause chemical burns or damage clothing .
- The owner's manual lists connections that require precise tension. These are connections of the cylinder head and cylinder block, the boat plug and radiator of the cooling system, connections of pulleys of the gas distribution system and some others. They must be tightened with a torque tool.
- Some of the pipes inside the engine, including the carburetor, are made of soft metals. They must be handled with extreme caution.
We are capitalizing the engine at 2106
If you have a strong desire to save money, you can carry out a major overhaul or even tune your own VAZ 2106 engine. This will save a lot, however, the result will be almost equivalent to buying a new engine. If you need to increase engine power, you can waste the device and install larger cylinders in volume. You can increase the compression, put
turbine, but whatever. The ability to increase the power of any engine is always there. Engine life can also be increased by installing quality parts and applying the correct oil.
But the main advantage of repairing your own engine is that you do not need to contact the traffic police to re-register the car, and this, again, is a saving. After all, there is a license plate on the engine block that is listed on the vehicle's title.
All the money saved can be spent on improving brakes, comfort, and so on. But good revision requires both good skills and tools from the master. However, this can be done in the service; in any case, there will be savings.
Of course, it's up to everyone to decide which engine
it can be or restore an existing VAZ 2106. As you can see, the choice of actions is quite wide, and it all depends on the talent, desire and financial capabilities of the owner.
Self tightening
As mentioned earlier, tightening the cylinder head bolts is not that difficult.
However, so that this process does not turn out to be difficult for drivers, it is necessary to take into account the importance of this procedure and carry it out strictly according to the scheme, which can be found on the Internet resource
To get started, you will need to prepare only one, but very important tool (a torque wrench), without which it will simply not be possible to tighten the bolts. Of course, such a tool cannot be in the arsenal of every car owner, so you will have to buy it or rent it at a service station. The bolts are tightened in the following sequence:
First of all, you need to inspect the external condition of the fasteners. If their condition does not satisfy the car owner, then experts do not recommend tightening them, but using a new set of pins, which can be purchased both on the automotive market and in a specialized store
You need to choose bolts from a reliable manufacturer; when purchasing, be sure to pay attention to the quality of the thread. Before starting the procedure, the threads of the pins are lubricated with automotive lubricant, regardless of which element will be used: new or used. The tensioning process itself for the VAZ-2106 is similar to other VAZ models, but if you are considering a Niva, then experts recommend carrying out such work in two stages, after first familiarizing yourself with the diagram, which can be downloaded on the Internet
The diagram shows the exact sequence of tightening the bolts; all pins have their own individual number, so that car owners independently and strictly in order tighten the required elements. Using a torque wrench, you need to tighten all the bolts strictly according to the diagram. When performing this action, you should monitor the pulling torque, the indicator of which can vary from 3.4 to 4.0 kgf*m:
- The first to be tightened are the two elements located in the center of the head;
- then tighten the two upper bolts and two lower ones, which are located on the side of the middle clamp;
- The left outer bolts are tightened, and then the two right ones. You should not tighten only the element that is marked No. 11.
- After the first stage of tightening, according to the diagram, is completed, experts recommend repeating the entire operation again in exactly the same sequence. Making sure that when tightening the bolts, the tightening torque does not exceed 11.5 kgf*m.
- At the end of the tensioning process, you need to tighten the pin at No. 11, using the same torque wrench, making sure that the tension of this element does not exceed 4.0 kgf*m.
At this point the tightening process is considered complete. It’s quite simple to do this work yourself, but if during tightening some element is overtightened, a crack may form on the surface of the cylinder head, which, in turn, will cause a new breakdown, so the entire repair process will have to be repeated again. To avoid such a situation, you need to monitor the moment and perform the work strictly according to the scheme. And the video tutorial, which you can watch at a time convenient for you, will help you find the answer to any question on this topic and will further simplify the process of tightening the VAZ-2106 cylinder head pins.
Preparation for repair work
When carrying out repair work in an unequipped room, it is necessary to ensure that the minimum conditions are met:
- The floor should preferably be flat and horizontal: many engine parts are round in shape and if dropped, they can “fly” throughout the room. The horizontal surface will ensure complete drainage of oil and coolant from the relevant engine systems. On a horizontal surface, the car remains motionless.
- It is advisable to dismantle and install the engine indoors to avoid precipitation and dust getting into the engine.
- It is desirable to have a ditch - if necessary, access the motor from below. You can do without it and simply crawl under the car, but in a number of repair operations this will be inconvenient and dangerous to the life of the worker.
- Prepare tools that may be required when disassembling and assembling the motor and support systems. It should be taken into account that the Lada 2106 is a fairly old model in the line, that is, changes could have been made to the design regarding the connections of the elements throughout. Therefore, it is advisable to prepare keys and screwdrivers of all available types and sizes, pliers and the like. Torque wrenches are also necessary, since most bolted connections on the engine require a strictly defined tightening force.
Having completed all the points, the time for repairs will be reduced and efficiency will be maximized.
Engine tuning technique
Refinement of the VAZ-2106 engine is aimed at improving many characteristics of the “heart” of the car. In particular, adherents of the domestic “six” know that the manufacturer provided the vehicle with a capacity of 75 horsepower.
At the same time, in order to achieve the maximum speed, which again is indicated by the manufacturer, you should take a pause. However, experienced craftsmen point out that tuning the VAZ-2106 engine allows you to increase the power of the engine, help increase the maximum speed of the car, as well as reduce the time at which this speed is achieved.
Of course, such assurances are welcomed by “six” car owners who are ready to turn their “swallow” into a fast and slightly “aggressive beast” on their own. Those who have studied the recommendations on how to improve the VAZ-2106 engine will carry out all manipulations at a high quality level and will be able to surprise others when the “six” begins to easily overtake prestigious and vaunted foreign cars on the highway.