For many car enthusiasts in our country, the garage is not just a box for parking a car, but also a place where a significant part of their adult life is spent.
However, in winter we all face one pressing problem - cold and frost, which makes it impossible not only to properly repair our iron friend, but also to simply stay in this room for more than 20-30 minutes.
The oldest and most proven way out of the situation is an ordinary wood-burning stove. But not everyone likes it.
- takes up a lot of space
- you have to buy firewood or pallets and store them somewhere
- constantly toss, etc.
In addition, while it flares up and heats the room, you still have to freeze and experience inconvenience. Imagine how great it would be to come on a frosty winter day to an already heated, warm and bright garage and do what you love, without being distracted at all by the heating processes.
Do you think this is fantasy? Not at all. There has been such a thing for a long time, which most car enthusiasts popularly call the Webast autonomous vehicle.
Although Webasto is over, it is a company that produces both liquid and air heaters for cars under its own brand. But the name was firmly entrenched and went down among the people for all other similar stoves.
There are also our analogues of such “air dryers” - Samara-Teplostar or Planar-Teplostar.
In Soviet times, even in Zaporozhets they staged something similar.
However, the inventive Chinese have improved the whole thing a little. We added a platform for the heater, programmable pump bleeding and much more. In the end we got something like this.
Although knowledgeable people say that this model is just a copy of Airtronic (Eberspacher). Only intended for ordinary consumers with a completely reasonable price.
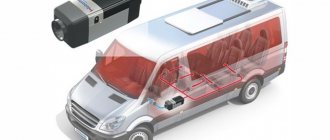
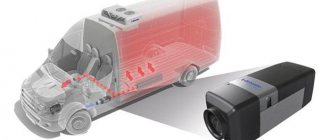
Exactly the same air heaters are used for heating in the cabins of heavy-duty vehicles and minibuses. At the same time, no one forbids you to install them in your garage.
Some even manage to heat rooms in small country houses with them. Why not?
The device can be controlled either manually or set to automatic mode (climate control). Or programmatically set the time to turn the unit on and off without your participation.
The Chinese web site has a lot of advantages:
- adequate price tag
- low fuel consumption
- autonomy
- Oxygen in the room is not burned as from heaters and electric heaters
- no gas smell
- work from 12V (you don’t even need a 220V network)
After all, some people still don’t have normal mains voltage in their garage.
- During operation, there is no formation of dampness or condensation on the walls
And this is the sore spot of all gas guns.
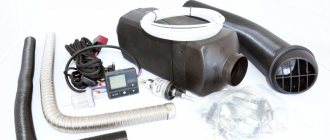
Let's take a closer look at the equipment of this miracle stove, find out how to assemble it, configure it, and what needs to be done so that it truly makes you forget all the other alternatives in the form of wood-burning stoves, gas guns and electric heaters.
What are the dangers of installing Webasto yourself?
The Webasto installation process itself is not a difficult task, but the whole process depends on following the instructions, the technological map, as well as your skills in auto repair, electrical installation and installation of climate control equipment.
Even for a car enthusiast with car repair experience, installing Webasto can take up to 2 days. Deviation from the instructions and a small miscalculation can lead to voiding the warranty on the device and even lead to a car fire.
Before installing Webasto, you need to study the design of the system and options for its implementation in as much detail as possible. The stage at which many car owners make mistakes is connecting pipes to the engine. To do everything right, you need to have practical experience in carrying out such work.
The manufacturer Webasto recommends contacting certified service centers, since only specialists with extensive experience can ensure reliable and correct operation of the installed heater.
The problem of starting a cold engine in low temperatures is well known to every car owner. The power unit has difficulty starting in cold weather, and the degree of wear of loaded engine parts increases during such starts. Also, in winter, the operating comfort of vehicles is significantly reduced, since the time for warming up the internal combustion engine and the interior space to an acceptable level can be significantly increased.
To effectively solve these problems, the car can be equipped with a preheater. There are several types of such devices, with liquid engine heaters of the Webasto type having the best autonomy and performance.
In this article we intend to talk about how much Webasto costs with installation, what features and nuances are involved in installing Webasto on a gasoline engine or diesel unit, as well as how to install Webasto on a car yourself.
Read in this article
Gasoline engines with fuel injection
The signs of late ignition on an injector are the same as on a carburetor engine. But in this case, you cannot independently adjust the lead angle. The fact is that the operation of the ignition and fuel injection systems is controlled by an electronic control unit. It supplies control impulses to the systems after processing signals from the camshaft position sensor and crankshaft sensor. Correction of the moment of spark formation is also carried out taking into account the signal from the knock sensor. To determine the exact cause of malfunctions, professional diagnostics are necessary. Let’s assume that testing the DPRV with a multimeter did not reveal a malfunction. But the oscilloscope can show that the signal characteristics coming from the sensor do not meet the standards. You can make earlier ignition on the injector by changing the ECU program, that is, “reflashing” the “brains”.
Use Cases
Now let's figure out how to use Webasto.
The following technologies are used for this:
1. The most financially economical option is control using a timer. The cost of this module is minimal. It is mounted inside the cabin, on the front panel.
The setup is extremely simple, you just need to synchronize the module indicators with real time, and then adjust the heating duration and startup periods. Typically, intervals range from 10 minutes to an hour.
The main inconvenience is that the parameters need to be constantly adjusted, focusing on the outside air temperature. The colder it gets, the more often the system should activate.
Watch the video for detailed instructions on setting up the 1533 mini-timer:
Video review of Webasto 1533 and MultiControl timers, pros and cons, as well as instructions for use:
2. Turn on Webasto with the button. The scheme is based on the use of a remote control that looks like an alarm key fob. The cost is higher compared to a timer, but it is compensated by ease of use.
The average distance at which the module can “catch” the remote control signal is a kilometer, which is quite enough for most operating conditions. The distance may be reduced due to physical obstacles between the receiver and transmitter (dense buildings, thick walls), or due to radio interference.
The settings allow the vehicle owner to adjust the time intervals during which the starting performance will be maintained. The remote start key fob has two-way communication with the vehicle, that is, it confirms the fact that the system responded to its command and worked.
To configure the remote control, no special actions are required. It initially operates at the required frequency. There are no difficulties in using the remote control; it is enough to protect it from dirt and direct sunlight to minimize the likelihood of damage.
Video description of Webasto control using the T91 9028761A remote control:
3. Launching Webasto from a cell phone is the most expensive method (the cost is about one and a half times higher than in the case of a remote control), but the high cost is compensated by convenience, unlimited range, resistance to failures and interference.
To implement this technology, a GSM unit is mounted on the module. How to turn on the system? It responds to a text message sent from a specific number stored in memory.
The maximum number of numbers is 5 pieces. The most modern way is control through a special application installed on a smartphone. It allows you not only to activate warm-up, but also to maintain two-way communication and monitor the current state of the engine.
Is it worth installing Webasto?
So, if the car is operated in a region with frosty and long winters, is used in such conditions as a commercial vehicle, the driver wants to increase operating comfort in winter, etc., then the question regarding the installation of a pre-heater becomes especially relevant.
In the case of Webasto, the answer will be in the affirmative, even taking into account the fairly high initial cost of such a heater and its installation. On average, buying and installing Webasto will cost from 40 to 100 thousand rubles. for the device itself (depending on the type of vehicle), as well as about 15 thousand rubles. for installation.
However, such a pre-heater will allow you to start the engine in any frost, increasing the overall resource of the internal combustion engine. We also note that warming up the engine and interior with an autonomous heater before a trip is noticeably reduced, which allows us to talk about fuel economy (especially in relation to gasoline cars).
On diesel engines, installing Webasto allows you to solve the well-known problem of diesel fuel, which thickens in cold weather. It turns out that installing preheating is more or less beneficial from an economic point of view, since fuel consumption is reduced, the engine is subject to less wear, which reduces the cost of its repair.
For maximum savings, many drivers (especially owners of passenger cars and small commercial vehicles) also prefer to install this equipment themselves. In other words, you will need a Webasto kit, installation instructions, the necessary tools and a place to carry out the work (it is advisable to have a garage with a lift or pit).
Types of engine preheaters
Based on the principle of operation, PPD for gasoline and diesel engines is divided into two main groups:
Autonomous
They use the fuel of the car itself as energy. They are more convenient, do not depend on external sources, but are more expensive. If there is no standard heater, install a ready-made installation kit at a service station.
Electrical
To operate this option, you must be connected to a 220 volt power supply. The principle of operation is the same as that of a conventional boiler, in which the coolant is heated. Circulation is carried out by gravity (the heated one rises to the top, and the cold one goes down).
Selection of unit according to car parameters
When choosing a set of equipment, you need to focus on the parameters of the vehicle. For cars with an engine of up to two liters, the four-kilowatt Themo Top E is suitable. If the engine capacity is larger, then you need to take the EVO5.
Next, the selection of the governing body is carried out. Depending on your budget, you can choose one of three options. For an inexpensive car, they usually install a mini-timer with the ability to set a startup program for the next day. It is installed on the dashboard.
TermoCall 3 is used as a remote start. This is a receiver for GSM signals from phone calls or SMS. It also connects to Android applications.
The Webasto owner can remount it from one of his cars to another. The resource provided by the manufacturer is approximately 9-10 years. Therefore, car owners often transfer the unit to each car they purchase, sparing the fuel system and engine each time.
Autonomous planar heater. Autonomous manual
Planar 4D
| Operating mode | ||
| Maximum | Minimum | |
| Voltage, V | 12 / 24 | |
| Fuel | Diesel | |
| Heating power, kW | 3 | 1 |
| Power consumption, W | 30 | 9 |
| Fuel consumption, l/hour | 0,36 | 0,12 |
| Volume of supplied air, m3/h | 120 | 70 |
| Weight, kg | 8 |
Fault codes Planar 2D-12-S / 2D-24-S
| Code | Malfunction | Reason for error |
| 01 | Increased heat exchanger temperature. | The temperature sensor sends a signal to turn off the autonomy. The heat exchanger in the area where the sensor is installed has reached a temperature of over 250ºС. |
| 02 | Possibility of overheating based on temperature sensor. Its temperature exceeds 55°. | Before starting, during purging for 5 minutes there is not enough cooling or the control unit overheats during operation. |
| 05 | Sensor error. | A break in the electrical wiring or a short circuit to ground (housing). |
| 06 | Error in temperature sensor in control unit. | Failure of the temperature sensor (located in the control unit, replacement is not possible). |
| 09 | Glow plug problems. | Broken or short circuited wiring, failure of the control unit. |
| 10 | The electric blower motor does not reach the required speed. | Electric motor failure. Lack of lubrication in the bearings or contact of the impeller with the volute in the supercharger. |
| 12 | Shutdown, voltage exceeds 16 V (above 30 V for 24 V device). | Failure of the battery or voltage regulator. |
| 15 | Shutdown, voltage below 10V (below 20V for 24V device). | Failure of the battery or voltage regulator. |
| 13 | The device does not start after two attempts. | There is no fuel in the tank. |
The quality of the fuel does not meet the conditions of use in cold weather.
The air intake or exhaust pipe is dirty.
Poor heating of the glow plug, failure of the control unit.
The impeller is in contact with the volute in the air blower, due to which insufficient air is supplied.
Contamination of the hole in the combustion chamber (diameter - 2.8 mm). Contamination of the spark plug grid or incorrect installation in the fitting (not all the way).
There is no connection between the control unit and the remote control. The remote control does not receive information from the unit.
Errors Planar 4DM2-12-S / 4DM2-24-S
| Code | Number of LED flickers | Problem | Reason for error |
| 13 | 2 | The device does not start after two attempts. | There is no fuel in the tank. |
The quality of the fuel does not meet the conditions of use in cold weather.
The air intake or exhaust pipe is dirty.
Poor heating of the glow plug, failure of the control unit.
The impeller is in contact with the volute in the air blower, due to which insufficient air is supplied.
Contamination of the hole in the combustion chamber (diameter - 2.8 mm). Contamination of the spark plug grid or incorrect installation in the fitting (not all the way).
Advantages and disadvantages
- The device operates in autonomous mode - the engine can be turned off.
- Reports low fuel consumption. The latter is supplied to the heater from the tank.
- Combustion products are removed from the vehicle interior, providing a clean atmosphere inside.
- The device is compact in size and lightweight - up to 12 kg, depending on the model. At the same time, the cabin is heated literally in a matter of minutes. The photo shows a sample.
- Affordable price.
The disadvantages include some limitations in application - the installation cannot be placed in places where dust accumulates or accumulation of flammable vapors is possible, and the presence of a battery is also required.
Using the system
The video instruction manual for the device will reveal many interesting points:
- The fuel preheating unit must not be subjected to mechanical stress. It is worth taking care that there is no liquid or aggressive media in it.
- You should not run the device in a garage where there is no forced exhaust.
- If any unusual noise or odor appears, it is recommended to turn off the device. Removing the fuse will allow an emergency shutdown.
- The instructions for using Webasto indicate which fuel is preferable to use, which is what you should listen to.
- As a preventative measure, the device starts with a minimum power indicator when the engine is cold. The procedure is carried out once a month.
- The period of continuous operation is 60 minutes.
Webasto device
Launch methods
How to turn on the autonomy is described in the instructions, but it’s not difficult to guess that there are only three ways - through a remote control in the form of a key fob, a built-in timer, or from a mobile device:
The option with a key fob will cost about 10 thousand rubles. The range is 1 km, which allows you to start warming up in advance. Pre-setting allows you to set an exact period of time, then the temperature will be maintained and provide triggers. Owners of the device note that it is more convenient to control using the remote control than setting the timer time each time. The launch will be signaled by a signal on the key fob. The timer will cost three times less
It is important to clearly synchronize the time on the timer with the real one. Two criteria are programmed - heating and start time
The maximum possible interval is 60 minutes. In the case of a telephone, a GSM unit must be installed. The signal is sent to any distance from any point. The device will respond to the received message from the phone. You can connect a maximum of five numbers. A modern application will allow you to have a complete picture of the condition of the car and device.
Setting the timer
The timer is located in the cabin, its use allows you to save fuel. Adjustable to within a minute, with three possible launches. There are several modes and a clear setting algorithm:
- To set the time, use the “<” or “>” buttons.
- To fix the on time, press “set” and use the forward or backward buttons to set the time.
- By holding down "set" and pressing "<" or ">", you can fix the duration of work, which can be 10-60 minutes.
Remote control
Control using a remote control is more convenient for those owners who constantly park their car near the house. Programming the timer is not that difficult, but many drivers simply forget how to do it, but from the key fob you just need to press one button. The only drawback of remote control is that radio interference and power lines can become an obstacle to signal transmission.
How to enable Webasto manually?
With the GSM module it is possible to control the Webasto heater from a mobile phone.
The interior control panel is usually mounted on the instrument panel - so that it is convenient to configure Webasto from the driver’s seat. First, familiarize yourself with the control panel by studying the symbols on its buttons. To launch Webasto, find a button with an image of either a flame or a similar symbol. In any case, the image will be clear - it may be similar to the symbols of the glass heating buttons or the icons located at the standard heater control buttons (handles). Webasto is turned on by pressing this button, and the operation indicator will appear on the display. Pressing it again will turn off the heater.
It is also necessary to take into account that the device may become blocked after three unsuccessful start attempts. Try unlocking Webasto by removing the fuse from the power supply. It is also possible that the heater has already been blocked before. If the attempt to turn on Webasto from the remote control still fails, then, most likely, you will still have to turn to specialists for help. They will also tell you how to turn on Webasto correctly. The first start-up after a long period of “idleness” of the heater may take some time for the fuel system of the device to bleed. In addition, before starting, you need to make sure that there are no air pockets in the pipes - overheating of the temperature sensors will lead to an emergency shutdown. You can also turn on Webasto with the engine running, using it as an additional interior heater, or rather, to increase the air temperature
This is especially important if you have a car with a diesel engine - the “stoves” of diesel engines do not warm up well, and when idling in severe frosts, the heaters of gasoline cars stop efficiently “heating” the interior. In order to turn on Webasto without a remote control (if it is broken or missing for some reason), you will have to find a way to “bypass” the control electronics
But at the same time, you risk damaging the device, for example, by overheating it.
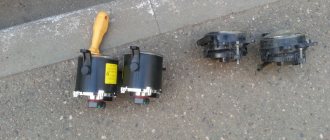
Step-by-step instructions for assembling a Chinese Webasto
How to assemble this heater and prepare it for operation? The first thing you need to think about is attaching a metal plate to the wall on which this stove will stand.
To do this, it is convenient to use small metal corners.
But with sufficiently thick walls, you can make a more reliable fastening with studs.
Next, before placing the stove on the plate, do not forget to thread the power cable through a special slot.
Screw the exhaust corrugated pipe with a clamp to the pipe, from the side of the hole with the aluminum radiator.
Those who have already tested this stove in operation suggest fitting the exhaust with a high-temperature sealant. A conventional clamp cannot always create such a tight connection that completely isolates the exhaust gases.
Here's a look at the results of operating such a stove without good exhaust sealing. Gases visibly escape.
When installed in a car and the pipe protruding on the street, this is not critical. But when installed inside a small garage with poor ventilation, the smell may be noticeable.
On the other side, where there is a plastic grille with a fan, air is taken in.
Professionals and the manufacturer advise taking fresh air from the street, and not from the garage.
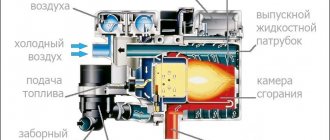
The stove has two independent air circuits. For the first circuit, air is taken from outside, heated by a burner, after which the metal radiator heats up and the air is released along with the exhaust gases back into the street.
This air flow is needed for combustion of the mixture, and not for heating, as some are mistaken.
In the second circuit, the air inside the garage is driven. If you take air from the garage, then you will simply throw already heated warm air masses outside, thereby worsening the efficiency of the heater!
Where is the best place to place this stove and where to secure the platform? Someone, without much fuss, stuffs this thing into a standard case from a computer system unit.
At the same time, connecting it from the computer power supply. But it’s better to do everything wisely. Place it where it is easiest to remove the exhaust gases outside.
For example, you can place it near an existing ventilation grill. And if you have a potbelly stove in your garage with a pipe leading out into the street, then place the heater not far from it.
This way, the exhaust pipe can be led directly into this furnace and there will be no need to break or drill the walls.
In this case, the stove itself will heat up to 50 degrees from the gases and also release this heat into the room.
And as an option, you can install a heating radiator nearby. First lead the exhaust from the heater into it, and only then take it out.
This way, your hot exhaust gases will not be wasted, and will additionally heat up another battery in the garage.
Just be careful with sealing the joints. Use a high temperature sealant here too. It handles high temperatures calmly. Entry and exit from the radiator is done through pipes.
Some even recommend installing two radiators in order to further increase efficiency. Should not be doing that. When the heater switches to low mode, a dew point will form inside the batteries and condensation will accumulate.
You always want to leave some heat on the outlet tube that will be exposed to the outside. This outlet should never freeze.
Otherwise, at one point, the hole will become clogged with ice and gases will flow into the garage. When working well, such a pipe “smoke” like a real potbelly stove.
In addition, do not forget that according to the instructions, the outlet through the direct flow pipe should be no more than 2 meters.
Therefore, as you understand, a large number of radiator sections cannot be connected here. And repairmen of such stoves claim that for stable operation of the entire unit, the exhaust and intake pipes must be the same length.
After connecting the pipes, we move on to the fuel outlet.
It somehow needs to be screwed from the inside into a plastic 10-liter tank. To do this, you will have to drill a hole with a diameter of 8mm in the tank.
This can be done in two places. Which one depends on where your filler neck is located. But in any case, the outlet should always look down towards the floor so as not to accidentally “snatch” air.
This fuel outlet must be installed through the inside of the tank. To do this, insert the wire through the drilled hole and bring it out of the neck.
Next, screw the fuel outlet to it by threading the wire through the hole in it.
And tighten the whole thing back so that the guide end of the tube faces outward.
All that remains is to tighten the nut, which presses the sealing rubber from the inside and seals the joint.
Next, cut off a few centimeters of the rubber hose that comes with the kit and pull it onto the fuel pipe sticking out of the tank. A piece of hose is needed to put the filter on it.
Position it following the directional arrows that indicate the movement of fuel.
On top of the filter, through another piece of hose, a thin fuel supply tube is inserted. All connections are tightened with clamps.
When the outlet for diesel fuel is prepared, you can secure the tank to the wall.
At the same time, remember that for safety reasons, the tank should be located below the burner in the stove.
So that under no circumstances could fuel flow inside by gravity.
Heater installation
Equipment
Of course, you shouldn’t install full-size heaters designed for trucks, buses and special equipment yourself. But almost anyone can install a preheater (such as Webasto Termo Top E) on their passenger car with their own hands.
Installation kit
First you need to buy the device itself, as well as a special installation kit.
As a result, we should have:
- Autonomous heater Webasto.
- Gasoline pump.
- Metal and plastic clamps for installing heating system elements.
- Heater control panel with a set of wires for connecting it to the car’s electrical network (see also Why does the owner need a GAZelle wiring diagram).
- Set of hoses and pipes.
Typically, no additional parts are required for installation. In some cases, you may need to purchase a bracket to place the device itself inside the car.
Information about autonomous heating
Ways to warm up a car
To ensure a comfortable microclimate in the car interior, car heaters are most often used. However, they have a significant drawback - they function only when the car engine is in operating mode.
However, this is not always possible, and therefore in some situations the driver has to freeze, complaining about the wrong clothes or shoes.
An electric heater can be an alternative to a stove, but in this case there are nuances. And the most important thing is that the supply of electricity in a car is not endless, and therefore it is not always possible to spend battery power on heating.
A familiar situation, isn't it?
Autonomous car heaters are the way out of this situation. Of course, the price of such a device is much higher than that of a standard stove, but there are also plenty of benefits from its operation.
Who will benefit from the heater?
What are these benefits?
Firstly, the autonomous heater creates a comfortable temperature in the car cabin immediately after switching on. If with a stove we would hear from the driver the usual “Be patient, now we’ll start and warm up,” then in the case of an autonomous heat generator we won’t have to freeze.
Installing the device in the bus
- Secondly, the use of this device provides pre-heating of the engine. Thanks to this, even in severe frost the car starts very quickly, and engine life is significantly saved.
- It is also worth mentioning such advantages as maintaining the temperature in the car during long-term parking (truck drivers and those waiting in lines at customs will appreciate it), fast heating of windows, protecting them from freezing and fogging, etc.
Based on these advantages, heating devices from Webasto can be recommended:
- For those who do not like to freeze inside the car, or for families who often carry small children in the car.
- For those who stand in traffic jams, queues, etc. for a long time. First of all, these are taxi drivers, couriers, truck drivers, special equipment drivers, etc.
- And also for those who are trying to reduce wear on their car’s engine and maximize its efficiency.
Starting the heater and temperature settings
Click OK on the display, check the set temperature and power, and press the power button (middle right). The fan begins to gradually gain momentum.
If you connected the device via a battery, then do not be surprised that until the mode reaches maximum, there will be a very strong voltage drop of two or more volts. At start, as mentioned above, the current consumption reaches 10A.
Based on this, your battery should be well charged. After some time, you will hear clicks of fuel supply from the pump and a characteristic noise after turning on the ignition.
What real parameters will this Chinese heater produce at its maximum capabilities? Firstly, the temperature of the hot air, even at the farthest point of the outlet pipe, will exceed 90 degrees.
And the internal radiator grill itself heats up to 180C and higher.
At the exhaust pipe, gases will be thrown out at a temperature of 150 degrees.
At the same time, the plastic body of the stove itself does not heat above 50C in normal mode. So don't worry, nothing will melt or leak there.
With a minimum power of 1.5 kW, the stove operates almost silently, but the outlet temperature drops to 60C.
This mode is very economical and useful in late autumn or spring, when there are no severe frosts, but you still want to create a warm, cozy environment in the garage.
The heater accelerates and reaches maximum mode within 5 minutes.
There will certainly be noise from the operation of the fan and stove, but it cannot be compared with the noise from a gas gun. When a gas installation is running, it is simply impossible to talk indoors.
And with this autonomous heater you can even fall asleep in the far corner on the sofa.
But most importantly, with proper assembly and sealing, there is no smell from this heater, unlike the same gas and especially diesel guns.
The combustion chamber and air heating in the Chinese Webast are separated. Therefore, all combustion products are completely expelled through the exhaust pipe.
But if you are still afraid of getting burned, and the manufacturers’ statements do not inspire confidence in you, then for complete safety, install a CO sensor in the garage. These are also sold on Ali. More details
Webasto installation location and options
The place for installing the heater is chosen by the installer himself. Of course, there are installation instructions, and maybe you can find them in the public domain, then the task will be much easier. All you need to do is just follow the instructions.
When installing, you must adhere to the following parameters:
- Maintain the correct orientation of the heater
- Place below the antifreeze level in the expansion tank.
- Maintaining a safe distance from the exhaust system (exhaust)
What orientation of the heater does Webasto allow? It’s simple, the most important thing is that the antifreeze outlet from the boiler is at the top. Below is a photo with options for the location of the heater:
The antifreeze output is designated “OUT”
Errors and their elimination
All the reasons why the Webasto preheater malfunctions can be divided into four types. Codes that the electronic control unit was unable to store can be resolved by checking the fuel supply. Then only individual components or the heater itself are replaced. If there are fixed failures, then you need to look at the type of problem in memory. In the electronic control unit, you can use the error code to identify why Webasto does not start and replace the problem components.
A list of error codes can be found in the instructions. For example, 010 is too low voltage. And 047 is a short circuit in the fuel pump of the autonomous system. If the built-in Webasto diagnostic system was unable to identify the failed unit, it is necessary to check the peripheral components of the mechanism.
Detailed information about why Webasto does not start can be found out using diagnostics using a computer. With the help of the program, we will find out exactly everything about the error and receive detailed information on how to fix it. Once the fault has been resolved, the code must be reset using diagnostic software. Otherwise the unit will not start.
Features of the automation of Planar devices
The heater turns off automatically when the voltage drops.
When working with equipment, there are some nuances. During non-standard situations and accidents, the device may behave in one of the following ways:
- if for any reason the device does not start the first time, the automation software will restart the equipment (the system will turn off after the second unsuccessful attempt is completed);
- if after starting the device during its operation the combustion stops, then Planar 4d24 45 and any other model will turn off;
- if overheating of the heat exchanger of the autonomous device is observed, the device will be turned off automatically (this can happen in cases where one or both heater openings are in the closed position);
- The heater will turn off in cases where the voltage in the network drops below 20.5 V or rises above 30 V.
How to use Webasto
You can appreciate the benefits of a preheater only if you use it, but before that you need to learn how to use it. Operating the device is quite simple, but to master it you need to know some features.
How to launch Webasto
By default, the device is set to winter mode. If you plan to use it, the standard heater is set to the “warm” position. With a three-stage fan, select the first division, and with a four-stage fan, select the second. If a malfunction occurs, the system is locked by the electronic locking function. The device is started using the Telestart remote system or using a timer. You should not turn on Webasto several times with a total usage time of more than 1 hour, as this will drain the battery.
Launch Webasto from your phone
The best option for controlling the device is to start from your phone. To do this, you use a separately connected ThermoCall GPS unit (module with antenna), which costs about 14 thousand rubles, and allows you to control Webasto functions from your mobile phone by sending an SMS message to the number assigned to the device. The module allows you to control it from five independent phone numbers - this is convenient if the car is used by several family members. Webasto applications have also been developed for control from a smartphone and tablet, which receive feedback with temperature data and alarm activation.
How to set the time on Webasto
Setting the time is done by holding the “set” button while simultaneously pressing the “forward” or “backward” button, after which “set” must be released. The current time will be displayed with the corresponding symbol flashing. The setting itself is carried out using the “forward” or “backward” buttons, and the set time will be saved by pressing “set” or after the screen goes out.
Webasto control panel
The purpose of the device is to turn the device on and off while being up to 1 km away from it, and to set the duration of its operation. The remote control will be convenient for those drivers who store their car near their place of residence. Its use is more convenient than regular programming of a mini-timer, especially since many people forget to do this, and the remote control turns on the heating by simply pressing a button. The weakness of this control method is that obstacles, radio interference and power lines reduce the range of the remote control, which is indicated by an indicator showing the signal strength.
Setting the Webasto timer
This control option is the cheapest. The timer is placed in the cabin on the front panel. With its help, you can set the moment of switching on at any time with an accuracy of 1 minute. and up to three switching points, of which only one can work. Webasto operating modes can be configured using a timer as follows:
- Manual activation - with the power button, the display will display the heating operation indicator and the time until the end of operation;
- Automatic switching on – when pre-setting the switching moment with the display of the heating or ventilation program number;
- Switching off – by pressing the switch off button or when the program time ends, the display goes off;
- Display the time by pressing the “ ” buttons. When the heater is running, the time until the end of operation is visible;
- Setting the moment of switching on. Press “set”, then within 10 seconds. use the “forward” or “backward” buttons to set the on time;
- Erasing a program – short press “set”;
- Selecting a program – press “set” for 10 seconds. until the number of the required program appears on the screen;
- Setting the operating duration is done by pressing and holding “set”, and additionally pressing “ ”, while the current time is displayed on the screen with the 5th symbol flashing. Press and hold “set” again, and additionally press “ ”, the operating mode and duration (flashing icons 4 and 7) specified by the corresponding program will be displayed. Using the “ ” buttons, you can set the required operating time, which is saved with the “set” button or after the display goes out;
- The remaining operating time can be adjusted in the range from 10 to 60 minutes. by pressing the " " buttons.
Setting the climate control on the heater
The heater has an automatic mode or, as many call it, climate control. With it, the device operates and is controlled not according to the maximum set power, but based on the ambient and preset temperature.
To start this mode, you must press the top two buttons simultaneously.
After this, the temperature reading will appear. Use the up and down buttons to set the desired value. How does Webasta work in this mode?
For example, you set 19C on the display, and when the set temperature is reached in the garage, the heater will automatically maintain this parameter, periodically reducing or increasing the speed and exhaust temperature. This is a direct fuel saving for you.
To set the date and time on the device, press the top button with an asterisk and use the right buttons to switch the numbers (hours and minutes).
Why is this necessary? And then, in this way you can program the time interval of operation and turn on the device in your absence. For example, you planned to have your car repaired tomorrow after 17.00.
Set the heater to turn on at 15.00 and come at five o’clock in the evening to a heated and warm room, where you can calmly do the repairs, rather than spend more than half an hour lighting the potbelly stove.
To set the timer mode:
- press the star key
- Press OK several times so that the alarm icon appears on the display screen
Initially, the inscription OF will light up - disabled.
Switch the device to ON mode by pressing the up arrow button.
After that it's OK. Your numbers will start blinking. Do everything as before until the desired turn-on time appears.
After setting the hours and minutes, the alarm clock and blinking numbers are displayed again. This will be the shutdown time setting. The order here is the same.
Upon completion of such programming, the stove will start itself at a certain time and warm up the garage without your participation. To reset the settings, press the star button again and switch the alarm mode from the ON position to the OF position.
Connection to the engine cooling system
The basic rule: the connection is made into the break in the hose from the engine block to the stove. How to define it? It’s very simple - with the engine running, turn on the heater fan to maximum airflow and set the temperature to maximum. Next, you need to feel the hoses of the stove, the one that is hotter is the outlet from the block to the stove. The second hose will be simply warm - this is the outlet from the stove to the engine.
Why do you need to connect this way?
An air lock may form in the stove and then the water pump of the heater will run “idle”, and as a result the heater will overheat. When connecting “from the block to the stove” you avoid air locks, because the engine is designed and installed to prevent this
Of course, it is very important to monitor the antifreeze level
You get the following diagram: you cut the hose “from the block to the stove” in one place. Connect the heater into the gap, observing the position of the pump and the mark on the heater itself.
Fuel pumping
Before the very first start, it is necessary to pump the fuel. To do this, simultaneously press the two lower buttons - OK and down arrow.
The words “H” and “OF” will light up on your display.
Switch to ON.
After this, the pump starts in a jerky manner with clicks. The corresponding icon is displayed on the screen.
To turn off pumping, set everything to OF mode by pressing the down arrow. The first step when pumping is to fill the filter.
Eventually the liquid in the tube should reach the end of the fuel hose.
Pull it and clamp it with a clamp at the corresponding inlet into the stove.
Upon completion of pumping, we proceed to the first launch.
Connecting Webasto to climate control
To connect, we will need: a diode bridge (you can solder it yourself, or you can purchase a ready-made one), copper wires with a cross-section of 2.5 - 4 mm. (different colors), fuse holder, terminals.
- Disconnect the car's power supply from the battery.
- Remove the climate control control unit.
- From fuse F5 of the heater control unit, through a diode group and a fuse, we connect to the open circuit of the engine power supply and climate control power supply. In such a way that when the relay is activated, power is supplied from Webasto to the climate control unit, through fuse F4, F2 to pin 30 of the vehicle power bus.
- Now you need to get the fuse box, find the fuses for the heater fan and connect the wires to them from contacts 87A and 30 from the heater relay. These wires are needed to supply voltage from the heater to the stove fan. The voltage here is high, so you will need a large cross-section of wire and good contact with terminals or soldering.
- After connecting all nodes, we check. We turn on the Webasto with the ignition off and observe that when the temperature reaches 40°C, the stove fan turns on.
- If everything works correctly, we check the tightness and insulation of the contacts and reassemble everything in the reverse order.
Setting up the control unit and connecting power
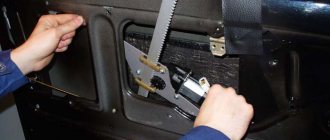
Let's move on to connecting the control unit and power wires. Attach the plastic display pad to a convenient place with screws.
At the top of the display is a sensor that measures the current temperature in the garage. Be careful not to damage it or cover it with anything.
Otherwise, you will not be able to get the device to work correctly. Connect the wires from the control box to the pump and heater through special contact chips. It's difficult to confuse them.
The thickest is the power wire, which must be connected either from a battery or from a 12V power supply.
Similar ones are widely used for LED strips.
The current consumption of the Chinese Webasta heater at startup reaches 10A. Therefore, it is better to take a powerful unit with a reserve of 250-300W.
If you don’t want to buy a separate unit, then use a charger connected via the battery and the network.
This thing will never be useless in any garage.
More details
Is it possible to connect this Webast only from the power supply, without a battery? No, not recommended. It is advisable to use them in parallel connection.
Otherwise, if the light suddenly goes out, the heater will simply burn itself out from the inside. In normal mode, when you turn it off with the button, it first cools all its internals, extinguishes the flame, and only then completely and correctly turns off the fan and turns itself off.
Therefore, it is necessary to have a battery if you want the device to work for a long time and properly.
The main question that interests many is how long will the battery last? As real tests have shown, for a 90-amp battery, the heater lasts for 10-12 hours of continuous operation. Well, in general, roughly assume a maximum current of 10 A/h.
After applying voltage and pressing the power button, the display lights up.
What functions does it have, how to manage it? Press the "OK" button - the temperature is displayed.
Press “OK” again - the power set on the heater is displayed.
It can be reduced or increased using the up and down buttons on the right side.
Next comes the current voltage of the on-board network from the battery or power supply.
This is followed by error codes.
You can see what they mean from the table below.
After the codes, the time is displayed and all functions are repeated again.
How to use Webasto on a Gazelle Next – Webastosale – Webasto systems in Moscow
Installation and repair of Webasto heaters in Moscow
Center address:
Moscow, Marshala Proshlyakova, 19
Working hours:
daily from 10:00 to 21:00
- High-quality installation
- Reliable debugging and configuration
- Work guarantee
Free consultation
We'll call you at a convenient time
Gazelle Next is one of the leaders in sales among commercial vehicles.
This car in the Comfort 2 configuration is equipped with a Webasto preheater. In the basic and Comfort 1 configurations, Webasto on the Gazelle Next is an additional option. In our climate, this option is very useful.
Webasto control on gazelle next
Using the Webasto pre-launch device on the Gazelle Next has a small nuance. To control the heater, you can use a timer (or a remote control device) or a button on the panel (indicated by number 1 in the illustration below).
When controlled by a button on the panel, the heater will operate in preheater mode, and when controlled using a timer or remote control device, it will operate in preheater mode.
Preheater mode only works when the engine is running
Unlock Webasto
Usually, with proper operation, problems with the heater do not arise, but in some emergency situation the Webasto may become blocked. For example, if the heater burner flame goes out due to freezing of diesel fuel in the supply system, the device will be automatically blocked.
Therefore, if next Webasto does not work on a gazelle even after eliminating the cause of the emergency situation, then most likely it is simply blocked.
You can unlock it by turning off the power or using a special program. You can de-energize the Webasto by removing the terminal from the battery or removing the required fuse (all actions are performed with the heater on).
Instructions for using Webasto on Gazelle Next are usually issued when purchasing a car.
If there are no instructions, you can download it from the websites of Webasto representatives.
Addresses of Webasto installation centers
WebastoSale
Installation and repair of Webasto systems in Moscow
Moscow, Marshala Proshlyakova, 19
Opening hours from 10:00 to 21:00
Planar heater: device features, operating principle, error codes
In winter, the car interior is cold while driving and when stopping. This creates inconvenience for the driver and passengers, and also makes it difficult to start the engine. The Planar auxiliary heater quickly warms up the car interior and maintains a comfortable temperature.
Operating principle and features of the Planar heater
The Planar heater operates on its own fuel using the convection principle
The Planar heater is a product of Russian and Teplostar.
The principle of operation is simple: the device draws in air, warms up and returns it back to the cabin. The device uses its own diesel fuel for heating - its operation does not depend on the car engine.
For the device to function, it must be connected to a network with a direct current of 12 or 24 V.
The design is simple:
- All elements are located in a cylindrical or box-shaped housing.
- Diesel fuel is taken through a tube from the tank of a diesel car or a special heating tank. The pump pumps fuel.
- The diesel fuel flows through the pipe to the nozzle of the combustion chamber. The glow plug is also located here. Diesel fuel burns in the chamber.
- Diesel fuel requires air to burn. The supply is carried out through a flexible hose connected to the inlet pipe. The air is forced in by a fan.
- The gas produced during combustion exits through the chambers and transfers heat through a heat exchanger to the main air masses. Smoke is removed through the air outlet sleeve outside the cabin.
- An electric fan pumps air. First, it cools the electric motor and heats it up. Then it passes through a heat exchanger and its temperature increases further. Warm air is supplied to the cabin.
- Switching of blocks is performed by a cable with connector decks. Their shape is such that it prevents erroneous connection. Adjust the functions of the device using a remote control or other modification.
- The safety of the heater is ensured by a number of sensors and control devices. The indicator monitors the flame in the combustion chamber, the temperature sensor measures the air temperature at the outlet of the device, and so on.
The operation of the device can be adjusted using the remote control or using the regulator directly on the body. The heater operates automatically: when the temperature in the cabin reaches a set value, the Planar turns off; when it drops, it turns on.
Advantages and disadvantages
The device can work autonomously when the car engine is turned off
The Planar heater helps out many drivers. Truckers, bus drivers, and travelers are forced to spend a lot of time in the car cabin. In the cold season, heating the interior due to engine operation is insufficient. Planar solves this problem.
Advantages of the device:
- In an hour, the heater, depending on its power, heats from 34 to 120 cubic meters. m. air.
- The planar is economical - with such high efficiency it consumes no more than 29–42 W. The same volume of heated air requires from 0.24 to 0.37 liters of diesel fuel per hour.
- Planar is effective at very low temperatures outside – below -20 C.
- The installation works without time restrictions. Automatically turns off when the specified temperature is reached and turns on when it drops. You can turn off the device manually.
- The device is safe. If it rolls over, has a weak flame, the flame goes out, or there is an interruption in the air or fuel supply, the Planar turns off.
- Noise level is low.
- If you connect air exhaust pipes, warm air can be directed not only into the cabin, but also into the bus interior or into the cargo compartment if the cargo being transported requires a certain temperature regime.
- The device operates autonomously from the car engine. This is a convenient option for spending the night in the car, as the Planar can heat the cabin all night long.
There are no disadvantages. Autonomous car heater Planar fully corresponds to its purpose.
The heater is used not only in cars, but also for heating cabins, vans, booths, and tents.
Equipment and characteristics
The heater package includes all components and parts of the device. The number and type of additional elements depends on the model. Mandatory include all fasteners - washers, bolts, clamps, corners with gaskets, plugs, screens, and also all connecting elements - power harness, fuel pump, exhaust pipe. The planar is equipped with its own fuel tank and control panel.
There are 4 types of device. The main characteristics are shown in the table.
| Model | 2D-12-S(24S) | 4DM2-12-S (24 S) | 44D-12-GP-S (24 S) | 8M-12-S (24 S) |
| Rated voltage, V | 12 (24) | 12 (24) | 12 (24) | 12 (24) |
| Thermal power, kW (max and min) | 0,8–2,0 | 1,0–3,0 | 1,0–4,0 | 2,0–6,0 |
| Fuel consumption, l/hour (max and min) | 0,1–0,24 | 0,12–0,37 | 0,12–0,51 | 0,42– 0,76 |
| Power consumption, W (max and min) | 10–29 | 9–38 | 10–58 | 8–85 |
| Volume of heated air, cubic meters m/hour (max min) | 34–75 | 70–120 | 70–120 | 70–175 |
| Start and stop mode | Manual/remote | Manual | Manual/remote | Manual |
| Weight, kg | 10 | 10 | 10 | 12 |
The air heater Planar 4DM2 24 differs from 12 only in the current requirements - 24 V, not 12 V.
All Planar models run on diesel fuel. If the supply is made from your own tank, diesel fuel is diluted with kerosene in certain proportions. The ratio depends on the type of diesel fuel and temperature.
Monitoring and control system
Using the control unit you can regulate the amount of heat
The Planar heater operates in several modes. Operational safety, adjustment and diagnostics of systems are ensured by sensors and a control unit.
Control block
The module is housed in a housing and connected to executive units with switching loops. Its functions are as follows:
- turning the device on and off;
- control and management of the fuel combustion process;
- initial diagnostics in case of breakdowns during startup;
- automatic ventilation after Planar stops;
- emergency shutdown in case of breakdown of any component, flame extinction, power surges, heat exchanger overheating and other situations.
The control unit works together with the remote control.
Operating modes
The device simultaneously performs the function of interior ventilation
The autonomous air engine heater operates in 3 modes. However, use often depends on the model’s configuration:
- In terms of power, it heats up the interior as quickly as possible. The heater, set to a certain power level - from 1 to 8, operates continuously until the device is turned off manually.
- By temperature – the heater warms the air to the set temperature. The heater then turns off and automatically turns on again as soon as the air has cooled to the specified minimum. In automatic mode, the device operates until manual shutdown.
- Ventilation – provides air exchange. Combined with temperature or power control. The temperature is maintained with high accuracy and does not fluctuate within the specified range.
Temperature and power are set before starting. Parameters cannot be adjusted during operation.
Control panels
The remote control is installed on the dashboard or hung on a container in any place convenient for the driver. The device is connected to the device via a cable. The remote control is convenient because it regulates the operation of the Planar and serves as a diagnostic tool.
The heaters are equipped with different types of remote control:
- PU-10M – allows the Planar to operate in power and temperature modes; ventilation is not provided. Equipped with LED indicator.
- PU-5 – allows Planar to operate in all modes. The potentiometer flywheel is equipped with a conditional graduation, so that the temperature can be set more accurately. An indicator indicates operation and malfunctions.
- PU-22 - functional buttons allow you to select a mode, a temperature sensor, the readings of which will be considered control, change the power and temperature indicators. Information about the Planar’s operation and breakdowns is reflected on the LED screen.
By the number, color and behavior of LEDs, you can determine the cause of the problem and quickly eliminate it.
Installation requirements
The device can be placed anywhere in the car, the control panel is next to the driver
Installation of Planar is carried out strictly according to the instructions:
- The heater is mounted both on the wall and on the floor. The position is strictly horizontal, tilting is prohibited.
- The distance from the walls or partitions to the inlet is at least 5 cm.
- The distance from the cabin walls from the outlet is at least 15 cm.
- The heater is installed in a place where it can be repaired and dismantled.
- The housing must not come into contact with the walls or floor of the cabin.
- The fuel tank must not be mounted in the passenger compartment, trunk or engine compartment. It is secured so that in the event of a spill, diesel fuel does not end up on the wiring.
- Combustion air is taken from outside, not from the passenger compartment or cargo compartment. The suction port of the pipe is placed against the air flow while driving.
The inlet hole must be placed so that the Planar does not suck in exhaust gases during operation.
Possible error codes and malfunctions
Planar heater error codes
The Planar indicator system signals errors. A number of breakdowns can be repaired yourself:
- 1 on the screen or blinking indicator - heat exchanger overheating. You need to check the air flow through the heater.
- 2 or 12 short flickers after a pause – the device itself is overheating. Check the pipes and air supply to the combustion chamber.
- 12 or 15 or 9 quick flashes indicate power surges. The device turns off.
- 12 or 2 flickers - starting is impossible due to lack of fuel, air, or a violation in the exhaust gases.
- 20 or 30 and 8 flickers – communication between the module and the control panel is lost. Check the cables.
- 29 or 3 blinks of the LED – flame failure in the burner. You need to check the fuel supply.
- 35 or 13 flickers is an error unique to the 8DM model. Flame failure due to low voltage.
- 78 – marked only on the screen. This is a warning that flameouts are occurring too frequently.
Problems indicated by the following codes cannot be eliminated independently. Requires dismantling of the device and intervention of a specialist:
- 4 or 6 or 6 flickers – the temperature sensor has failed.
- 5 or 5 flashes – flame indicator is broken.
- 9 or 4 flickers – the problem is in the glow plug.
- 10, 27, 28 or 11 blinks – the electric drive is damaged;
- 11 on the screen or 18 flickers - the temperature sensor on the supply pipe is broken.
- Problems on the incoming pipe are coded by the number 23 or 15 flickers.
- 17 or 7 flashes – fuel pump failure.
- The appearance of the number 33 or 16 flashes after a pause indicates that the device is blocked, since overheating was recorded three times in a row. Unlocking is carried out only at a service center.
- 36 or 20 flickers – the flame temperature sensor detects the temperature is too high.
The readings of the device cannot be ignored. If the same type of errors is repeated, the device is blocked or fails.
Operating instructions for the Planar heater
You can install and run Planar yourself, but if you have no experience working with heating systems, you need to invite a specialist.
When turned on, Planar conducts testing, and if all elements are in working order, it begins ignition. First, the chamber is purged, then diesel fuel and air are supplied. The burner operates until the sensor registers the set value. After this, the device turns off if it is not operating in power mode.
After manual shutdown, the Planar is automatically ventilated.
Safety precautions
The Planar must be turned off when refueling.
A cabin or car interior is a very small room. Safety precautions must be strictly observed:
- there should be a fire extinguisher in the car, and at least a bucket of sand in the shed or garage;
- It is prohibited to lay the fuel wire inside the passenger compartment or cabin;
- during refueling the device is turned off;
- during repair and welding work, the heater is disconnected from the battery;
- It is prohibited to disconnect the device from the power supply until the purge is completed;
- after stopping the device, turn it on again no earlier than after 5–10 seconds.
If safety regulations are not followed, the manufacturer has the right to refuse warranty service.
You may also like
Webasto operating instructions
The heater itself should not pose a fire hazard, despite the fact that its operating principle is based on burning fuel. This requirement is quite feasible if you maintain the distance between all parts of the heater. If your car is an M2 or M3 class, it is not recommended to install the heater in the passenger compartment.
Particular attention should be paid to the installation of the fuel supply system. If the car runs on liquid fuel, then you should ensure that the filler pipe is equipped with a locking cap
Speaking about a similar operating system, I would like to say that all diesel heaters are similar, just like all gasoline heaters are similar to each other. Among diesel engines, the most popular model is the Evo 5500 12V. Among gasoline heaters, the popular models are Thermo 90ST, Thermo Top E and Webasto Thermo Top C.
It is worth noting that from time to time it is necessary to carry out maintenance procedures and monitor the health of the heater. Today, you can undergo a technical inspection and maintenance procedure at any auto repair shop.
That's why you need to choose a refrigerator wisely
17 tips from an expert
To know
How Webasto works
The heater is started by a program timer located in the cabin, or by the remote control with which the device is equipped. The device operates as follows:
- Fuel from the tank enters the combustion chamber of the heater and heats the coolant of the heat exchanger.
- The circulation pump pumps heated liquid through the engine cooling circuit, due to which the engine itself and the interior heating radiator warm up.
The Webasto operation process is fully automated - its start and stop is subject to timer commands, engine and environmental temperature sensors. This solution made it possible to minimize fuel consumption to 0.5 l/h, and reduce the warm-up speed in a passenger car to 15 minutes at an outside temperature of -20°C.
Autonomous heater "Planar"
In Russia, with its harsh climate, especially in the winter, problems with a cold interior are always relevant. To solve this issue, autonomous heaters were developed that increase the temperature of the interior regardless of the operation of the car's standard heater. One example of such devices is the Planar line of heaters.
What is an autonomous heater "Planar"
Autonomous heater "Planar" is an autonomous heater that allows you to heat the interior and maintain the set temperature regardless of the operation of the car's heating system. Such a heater allows you to solve the problems of operating cars and premises in harsh winter conditions.
Autonomous heaters of the Planar brand are a product of domestic manufacturers of automotive components. The heater was jointly developed by Adverse. The first generation of Planar was released in 1995; since then, the joint product of the two manufacturers has experienced many innovations and updates.
Formally, the Planar line is not a pre-heater, but an air heater for the engine and interior. Thanks to this, products under the Planar brand are expanding the scope of their use.
Planar heaters can be used not only in passenger cars, but also in trucks, special equipment, industrial units, etc.
Planar heaters can also be used to heat rooms.
Therefore, in terms of their purpose, Planar brand heaters differ from imported pre-heaters. "Planar" will not raise the engine temperature to make it easier to start the engine, but it will establish and maintain a comfortable temperature inside the car.
Principle of operation
The air heater is mounted in the engine compartment or inside the car.
The device runs on diesel fuel, so on cars with diesel power units, fuel can come directly from the car's tank.
On cars with gasoline engines, it is necessary to install a separate 5-10 liter tank for the device to operate. Power is supplied by connecting a battery to the circuit.
For the operation of the electric motor of the device, air is also required, which is taken from outside or through the air recirculation mode from the passenger compartment.
Passing through the heat exchanger of the device, the air heats up and flows back into the cabin.
Thus, even before the engine starts and the standard heating system begins to operate, the air temperature in the cabin rises to acceptable values and is maintained in the future.
How to use the device
The device is controlled using a remote control. The device is started and controlled by pressing buttons on the remote control.
When using Planar, there are certain subtleties, the observance of which allows you to prevent the occurrence of technical problems.
- It is prohibited to lay fuel pipes inside the vehicle.
- The heater must not be used in enclosed spaces; for safe operation, the room or vehicle interior must be equipped with a fire extinguisher.
- If the heater is connected to the vehicle's fuel system, it should be turned off when refueling the vehicle.
- After turning off, the device can be turned on again no earlier than after 10 seconds.
- It is recommended to use the device at full power more often, which allows you to clean the air ducts and fuel lines of the heater.
- The device must not be switched off before the end of the purge cycle.
- In summer, it is recommended to drain the fuel from the fuel tank of the device.
Heater control panel
The device control panel is designed to perform the following tasks:
- starting and stopping the heater in manual mode;
- setting the heater operating mode (by power or temperature);
- temperature indication;
- error code indication in case of device malfunction.
The remote control operates from the heater's power supply and is equipped with an adapter harness that is connected to the device's power supply. Reception and transmission of signals to the heater control unit is carried out using electrical impulses.
On the front side of the remote control there is a screen and control buttons, with which you can adjust the operating mode of the heater, as well as start and turn off the device. The front side is also equipped with a light indicator.
Error codes
The self-diagnosis function, built into the control system of the autonomous heater "Planar" of various modifications, allows you to determine the area and cause of the malfunction. Information is provided to the driver in the form of error codes and flashing indicator lights on the remote control.
Decoding the most common error codes for Planar brand heaters.
| Fault code | Number of indicator light blinks | Malfunction | Cause of malfunction |
| 1 | 1 | Heat exchanger overheating | The control sensor detected overheating and turned off the heater. The reason is that a temperature of over 250 °C was recorded in the area of the heat exchanger. |
| 13 | 2 | The number of possible launches has been exhausted | The reason is problems with fuel: it is missing, its brand does not match, insufficient supply due to clogging or leakage of the fuel line, problems with glow plugs, insufficient pressure of air entering the combustion chamber |
| 2 | 12 | Overheating in the area of the control unit or flame indicator sensor | The temperature in the location area exceeds 50 °C. Overheating of the control unit during operation or during the purge period before starting operation the control unit was not cooled. |
| 4 and 6 | 6 | Failure of the temperature sensor of the control unit | The temperature sensor has failed |
| 5 | 5 | Flame indicator fault | Short circuit or open circuit in the indicator power supply |
| 8 | 3 | Flame interruption | Leaking fuel line, broken flame indicator or fuel pump |
| 9 | 4 | Glow plug malfunction | Short circuit, open circuit, malfunction of the heater control unit |
| 10 | 11 | Insufficient air blower speed | Fan failure |
| 12 | 9 | Voltage over 30 V, emergency shutdown | Battery or regulator malfunction |
| 15 | 9 | Insufficient voltage, emergency shutdown | Malfunction of the battery or regulator, broken wiring |
| 16 | 10 | The combustion chamber ventilation interval has been exceeded | The flame indicator was not cooled down during purging; there was a problem in the heater control unit |
| 17 | 7 | Fuel pump malfunction | Open or short circuit in the electrical power supply circuit of the fuel pump |
| 20 | 8 | Lost connection between control unit and remote control | Broken electrical wiring, faulty remote control or control unit |
| 27 | 11 | The electric motor does not work | Electric motor wedge due to destruction of the bearing, rotor or foreign objects |
| 28 | 11 | The motor runs at constant speed | Malfunction of the control unit or board on the control unit |
| 36 | 20 | Flame sensor temperature exceeded | Control unit malfunction |
Basic malfunctions and ways to eliminate them
Most of the malfunctions and malfunctions in the autonomous heaters of the Planar series, detected using error codes when diagnosing the device, can be divided into several groups:
- malfunction of the control unit or temperature sensor;
- violation of the integrity of the electrical power supply circuit of the device;
- malfunction of the fuel system of the device;
- mechanical damage to the electric motor of the device;
- The device remote control is faulty.
Failure of the control unit is resolved by replacing it - repair is impractical due to complexity and high cost. A malfunction of the temperature sensor or flame indicator can also be resolved by replacing the part.
Problems in the electrical power circuit of the device, identified through diagnostics, are solved by checking the wiring. It is necessary to check the power wires, connectors, harnesses, and terminals on the battery using a multimeter. Damaged wiring must be insulated or replaced, and faulty connectors must also be replaced.
Fuel system malfunctions that affect the operation of the heater can have various causes. The problem may lie in a lack of fuel or in its quality, so to correct the situation you need to fill the device tank with higher quality fuel.
A violation in the fuel supply system can be resolved by inspecting the fuel pipes, replacing the glow plugs and fuel pump, and checking the air injection and exhaust gas systems.
Blockages in the fuel supply system must be eliminated, leaks must be sealed, and if necessary, the tubes or broken fuel pump must be replaced.
Damage to the heater motor that has led to engine jamming can be corrected by replacing the engine bearing or rotor. In case of serious damage, it is more advisable to replace the electric motor assembly. Problems with the heater remote control are usually resolved by replacing the remote control with a new one.
The autonomous heater "Planar" allows you to increase and maintain the air temperature in the car interior, as well as in utility or industrial premises. "Planar" cannot be called a pre-heater, since it does not increase the engine temperature before it starts. However, it copes well with the task of maintaining a comfortable temperature in the cabin.