At the very beginning of our article, we will define the concept of “Chinese radios” so as not to return to it later. So. Today, all audio and video electronics of universally known world brands, intended for installation in passenger cars and heavy-duty vehicles, are produced at the production facilities of the companies of the same name located in China. Thus, when we say Pioneer, Sony and similar names, we automatically mean products manufactured in China.
Scheme
How to connect a Chinese 2 din radio according to the diagram yourself
Discussion 2-din media player with GPS 7020G7021G
* Before posting a photo, read the topic
Working with images on the forum * Place images only under a spoiler! * Messages that are not related to the topic of discussion (offtopic) are deleted without warning.
The main question that arises when choosing or after purchasing is what is the difference between the 7020G and 7021G models. As operation has shown, there is nothing in terms of internal content, the only difference is the design of the control buttons on the front panel. Model 7020 has them flat,
7021 are slightly convex.
The main differences are in the chassis (motherboard) used on this platform, regardless of which model 7020 or 7021 it is installed on. Until mid-2022, chassis 7023
, after (and until now)
7026
.
Their main differences are in the software (firmware) and, accordingly, changes in the shell interface (menu). In the review from Gargantua
, the first revision is on the 7023 board, so the interface and menu settings differ from those included in the firmware of the 7026 board. Some “jambs” (not saving the selected backlight, problem with the volume at zero value) inherent in the 7023 chassis (described in the header ) were fixed on the 7026. The only obvious problem on the 7026 was the lack of playback of media content and radio when working with navigation, but this problem was fixed after the release of the updated firmware (available in the header).
Many devices purchased later have this firmware already installed. There are also differences in the VinCE modules (navigation modules) installed on the chassis. On the 7023, a module was used on the SIRF Atlas processor with 128MB of RAM (brand H12-L06-B0374-R00), on the 7026 on the MStar processor in 2 modifications - with 256MB of RAM (quite rare) or with 128MB of RAM (brand G10 -V3 ZSKTEK). The shortcomings of the navimodule on SIRF Atlas (problems with Navitel) were not noticed on MStars. How can I find out which revision of the board is installed in the radio? The easiest way to do this is by looking at the review from Gargantua
, if the interface and settings are similar, then the 1st revision (chassis 7023), if they are different, then the 2nd (chassis 7026).
You can determine with 100% certainty by disassembling the radio, unscrewing 4 screws and looking at the markings on the board. If there are numbers 7023 (full name 7023G TFT V01), then 1st, if 7026 (full name 7026G-C500 V01.1), then 2nd. Since the end of 2022, a new revision of the 7026g-c500 v02
, with new firmware (the dump is in the header).
Since mid-2022, a new revision of the 7026G-C800DM-v01
on the F1C800 processor has appeared.
IMPORTANT!
Firmware for boards 7023 and 7026
are not interchangeable.
Using someone else's firmware will lead to bricking of the device. The rear boards with amplifier and connectors are the same for both models.
Instructions for connecting a Chinese radio
At the very beginning of our article, we will define the concept of “Chinese radios” so as not to return to it later. So. Today, all audio and video electronics of universally known world brands, intended for installation in passenger cars and heavy-duty vehicles, are produced at the production facilities of the companies of the same name located in China. Thus, when we say Pioneer, Sony and similar names, we automatically mean products manufactured in China.
Scheme
Chinese players for passenger cars
It should be noted that the entire production cycle for the assembly of this type of equipment occurs in full compliance with the requirements of the companies that own the brands, which guarantees the high quality of the declared trademark.
There are a number of car radios that are positioned as native, Chinese products. But upon closer examination, these often turn out to be the same Kenwoods, Prologies, and so on, in a slightly modified form. By the way, very good quality. For the reason that Chinese developers do not bother themselves with technical changes to the devices, limiting themselves, as we have already said, to changing the design.
The third option for Chinese players can be called gadgets of unknown brand and manufacture. You should stay away from such radios, because apart from troubles and wasted money (despite the low price), they will not bring you anything.
To summarize our introduction, let's say. Most of the sound reproduction equipment present on the modern market is Chinese in nature, but developed and certified to global standards by well-known companies. Accordingly, the process of installing, connecting and operating these gadgets, as well as additionally connected equipment, is uniform (by model). And it is no different from the European (American, Japanese) assembly technology (does it exist at all?).
2 din connection via ISO connector
The connection diagram for a Chinese 2 din radio is described in detail in the operating instructions supplied with it from the manufacturer. To facilitate installation work, on the back panel of the player, as a rule, there is the necessary marking of all components and connections. Mostly, the difficulties for car enthusiasts who are faced with the installation of a standard or non-standard radio for the first time are caused by the correct connection of the car's electrical wiring to the receiver.
All work on connecting the car radio is carried out through the ISO connector, which consists of two plug boxes - A and B (each contains eight contact connections) or one combined box, where A is the plug for the power connections of the radio, B is responsible for the car acoustics.
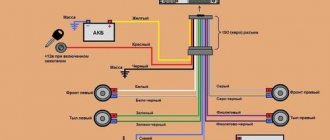
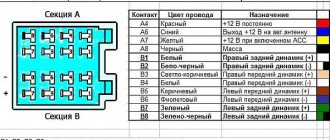
The standard wire connection diagram (pinout) is as follows.
- Connector A. 1, 2 and 3 pins are not used.
- 4 - yellow power cable going to the car battery;
- 5 - blue wire, amplifiers and external antenna;
- 6 — orange cable, backlight;
- 7 - red - ignition;
- 6 - black. Weight.
- Block B. Everything here is also quite simple.
- Contacts 1 and 2 - purple, purple-black wire. Plus and minus of the right rear speaker (speakers);
- 3, 4. Gray. Gray-black. Plus or minus the front right column;
- 5, 6. White. White-black wire. Front left plus or minus;
- 7 and 8. Green and green-black wire. Rear left positive and negative contact.
When connecting a car radio, it is very important not to mix up the contact groups of wires. Since the sound quality of your equipment depends on them. And often the safety of the equipment itself.
Pinout of a standard Euro connector
A Euro connector is a standard plug used in most countries around the world. When connecting equipment, you may encounter non-standard wires tangled in a bundle. This problem is solved by purchasing adapters and pinouting the radio chips.
Standards 1din and 2din
Speaker system connectors come in two types: non-standard ones from the manufacturer, mostly pin-type, and standardized European ones, which are located at the back. Installation of equipment with a special audio connector from the manufacturer will require the use of a special proprietary connector. If the plug is ISO, then you can connect to it directly. There are two types of Euro connectors: 1din and 2din, the difference is in the height of the car radios. The two-block one is twice as tall; it is not connected to all cars, because there is no space on the panel for the required dimensions.
Radios with European 1din are the most common.
When installing car radios, wires with a small diameter of 1.5-2 mm are used, for power lines - with a large cross-section. Failure to follow these simple rules will distort the sound and damage the equipment.
| № 1 | — |
| № 2 | — |
| № 3 | — |
| № 4 | Constant power |
| № 5 | Antenna power |
| № 6 | Backlight |
| № 7 | Ignition |
| № 8 | Weight |
Manufacturers in Japan, the USA and some Chinese use the 2din standard.
Upper power connector A
The plug is used to supply electricity to the receiver, antenna and amplifier, as well as when it is necessary to control the backlight or turn off the sound signal. Standard color markings are used. Outputs 1-3 and 6 are not used in low- and mid-price segment speakers; they are intended for additional options for high-end products.
Connection types
- The first is the connection in the socket of wires of two colors, yellow and red, turning the receiver on/off does not depend on the ignition. The method is inconvenient because it predisposes the battery to discharge if the acoustics are not turned off;
- The second wire is connected through the ignition switch, the yellow wire is connected to the on-board computer.
Functional purpose of the receiver outputs
| ANT | The connector is used if the car has a retractable antenna |
| Remote | Multiple speakers can be connected |
| Illumination | Allows you to change the intensity of the device's glow |
| Mute | Adjusting the sound |
| A4 | Turn on/off |
Pinout of radio ISO connector
| A 4 | Color yellow | Battery + Power |
| A 5 | Color blue | Antenna. |
| A 6 | Color orange | Backlight |
| A 7 | Color red | Ignition, 12V. When disconnected, reset settings to factory settings. |
| A 8 | Color black | Acoustics |
Bottom speaker connector B
Used to connect amplifiers (2 cables each). The sound of the equipment depends on whether all connectors are connected correctly. The main thing is not to confuse them, otherwise the acoustics will be of poor quality.
Rules for connecting speakers by color marking of wires
| Color white | Left front |
| Color grey | Right front |
| Color green | Left rear |
| Color violet | Right rear |
Rear View Camera
There is no need to talk about the usefulness of this equipment. The rear view camera is an invaluable assistant for novice car enthusiasts who, as a rule, experience difficulties when performing parking actions.
Depending on the type (location and method) of installation, there are several types of rear view cameras:
- Standard installed cameras. In places strictly specified by the car manufacturer;
- Universal devices. The location is chosen by the driver himself;
- Wired;
- Wireless rear view cameras.
As an example, we use a universal wired camera and a Chinese 2 din radio.
Select the installation location. License plate frame, luggage compartment handle, etc. It is not recommended to place a camera inside the rear window.
We lay the cable connecting the camera and the GO. A five-meter long wire is included with the device.
Connect the camera to power. Any of the reversing lights acts as a source. Be sure to use a fuse in this circuit.
We connect the camera to the player via a tulip (connector). A separate exit is provided for this. If it is absent, the device is connected via the “video” input.
We adjust the picture and camera location.
Multifunctional steering wheel
This name means connecting a Chinese radio to the steering wheel of a car. That is, it is possible to control the standard player directly from the steering wheel.
To make this connection you will need:
- Steering wheel with built-in control buttons or a niche for their placement;
- Car radio;
- Two ISO adapters;
- Adapter devices for the antenna and combining the steering wheel buttons with the radio.
Let’s say right away that the process of connecting a multimedia system and adapting it with a multifunction steering wheel is not a complicated process, but it is painstaking and requires certain skills. This is explained by the fact that very often the pinouts of such connections between the car radio and the steering wheel do not match, although they are specified in the instructions. And therefore, we advise, if possible, to contact a specialized center that deals with this type of installation.
Advantages of the work of Yudu masters
Sizes vary in height. When installing it yourself, you need to route the cables through rubber corrugated sleeves located between the door and the body pillars, and then route the cords under the interior trim to the place where the player is installed.
There is also a simpler option - connect a rear-type surveillance device to a monitor, and connect it to a laptop.
Connection diagram of the camera cable connectors to the car radio. Rear surveillance devices are placed in the base location of the lamp for illuminating license plates. There are several schemes for connecting devices. If the user installs the remote control included with the audio headunit, it is necessary to install patch cables and install an infrared signal receiver. The service center will be able to help you resolve this issue professionally. The button travel is short and clicky. Chinese car radios with this connector size differ from conventional devices with a standard 1 din type.
That is, the radio can be used not only as a music player, but also as a video player, since such systems allow you to work with video files. However, it can also be contained in a multi-pin connector. But the cost of these radio tape recorders is often inadequate.
The former can be installed in almost any car, the latter - only in specific models. The higher the power, the higher the playback quality will be. When installing it yourself, you need to route the cables through rubber corrugated sleeves located between the door and the body pillars, and then route the cords under the interior trim to the place where the player is installed.
The device, which will monitor what is happening behind, is mounted on a rotating bracket located at the rear of the car. On sale you can find not just music systems, but also radios with navigation.
And vice versa. The result is this: We insert the frame into its original place. Large test of navigation and multimedia centers. How to properly connect a rear view camera to the stock radio on Android Junsun? (not for kettle)
How to connect a Chinese 2 DIN radio to a car according to the diagram yourself
A car radio made in China is installed instead of the old built-in music equipment. The advantage of the equipment is its low cost with wide functionality and fairly good build quality. For experienced motorists who have an understanding of the basics of electrical engineering, independently connecting a Chinese 2 DIN radio according to the diagram will not cause any difficulties.
Connection features
Based on the installation method, car players are divided into built-in and stationary. The former are equipped with a removable panel, which serves as excellent protection against theft. The hardware of the device is simple and is aimed at one main function - playing music from various media. The Chinese 2 DIN radio tape recorder belongs to the second type. It has a 7-inch touch display on which you can view movies, a rear view camera and maps. The device is also equipped with built-in GPS (GLONASS) navigation units.
The car radio connectors are equipped with additional sections that allow you to connect some buttons on the steering wheel.
To do this, you will need to purchase additional wiring harnesses and a special adapter. Standard car wiring uses ISO type connectors, which are not compatible with Chinese devices.
To properly connect the player yourself, you must adhere to 2 basic rules:
- The equipment must be installed strictly according to the instructions. Otherwise, it may fail or burn out.
- When connecting equipment to old domestic cars, you should remember that their wiring is designed to accommodate devices with mechanical settings. Therefore, when you turn the key in the ignition, the specified player settings may be erased.
The connection diagram for a Chinese 2 DIN radio consists of the following steps:
- The first step is to lay patch cables leading to additional sections.
- An adapter is installed, which ensures that the front part of the device is integrated into the interior of the vehicle.
- The player is attached using screws and a metal transition shaft, which, in turn, is held in place by tongues and screws.
- The cables are connected to the battery and ignition according to the pinout in the instructions.
Multifunctional steering wheel
The name multifunction steering wheel is an abbreviation for the generally accepted term - multifunctional steering wheel.
What is hidden under this designation? As mentioned earlier, all automobile designers strive to make driving a car very convenient. Since modern vehicles have many different gadgets and bells and whistles, which often require switching and adjustments during a trip, the driver has to be regularly distracted by them, which in turn can lead to emergency situations. It was this factor that was decisive for auto engineers in creating a multifunctional steering wheel. They tried to transfer some of the control elements to the steering wheel and save the driver from having to throw the steering wheel and switch all sorts of buttons and levers.
Multifunction steering wheel (multifunctional steering wheel) is a regular steering wheel on which various auxiliary elements for controlling the electrical equipment of the car are located. In modern cars this can be a very advanced technological device.
Connecting speakers
The speakers are equipped with 2 wires responsible for supplying a negative and positive signal. Speaker cords are supplied as standard or are laid in a new way. If the cables are laid independently, they are routed through rubber sleeves, which are located between the doors and racks. Next, the gasket is carried out under the interior trim to the location of the radio.
The cords are then combined into a plug with an ISO connector or adapter that meets the requirements of the equipment. When connecting, it is important to consider the polarity of the wires and the location of the speaker. It is prohibited to combine negative signal cables into one branch and their subsequent connection to the vehicle body. The procedure is performed to create grounding. Upon completion, you need to turn on the radio and check the functionality of the connection.
What could be on the steering wheel?
On our roads you can find vehicles of various classes; naturally, the electronic components of such cars will be significantly different. Multifunctional steering wheels will also differ depending on the class. So, for example, in an inexpensive car, at best the steering wheel will control the audio system, and even then only the function of turning it on or off. Sound adjustments and other settings will most likely have to be made as usual.
If the car is of a slightly higher class, then the steering wheel will most likely also have controls for adjusting the climate system, controlling the on-board computer and cruise control.
In even more advanced versions, you can find the ability to control a mobile phone from the steering wheel. This feature is called “hands free” or “hands free”. Today, many smartphones have the ability to access car audio systems, and by controlling the smartphone from the steering wheel, you can also control the multimedia system.
In addition to the listed functions, the multifunction steering wheel buttons can control:
- Operation of manual and automatic transmissions.
- Monitoring transmission functions in vehicles with all-wheel drive.
- Adjusting the operating modes of the suspensions, which changes the ground clearance and their rigidity.
Multifunctional steering wheels in cars with very expensive equipment, most of the prestigious brands, usually have all these capabilities.
How to connect an antenna
To connect a radio receiver, you must additionally install and connect an antenna. Most often it is located on the roof or fender of the car. A stronger and more stable signal is provided by an additional amplifier, which is located in the switching circuit. Power is supplied via a separate cord. The connection diagram depends on the model of the head unit and the technical design of the amplifier itself.
In a 2 DIN radio, the round ANT connector is responsible for connecting the antenna. The wire with positive polarity is connected to the red cable, which is responsible for supplying voltage. The negative cord is connected to the body panel.
How to connect a Chinese 2 din radio according to the diagram yourself
The concept of “Chinese car radio” includes all audio equipment of both local and popular global brands produced in China. Due to the fact that the devices are manufactured under the supervision of specialists from the companies that own the brands, they are certified according to international standards. Therefore, connecting a Chinese 2 din radio according to the diagram in the instructions will not be difficult, and the designation of the terminals does not differ from devices from European or Japanese manufacturers.
Features of Chinese car radios
2 din radios differ significantly from smaller devices. These multifunctional modules with a 7-inch diagonal LCD screen allow you not only to listen to music, but also to watch videos. The size of the radio exceeds the dimensions of a 1din device, which immediately catches your eye. Users note their stable operation and high-quality sound.
Most often, Chinese 2 din format radios are equipped with a GPS module. With such a car player, there is no need to purchase a navigator. Additional gadgets can be connected to a Chinese head unit (GU) of this format: multifunction steering wheel, rear view camera, GPS antenna. This slightly modifies the connection diagram of the car radio, because new wires appear that were not on the standard chip.
In most cases, the audio device comes with ISO connectors and wires. Otherwise, you will have to buy an adapter to connect the purchased car player. Switching the device with a source of electricity will not be difficult, since the pinout of radio tape recorders of both formats is identical.
The yellow DC +12V wire is connected directly to the battery through a safety device.
The red control wire is connected to the ignition switch. It is desirable that when the key is turned to the ACC position, there are no other consumers besides the control unit. This will reduce the load on the battery. It is better to connect the black wire (“ground”) to the negative terminal of the battery, and not to the car body, since a 2 din radio is an energy-intensive device.
Dimensions
In accordance with the standard, the size of the car's landing niche for installing a 2 DIN car radio should be 180x100 mm. In this case, the depth of the cell is not determined and depends on the design of the machine. Most often, head units are made with an installation size of 16 cm.
In most cars, the holes for the radio have dimensions of 173x98 mm, and in some models they are 178x100 mm. This nuance must be taken into account when choosing a car tape recorder. In Europe, the standard head unit size is Single DIN ISO 7736 (178 x 53 mm), and in North America, the UK and Japan it is Double DIN (178 x 106 mm).
A 2-din radio is most often equipped with a touch screen and, in addition to playing video and audio, is equipped with additional functions: GPS navigator, viewing information from cameras. Many manufacturers in new models provide monitoring of the condition of the engine and the systems that support it. Often the devices are integrated into the car alarm system.
Connecting speakers
The following wires are responsible for connecting the speaker system of a Chinese 2 din radio:
The first 2 connect the front speakers, the rest - the rear ones. The speakers have 2 wires - positive and negative. A pure color is “+”, and a similar one with a black stripe is “-“.
It must be remembered that failure to observe polarity when connecting speakers will lead to sound distortion, since the devices will operate in antiphase.
If the standard control unit on a car is being replaced with a “Chinese” one, and the markings of the speaker wires do not correspond to the ISO connectors, then you must remember that a cable with a wide terminal is positive, and a cable with a narrow terminal is negative.
If the speaker outputs on the connected car player have additional “tulip” type connectors, then it is advisable to use them if the same connection is also available on the car speakers.
Connecting the audio system
It is not difficult for a person with minimal knowledge of electrical engineering to connect a Chinese 2 din radio. You just need to follow the included instructions exactly. In addition to connecting 4 speakers, it is possible to connect an amplifier or subwoofer. The wire marked AMP-CONT is responsible for this. The line has a built-in fuse, and power is supplied with a time delay of 8-10 seconds to reduce noise that occurs when the car player is turned on.
The acoustics are connected to the 2din radio with special multi-core acoustic wires. Their length should be minimal to reduce line resistance. It is not advisable to twist the wires, as this affects the sound quality. It is better to use special connectors.
DVD
The radio reads all the DVDs I have (I found only two). I read the wedding disc in DVD 16:9 format without any problems, although with some delay. The screen format is appropriate. The recorded video on a CD-R disc in AVI format began to play back instantly, without braking. When you click on any area of the screen, the Settings Menu
, which includes buttons: - RPT - REPEAT PLAY - Track/disc repeat function. After finishing playing a given recording, it will be played from the beginning. — RDM — Random play function. Plays all tracks of the current disc in random order. — L/R — turn stereo mode on and off — OSD — On-screen display. Display on the screen, sound settings, image parameters, timer and other information. — SUB_T — Function to turn on/off subtitles — MENU — Exit to the main menu — Left/Right/Up/Down — move the cursor — OK — close the settings tray The delay for the disappearance of this panel is 10 seconds. Taking into account the fact that there are no physical buttons for scrolling through tracks, you need to meet the allotted time.
Antenna connection
Having a radio in the car, some car enthusiasts prefer to listen to music or watch videos. But many drivers like to listen to their favorite radio stations while on the road, which is why every car audio system has an FM tuner. An external antenna is required for its normal operation. Experts recommend installing an active module that ensures stable reception of radio stations. The antenna is powered from the car network via the radio.
Chinese audio devices are equipped with a special output labeled ANT. Depending on the settings, power may be supplied to the antenna when the radio is turned on or only to the radio. The antenna cable is connected to a special socket located on the back wall of the device. The receiving part is located on the windshield. The active antenna is connected with 3 wires:
- Weight. It is connected to the car body or to the standard terminal on the GU body.
- Power wire. Connects to the red wire of the device control.
- Antenna wire. Connects to the corresponding socket on the radio.
In the case of installing a simple receiving device, an antenna adapter containing an amplifier is additionally used to improve the quality of the received signal. In radios with a GPS module, an active GPS receiver is used, which ensures stable operation of both the navigator and the radio. Connects similarly to an active antenna for a car radio.
Preparing the basket
We take the radio basket along with the cover from the radio kit, the original brackets, the frame, and go to the car.
Screw the brackets into place.
We push the basket between the brackets. It will clamp and hang on its own without fixation.
Putting the frame in place:
We adjust the position of the basket the way we need it.
Using a marker, we put marks on the brackets through the holes in the basket, then using these marks we will fix the brackets to the basket.
We take everything off (we try not to lose the clips on the frame) and take it home.
Now you need to attach the brackets to the basket. This is best done with rivets. I didn’t have a riveter, so I did it using self-tapping screws with a press washer. We fix the bracket to the basket according to the marks with a clamp, drill holes, rivet or tighten screws (from the inside). The protruding ends of the screws must be cut off with a grinder (a hacksaw will not take it), otherwise they will interfere with installation.
We grind off the caps of the screws with a file, as far as possible - they will interfere.
We insert the radio into the basket and screw it on. We install an overhead frame. The radio is ready for installation:
Now let's go to the car.
Let's start the actual installation with the installation and installation of peripheral devices.
Installing a Chinese 2 din radio in a car: how to do it yourself
Hello, dear readers of our site! Today I want to discuss with you such a topic as installing a 2 din radio. This is a fairly common solution among motorists who want to expand the capabilities of their existing audio system.
As practice and reviews from many car owners show, it is not difficult for them to install such equipment with their own hands.
Let me immediately note that the concept of 2 din refers to the standard size of the radio, which is 180 mm or 7 inches in length and 100 mm or 4 inches in height. If the parameters are 180 by 50 mm, then you have a single-dyne system. Don't worry, because putting 1 din instead of 2 din is just as feasible as doing the opposite. You only need a special frame or adapter bracket to install a non-standard radio.
Fastening Options at a Glance
On sale you can find several options for devices for 1 din and 2 din, including modular modifications that are complete solutions. The most modern, of course, is a robotic elevator, which includes moving elements. This option should not be considered publicly available. In most cases, well-proven methods are used.
Car radios
Installation to the dashboard
In some cars, in order to ensure the reliability of the installation of the audio system and the absence of risks of failure as a result of vibration, the installation is carried out to the dashboard, that is, to the power fittings of the car. The entire dashboard is supported on a pipe, to which it is fixed using specialized corners. This installation option is practiced in a number of premium cars, for example, Toyota, Mazda and others. A well-thought-out power structure, in turn, ensures a quiet interior.
Car radio mount
The version of the “power” mounting of the media system complements the standard shaft, but installers often remove these very “power” corners and install the radio only on the “light” fittings of the shaft. This option cannot be considered reliable and is designed for extreme driving and minor road accidents, which could result in damage to the audio system.
Features of Chinese radios
It’s not for nothing that the title of the material includes the concept of a Chinese 2 din radio. Why not? Who is against installing Chinese devices on cars? Write in the comments and justify your decisions.
In general, there is absolutely nothing wrong with a Chinese radio. This can be explained very simply.
Almost all car radios can be considered Chinese. Why? Everything is elementary. Leading manufacturers, including Japanese, European and American brands, prefer to carry out assembly in China. This is due to financial gain. Collecting everything in China, including radios, is very cheap. Hence the conclusion that most of the radios offered on the market are from China. But here it is also important to determine which Chinese product we are talking about.
All car radios can be divided into several categories. Moreover, I advise you to study this issue separately in more detail.
Each category of car radios is sold in Moscow, St. Petersburg, Ufa, Kyiv, Minsk, Volgograd and through online stores. Only their prices are slightly different.
Price is a largely determining factor in choice. When buying a Chinese radio, you actually choose one of 3 options.
- Radio tape recorders manufactured to order from leading manufacturers. These include Sony, Pioneer, Kenwood, etc. There are clear regulations, rules and standards from which the contractor (factory in China) has no right to deviate. This allows you to obtain very high-quality devices at low manufacturing costs for the brand owner;
- Chinese brands. These are well-known companies that offer radios under their own brands on the international market. The quality may be a little lower, but the price is appropriate. In most cases, they copy or make radios as similar as possible to devices from leading radio manufacturers;
- Unknown Chinese brands. These are radio tape recorders with an incomprehensible name and the same origin. If this is your first time hearing about the company and you can’t find anything really about it on the Internet, it’s better not to mess with such a 2 din radio.
Drawing conclusions, I can say that the best solution would be to buy a radio for your car from category 1 or 2.
Cost of services
| Installing a 1 DIN car radio | from 1000 rub. |
| Installing a 2 DIN car radio | from 3000 rub. |
| Installing a standard head unit | from 3500 rub. |
| Installing Ceiling Monitors | from 8000 rub. |
| Installing head restraints | from 5000 rub. |
Connecting the multifunction steering wheel to a Chinese radio
Secure parking
Safety of your car under reliable round-the-clock protection
Inexpensive
Contact us to do it cheaper and better
Result guarantee
Our team includes only the best installers, experts and recognized masters of their craft.
It would seem that today no one needs a new 2 din radio. After all, most new cars already come equipped with a factory audio system. Of course, there are still many exceptions in the form of models for which they are not set as standard. And, contrary to appearances, these are not only luxury models, but also popular passenger cars, such as the cheapest versions of Dacia, Fiat Panda, Renault Clio or Skoda Fabia.
New cars are not the whole market. We must not forget about the huge used car market, where various components (including audio equipment) begin to fail. And this is a fairly large market, which will be developed not only by the most reputable manufacturers, but also by dozens of unknown companies producing car audio equipment from China.
According to reports from the Automobile Manufacturers' Association (ACEA) and Sony, only 8 percent of the 216 million cars driving on European roads are. does not include a USB connector. However, more than half are not equipped with Bluetooth hands-free calling. 93 percent of cars registered in Europe do not have a DAB receiver. Android Auto or CarPlay functions are missing on 98% of cars. What's more, of all recently sold cars in Europe (in 2019), a whopping 68 percent are fitted with upgrades to more advanced and better equipped universal kits. The list of popular models includes Fiat Panda, Citroen C4, Nissan Qashqai, Peugeot 208, Renault Clio, Skoda Octavia or Volkswagen Golf, Jetta.
So it's no surprise that audio equipment manufacturers are still working on the next generation of radios, all-in-one systems and multimedia stations. Of course, they must adapt to popular trends to increase the appeal of their products. Consequently, this becomes easier with new equipment adapted to work with smartphones and various applications (for example, Facebook, Spotify or Yandex.Music)
And what's important is that new devices are not as expensive as they used to be. Currently, you can easily buy a modern multimedia radio with a large touch screen for less than 13,000 rubles
More than 20 years ago, this amount would have been enough for a radio of the lowest class.
Currently, universal radio players without a CD or DVD player mechanism are beginning to dominate store shelves. The absence of an expensive and rather unreliable player usually means that the radio has a much smaller (shallower) housing, making installation in many cars much easier. You no longer need to skillfully insert the wiring harness into narrow mounting recesses. In addition, it is easier to install additional accessories in a 2-din radio, such as an adapter for connecting the device to a standard control element on or near the steering wheel.
When purchasing and installing a 2 din radio, you need to connect at least auxiliary adapters, because they significantly increase the comfort of everyday use. To change the song, radio station or volume level, you don't have to reach for the radio because you just need to use the steering wheel buttons or the handy remote control attached near the turn signal stalk or windshield wiper operation.
It is important that the same functions of the 2 din radio can be controlled via a smartphone application. However, it is difficult to imagine that using the app will be as convenient and safe while driving as using a controller on the steering wheel
This is a good example of how temporary fashion forces the use of solutions that have nothing to do with real functionality.
Connection nuances
I think no one will have any problems or difficulties in removing the stock radio. There is an instruction manual and a number of videos online that can help you do the work step by step.
There is no point in describing the removal and installation procedure, since each machine has its own dismantling nuances. But most often 2 din are installed:
- to Granta;
- Ford Focus;
- Lada Kalina 2;
- Kia Rio;
- VAZ 2110;
- Lada Largus;
- Lada Priora;
- Renault Logan;
- Renault Sandero;
- VAZ 21099;
- VAZ 2114;
- Nissan Almera, etc.