Lada Largus cars are available in several modifications, which differ in equipment. Basic versions do not have air conditioning and a standard head unit. Connecting a radio to a Lada Largus does not require the owner to have knowledge of electrical engineering or car design and can be done independently.
How to install
Some cars come from the factory with a 1 DIN car radio with CD player. Basic versions are equipped only with audio preparation; a plastic plug is mounted instead of the head unit.
To install the radio on Largus with your own hands, you need to:
- After removing the plug, place guide slides with locks in the instrument panel.
- Secure the mounting assembly using the tabs located around the perimeter of the part. Bending is done with a screwdriver; the installed shaft should not vibrate or make any extraneous sounds.
- Connect the ISO connectors located on the standard wiring to the head unit.
- Connect the antenna plug to the socket on the radio. If the sizes and shapes of connectors and plugs do not match, appropriate adapters are used.
- Insert the audio device into the shaft and push it until it clicks, indicating that the latches engage.
- Install a decorative frame around the radio panel.
Some owners install 2 DIN size radios on their Lada Largus. To place the head unit, it is necessary to replace the front plastic trim on the instrument panel, since it is impossible to accurately modify the original one.
The original panel is secured with latches, which can be removed manually or with a plastic screwdriver inserted into the gap between the parts.
The front panel with an extended window requires modification - it is necessary to install control buttons for additional equipment on it, borrowed from the Renault Logan sedan; original elements from Largus cannot be placed. This is due to the fact that the panel is designed for oval-shaped keys, which were never used on Largus.
At the same time, the mounting sockets for installing mounting clips are being finalized.
In the instrument panel, it is necessary to remove the horizontal jumpers located near the socket of the standard radio and climate control controls. Dismantling is carried out with a hacksaw and wire cutters, the remaining elements are cut off with a construction knife. All manipulations are carried out with caution, since there is a risk of damage to the standard electrical wiring. Then you need to reinstall the center console to assess the contact density of the elements.
Since the original wiring has cables with colored insulation that does not comply with the ISO standard, it will be necessary to compare the assignments of each element on the car and the radio. An adapter is used for connection; wire switching is allowed by twisting the necessary cables. It is recommended to reinforce the joints with tin-lead solder or a metal connecting sleeve. The connection point is covered from above with a heat-shrinkable tube, which provides protection from moisture and short circuits.
Speakers in Largus size
When I first saw the Lada Largus, I immediately decided for myself: I will have it.
The sound from the standard speakers began to irritate me. .(
Less than a year has passed since the purchase of TRIFON, when the standard acoustics began to slowly “order to live long”! .) Strumming, metallic jingling, etc. began to appear. It all started with the front right speaker, then the rear left... And in order not to wait, it was decided to replace the standard speakers with something better than the standard ones. The budget for purchasing 2 sets of speakers was limited to $60. It was also decided to install speakers of standard size – 5.25″ (130mm). I turned to my friend. Outlined the situation. They inspected the speaker seats. The budget has been announced. And then it started. .) For the rear doors I was offered this kit: Coaxial speaker system DLS Matador M125G .
Characteristics: Type: Coaxial speaker Size: 130mm. (5.25″) Number of bands: 2 Rated power: 40 W. Maximum power: 60 W. Sensitivity: 90 dB (W/m) Frequency range: 60 – 20000 Hz Impedance: 4 Ohm
Tweeter Dimensions: 16mm. (0.63″)
Woofer Size: 130mm. (5.25″) Installation depth: 52mm. Installation hole: 120mm. (4.7″) Built-in filter.
I started replacing the standard acoustics. I started with the right rear door.
From above, I used a plastic spatula to pry off the standard protective mesh.
Released the top latch.
And carefully, pulling the protective mesh towards himself, he freed it from the hooks of the remaining latches.
I unscrewed the 4 screws that secure the speaker in the basket. And he took out the speaker.
This “miracle” is installed as standard acoustics.
As you can see in the photo, the standard speakers are connected with a specific chip (Renault). And in order to connect a third-party speaker system to the standard wiring, you need to buy special adapters! And since: “Our hands are not for boredom. ". And the price for these adapters is very steep, so I decided to make them myself. (Since I already took out one standard speaker, I made 4 adapters in advance.)
How to connect a radio
Connecting the head unit depends on the vehicle modification. When installing the radio, you need to firmly snap the ISO plugs in place, and then reinstall the antenna connector.
If the product is equipped with a wired remote control, it is located on the steering column or the front of the instrument panel. The wire is laid inside the panel along the standard lines of the electrical harnesses.
With 2 speakers
The 2-speaker circuit is used only on cargo vans; the loudspeakers are located in the doors under the plastic panels.
The radio is ready for use immediately after connecting to the standard connectors. The car owner can install additional speakers in the cabin by laying separate speaker wires to them.
With 4 speakers
On passenger versions, 4 speakers are used, which improves the sound quality in the cabin. The wiring has a separate harness leading to the speakers in the rear doors.
The connection does not require any additional modifications to the vehicle wiring.
No speakers
The layout without speakers is found on the basic configuration. The car has connectors for connecting the radio and front speakers, as well as an antenna output. After switching the radio, you need to disassemble the door trims, which will allow you to mount the speakers in their standard places.
Loudspeakers are attached to factory mounting points, and wooden adapter rings may be used. After installing the elements, it is necessary to return the removed parts to their place.
Lada Largus is largely copied from models of the French brand Renault. And this applies not only to components and assemblies, but also to the standard radio. For example, the Renault Duster, Sandero, Logan models have exactly the same audio system head units. There is nothing surprising in this, because the assembly of these cars is completely organized in Russia. On Largus, the standard radio can only be seen in the “luxury” or “standard” configuration.
A budget option for replacing standard acoustics. Part 1.
When I first saw the Lada Largus, I immediately decided for myself: I will have it.
The sound from the standard speakers began to irritate me. .(
Less than a year has passed since the purchase of TRIFON, when the standard acoustics began to slowly “order to live long”! .) Strumming, metallic jingling, etc. began to appear. It all started with the front right speaker, then the rear left... And in order not to wait, it was decided to replace the standard speakers with something better than the standard ones. The budget for purchasing 2 sets of speakers was limited to $60. It was also decided to install speakers of standard size - 5.25″ (130mm). I turned to my friend. Outlined the situation. They inspected the speaker seats. The budget has been announced. And then it started. .) For the rear doors I was offered this kit: Coaxial speaker system DLS Matador M125G .
Characteristics: Type: Coaxial speaker Size: 130mm. (5.25″) Number of bands: 2 Rated power: 40 W. Maximum power: 60 W. Sensitivity: 90 dB (W/m) Frequency range: 60 - 20000 Hz Impedance: 4 Ohm
Tweeter Dimensions: 16mm. (0.63″)
Woofer Size: 130mm. (5.25″) Installation depth: 52mm. Installation hole: 120mm. (4.7″) Built-in filter.
I started replacing the standard acoustics. I started with the right rear door.
From above, I used a plastic spatula to pry off the standard protective mesh.
Released the top latch.
And carefully, pulling the protective mesh towards himself, he freed it from the hooks of the remaining latches.
I unscrewed the 4 screws that secure the speaker in the basket. And he took out the speaker.
This “miracle” is installed as standard acoustics.
As you can see in the photo, the standard speakers are connected with a specific chip (Renault). And in order to connect a third-party speaker system to the standard wiring, you need to buy special adapters! And since: “Our hands are not for boredom. ". And the price for these adapters is very steep, so I decided to make them myself. (Since I already took out one standard speaker, I made 4 adapters in advance.)
The recently purchased “nice thing” came in handy again.
Crimped and insulated with heat shrink casing - 4 adapters.
Let's continue. I disconnected (took out) the connector from the standard speaker and took the wires out of the chip.
And further. If you don't have a wiring diagram for the speaker system at hand. For ease of definition, so as not to guess where is the “+” and where is the “-“.
I connect and isolate the adapters.
And at the same time I wrapped a plastic chip with electrical tape. So as not to lose it in the garage, and... But what if. .)
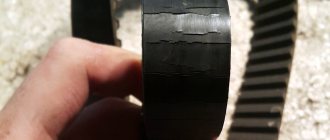
There was also an incident with the installed speaker system. Due to the slightly wide petals (with which the speaker fits into the recesses of the cup and is attached to it with self-tapping screws), they fit very tightly into the regular places. And so that the diffusers are not damaged when dismantling them. I bent the petals a little.
Device characteristics
It can't be called complicated. In addition, the instructions and user manual supplied with the system will help you understand the structure, functionality and characteristics of the device. Structurally, a car can be equipped with either a conventional 1 Din or 2 Din radio. The differences between them are minimal and lie in the location of the buttons and inscriptions.
To reproduce high-quality sound, the audio system provides four speakers:
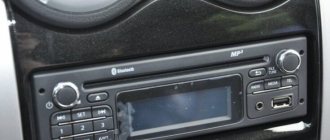
One of the main features and at the same time advantages of this device is the ability to connect to a smartphone via Bluetooth wireless channel. In addition to comfort and convenience, this function provides passive safety, since the Hands free system allows you to talk on the phone while driving without using your hands. The quality of communication is decent, communication with the interlocutor is not associated with difficulties, the driver does not need to raise his voice, and passengers hear him well.
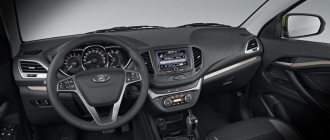
Head unit in Lada Largus
Many people spend a lot of time in their car. This is especially true for residents of megacities, because in order to get to work and back, they often have to sit in traffic jams. The Lada Largus car is equipped with a modern audio system that allows you to brighten up your time on the road. Let's take a closer look at what capabilities the standard radio in Largus has. The radio installed in the car comes with a user manual, so it won’t be difficult to figure out how and what works. Schematically, the instructions indicate two devices: a double-din version and a standard one. The difference between them is mainly in the form of buttons and the inscriptions on them. Four speakers allow you to reproduce clear and high-quality sound.
The radio provides good sound through four speakers
The most useful and necessary characteristic of the radio is the ability to connect it via a wireless Bluetooth connection to a mobile phone. This is not only convenient and comfortable, but also safe, because now you can talk on the phone without using your hands. And the quality of such communication is quite decent, the interlocutor hears perfectly, and there is no need to shout.
This is interesting: Removing and disassembling the starter VAZ (Lada) Kalina 1117 2004 - 2013
Radio malfunctions and methods for diagnosing them
As you know, the Lada Largus is equipped with an audio system with a set of speakers already from the factory (depending on the configuration). The amplifiers are located in the front and rear door panels. To connect non-original speakers, several wiring harnesses are provided (including for increasing power using an amplifier when connecting a subwoofer). Since the connector plugs do not comply with the current standard, to connect another head unit you will need to additionally purchase adapters.
A standard car radio sometimes brings not only the pleasure of listening to music, but also some problems. The device may not work or function incorrectly for various reasons. In general, the list of faults includes only those that an ordinary driver (without special knowledge of electrical engineering) can fix with his own hands, without the need to contact a specialized center.
When it comes to repairs, it can often be cheaper to replace the device. Especially considering the availability of alternative options in different price categories and with different capabilities. At a cost of no more than 6,000 rubles, repairs can cost half this amount.
How to remove the Lada Largus standard radio and enter the code
- Files
- Engine
When removing the battery or for other reasons, the Lada Largus head unit requires entering a 4-digit code.
The code is usually written in the service book, but anything can happen - they lost the book, changed the radio, etc.
The radio code can be restored using our Renault and Lada Largus standard radio code generator
To do this, we need to find out the so-called PRE-CODE , which is contained in the information on the radio itself; to find it out, we remove the radio.
How to remove the standard radio of Lada Largus
The standard radio on the Lada Largus is removed in the same way as removing the standard radio on many Renault models, for example: Megane
For removal there is an original tool from Renault, code - 7711381821
But there is no need to buy it; 4 or even 2 regular ballpoint pen refills are suitable for removal.
This is interesting: Uneven tread wear on Lada Granta tires
Firmware for audio device on Lada Largus
The standard head unit on cars of this model does not look very presentable, but at the same time the functionality is complemented by a large number of possibilities. Unfortunately, despite the decent quality of the technical part, the manufacturers did not pay enough attention to the software. It's no secret that modern audio systems have a full-fledged electronic control unit, which is a kind of computer. There is a processor, devices for reading removable media, various connectors and other functionality. In addition, the standard radio is combined with the on-board computer.
On the other hand, the more complex the audio system, the greater the likelihood of failures and malfunctions. The radio installed on the Lada Largus is no exception to the rule. The software has not been properly tested, so malfunctions are not uncommon. The most common problems are the inability to recognize the file format, reproduce high-quality sound, or identify the removable storage device. Also on Largus, incorrect display of Russian fonts on the display is often encountered. As a result, instead of the usual Cyrillic alphabet, the driver sees incomprehensible symbols. It is in these cases that updating the device firmware will help solve the problem.
Where to download and how to install
You can find out the firmware version directly on the device case, on the back side. The manufacturer regularly releases updated, i.e. improved firmware. You can find them either on the official website of the developer or on specialized thematic forums. If necessary, please contact your authorized dealer.
The firmware for the Largus radio is identical to the software from Duster or Sandero. At the factory, these cars are equipped with T2024 firmware (starting from 2014).
Preparation for the procedure
A firmware update may not be necessary if you try to reset the current settings to factory settings. The procedure is simple, but in most cases ineffective. If you update the firmware to a new version, you can expect a significant improvement in device performance. Typically, an official update is released rarely and always turns out better as testing is done and bugs are fixed.
The updated version V2030 was released in 2015. To install, you will need a flash drive or adapter with other removable media. Before you begin the procedure, you should prepare the media and find the appropriate firmware. You can download the firmware on the official AvtoVAZ website or on thematic official forums for Renault cars.
The file with the firmware is in the archive, so you need to first unpack it into a separate folder on your PC. The unpacked firmware provides a special archive that does not need to be unpacked further. The flash drive must be clean and formatted in FAT format. The unpacked CAB firmware archive is placed on it.
Update process
Now you can connect the media to the radio in your car.
- Before starting the procedure, be sure to turn on the ignition. Otherwise, the radio will automatically turn off and the firmware process will be interrupted, which may lead to device failure.
- When reading information on the media, the radio will determine that the contents on the drive are material for flashing. After analyzing the information, the device will offer to update the software. You should select "Yes" to refuse to click "No".
- Confirm the information by clicking the “OK” button.
The main advantages of the Largus car radio over analogues from other manufacturers
The device operates on cutting-edge Android 8.1 software and has a Russified interface, the operation of which is similar to using a regular smartphone.
Applications here are conveniently downloaded via Google Play Market and are easy to install. In addition, this operating system will not require updating for a long time. The powerful 4-core TX A9 processor from Cortex guarantees fast command execution and high performance. A separate chip manufactured by Samsung is responsible for audio playback in the Largus car radio. It provides high-quality sound and increases the overall reliability of the device.
The 2 din radio for Largus has a 12-month warranty, and new service centers exist and are constantly opening in Russia.
Internet access in Largus
The built-in Wi-Fi module will accept the Internet from your smartphone as a distribution point. In addition, the radio receives the Internet from a 3G modem, for which it is equipped with two USB ports. Removable hard drives and other storage media are also connected here.
The radio in the Lada Largus has a seven-inch touch-sensitive screen with an IPS matrix. The large display makes it easy to manage and view various video files. Easily display images from front and rear view cameras, as well as a video recorder.
The Largus car radio has a built-in memory of 16 GB, allowing you to create collections of your favorite songs and other content in its storage. In addition, its FM tuner makes it possible to listen to all known radio stations. In addition, listen to music via Bluetooth connection.
The device is characterized by excellent compatibility with any applications. For example, after downloading a navigation program from Google or Yandex, a driver using a GPS module will receive on the screen information about traffic jams and other information about the route of travel that interests him.
Exterior of standard car radio
To paraphrase a well-known saying, it should immediately be noted that in terms of taste and color characteristics you will not find two identical people. This also applies to the radio in the Lada Largus. Some owners will zealously prove its superiority, elevating it to the rank of ingenious devices, while others, on the contrary, will sarcastically criticize it, wanting to find more shortcomings. In general terms, we will say that the device harmoniously combines with the design of the panel and does not cause a feeling of rejection. Its functionality is convenient, and all elements (buttons) are located in optimal places, which allows you to make switches and other manipulations on an intuitive level. There are no backlashes, squeaks or other negative factors here. The fit is excellent.
Lada Largus › Logbook › Installing a 2 Din radio on Android + joystick (setup, programs)
The article will be long, I even wanted to break it into several. Final result:
A long time ago (about 4 years ago) I was impressed by the GU on Android from Romario-163 here, but somehow I couldn’t get around to buying it, but the toad was choking me. And then I saw that Android radios now cost around 3 thousand for 7 inches, so I decided to order one. Moreover, on 4pda there is a topic here about this radio “Head unit ML-CK1018 and similar ones, based on the MT/AC8227L processor” Characteristics:
Radio connection diagram
Largus radio block diagram
Delivery took about a week (I ordered from the Russian Federation), delivered by courier. With delivery in the Russian Federation, it was possible to buy only with a universal connector, but I already had an ISO adapter - FR-12 and ISO-Ant1, the wires on the radio were all labeled, so connecting it was not difficult. By the way, the connector on the Android 2DIN radio is called Alpine, if anyone suddenly needs to buy an adapter at an auto parts store. I ordered a frame on Avito for 2,500 rubles (the Largus shop also has it, but the wait is long). Fits perfectly, I had to cut the panel a little.
I glued the GPS sensor on double-sided tape to the upper right windshield. I ran the wires along the rack. It picks up satellites well.
On the plus side, the screen is 7 inches, the play market works, I installed Yandex navigator, YouTube and other programs, installed a 128 GB flash drive, now I have a multimedia archive with cartoons and music in the car.
But the standard launcher on this radio is something like a cross between a Pavasonic and Abibas radio. Fortunately, there is a free, advertising-free Car Launcher (4pda.ru/forum/index.php?showtopic=672503) and similar ones. Setting up the radio - in the standard launcher you can change the default Navigator and player. In the settings, look for the “Developer Mode” item, password 8888
You can change the default navigator and player. There are still a bunch of settings. You can set the automatic download of some programs when you turn on the radio. I set the Navigator, the store and the DVR to turn on automatically.
from the programs I installed: Car Launcher (the actual shell) Torgue (but could not connect the OBD adapter yet) Yandex Navigator (the radio has Google maps) Total Commander Dimmer (to automatically reduce the screen brightness using a timer) MX player (for video) VLC ( for video) MapcamDroid (radar detector) MultiGO (list of gas stations with prices, I drive on gas is very important for me) Waze (navigator-social network) *Everyone praises it very much, but I haven’t figured out the settings yet, in my opinion, it’s some kind of hat
Sound via Bluetooth
A standard car radio in combination with dynamic speakers “reads” music programs equally well, “digesting” any genre without much difficulty. The manufacturer has addressed radio lovers with a powerful antenna device that allows them to pick up a signal of even minimal power. The radio allows you to memorize 6 stations in each frequency range.
Listening to music is available via CD drives or flash devices. Also for the same purposes, switching using Bluetooth is possible.
With a wireless connection, it is possible to rewind not only between music programs, but also directly within a track.
The display clearly displays the charge level indication (if “Bluetooth”), as well as the “RDS” line. There is a Russified font in “IDTag”.
Other methods of connecting to this device are the “Jack” and “USB” sockets.
Some owners are not satisfied with the lack of a removable decorative panel for the radio. We consider this point to be unimportant, since it is not able to protect against fraudsters.
Installation/connection of the radio
Installing a car radio is a process that requires some knowledge of the technology for installing this device, but it is not at all complicated. Even not the most experienced car owner, who has at least a minimal understanding of the basics of electrical engineering, can easily cope with the independent installation of a car radio. In this article, we will look at the issue of installing a radio in a car so that you do not have even the slightest difficulty with this process.
Let's sum it up
In our opinion, the standard car radio present in the practical Lada Largus station wagon is very worthy in terms of its functionality and sound. This can be confirmed by many owners of this practical car, because there are a lot of positive reviews on this topic on the Internet. In addition, a convenient manual is included, through which “making friends” with the radio will not be difficult and will not require much time.
| FM, Am ant OK | The radio module is working properly. |
| Microphone OK | The microphone is working. |
| VT-Module OK | Bluetooth works fine. |
| CD OK | The disc player operates normally. |
| Fascia Button OK | The keys work properly. |
| Power IC OK | The on/off button works. |
Entering the code
To decode the car radio on Lada Largus, you need:
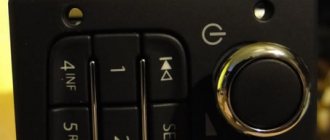
- Press the button with icon 1 located on the front panel to turn on the equipment. The display will show the text message Code, next to which there is a field like 0000 for entering a number. The first register of the code range must operate in flashing mode.
- To enter the first number, you need to successively press key 1; the number of short actions corresponds to the value of the number. Input using a standard joystick is allowed.
- To proceed to entering the second digit, you need to press the button marked 2, and the corresponding field on the head unit screen will begin to flash.
- Enter the value of the number by analogy.
- Program register 3 and proceed to entering the last character.
- Press button 4 on the panel until the last digit of the password is displayed.
- After entering, press and hold button 6 until the head unit controller reads the password and writes it into memory. Once the lock is unlocked, a short confirmation beep will sound.
- Check the functionality of the device.