- Open your phone settings.
Select Connected devices. If you see a Bluetooth button, press it.
Attention! Not all cars can make and receive calls via Bluetooth. If the problem is specific to your vehicle, read your vehicle's manual.
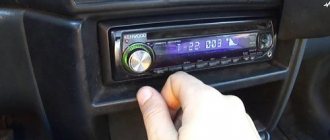
The Lada Largus car comes from the factory with a standard radio with the ability to connect via Bluetooth to a smartphone. In this article we will tell you how to connect to bluetooth Lada Largus.
Characteristics of the Lada Largus head unit
The Lada Largus head unit cannot be called complex and multifunctional. But don’t forget that this is a Renault radio, which migrated to Largus at the very beginning of its release in 2012. And this radio was installed on the DACIA MCV back in 2006. For 2006, this is a completely normal radio with a good set of functions.
A smartphone connected to the radio via Bluetooth can be used as a storage medium for music.
In terms of formats, the radio tape recorder supports
Coding of the original car radio
The standard Lada Largus device contains a set of protection functions that allow you to block attempts to turn on in cases where:
- the power supply from the on-board network (battery) is disconnected;
- the fuse-link protecting the device burns out;
- The radio is directly disconnected from the local power supply.
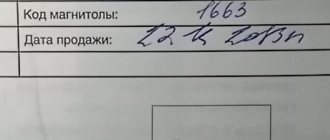
To be able to turn on a locked radio, you will need to enter a special four-digit code key. This code for the radio may be present in the service documentation attached to the device itself or simply be communicated to the owner at the time of purchase in the showroom.
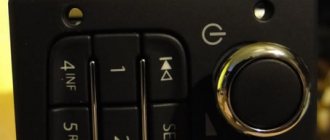
Note that the code for the radio is entered using the keyboard, which is located on the front panel of the device.
How to connect to bluetooth Lada Largus?
There are two ways to connect your phone via Bluetooth to the Lada Largus radio. First, open the Bluetooth connection menu on your phone and click search for device.
After a while, a list of available devices will be displayed, from which you need to select your radio. The official name is My Radio. Next, enter the standard password 0000 or 1234 and create a pair. The passcode will be displayed on the radio display.
Now you can listen to music from your smartphone through the standard Lada Largus speakers.
We perform a search and connect the radio to your phone. We confirm the connection on the phone.
When a smartphone is paired with the standard Lada Largus radio, all calls to the phone will go through the standard acoustics, providing the driver and passengers with additional safety.
Also, all paired devices will be stored in the radio’s memory. The next time you connect, you won’t have to reconnect the devices, you just need to select them from the list.
Instructions
Usually a user manual is included with the radio. There are detailed characteristics of how it is used, what to press and when, and most importantly, why.
According to the diagram in the instructions, two versions of the radio are indicated:
There is nothing complicated about the first category, it’s just the name that is incomprehensible. These two versions differ only in different buttons and what is written on them. The most useful and practical feature is the ability to pair with some wireless devices via Bluetooth, such as connecting to a mobile phone. In this case, the standard radio on the Lada Largus will provide you with the opportunity to talk on the phone even without using your hands, thereby not violating traffic rules. If you think that you will have to talk very loudly or shout so that the interlocutor can hear clearly, then nothing like that. A normal tone of voice will be sufficient.
How to turn on bluetooth Lada Largus
In order to be able to connect to Bluetooth Lada Largus, you must first activate this function.
1. Press the Tel key on the radio and use the right wheel to scroll through the menu to the Bluetooth item. Click on it with the right wheel.
2. Select the ON item in the menu that opens and press the wheel again.
3. That's it, bluetooth is activated and you can connect to your phone. To disable the function, select OFF in this menu and press the wheel.
Lada Largus is largely copied from models of the French brand Renault. And this applies not only to components and assemblies, but also to the standard radio. For example, the Renault Duster, Sandero, Logan models have exactly the same audio system head units. There is nothing surprising in this, because the assembly of these cars is completely organized in Russia. On Largus, the standard radio can only be seen in the “luxury” or “standard” configuration.
Tips for motorists
On the Lada Largus passenger car, a standard radio and four speakers are already installed on the conveyor, located in the front and rear doors, and for its connection there are two wire harnesses (power supply and speaker connection), at the ends of which a pair of plugs are installed. But, these plugs do not comply with the ISO standard, and if you do not like this radio, then to connect another radio you will have to purchase adapters.
There are many reasons why the standard radio may refuse to work. Therefore, we will only talk about those malfunctions that the driver himself can eliminate, even if he is not very well versed in electrical engineering.
If, when you turn on the radio, its head unit does not show any signs of “life,” then it will be necessary to check the integrity of fuse F28 (15A), since it is through it that power is supplied to the volatile memory of the radio, where its settings are stored. To do this, you don’t even need to open the cover of the mounting block, located on the left side of the front panel, because if it burns out, the instrument cluster and the interior and trunk lamps will not work, since all these devices are powered through fuse F28. And if this fuse is intact, then you will need to check the condition of the contacts and the wire going from this fuse to terminal A4 of the radio.
There are times when the head unit of the radio turns on, but no sounds are heard from all four speakers. Then you will have to check fuse F38 (15A), since power is supplied to the speakers through it. This can be done by checking the functionality of the cigarette lighter.
If the cigarette lighter works, then this fuse is intact, since both of these electrical circuits receive power through it. If fuse F38 is intact and there is no sound from the speakers, then we check the electrical circuit from this fuse to terminal A7 of the radio. If only the rear speakers refuse to work, then a possible reason for their failure may be poor contact in the intermediate block located behind the driver's seat at the bottom of the pillar between the front and rear doors of the car.
Problems with the operation of the radio may also arise due to poor contact between the terminals of the black wire going to the ground of the car. In this case, you need to start checking from terminal A8 of the radio.
Lada Largus is largely copied from models of the French brand Renault. And this applies not only to components and assemblies, but also to the standard radio. For example, the Renault Duster, Sandero, Logan models have exactly the same audio system head units. There is nothing surprising in this, because the assembly of these cars is completely organized in Russia. On Largus, the standard radio can only be seen in the “luxury” or “standard” configuration.
Device characteristics
It can't be called complicated. In addition, the instructions and user manual supplied with the system will help you understand the structure, functionality and characteristics of the device. Structurally, a car can be equipped with either a conventional 1 Din or 2 Din radio. The differences between them are minimal and lie in the location of the buttons and inscriptions.
To reproduce high-quality sound, the audio system provides four speakers:
One of the main features and at the same time advantages of this device is the ability to connect to a smartphone via Bluetooth wireless channel. In addition to comfort and convenience, this function provides passive safety, since the Hands free system allows you to talk on the phone while driving without using your hands. The quality of communication is decent, communication with the interlocutor is not associated with difficulties, the driver does not need to raise his voice, and passengers hear him well.
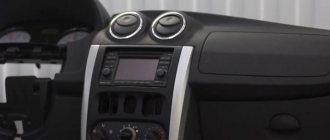
The standard radio on Largus does not have much functionality and advanced capabilities, for some this is quite enough, but for others the characteristics of the radio are not enough. In terms of appearance, the device blends harmoniously with the standard car interior. All buttons and other controls are easy to use, and the inscriptions are easy to read and intuitive. The device is tightly fixed in the seat, there is no play or other defects.
Capabilities of standard audio device
Music in the car can be played both through removable media and via the Bluetooth wireless communication channel. At the same time, the genre of music does not matter, the sound quality remains at the proper level. To listen to radio stations, a standard antenna is provided, which can pick up even a weak and unstable signal. If necessary, you can save up to 6 radio stations in the device’s memory for quick playback, in each of the available bands.
In addition to the Bluetooth channel, you can listen to music via SD, USB media or CD, MP3 discs.
The radio supports most popular formats, for example:
- MP3;
- WAV;
- WMA;
- AAC and some others.
Via the Bluetooth channel, you can control playback, i.e. pause the song or rewind to the desired segment. For convenience, it is possible to display the artist of the song and its title on the monochrome display. The radio can also recognize Russian fonts.
There are several connectors for connecting removable devices:
The unit is also equipped with several inputs for playing sound through third-party gadgets. The panel of the standard head unit is not removable, but this is no longer considered a disadvantage, since most car owners store the removable panel directly in the car rather than carry it with them. The purpose of each button, which is quite small, usually does not cause any difficulties. It would be much more informative to consider here other hidden features that are not mentioned in the detailed user instructions.
“Secret” menu of the Lada Largus radio
To go to the section with individual settings, use the SET button located on the front of the radio panel. Not every car owner knows that this button has hidden capabilities. Just press this key and hold for 6–7 seconds. The device will go to the engineering menu, where a number of special settings become available. The instructions included with the standard radio contain no information about such a tab.
In the “Radio Monitor” section you can see the current frequency at which the received signal is located and some other data. In the “Diagnostics” section there is an additional subsection with the items “Autotest”, “Monitor” and “Errors”. The “Errors” block was created to inform the driver about existing problems in the BC (on-board computer). If there are no problems, the display will be blank. The “Autotest” item contains information about the current state of the equipment (OK on the screen means “functional equipment”).
The best option would look like this
What does it mean
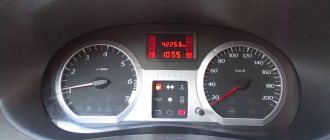
The “Monitor” item provides information about the vehicle’s operating parameters. Simply put, the radio display displays information from the electronic control unit. In this menu, you can find out about the status of the current network, the functionality of the car’s backlight (to check the mode, just turn on or off the side lights - accordingly, the information about the backlight will change properly).
It also displays data on battery charging and its current voltage, whether a removable device is connected or not, data on the correct decrease or, conversely, increase in volume when the vehicle speed changes (only if the wire required for this is connected to the appropriate connector).
In general, the engineering hidden menu on the Lada Largus radio was a good addition to the standard functionality. It won’t be difficult to figure out what’s here and how.
As for the electrical circuit and connection method, including pinout, this information can be clearly seen in the user manual or in the photo.
How to install
Some cars come from the factory with a 1 DIN car radio with CD player. Basic versions are equipped only with audio preparation; a plastic plug is mounted instead of the head unit.
To install the radio on Largus with your own hands, you need to:
- After removing the plug, place guide slides with locks in the instrument panel.
- Secure the mounting assembly using the tabs located around the perimeter of the part. Bending is done with a screwdriver; the installed shaft should not vibrate or make any extraneous sounds.
- Connect the ISO connectors located on the standard wiring to the head unit.
- Connect the antenna plug to the socket on the radio. If the sizes and shapes of connectors and plugs do not match, appropriate adapters are used.
- Insert the audio device into the shaft and push it until it clicks, indicating that the latches engage.
- Install a decorative frame around the radio panel.
Some owners install 2 DIN size radios on their Lada Largus. To place the head unit, it is necessary to replace the front plastic trim on the instrument panel, since it is impossible to accurately modify the original one.
The original panel is secured with latches, which can be removed manually or with a plastic screwdriver inserted into the gap between the parts.
The front panel with an extended window requires modification - it is necessary to install control buttons for additional equipment on it, borrowed from the Renault Logan sedan; original elements from Largus cannot be placed. This is due to the fact that the panel is designed for oval-shaped keys, which were never used on Largus.
At the same time, the mounting sockets for installing mounting clips are being finalized.
In the instrument panel, it is necessary to remove the horizontal jumpers located near the socket of the standard radio and climate control controls. Dismantling is carried out with a hacksaw and wire cutters, the remaining elements are cut off with a construction knife. All manipulations are carried out with caution, since there is a risk of damage to the standard electrical wiring. Then you need to reinstall the center console to assess the contact density of the elements.
Radio malfunctions and methods for diagnosing them
As you know, the Lada Largus is equipped with an audio system with a set of speakers already from the factory (depending on the configuration). The amplifiers are located in the front and rear door panels. To connect non-original speakers, several wiring harnesses are provided (including for increasing power using an amplifier when connecting a subwoofer). Since the connector plugs do not comply with the current standard, to connect another head unit you will need to additionally purchase adapters.
A standard car radio sometimes brings not only the pleasure of listening to music, but also some problems. The device may not work or function incorrectly for various reasons. In general, the list of faults includes only those that an ordinary driver (without special knowledge of electrical engineering) can fix with his own hands, without the need to contact a specialized center.
When it comes to repairs, it can often be cheaper to replace the device. Especially considering the availability of alternative options in different price categories and with different capabilities. At a cost of no more than 6,000 rubles, repairs can cost half this amount.
Main problems
If, when you press the power button, the head unit does not respond and does not turn on, then first of all you should pay attention to the mounting block, checking the 15A fuse in socket F28. Through it, the electrical memory circuit of the device is connected to the saved settings. The mounting block cover is located on the front panel on the left side at the end. You can understand that this fuse has blown by the absence of signs of operation of the instrument cluster panel, interior lighting and trunk lighting, since their electrical circuit is also powered by F28. If the fuse has not blown, the next check point will be the condition of the connecting contacts and the integrity of the wire that goes from the fuse to the A4 power connector on the back of the radio.
A common problem is no sound, i.e. the device itself turns on but there is no sound coming from any of the speakers when playing music.
In this case, the fault may also be the fuse, but F38. It supplies power to audio output devices. A faulty fuse is also indicated by a non-functioning cigarette lighter. If the latter works, then the fuse is intact. The lack of sound can also be caused by a violation of the integrity of the wire running from the fuse to connector A7 on the radio. And if only the rear speakers do not work, the culprit may be a broken connection in the block, which is located directly behind the driver's seat between the front and rear doors.
The cause of the malfunction may be the absence of ground - this is the black wire going to the radio (terminal A8). In all other cases, intervention in the electrical circuits of the device will be required. Without appropriate knowledge in this area, there is a high probability of complete failure of the radio. When contacting specialists, repairs can cost at least 1,000 rubles, not counting diagnostics.
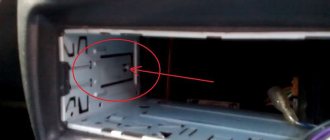
Removing and installing the radio
If a device fails, you will need to dismantle it to install another one. Removal will also be necessary if it is necessary to connect speakers, repair, clean terminals or reflash. Visually, there are no latches or keys for removal on the front panel.
In fact, on the front of the radio there are four holes into which you need to insert 4 rods of suitable diameter (about 2 mm). The dismantling process is as follows.
- Two rods are inserted into the holes on the left side.
- Two more - on the right.
- Now you should simultaneously press all the rods at once.
- At the same time, pry it with a suitable plate, for example, a plastic card.
- After characteristic clicks indicating that the latches are loosened, you can remove the device.
Installing the radio is even simpler: just insert it into the mounting socket and press until the latches fit into the grooves.
How to find Pre-code
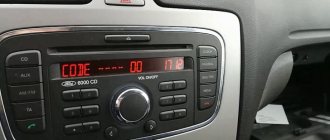
Largus cars use a head acoustic device, unified with Renault-Nissan products. To protect the radio from theft, there is coding that does not allow access to the device's functions without first entering a 4-digit number. The prerequisites for the appearance of a text message like “Radio Code 0000” on the screen are as follows: a terminal has been removed from the positive or negative terminals of the battery to install additional equipment, repair electrical circuits, or install a new battery.
Another reason for enabling encoding is poor contact in the power supply plug, which is connected to the rear wall of the head unit. In this case, the radio operates for a few minutes and then turns off. When you turn it on again, you will be prompted to enter a password.
The code required to unlock the radio can be calculated using a special calculator. It requires entering a 4-digit alphanumeric code printed on a paper label that is pasted on the top cover of the head unit.
Access to the plate requires removal of the equipment.
To dismantle the radio from Largus (and how to find out the code), you need to:
- Prepare a special removable device, unified for Renault radio tape recorders. The equipment has a factory code 7711381821 and is purchased through official dealers or spare parts stores. To reduce costs, ballpoint pen refills or metal rods of suitable diameter with rounded tips are used.
- Insert pullers into the 4 holes located in the corners of the radio. Press down on the elements to release the clamps; it is possible to remove the spring clips alternately from the left and right.
- Carefully pry off the bottom of the front panel using a plastic spatula or an old bank card.
- Pull the head unit completely out of the mounting shaft. Disconnect the power plugs and check their condition (in case of periodic spontaneous shutdowns).
- The pre-code is a part of the barcode that is applied to the square label with the Renault markings. You need to write down the last 4 characters, which include 1 letter and 3 numbers, on a piece of paper.
- Install the removed elements in their original places. The radio is mounted without distortions until all latches are activated.
- Enter the code value into the online calculator, which generates a code to unlock the head unit.
Firmware for audio device on Lada Largus
The standard head unit on cars of this model does not look very presentable, but at the same time the functionality is complemented by a large number of possibilities. Unfortunately, despite the decent quality of the technical part, the manufacturers did not pay enough attention to the software. It's no secret that modern audio systems have a full-fledged electronic control unit, which is a kind of computer. There is a processor, devices for reading removable media, various connectors and other functionality. In addition, the standard radio is combined with the on-board computer.
On the other hand, the more complex the audio system, the greater the likelihood of failures and malfunctions. The radio installed on the Lada Largus is no exception to the rule. The software has not been properly tested, so malfunctions are not uncommon. The most common problems are the inability to recognize the file format, reproduce high-quality sound, or identify the removable storage device. Also on Largus, incorrect display of Russian fonts on the display is often encountered. As a result, instead of the usual Cyrillic alphabet, the driver sees incomprehensible symbols. It is in these cases that updating the device firmware will help solve the problem.
Where to download and how to install
You can find out the firmware version directly on the device case, on the back side. The manufacturer regularly releases updated, i.e. improved firmware. You can find them either on the official website of the developer or on specialized thematic forums. If necessary, please contact your authorized dealer.
The firmware for the Largus radio is identical to the software from Duster or Sandero. At the factory, these cars are equipped with T2024 firmware (starting from 2014).
Preparation for the procedure
A firmware update may not be necessary if you try to reset the current settings to factory settings. The procedure is simple, but in most cases ineffective. If you update the firmware to a new version, you can expect a significant improvement in device performance. Typically, an official update is released rarely and always turns out better as testing is done and bugs are fixed.
The file with the firmware is in the archive, so you need to first unpack it into a separate folder on your PC. The unpacked firmware provides a special archive that does not need to be unpacked further. The flash drive must be clean and formatted in FAT format. The unpacked CAB firmware archive is placed on it.
Update process
Now you can connect the media to the radio in your car.
- Before starting the procedure, be sure to turn on the ignition. Otherwise, the radio will automatically turn off and the firmware process will be interrupted, which may lead to device failure.
- When reading information on the media, the radio will determine that the contents on the drive are material for flashing. After analyzing the information, the device will offer to update the software. You should select "Yes" to refuse to click "No".
- Confirm the information by clicking the “OK” button.
Final operations
After confirmation, the firmware update procedure will begin. The display will show Upgrading. At this time, removing removable media or performing any manipulations with the radio is strictly prohibited. The completion of successful firmware will be accompanied by the inscription Complete on the screen. Next, you need to remove the drive, and the head unit should automatically turn off to reboot. If this is not observed, you should disconnect the terminals from the battery and wait a few minutes, then reconnect the terminals.
After rebooting, the radio will require you to enter a special service code for activation. The code can be found in the warranty card or on the back of the device. Use buttons 1 to 4 to enter the corresponding code, after which key 6 confirms the entry, and must be held down for several seconds. The system is unlocked, and you can enjoy the updated functionality and the absence of incorrect display of Cyrillic characters. When addressing this issue to specialists, you will have to pay at least 500 rubles. Inexpensive, but why pay for such a simple procedure that you can do yourself in a few minutes.
The standard radio on Largus is not rich in functionality. There is no touch screen or the ability to connect a rear view camera. On the other hand, it is a reliable device that, if handled properly, rarely causes problems for the owner. For listening to music and radio, as well as for talking on the phone, the available options are quite sufficient.
In recent years, we have witnessed thousands of users in Spain connecting their mobile phone to their car using Bluetooth technology. Also, this is not something new that has come out now with the implementation of Android Auto. Previously, some cars already had such a connection between radio settings. However, although it usually connects automatically, the truth is that sometimes the connection fails.
If this happens to you, the mission of connecting your Android mobile phone to your car via Bluetooth becomes an almost impossible mission. Additionally, this can happen to any brand of phone that runs Google's operating system, so it could affect any user. Fortunately, although it may seem impossible to connect your phone to the car using this type of connection, there are a number of solutions that we can try on our mobile devices. Thanks to them, this will be resolved, so we will connect both again, as it has been until now. Some of these solutions will probably work.
Other unlock options
Another way to remove the blockage is to contact an authorized dealer. Specialists transmit the vehicle's VIN number to the manufacturer and receive the code for the installed radio. The method does not work if the head unit was replaced with a similar one under warranty or by the owner himself. In most cases, the official will remove the radio and read the information on the label. The code number is then determined by the calculator.
On early releases of Largus there was a radio tape recorder that broadcasts a preliminary code to the display. To display the value, you need to simultaneously press and hold keys 1 and 6 for 5-6 seconds. A text explanation and a 4-digit code will be displayed on the screen, which must be entered into the calculator using the method described above. But such equipment is rare. There are no other methods for decoding the Largus radio. Reflashing the software does not remove the hardware from the code.
| FM, Am ant OK | The radio module is working properly. |
| Microphone OK | The microphone is working. |
| VT-Module OK | Bluetooth works fine. |
| CD OK | The disc player operates normally. |
| Fascia Button OK | The keys work properly. |
| Power IC OK | The on/off button works. |
The mobile phone cannot be heard or is not connected through this connection
When we try to connect to our car Sometimes things are not so simple with this technology of our mobile device. Even in other cases, we can be fully connected, but without being able to hear any sound that we have activated on our smartphone.
This may be due to various factors, the first of which is that our car is not compatible with this connection of our mobile device. This may seem strange, but perhaps the radio is too old and therefore our phone's multimedia sound cannot be transmitted through either the car's speakerphone or speakers.
Another factor that we may not have taken into account, and which tends to happen more often than we think, is that we do not have it activated in the connection options of our car. So it will be as simple as checking it by opening Settings > Connections > Bluetooth and tapping the connection to see if everything is ok. Well, when accessing this section, we see that it is on the device we connected that the sound is not turned on.
In the event that we see that everything is correct, we will have to try to disconnect and reconnect this technology. If it still doesn't work, we'll have to move on to the next alternative, which we'll show you below. Are there other devices nearby?
One aspect that we must take into account is the presence of other devices nearby that may interfere with the connection of the mobile phone to the car. For example, there may be wireless headphones nearby, which in this case cause problems. If there are other devices nearby and they are activated, it is better to deactivate them so that they do not interfere with this process.
How does a cigarette lighter work?
The electrical circuit for supplying power to the Renault Logan cigarette lighter is quite primitive and simple. Power is supplied to the cigarette lighter through a fuse, which is located in the mounting block inside the car.
Possible causes of failure
When malfunctions related to the cigarette lighter occur, the first thing you should pay attention to is fuse number F38 10 ampere .
- The first reason that the cigarette lighter fails is when an electric pump is connected to inflate the wheels. During operation, the device consumes a current of more than 10 amperes, which causes the fuse to blow.
- The second reason lies in the mismatch between the sizes of the plug, the device being connected and the socket itself. Since the contact area of the contacts is much smaller than required, weak elements overheat and simply fall off, causing a short circuit. (If such a breakdown occurs, you will have to change the cigarette lighter).
The cigarette lighter has melted, it only needs to be replaced now
As you can see, the cause of a cigarette lighter malfunction is most often a failed fuse. And in order to continue working with the cigarette lighter, you simply need to replace this fusible element of the electrical circuit.
Precautions for handling the fuse
- Read the instructions for the connected device more carefully. This is especially true for 220 V car inverters.
- Pay attention to the plug of the device you are connecting; it must fit tightly into the socket.
- The wire that is connected to the cigarette lighter should not be stretched.
- The purchased devices must meet all the requirements of your vehicle's electrical network.
- Do not leave any devices connected to the device unattended while the ignition is on.
And the most important rule is to always keep a set of fuses in stock, because the stable operation of all elements in the electrical circuit depends on them.
Remove your car from the Bluetooth section
Surely you have tried this method with other types of devices that have this connection: remove it from the list of devices that connect through this connection to our smartphone. And here everything will not be different, perhaps some error has occurred that cannot be associated, so we will have to try to remove it from the list that is created when connecting the phone to another device using this technology.
After we remove our car from this list, we will only have to repeat the pairing manually, that is, like the first time. Additionally, this method usually works best as it allows you both to reconnect before problems arise. To do this, follow these steps:
- Access your mobile phone settings.
- Enter the connections section.
- Click on Bluetooth.
- Find a list of devices for your car.
- Remove or unpair with this device.
- Find nearby devices and pair the car again.
Beware of no-name Bluetooth devices
The problem may be that Bluetooth is not activated on your phone, making it impossible to connect two devices. Or perhaps the device we want to connect to the phone does not appear in this list, even if it is active at the time.
- Access to settings.
- Enter the System section.
- Click Developer Options.
- Look for an option called Show unnamed Bluetooth devices.
- Activate this option by clicking the switch.
- Then go back to the previous section and check if it is now listed.
The radio is working, but there is no sound - reasons
At first glance, nothing has changed in the operation of the radio. It works as before, but there is no sound. This is often due to a breakdown in the power circuits. But there are other situations that cause the sound to disappear. These include:
- The speakers are faulty. There are two of them in the radio and they can simply break. Then the sound will not be played. As practice shows, there are mainly cases when one speaker breaks. This also affects the sound quality, it becomes quieter. If both do not work, then it is necessary to carry out a full diagnosis of the device. Since the cause of the breakdown could have been a completely different problem;
- The amplifier is faulty;
- The contacts on the device have become weaker. This happens over time. One or more contacts are broken. To correct the situation, it is enough to simply solder them;
- Closing the circuit. This leads to the fact that the equipment receives a small amount of electrical energy and it is not enough for its full operation;
- Use of a powerful speaker system. When choosing it, you need to calculate the capabilities of the radio. Is she able to withstand them? Otherwise, the load on the amplifier will be very large, which will lead to its breakdown. It is very rarely repaired, mostly replaced with a new one. This procedure is also carried out when the owner is not satisfied with the sound. Since its standard version is designed for low volumes, when it is increased, the sound is greatly distorted.
This connection is not working
The first thing we need to do is try how to connect our terminal with another through this type of connection. And in the same way we should try to connect another smartphone to our car. Thus, we can rule out that it is a failure of Bluetooth itself. In case this component has stopped working or constantly has different problems, we may have two alternatives: restart the terminal or reset its settings.
As we have already said, one option would be to completely format our phone, but fortunately we will not lose anything if we make a complete backup of everything we have saved on the smartphone. However, we advise you to try to quickly restart it before performing this step because this simple action can resolve many errors that occur in the phone system itself.
It is also important to emphasize that we can find various recovery methods that allow us not to lose all the data. One of these alternatives, which we also recommend, is to reset your network and connection settings.
- Go to your phone settings.
- Enter the System section.
- Then go to Reset.
- Click Reset network settings.
- Click the switch to perform this action.
If after using all these methods you are unable to solve the problem, you will only need to get your phone repaired. Mainly because this technology on your smartphone might be broken and only a professional can fix it. If you have a warranty, you only need to contact technical support. So they will take your terminal to the company or store where you bought it to get it fixed.