The clock was first installed on the VAZ 2103. At that time, the presence of this device on the car panel was considered a luxury for examples of the Soviet automobile industry. Today it is unlikely that such a device will surprise anyone, but it cannot be said that the VAZ 2107 watch is a useless element of the interior. Moreover, tuning enthusiasts also fell in love with them, installing other devices in their place, for example, a voltmeter, or replacing the standard clock with a more interesting option - an electronic clock with a set of additional functions.
VAZ 2107 watch: troubleshooting and modernization
The clock was first installed on the VAZ 2103. At that time, the presence of this device on the car panel was considered a luxury for examples of the Soviet automobile industry. Today it is unlikely that such a device will surprise anyone, but it cannot be said that the VAZ 2107 watch is a useless element of the interior. Moreover, tuning enthusiasts also fell in love with them, installing other devices in their place, for example, a voltmeter, or replacing the standard clock with a more interesting option - an electronic clock with a set of additional functions.
Connecting a VAZ 2107 watch
When assembling the “beard” of a VAZ 2107, beginners often encounter the problem of connecting electrical appliances. Moreover, all of them, be it a cigarette lighter or a watch, have no secrets. There are three wires connected to an electromechanical clock: “minus”, clock power and backlight power. The minus is connected to a terminal located directly on the case; further connection of the VAZ 2107 watch can be done literally “at random”. The remaining two wires can be connected in any order. If the clock does not go, but the backlight lights up, you should simply swap the wires.
Dismantling and installation of VAZ 2107 watches
You have to take off your watch to check it, repair it, tune it, or replace it with a more advanced version of the device. Before removing the watch, you must disconnect the ground terminal from the battery. The removal procedure is slightly different on models before and after 1993. In the first case, the sequence is:
- remove the three plates covering the instrument cluster mounting screws;
- Unscrew the screws and lift the dashboard;
- release the clock fastening brackets and remove them from the panel;
- disconnect the terminals of the wires connected to the clock.
To remove the watch on a “Seven” older than 1993, you must perform the following operations:
- unscrew the screws securing the center console and remove it;
- unscrew a couple of screws located at the bottom of the ashtray;
- remove the radio;
- Unscrew a couple of screws securing the radio frame;
- remove the decorative plate from the frame of the upper ventilation nozzles that covers the screw;
- unscrew the screw;
- Unscrew the 4 screws of the lining installed under the control panel for the interior ventilation and heating system;
- dismantle the switches installed under the central heating and ventilation nozzles of the cabin;
- unscrew the screw holding the instrument panel;
- pull out the instrument panel, disconnect the wire terminals from the clock;
- remove the panel along with the ventilation nozzles;
- unscrew a couple of screws securing the clock;
- remove the watch.
Installation of the clock is carried out in the reverse order of dismantling.
Car cigarette lighter illumination
Sometimes a light bulb burns out. This occurs due to old age or a small short circuit. You need to diagnose the problem and then replace the backlight bulb with a new one.
- Remove the wire from the battery.
- We take out the metal cartridge.
- Remove the central plastic cover.
- Disconnect the power wires.
- Unscrew the fixing nut.
- Remove the housing along with the backlight bulb.
- We replace the burnt out element with a new spare part.
- We assemble everything according to the diagram in reverse order.
PROMOTION: SALE OF NEW CAR 2022 PRODUCTION
Malfunctions
The standard VAZ 2107 clock is not the most “vitally important” device, however, when it is standing, it causes certain inconvenience and can disorient you in time. Therefore, their malfunction, like any other device or car system, must be eliminated. To restore their functionality, it is necessary to determine why the clock on the VAZ 2107 does not work. In principle, there are few reasons for the malfunction:
- fuse F6, located in the fuse block, has burned out;
- the power (ground) terminal connected to the clock has fallen off or come loose;
- The clock power cord is damaged;
- The clock mechanism has failed.
The fuse can even be checked visually. To do this, just remove it from its seat and inspect the thread. If the fuse is blown, you should replace it with another one of the same rating. However, fuses often burn for a reason, but when a short circuit occurs in the circuit. It can occur if the terminal of the positive wire has fallen off and touched a metal part of the body, or if the insulation of the power wire is damaged and “shorted” to ground. Therefore, before replacing the fuse, and especially if it is working and the clock does not work, you need to check the condition of the wire and power terminals. Therefore, the watch will have to be removed.
Next, you need to check whether the terminals of the wires suitable for the clock have come loose or oxidized, as well as how tightly they sit on the contacts.
You can check for a short or break in the power wires by ringing them on the housing or on the terminals of the corresponding fuses.
Oxidized terminals must be cleaned, but if they are loose and do not fit well on the contacts, lightly press them with pliers. If there is damage to the wire insulation, it can be repaired by wrapping it with electrical tape.
The feasibility of self-repair
Self-repair is possible if the driver is well versed in electrical engineering. Car enthusiasts who do not have such skills can replace a fuse, relay or clean the terminals.
If the contacts are not oxidized, but burned out, then it is easier to install a new signaling device. If you know how to make a signal on a VAZ 2107, you can do the repairs yourself - this will give you the opportunity to gain experience in electrical repair work and save money at the service station.
If the signal on a VAZ 2107 is lost, it should be repaired as quickly as possible, since its malfunction increases the risk of an accident.
In addition, according to traffic rules, operating a car without a sound signal is prohibited. Therefore, it is impossible to pass a technical inspection with a faulty horn.
Replacing the standard clock of a VAZ 2107 with digital ones
The standard clock is not informative enough, and it looks too standard.
Therefore, many owners of the “Seven” change them to more advanced models. Usually this is an electronic watch with a voltmeter function. Such a device not only looks more modern and attractive, but also allows you to control the voltage of the on-board network. Installing an electronic clock on a VAZ 2107 is easy. On the market you can find a wide range of electronic watches for the “seven” with different display colors and functionality. A good option is a watch with alarm, calendar, voltmeter and thermometer functions. The most advanced model has two temperature sensors - internal and external, which allows you to control two temperature parameters at once.
Such clocks fit perfectly into the place of the standard ones, and connecting them does not require the installation of additional power circuits. The only thing you should take care of is to install an external temperature sensor and run a wire from it to the location where the clock is installed.
If the electronic clock does not have a function for measuring external temperature, its installation is completely similar to the installation of a standard clock and does not require additional actions.
Help with choosing a part
Today, there are many options for the VAZ 2107 cigarette lighter available on the market. The average price of a part is 200 - 400 rubles for a standard element and 500 - 600 for a European cigarette lighter. It is advisable to choose the latter option. It has several advantages relative to the classic part.
- Reliable fixation. The European cigarette lighter is securely held in the socket, and the fixing nut does not unscrew.
- The appearance and backlight are prettier.
- A modern car lighter allows you to connect several devices at the same time.
Common malfunctions of VAZ 2107 watches and their modernization
The main highlight of the cars of the domestic automobile industry is the installation of a clock in the car interior, starting with the VAZ 2103 model. This important element is so loved by car owners that when a malfunction occurs, the question immediately arises of how to repair the clock on a VAZ 2107. To repair this device, you will need to initially understand the reasons why malfunctions occur.
Clock malfunctions on VAZ 2107
The standard clock on the VAZ 2107 is not the most important element in the car, but when something on the dashboard does not work, it causes a lot of inconvenience. If the clock, which is located on the center console of the 7's interior, does not work, then the driver and passengers cannot navigate the time. When a watch does not work, nothing more than identifying the cause of the breakdown and eliminating it will help solve such a problem. The main reasons why the clock in the VAZ 2107 may not work are:
- The fuse has blown - this is the part where you should start troubleshooting. The fuse is located on the fuse block called F6. A multimeter set to continuity mode will help you check its malfunction.
- The ground power terminal has become disconnected (or oxidized), which is connected directly to the device itself. To check this malfunction, you will need to remove the panel on which the clock and cigarette lighter are installed and check the quality of the connectors.
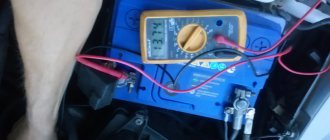
- The insulation is broken or the core of the power wire is damaged - this happens rarely, but if it is not a fuse or a contact, then you need to check the integrity of the power wire and ground. A device such as a multimeter set to DC voltage measurement mode can help with this.
- The mechanism is damaged. If all the component parts are intact, then there is a high probability that the problem is in the devices themselves. They can be repaired, or you can install electronic devices instead of standard ones.
It is recommended to check the serviceability of devices in the order presented in the material. If it turns out that the fuse is damaged, it can be replaced, and if the contact is poor, the terminal should be tightened. If the wire is damaged, then it needs to be insulated or replaced, but if the breakdown occurs with the watch mechanism itself, then it will have to be replaced or repaired. Practice shows that it is easier to replace them, especially since electronic devices not only look stylish, but also have wider functionality.
Connection
The question of how to connect a clock to a VAZ 2107 is asked by all owners who removed the torpedo and then put it in its place. On the VAZ 2107, a round electromechanical clock is installed on the center console. They are installed on all models of sevens, both carburetor and injection.
The devices in question are located next to the cigarette lighter. They are connected to the standard network, from which they are activated. To ensure the clock operates, three wires are used, the connection diagram of which is shown in the photo below.
What to do
The cigarette lighter is not directly responsible for the operation of any component of the car, but its operation negatively affects the comfort of the driver and passengers of the car. If the device is damaged, it must be repaired or replaced.
Where is the fuse for the cigarette lighter?
The VAZ-2107 cigarette lighter fuse is located in the fuse and relay mounting block. In VAZ cars this block is located in the engine compartment on the passenger side. To gain access to the fuse, you must remove the transparent plastic cover of the mounting block. The cigarette lighter fuse is marked F 6 and is rated for a current of 10 amperes.
How to disassemble the cigarette lighter
The socket and removable cartridge are inexpensive parts that can easily be found at any auto store. If they stop working, it is impractical to repair them; a complete replacement is performed. To do this, disconnect the ground bus from the battery and disassemble the socket fixed on the front panel of the VAZ-2106, performing the following procedure:
- remove the heater cartridge from the socket;
- we pick up the panel on which the clock and cigarette lighter are located and drag it with a flat-head screwdriver until the latches click;
- carefully remove the dashboard; there may be short wires behind it;
- remove the dashboard connection terminals;
- unscrew the locking nut;
- remove the outer casing along with the backlight;
- remove the internal cigarette lighter socket.
How to connect a clock to a VAZ 2107 diagram
Today I went to the market with a friend. and bought myself such a device. I wanted it to have a voltmeter. I looked at a lot, but decided on this model. It connects to the standard wires; there is no need to redo or sharpen anything.
VST-7042V (Electronic clock, thermometer, voltmeter for car).
Functions of this device:
1. Shows date, time, day of the week, 12 and 24 hour time display mode.
2. This watch model has an alarm function.
3. The watch also has a SNOOZE function (sleepyhead): when pressed, it turns off the alarm, but after 5 minutes the sound signal will sound again.
4. There is a thermometer. Shows indoor and outdoor temperatures. The internal temperature sensor is built into the clock; the external external temperature sensor has a wire length of 3 meters. Readings are in degrees Celsius and Fahrenheit. The reading range varies from -50 to +70 degrees Celsius. Thermometer error is +/- 1.0 degrees Celsius. Temperature update rate is 20 seconds.
5. When connected to the car's power supply, the indicator works in full, if on its own source (built-in replaceable batteries - tablets: 2 pcs) the indicator works in economy mode and shows only the time.
6. The indicator shows the battery charge level.
When a clock was first installed on the VAZ 2103, it was considered a luxury. Today, many will be more surprised by the absence of this necessary device than by its presence. Drivers are so accustomed to checking the time on the instrument panel that if the clock on a VAZ 2107 breaks down, they want to fix it immediately. In this article we will discuss how to remove the old clock and install a new one, how to repair and connect it. You will also learn how to replace a standard mechanism with a digital one.
As a conclusion
Changing the lamps on the headlights of a VAZ 2107 is not a difficult task. The main thing is to act carefully, because not so often a living person looks into them. Some parts may become “bitten” and will not want to be removed the first time. With a lot of force, there is a chance of breaking them. For example, when replacing dimensions, they often jam in the reflectors. There have been cases in my practice where they were “torn out” with a piece of that same reflector, and this was a replacement for the entire headlight.
So, you need to be careful, the “Seven”, although a strong machine, can tolerate and forgive you a lot, but some of its elements require a certain “tenderness”. A car is like a girl - the way you drive it is the way you will live with it - a popular automotive saying.
Good luck to everyone on the roads!
Good afternoon dear friends. Many Classic car owners do not like the backlighting of the instrument panel. The question arises whether you need to either change the lamps to brighter ones, or carry out tuning - upgrading the lighting of the VAZ 2107 dashboard. And it happens that you need to change the light bulbs for a completely banal reason - one of them has burned out. Today we will look at the process of replacing the backlight and alarm lamps of the VAZ 2105-07 panel . It is these two Zhiguli models, because their devices are similar.
Replacing burnt-out lamps on the dashboard of a VAZ Semerka
First of all, before you start replacing, you need to find out what kind of light bulbs are used on classic VAZ models . Because it will be a shame to buy the wrong one, or with a different base. And find out after the device is completely disassembled.
So, how are light bulbs used:
- Lighting for the speedometer and tachometer and the entire panel as a whole: power 3 Watt, base type – T3W,
- Signaling lamps for turning on the dimensions, high beam, parking brake, opening the air damper (choke for carburetor modifications), low battery charge, oil pressure, direction indicators: baseless linden lamps W1.2W, power 1.2 W.
In some modifications, older models, alarm lamps with a T3W type socket with a power of 3 Watts can be installed in the dashboard. Here, unfortunately, you can’t guess. The figure below shows the appearance of all the light bulbs used on the VAZ 2107 to get an idea of what they look like.
How to Replace Dashboard Bulbs
- First of all we remove the “Seven” tidy to gain access to the mounting board where they are installed
- We dismantle the burnt lamp. She removes it from the board by turning its socket 90 degrees. Turned and removed from the instrument panel
- If you are using a lamp with a W1.2W base, then simply pull it towards you and it will “come out” of the socket. If the type of lamps installed is T3W, then removal from the socket is carried out by turning it 90 degrees.
Install new light bulbs in reverse order. If you are the happy owner of a dashboard with W1.2W lamps, then in the markets you can buy light bulbs assembled with a socket. It is enough to mount it into the board without bothering with its removal from the socket. Because there were cases when baseless lamps, type W1.2, got stuck in the socket and it was impossible to remove them, or their seat was damaged.
Conclusion
Thus, you can not only replace a burnt-out lamp, but also modernize the instrument panel of the VAZ 2107 by installing LED lamps in them. But you need to do this wisely, because there are some nuances that we will talk about in the following articles.
Good luck to everyone on the roads.
Join the group and you will be able to view images in full size
What types of malfunctions are there?
The main causes of failure may be the following:
- The fuse has blown. Usually. It is this detail that first needs to be diagnosed. It is located in the block at position F. You can verify the serviceability of the mechanism using a multimeter set to continuity mode.
- The ground power terminal, which connects to the device body, has oxidized or simply turned off. You will have to remove the panel and inspect the quality of the connection.
- The insulation of the power wire is damaged or its core is broken. This doesn't happen often. But if there are no other problems, and the clock does not work, you need to use a multimeter in DC mode to check the integrity of the wire.
- The mechanism is damaged. Of course it can be repaired. But it’s better to install a new watch or replace it with a more modern electronic version.
Connection diagram
When assembling an instrument panel for the first time in his life, a car enthusiast is faced with a difficulty: how to connect a clock to a VAZ 2107. There are no special secrets in this matter. A classic mechanical watch has three electrical wires. One wire is “minus”; the second is power, and the third is backlight.
The negative must be connected to the terminal, which is located on the body. The remaining two wires are easily connected using the well-known “poke method”. If something doesn't work, you can simply swap the wires. The connection diagram will help you do everything correctly.
The negative wire must be attached to the watch body. The power and backlight wires are connected to terminals with a positive charge. Keep in mind that the backlight should only work when the lights are on, so it must be connected to their terminal.
Seven dashboard design
In terms of science intensity and level of professionalism, there can be no special complaints about the person performing this operation. If the owner knows how to disassemble an electric kettle and what is the best way to do it, then how to remove the instrument panel on a VAZ 2107 will certainly not raise any questions. Difficulties will appear only the first time, when before this you have not had to disassemble the Zhiguli front panel and pick out the tidy from it.
Absolutely all modifications 2107 and 2105 have a similar algorithm for dismantling the tidy, which we will announce today to help desperate owners who decide to spend a day off replacing a light bulb. First you need to be patient, this is the most important thing, and then have a good set of screwdrivers of different lengths and thicknesses. We will use them as assembly blades and manipulators where it is physically impossible to reach with our hands.
Tuning VAZ 2107 watches
Many tuning enthusiasts like to install something exotic on their dashboards. The easiest way is to change the standard clock to an electronic analogue. On the Aliexpress website you can find many suitable models for every taste and color.
The process of replacing a watch with a new one is very simple and takes no more than 10 minutes.
The main thing is that the upgraded device has a similar diameter, which will make it possible to place it in the console hole.
Today you can find two types of models:
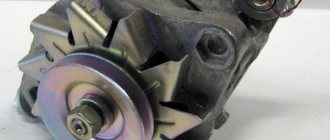
- Models that additionally display temperature, calendar, voltmeter and alarm clock. It's quite convenient. A voltmeter is especially useful. After all, by keeping the state of the network voltage under control, you can preserve the battery charge, even if the generator is not working properly.
- Devices that are additionally equipped with temperature sensors under the hood and in the cabin.
Installation of the new mechanism is simple: you need to connect the wires to the appropriate terminals and place the clock in the hole in the console.
The electromechanical clock on the VAZ-2107 car failed (marking on the case AKCH-1, with a second hand). After flaring the decorative metal ring, the watch was disassembled and the condition of the components was analyzed. The mechanical part of the watch (gearbox) and the engine turned out to be in good working order. The electronic unit has failed. The reason is the failure of an unpackaged microcircuit placed on a printed circuit board and filled with compound.
Since it naturally turned out to be impossible to repair the watch by replacing the microcircuit, it was decided to develop an electronic unit to replace the failed one. The diagram of this unit is shown in Fig. 1.
The electronic unit is based on the PIC12F675 microcontroller. Clock frequency
The microcontroller is determined by the quartz resonator and capacitors C4 and C5 connected to it. The microcontroller is powered from a 12 V battery through a linear voltage regulator DA1 with filter capacitors C1-SZ. The electronic unit includes a switching bridge formed by two pairs of transistors of different conductivity VT1-VT2 and VT3-VT4. The clock motor M1 is connected to the bridge outputs. The bridge is controlled by a microcontroller through its pins 6 and 7 and resistors R1-R4.
The microcontroller program, launched when voltage is applied to it, configures pins 5-7 as output. Pin 4 of the microcontroller is a free input. To avoid the appearance of a floating voltage on it and an increase in the current consumed by the device due to this, it is connected to a common wire. The microcontroller program initializes the built-in
The TMR1 timer module is installed in the microcontroller in such a way as to receive interrupts from it every second. In a program activated by interrupts, outputs 6 and 7 of the microcontroller are transferred to opposite states: when output 6 is set to “0”, output 7 is set to “1”. After a second, the output states change to the opposite. One of the inputs of the clock motor is connected through bridge transistors to the output of the stabilizer, and the other is connected to the common wire, i.e. The polarity of the motor connection is reversed every second. This is exactly what is necessary for its normal operation.
The tailoring text is shown in Table 1. The required configuration word (3F88) is already specified in the program text.
The printed circuit board of the electronic unit was not developed. For assembly, a breadboard was used, installed in place of the failed electronic unit. Capacitors, resistors - any small ones.
How to connect a clock to a VAZ 2107: where is the diagram?
Sometimes it happens that after an unsuccessfully pulled out cigarette lighter on a VAZ 2107, the entire central insert follows it, then - puff! – a spark flickers with a crackle, and that’s it. The cigarette lighter doesn't work.
The non-smoking driver doesn’t seem to have much trouble, God bless him, the repairs can wait. But the catch is that, due to the peculiarities of the cigarette lighter connection circuit on the VAZ 2107, the car radio (or radio), as well as the car clock along with its backlight, fails and does not work.
With the advent of the third millennium, the problems became even greater: a cell phone charger is connected to this socket, a DVR, a mini-TV and even a small refrigerator are powered. All this is absolutely not scary, but some lazy car enthusiasts have stopped carrying a hand or foot pump with them, and use exclusively an electric one, from the same source. This is where problems begin on the highway, in case of a puncture. You need to vote “to ask for a pump.”
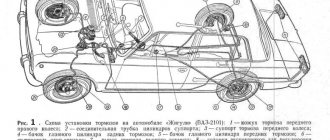
Click to enlarge (422 KB)
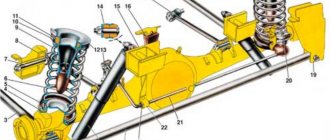
1 — side direction indicators; 2 — headlights; 3 — headlight cleaners for VAZ 2107; 4 — sound signals; 5 — electric motor of the VAZ 2107 fan; 6 — sensor for switching on the electric motor of the VAZ 2107 fan; 7 — electric motor for headlight washer; 8 — pneumatic valve control unit; 9 — electric motor for windshield wiper; 10 — electric motor for windshield washer; 11 — brake fluid level sensor; 12 — ignition coil VAZ 2107; 13 — engine compartment lamp; 14 — oil pressure indicator sensor; 15 — ignition distributor VAZ 2107; 16 — oil pressure warning lamp sensor; 17 — spark plugs for a VAZ 2107 car; 18 — coolant temperature sensor VAZ 2107; 19 — generator of a VAZ 2107 car; 20 - microswitch for carburetor VAZ 2107; 21 - battery; 22 — pneumatic valve of the VAZ 2107 carburetor; 23 — starter activation relay; 24 — starter VAZ 2107; 25 — windshield wiper relay; 26.
Since all car gadgets are usually powered through the cigarette lighter, from DVRs to mobile car refrigerators, this circuit is very important and there are often problems with it. Often the cigarette lighter fuse fails to withstand the load - indicated in the diagram. The scheme is identical to both the VAZ-2107 and the VAZ-2104 and VAZ-2105 with some amendments, depending on which panel you have installed - the fifth or seventh.
If you have a VAZ-2105 console
The ground wire (white-black) is double, one branch goes to the glove compartment illumination lamp, the ground is attached in the same place as the ground of all devices (under the ignition relay mounting bolt). The power wire (red-blue) is double, one branch goes to the plug socket.
If you have a VAZ-2107 console
The ground wire is black. The power wire (red-blue) is double, one branch goes to power the clock. The lighting wire (white) is double, one.
Cars considered: VAZ 2107, VAZ 21047 carburetor, injector
Location of the VAZ 2107 fuse box under the hood
Fuse and relay mounting block number 5
With the lid open it looks like this
Location of fuses and relays VAZ 2107
Earlier vehicles had an old fuse box.
Old style VAZ 2107 fuses
Location of relays and pin-type fuses in the mounting block: Relay for turning on the heated rear window. Relay for turning on headlight cleaners and washers. Relay for turning on sound signals (jumper installed). Cooling system fan motor activation relay (not used since 2000). Headlight high beam relay. Relay for low beam headlights.
VAZ 2107 injector fuses
The fuse and relay block of the VAZ 2107 injector is located on.
Pinout of the old instrument cluster (with oil pressure indicator)
In addition to the presence of an oil pressure indicator, it is worth noting that this instrument panel does not have an air damper indicator lamp (choke), and the emergency oil pressure lamp is located next to the pressure indicator. Because of this, it contains lamps for low brake fluid levels and fog lamps.
White 6-terminal block X1:
- Gasoline level sensor
- Turn signal indicator lamp
- Battery charge sensor (voltmeter -)
- Gasoline level warning lamp
- Overall plus (+)
- Battery charge sensor (voltmeter +)
White 8 terminal block X2:
- Fog lamp warning lamp
- High beam warning lamp
- Dimensions indicator lamp
- Empty
- Battery charge indicator lamp
- Brake fluid level warning lamp
- Empty
- Parking brake warning lamp (handbrake)
Orange 6-terminal block X3:
- General minus (-)
- Tachometer
- Instrument lighting
- Oil pressure sensor
- Oil pressure warning lamp
- Coolant temperature sensor