Good day to you! Recently we brought a VAZ 2101 in for repair; it was necessary to carry out a major overhaul of the brake system in a penny. And after looking a little at what they write about this on the Internet, I decided to write some instructions for repairing brakes.
Brake repair VAZ 2101
I'll try to do everything quickly and to the point. My opinion is that the braking system in a car is not something you can save on, but as always the budget... Oh the budget...
It’s the same with my repairs, they brought me in and said that we are changing everything to the minimum, repair kits for all cylinders, etc... Well, that’s how it should be. Diagnostics showed:
- The front cylinders were almost jammed, the hoses had cracks
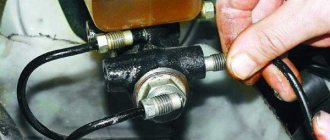
- The main brake cylinder was extremely worn out and was leaking
- The handbrake cable is stuck
- Rear cylinders were leaking
Not only that, but the short-lived repairmen also mixed up the tubes on the master cylinder, the rear circuit was connected instead of the right front wheel, and the right wheel was on the rear circuit :) And the car drove...
In general, repairing brakes on a penny is not too complicated, although there is a lot of work and it includes the following sections:
- Repair or replacement of the main brake cylinder
- Front brake repair
- Rear brake repair
- Bleeding the brake system of VAZ 2101
- Adjusting the hand brake
And now everything is point by point.
Possible brake malfunctions, their causes and methods for eliminating VAZ 2101
| CAUSE | REMEDY METHOD |
| Insufficient braking performance | |
| Leakage of brake fluid from the wheel cylinders of the front or rear brakes | Replace unusable parts of the wheel cylinders, wash and dry the pads and drums, bleed the hydraulic drive system |
| Air in the brake system | Remove air from the system |
| Damaged rubber seals in the master brake cylinder | Replace seals and bleed the system |
| Damaged rubber brake hoses | Check hoses, replace damaged ones |
| Incomplete release of all wheels | |
| There is no free play in the brake pedal | Adjust pedal free play |
| Clogged compensation hole in the master cylinder | Clean the hole and bleed the brake hydraulic drive |
| Swelling of the rubber seals of the master cylinder due to gasoline, mineral oils, etc. getting into the liquid. | Thoroughly flush the entire system with brake fluid, replace damaged parts, bleed the hydraulic drive system |
| Main cylinder piston stuck | Check and, if necessary, replace the master cylinder, bleed the brake drive |
| Braking one of the wheels when the brake pedal is released | |
| The brake pad tension spring is loose or broken | Replace springs |
| Piston stuck in wheel cylinder due to corrosion or blockage | Disassemble the cylinder. Clean and rinse parts, replace damaged ones |
| Swelling of the o-rings of the wheel cylinder due to the ingress of fuels and lubricants into the liquid | Replace the rings, flush the brake hydraulic system with brake fluid |
| There is no clearance between the pads and the drum | Adjust the parking and rear brakes |
| Violation of the position of the caliper relative to the brake disc due to loosening of the bolts securing it to the bracket | Tighten the fastening bolts; if necessary, replace damaged parts |
| Increased runout of the brake disc (more than 0.15 mm) | Sand the disc, if the thickness is less than 9.0 mm, replace it |
| The car skidding or pulling to the side when braking | |
| 1. Brake fluid leak in one of the wheel cylinders | Replace seals and bleed the system |
| Brake wheel cylinder piston jamming | Check and eliminate jamming of the piston in the cylinder, if necessary, replace damaged parts |
| Blockage of any steel tube due to dent or blockage | Replace the tube or clean it and bleed the system |
| Different tire pressures | Set normal pressure |
| Incorrect front wheel alignment angles | Adjust wheel alignment |
| Contamination or oiling of discs, drums and linings | Clean the brake parts |
| Incorrect installation of pressure regulator | Adjust the position of the pressure regulator |
| Pressure regulator faulty | Repair or replace pressure regulator |
| Increased pressure on the brake pedal | |
| Swelling of cylinder seals due to gasoline, oils, etc. getting into the liquid. | Thoroughly rinse the entire system, replace damaged rubber parts; bleed the system |
| Squealing or squealing brakes | |
| Loosening of the rear brake pad tension spring | Check the tension spring and replace it with a new one if necessary. |
| Ovality of rear brake drums | Bore the drums |
| Oiling the friction linings | Clean the pads with a wire brush using warm water and detergent. Eliminate causes of fluid or grease getting on the brake pads |
| Wear of the linings or inclusion of foreign bodies in them | Replace the pads |
| Excessive brake disc runout or uneven wear | Grind the disk; if the thickness is less than 9 mm, replace the disk assembly with the front wheel bearing hub |
Video about “Possible brake malfunctions, their causes and methods of elimination” for VAZ 2101
How to check the vacuum brake booster.
How to bleed the main brake or why the brakes won't bleed.
WHY ARE THE BRAKES AND CLUTCH NOT PUMPED!!!
How to bleed the brakes on a VAZ 2107 yourself Video, photo
The brake system, like all automotive systems, requires periodic inspection and maintenance. In addition to monitoring the condition of the brake pads, it is necessary to periodically remove air bubbles that appear in the brake fluid. To remove air, the system must be bled. The operation can be performed without contacting service station specialists. This does not require special knowledge or qualifications. You will need a special tool and an assistant.
When is it necessary to pump the brakes of a VAZ 2107
It is necessary to bleed the brake system in four cases:
- Replacing brake fluid. Brake fluid has a limited service life. Over time, it absorbs moisture from the air, which can cause corrosion of the surface of the brake cylinders and their failure. Water also worsens the main property of brake fluid - it reduces the boiling point.
- The recommended service life of brake fluid on VAZ cars is 2 years, after which it is worth replacing it. This applies to standard glycol-based brake fluid.
- Troubleshooting the brake system. When replacing brake hoses and cylinders, brake fluid leaks and air enters the system. Therefore, after repair work, the VAZ 2107 brakes must be bled.
- Air ingress during operation. This manifests itself in deterioration in braking efficiency, a “soft pedal” or uneven braking of individual wheels.
What is needed to bleed the brake system
It is almost impossible to bleed the brake system yourself. The work is carried out by two people. One person (“mechanic”) works with the brake system, unscrews the fittings. The second (“partner”) is located inside the car and must press or release the brake pedal on command.
You also need the following tools:
- 8/10 socket wrench;
- a PVC tube or rubber hose, the inner diameter of which corresponds to the diameter of the fitting;
- container for collecting waste liquid.
- Brake fluid is also needed.
If cars are equipped with 8-mm wrench fittings, it is better to replace them with similar 10-mm hexagon fittings. The latter will subsequently be easier to unscrew without tearing off the edges.
How to bleed the brakes on a VAZ 2107
For ease of work and to ensure free access to the brake cylinder fittings, you should use an inspection hole. The design of the front brake mechanisms requires removal of the wheels to bleed the brake system.
Before starting work, it is necessary to fill the brake reservoir to the maximum, and during bleeding, you must ensure that it is constantly filled with brake fluid. If you miss this moment, air will get into the working cylinder and you will have to start work again.
The procedure for each of the 4 working cylinders is as follows:
- Remove the protective cap from the fitting.
- Loosen the fitting using a spanner. If the fitting has not been unscrewed for a long time, significant effort may be required. You must be especially careful not to damage the edges, otherwise the work may become very difficult, even to the point that the brake cylinder will need to be replaced.
- Place the tube on the fitting and lower it into the brake fluid container.
Direct pumping is performed as follows:
- The “partner” sitting in the cabin, at the command of the “mechanic”, presses the pedal all the way.
- The “mechanic” unscrews the fitting half a turn so that the liquid, along with air bubbles, comes out into the container through the inserted tube. The brake pedal “sinks” to the floor.
- The “fitter” tightens the fitting, and the “partner” releases the pedal on command.
The procedure is repeated until no more air bubbles come out of the tube. During bleeding, the end of the tube must be constantly lowered into the brake fluid so that air does not enter the cylinder.
In this way, all four working brake cylinders are pumped. A certain sequence should be followed when bleeding the cylinders. They are pumped “from far to near”:
- Right rear.
- Left back.
- Right front.
- Left front.
After completing bleeding of each cylinder, it is necessary to tighten the fitting and put on the protective cap.
Bleeding the brakes of a VAZ 2107 is quite feasible at home and does not require expensive special tools and devices. No special qualifications are required either. Even a child can release and press the brake pedal at the “locksmith’s” command.
Often, owners upgrade the brake system by installing more efficient, high-quality and expensive parts. However, this does not change the bleeding method in any way and does not eliminate the need for periodic work to replace the brake fluid.
https://youtube.com/watch?v=Zz5lBYsXajo
Another version of the VAZ-2101 scheme
Outdoor Lighting
1 – Headlights 2101 2 – engine compartment lamp; 3 – battery; 4 – generator; 5 – reverse light switch; 6 – fuse block; 7 – indicator lamp for external lighting in the instrument cluster; 8 – glove box lighting lamp; 9 – instrument cluster lighting lamp; 10 – plug socket for a portable lamp; 11 – instrument lighting switch; 12 – external lighting switch; 13 – brake light switch; 14 – ignition switch; 15 – lamp switches located in the front door pillars; 16 – lamp switches located in the rear door pillars; 17 – lampshades; 18 – trunk lighting lamp; 19 – rear lights; 20 – license plate light; 21 – reversing lamp
Turning on the headlights 2101
1 – headlights VAZ 2101; 2 – battery; 3 – generator; 4 – fuse block; 5 – headlight switch; 6 – external lighting switch; 7 – ignition switch; 8 – indicator lamp for high beam headlights in the instrument cluster
Direction indicators
1 – sidelights VAZ 2101; 2 – side direction indicators; 3 – battery; 4 – generator; 5 – ignition switch; 6 – fuse block; 7 – relay-interrupter of direction indicators; 8 – indicator lamp for direction indicators; 9 – direction indicator switch; 10 – rear lights
Sound signals 2101
1 – sound signals; 2 – battery; 3 – fuse block; 4 – sound signal switch; 5 – generator VAZ 2101.
Wiper circuit
1 – generator VAZ 2101; 2 – battery; 3 – ignition switch; 4 – windshield wiper switch; 5 – windshield wiper relay; 6 – windshield wiper gearmotor; 7 – thermobimetallic fuse; 8 – windshield wiper switch located in the glass washer pump; 9 – fuse block.
Useful: Pinout of mounting blocks for VAZ cars
Heater fan Zhiguli
1 – generator VAZ 2101; 2 – battery; 3 – ignition switch; 4 – fuse block; 5 – heater switch; 6 – additional resistor; 7 – heater fan electric motor.
Ignition block diagram
The lock is attached to the steering shaft. Some of the power circuits, which are protected by fuses, are connected directly to the battery, regardless of the position of the key:
- interior lamp;
- sound signal;
- cigarette lighter;
- stop signal.
To adjust the voltage generated by the generator, a relay regulator is provided in the circuit. Its responsibilities include monitoring the voltage at the output of the generator, and when the readings drop, the relay sends a signal to the control lamp located on the instrument panel. If the charging voltage is low, the battery may discharge prematurely and not have time to recharge, which can damage it. If the charging voltage is too high, the electrolyte in the battery may boil, which will also not lead to anything good.
| Key position | Contact under e.g. | Switched circuits |
| "Parking" | "30"-"INT" | Exterior lighting, windshield wiper, heater |
| «30/1» | — | |
| "Turned off" | «30», «30/1» | — |
| "Ignition" | "30"-"INT" | — |
| «30/1″-«15» | Exterior lighting, windshield wiper, heater | |
| "Starter" | «30″-«50» | Starter |
| «30″-«16» |
Bleeding the brakes of a VAZ 2101 Zhiguli
You will probably ask why bleed the brakes on a VAZ, the answer is very simple, if you don’t do this, then the effectiveness of your braking system will be in doubt and I would not trust it 100%. It turns out that you press the brake pedal, but your car does not want to stop, or the system starts working when the pedal has gone halfway - the free play of the pedal has increased.
This happens due to the fact that air is present in the system along with the liquid, and from school we know that air can be compressed compared to liquid bodies.
Most often, air can get into your brakes if you have repaired it, changed hoses and pipes, other elements that maintain the tightness of the system, or maybe just years are making themselves felt.
Below we will carefully consider the procedure for bleeding the brakes using the example of the famous Zhiguli - VAZ 2101. For this operation you will need a partner and it is best to carry out bleeding in the inspection hole, it is more convenient.
Procedure for pumping brakes on a VAZ 2101
- First, we must check the tightness of the system and make sure that nothing is leaking, look in the brake fluid reservoir, it may need to be topped up.
- As experienced drivers told me, bleeding the brakes needs to be done from a long pipeline, and for us it’s the rear wheels. This refers to the distance from the master cylinder to the slave cylinder.
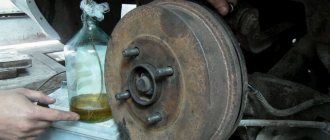
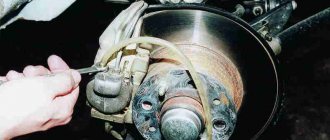
- To make it more clear, we will show how this is done using the example of the front wheel, which we remove, and put a transparent hose (1) on the fitting. The second end of which we insert into a jar or plastic bottle and pour “brake fluid” into it, so that we can see the air bubbles that we want to expel from our braking system.
- Your friend presses the brake pedal several times (3-5), every 2-3 seconds. Meanwhile, you are not sleeping, but unscrew the fitting a little, that is, 1/2–3/4 of a turn, while the pedal must be pressed to create pressure in the system.
- In this way, we pump the brakes until fluid stops leaking from the tube and the pedal reaches the stop, after which we tighten the fitting with the brake pedal pressed, then you can remove the hose.
- Wipe the brake fluid from the fitting and do not forget to put on the protective cap.
- Keep an eye on the brake fluid level, which will constantly drop, so as not to pump a portion of fresh air into the system that you are struggling with.
- Next, we carry out the same procedure for pumping the brakes, on the same circuit, and then move on to the other two wheels of the other.
- If you did everything correctly, then the pedal should not go through more than 1/2–2/3 of its stroke.
- I talked about the rear brake pressure regulator, so that everything is correct, bleeding must be done with the rear of the car loaded.
- When changing the brake fluid to a new one, unscrew the air bleeder fittings on all wheels by 1.5–2 turns. We press the pedal with sharp movements and slowly release it, tighten those fittings where the liquid appears, and then, as written above, we completely pump the brakes of the VAZ car.
- An unpleasant situation may happen, you suffer, pump the brakes, but there is still air, this may be due to a malfunction of the pipes of their connections, or perhaps the wheel or master cylinder has failed.
Adviсe!!!
If your workhorse has been driving for a long time, then think about replacing the brake fluid with new and fresh one.
If the brake fluid can still serve you, then filter it and let it sit in a closed jar.
Popularity: 37%
Brake pedal
The main control element of the VAZ 2101 braking system is the brake pedal, located in the cabin under the steering column between the clutch and accelerator pedals. The pedal transmits the muscular force from the driver's legs to the GTZ. If the brake pedal is adjusted correctly, the free play will be 4–6 cm. When you press it and travel the specified distance, the vehicle begins to smoothly slow down.
Bleeding the brakes of a VAZ 2101 Zhiguli
This happens due to the fact that air is present in the system along with the liquid, and from school we know that air can be compressed compared to liquid bodies.
Most often, air can get into your brakes if you have repaired it, changed hoses and pipes, other elements that maintain the tightness of the system, or maybe just years are making themselves felt.
Below we will carefully consider the procedure for bleeding the brakes using the example of the famous Zhiguli - VAZ 2101. For this operation you will need a partner and it is best to carry out bleeding in the inspection hole, it is more convenient.
Procedure for pumping brakes on a VAZ 2101
- First, we must check the tightness of the system and make sure that nothing is leaking, look in the brake fluid reservoir, it may need to be topped up.
- As experienced drivers told me, bleeding the brakes needs to be done from a long pipeline, and for us it’s the rear wheels. This refers to the distance from the master cylinder to the slave cylinder.
- To make it more clear, we will show how this is done using the example of the front wheel, which we remove, and put a transparent hose (1) on the fitting. The second end of which we insert into a jar or plastic bottle and pour “brake fluid” into it, so that we can see the air bubbles that we want to expel from our braking system.
- Your friend presses the brake pedal several times (3-5), every 2-3 seconds. Meanwhile, you are not sleeping, but unscrew the fitting a little, that is, 1/2–3/4 of a turn, while the pedal must be pressed to create pressure in the system.
- In this way, we pump the brakes until fluid stops leaking from the tube and the pedal reaches the stop, after which we tighten the fitting with the brake pedal pressed, then you can remove the hose.
- Wipe the brake fluid from the fitting and do not forget to put on the protective cap.
- Keep an eye on the brake fluid level, which will constantly drop, so as not to pump a portion of fresh air into the system that you are struggling with.
- Next, we carry out the same procedure for pumping the brakes, on the same circuit, and then move on to the other two wheels of the other.
- If you did everything correctly, then the pedal should not go through more than 1/2–2/3 of its stroke.
- I talked about the rear brake pressure regulator, so that everything is correct, bleeding must be done with the rear of the car loaded.
- When changing the brake fluid to a new one, unscrew the air bleeder fittings on all wheels by 1.5–2 turns. We press the pedal with sharp movements and slowly release it, tighten those fittings where the liquid appears, and then, as written above, we completely pump the brakes of the VAZ car.
- An unpleasant situation may happen, you suffer, pump the brakes, but there is still air, this may be due to a malfunction of the pipes of their connections, or perhaps the wheel or master cylinder has failed.
Adviсe.
If your workhorse has been driving for a long time, then think about replacing the brake fluid with new and fresh one.
If the brake fluid can still serve you, then filter it and let it sit in a closed jar.
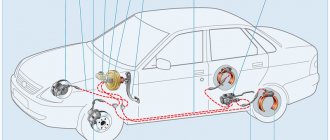
General structure of the working vehicle
The schematic diagram of the vehicle includes the following elements:
- brake mechanism;
- brake drive.
The brake mechanism implements the function of braking - achieving the torque that is necessary to reduce the speed of movement or stop.
The VAZ-2107 is equipped with a classic version of friction mechanisms based on friction force.
Their design can be represented by the following two options:
- disk (compression mechanism);
- drum (unclamping mechanism).
In the VAZ-2107, a disc mechanism is used on the front wheels, and a drum mechanism on the rear.
A brake actuator is needed to control the braking mechanisms. There are mechanical, pneumatic, hydraulic, electric and combined operating principles of drives. The VAZ-2107 uses the most common hydraulic principle, based on the action of brake fluid (a special oily substance).
The hydraulic drive circuit includes:
- brake pedal (to control the hydraulic drive);
- vacuum booster (to create additional force when pressing the pedal);
- master brake cylinder with an expansion tank (to ensure an increase or decrease in fluid pressure in the dual-circuit system, as well as to replenish fluid);
- wheel (or working) cylinders (to bring the control functions of the pedal to the brake mechanism);
- rear brake pressure regulator (to adjust the braking force as the vehicle weight increases);
- pipelines and hoses (for placing and moving brake fluid throughout the system).
The implementation of braking functions in the VAZ-2107 (as well as in related models - sedans 2101, 2103, 2105, 2106 and station wagons 2102, 2104) involves the use of two parallel independent hydraulic drive circuits. In the event of a malfunction of one circuit, the braking functions are redistributed to the second.
GTZ malfunctions
The VAZ 2101 brake system has many parts that can fail due to wear, poor quality or untimely maintenance. The following characteristic symptoms of problems can be identified:
- slow stopping of the vehicle after pressing the brake pedal. One of the reasons is that the lip seals of the pistons have become unusable, which led to a loss of tightness;
- high pedal effort. This problem appears when the cuffs increase in size, for example, when installing a low-quality repair kit;
- The brake pedal has a short stroke. The working environment, i.e. the brake fluid, has nowhere to go due to the fact that the compensation hole is clogged. In addition, the canal may be blocked by swollen cuffs;
- The car only brakes when the pedal is pressed to the floor. This indicates a complete failure of the lip seals when the liquid goes into the tank and not into the system;
- Brake pads do not move away from the discs and drums, causing them to become hot while driving.
The reason lies in the jamming of one of the pistons or the formation of a blockage in the bypass hole. If the seal is lost, liquid begins to flow out of the cylinder
These symptoms may also occur if there are problems with other parts of the braking system. For example, the pedal may fail if there is no fluid in one of the wheel cylinders or if air gets into the system
Therefore, for a final diagnosis, it is necessary to pay attention to additional features of the car’s behavior. For example, there are certain signs that clearly indicate problems with other components of the brake system, and not with the GTZ:
- pulling the car to the side when braking;
- jamming of the brake mechanisms on one of the wheels;
- the appearance of sounds uncharacteristic of normal brake operation (creaking, squeaking, grinding);
- heating of brake pads or discs on one wheel.
Checking the brake master cylinder
The most common cause of GTZ problems is wear of the seals. When replacing cuffs, you need to take into account that repairs only make sense if the piston and cylinder walls do not have wear. Otherwise, replacing the rubber seals will not bring any results and soon you will still have to install a new part. Before you start checking the main hydraulic brake drive, you should make sure that there are no problems with other elements of the system:
- Inspect the wheels from the inner surface to identify any leaks of brake fluid from the brake fluid brake system.
- Check the integrity of the tank and hoses connecting it to the gas turbine engine, as well as the presence of fluid and its level.
Fluid leaks on the inside of the wheel indicate a leak in the brake system.
A clear sign that there is a problem with the master cylinder is the appearance of liquid on the unit body. A working mechanism should always be dry without a hint of leakage. If the hydraulic drive has lost its seal, it must be dismantled for further disassembly and repair. You can determine that the gas turbine engine bypasses fluid, i.e., it does not enter the system, but returns to the expansion tank when you press the pedal:
- Open the tank lid.
- An assistant is seated in the driver's seat. The engine does not start.
- Your partner presses the brake pedal, and you listen to the sounds coming from the reservoir.
- If gurgling is heard from the container, and the pedal is pressed lightly, it means that the liquid is entering the tank instead of the system. The malfunction lies in the wear of the seals, which are unable to create the necessary pressure in the cylinder circuits.
Brake wheel cylinders
Due to the design differences between the front and rear axle brakes, each mechanism should be considered separately.
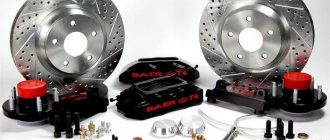
Front brakes
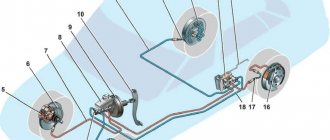
The VAZ 2101 uses disc brakes at the front. The caliper is attached to the bracket 11 by means of a bolted connection 9. The bracket is fixed to the flange of the trunnion 10 together with the protective element 13 and the rotary lever.
The caliper has slots for the brake disc 18 and pads 16, as well as seats in which two cylinders 17 are fixed. To fix them in relation to the caliper, the hydraulic cylinder itself has a locking element 4, which fits into the groove of the caliper. The hydraulic cylinders have pistons 3, which are sealed using cuffs 6 located in the cylinder groove. To prevent dirt from entering the cylinder, it is protected from the outside by a rubber element. Both cylinders are connected to each other by tube 2, through which simultaneous pressure is ensured on the brake pads on both sides of the disc. The external hydraulic cylinder has a fitting 1, through which air is removed from the system, and working fluid is supplied to the internal one through the same element. When the pedal is pressed, the piston element 3 presses on the pads 16. The latter are fixed with fingers 8 and pressed by elastic elements 15. The rods in the cylinder are held by cotter pins 14. The brake disc is secured to the hub with two pins.
Hydraulic cylinder repair
In case of problems with the front end RTC, the mechanism is dismantled and a new one is installed or repairs are made by replacing the lip seals. To remove the cylinder you will need the following tools:
- flat blade screwdriver;
- hammer;
- pliers;
- mites;
- jack;
- set of open-end wrenches;
- wrench for unscrewing brake pipes.
We carry out the repair procedure in the following order:
- We jack up the front of the car on the side where the hydraulic cylinders are supposed to be replaced and remove the wheel.
- Using pliers, remove the cotter pins that secure the guide rods of the pads.
Replacing pads
If the repair procedure comes down to only replacing the pads, then we carry out steps 1–6 to replace the RTC and install new brake elements with preliminary application of Litol-24 lubricant to the guides. The front pads require replacement as soon as the friction lining reaches a thickness of 1.5 mm.
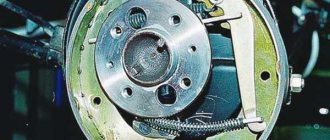
Rear brakes
Rear axle brakes are “penny” drum type. The mechanism parts are mounted on a special shield, which is fixed to the end part of the rear beam. There are parts installed at the bottom of the shield, one of which serves as a supporting element for the lower part of the brake pads.
To be able to adjust the distance between the drum and the shoes, eccentrics 8 are used, against which the shoes rest under the influence of elastic elements 5 and 10.
The RTC consists of a body and two pistons 2, pressed by an elastic element 7. By means of the same spring, lip seals 3 are pressed to the end part of the pistons.
Structurally, the pistons are made in such a way that on the outside there are special stops for the upper ends of the brake pads. The tightness of the cylinders is ensured by protective element 1. Bleeding of the device is ensured through fitting 6.
Cylinder replacement
To replace the rear RTCs you will need the following tools:
- a set of keys;
- wrench for unscrewing brake pipes;
- screwdriver;
- hammer.
The operation consists of the following steps:
- Raise the rear of the car and remove the wheel.
- Unscrew the guide pins.
Hydraulic cylinders are rarely repaired, since replacing seals only briefly prolongs the serviceability of the mechanism. Therefore, if the RTC malfunctions, it is better to install a new part.
Replacing pads
The rear brake pads must be replaced when the friction material reaches the same thickness as the front brake elements. To replace, you will need pliers and a screwdriver. We carry out the procedure in the following sequence:
- We press and rotate the cups that hold the pads. Remove the cups along with the spring.
Pressure regulator
The rear brakes are equipped with a regulating element, through which the pressure in the braking drive is adjusted when the vehicle load changes. The essence of the regulator's operation is to automatically stop the supply of fluid to the working hydraulic cylinders, which helps reduce the likelihood of the rear axle skidding during braking.
The serviceability of the mechanism is easy to check. To do this, we perform the following steps:
- We clean the part from dirt and remove the boot.
- The partner presses on the brake pedal, creating a force of 70–80 kgf. At this time, a second person controls the movement of the protruding part of the piston.
- When the piston element moves by 0.5–0.9 mm, the regulator is considered to be in good condition. If this is not the case, the device must be replaced.
Video: setting the brake pressure regulator on a Zhiguli
Many car owners of classic Zhiguli cars remove the pressure regulator from their car. The main reason is souring of the piston, as a result of which the fluid is not supplied to the rear axle RTC, and the pedal becomes sluggish after braking.
Tubes and hoses
Brake pipes and hoses of the braking system of the VAZ “kopek” are used both front and rear. Their purpose is to connect the GTZ and RTC to each other and supply brake fluid to them. Sometimes connecting elements become unusable, especially hoses, due to aging rubber.
Damage to the hose leads to fluid leakage and depressurization of the brake system.The parts in question are attached using a threaded connection. There are no difficulties in replacing them. You just need to unscrew the fasteners on both sides, remove the worn element and install a new one in its place.
Master brake cylinder
The GTZ of the VAZ “kopek” is a hydraulic type mechanism, consisting of two sections and designed to operate a system with two circuits.
If problems arise with one of the circuits, the second, although not as effective, will ensure that the car stops. The GTZ is mounted to the pedal assembly bracket.
Pistons 3 and 5 are responsible for the performance of different circuits. The initial position of the piston elements is ensured by springs 8, by means of which the pistons are pressed into screws 7. The hydraulic cylinder is sealed with the corresponding cuffs 6. In the front part of the housing is plugged with a plug 1.
The main problems with the GTZ are wear of the lip seals, the piston or the cylinder itself. If rubber products can be replaced with new ones from the repair kit, then if the cylinder or piston is damaged, the device will have to be completely replaced. Since the product is located under the hood near the clutch master cylinder, replacing it does not cause any difficulties.
Video: replacing the GTZ with a “classic”
Absolute malfunctions of the VAZ 2107 brake system
Ineffective brake system operation is the most common malfunction. It is diagnosed by an increase in braking distance and worsening deceleration during braking. This can be determined by eye. If the braking distance from a speed of 40 km/h exceeds 12.2 meters, the use of the vehicle (even to move to the repair site) is prohibited.
The causes of the malfunction may be:
- Brake fluid leak.
- Presence of air in the system.
- Breakdown of the brake cylinders (main or working).
- Pad wear.
That is, the entire brake system must be checked.
Brake fluid leak. The cause of this malfunction is wear of the cylinders and pipe elements of the brake system. With this type of breakdown, operation of the vehicle is prohibited. To eliminate the leak, it is necessary to carefully check the system elements and replace damaged ones.
Parking brake failure. This is a common defect that manifests itself in the movement of the car when the handbrake lever is raised. The reason for this lies in the stretching of the cable or wear of the drums and brake pads.
According to traffic regulations, the handbrake must hold the car on a slope of up to 16 degrees when fully loaded. If its efficiency is worse, you can only drive the car to the place of repair.
The problem can be fixed by adjusting the cable or replacing worn elements.
Recommended brake fluid and price
The basis of the TF component is a mixture of polyglycols and their esters and/or silicones, additional additives, the main function of which is to preserve the metal components of the brake system from corrosion.
You can purchase brake fluid of class 6 and higher quality from the manufacturer Tosol-Sintez “ROSDOT 6”, betel volume 1 liter, article number 4606532003845, price 400 rubles. The high level of brake fluid class ROSDOT 6 advanced ABS formula makes it possible to mix it with lower class fluids, such as DOT3, DOT4 and DOT 4 plus. However, it makes no sense to overpay for a more expensive one, since “ROSDOT 6” ensures reliable functioning of the braking system.
Also suitable for pouring into the brake system of the Lada Vesta are fluids of classes DOT 4, DOT 5.1.
Brake fluid has shades of color from light yellow to brown.
The most suitable TJ. Brake fluid “BRAKE FLUID”, DOT 4, container volume 1 l produced by companies: TRW, product code PFB401; Hella-Pagid, article number 8DF355360021; Bosch, product code 1987479107; Textar, article number 95002200. The cost of goods ranges from 300 to 340 rubles. A 1-liter canister of Liqui Moly, product code 8834, will cost 510 rubles.
Prices are current for autumn 2017 for Moscow and the region.
How to change brake fluid yourself
To accomplish this task you will need:
- inspection hole or overpass;
- transparent tube with a diameter of 4-5 mm;
- keys for fittings “7” and “8” mm;
- container for draining old fuel oil;
- new TZ meeting the manufacturer's specifications.
Guide to replacing TZ on Lada Vesta
- We place the car on a pit or overpass.
- Unscrew the cap of the brake master cylinder reservoir.
- Using rags, clean the brake cylinder fitting of the rear right wheel.
- Remove the protective cap from the fitting.
- We put a 7 mm wrench on the bleeder fitting, and then a transparent vinyl tube. We lower the other end of the tube into a transparent bottle containing a little TJ.
- An assistant from the driver's seat depresses the brake pedal 3-4 times, and then presses and holds the pedal all the way.
- In the meantime, unscrew the bleeder fitting to release the fuel fluid.
- As soon as the fuel fluid stops coming out of the tube, screw in the fitting.
- We repeat the steps until the release of the fluid with air bubbles ends.
- If necessary, add fuel fluid to the cylinder reservoir.
- We repeat similar steps on the brake cylinders of other wheels.
1
We are replacing brake fluid on Lada Vesta.
2
Unscrew the filler cap of the tank.
3
We pump out the old liquid from the tank with a syringe or rubber bulb.
4
Fill the reservoir with new brake fluid.
5
We remove the wheel for more convenient access to the caliper and the bleeder fitting on it.
6
Remove the rubber seal from the fitting, which protects against dirt.
7
We put a key and a tube for draining used brake fluid onto the bleeder fitting.
8
Next, the assistant presses the pedals to create pressure in the circuit, at this time it is necessary to loosen the bleeder fitting with a key.
9
We drain the used brake fluid along with air bubbles into a previously prepared bottle. The procedure of pressing the pedals must be repeated several times.
When draining, pay attention to the color and drain until clean brake fluid comes out. Thus, we pump all the wheels. 10
10
Next, tighten the fitting.
11
Check the level in the reservoir and add brake fluid. Screw the cap on the filler neck.