The front suspension arms of the VAZ 2107 are subject to significant loads when driving, and given our roads, their premature failure is not surprising. To take care of your safety, you need to regularly check the condition of the suspension and have it repaired in a timely manner. In this article I want to touch on how to replace the upper front suspension arm of a VAZ 2107 (this, in principle, also applies to models 2101 - 2106).
Signs of malfunction of levers and silent blocks
One of the signs of a malfunction is noise in the suspension when driving, especially on a bad road. Among other things, it occurs when silent blocks (rubber-metal hinges of levers) are severely worn. Also, if the silent blocks are worn out or the VAZ 2107 lever is deformed, it becomes impossible to set the alignment angles of the front wheels. The same problem occurs when the axes of the front arms are deformed.
If the levers are deformed, the car may pull to the side when driving on a flat road. An extremely unpleasant phenomenon - self-excited vibrations of the front wheels - is often a consequence of wear of the silent blocks.
Elimination of any of the listed malfunctions of the levers and silent blocks requires the removal of the suspension arms
Notes
It is better to replace the self-locking nuts of the upper ball joint and axle with new ones.
If your VAZ 2107 has an upper arm kickback and it is loose, then it’s time to change the silent blocks or change the axle due to wear due to poor tightening.
If the VAZ 2107 upper arm bolt does not come out, treat it with a WD wheel, then turn it with a wrench and lightly tap it.
Shoulder replacement video:
The most loaded element of the VAZ 2107 car is the front suspension. In fact, it takes on almost all the mechanical loads that arise during movement. For this reason, it is important to pay close attention to this unit, carry out timely repairs and, if possible, modify it by installing more durable and functional elements.
Replacement of the upper arm of the front suspension
Removing the upper arm of the VAZ front suspension is necessary in three cases:
- Replacing the lever.
- Replacing silent blocks.
- Replacing the lever axis.
The procedure for removing the lever is as follows:
- Place the car on a lift or inspection hole.
- Remove the wheel using a wheel wrench and a jack (the latter is only needed in a pit).
- Remove the bolt securing the front bumper bracket.
- Disconnect the upper ball joint by unscrewing the self-locking nut and mounting bolts.
- Unscrew the self-locking nut of the lever axle, holding the axle with a wrench.
- Remove the axle.
- Remove the upper arm.
If the lever is not deformed or cracked, it can be reused by first replacing the silent blocks. To do this, they need to be pressed out with a puller. When pressing out, the lever is clamped in a vice.
Before installing the lever, it is necessary to press in new silent blocks. This is done with the same puller. To press in the silent blocks, it is necessary to change the position of the puller parts on the suspension arm.
Before installing the lever, it is recommended to replace the self-locking nuts of the lever shaft and ball joint pin with new ones.
Installation of the upper arm is carried out in the following sequence:
- Place the lever on the axle and secure it with nuts without tightening them.
- Install the bolt securing the front bumper mount.
- Load the suspension by lowering the jack or lift.
- Place the ball joint pin into the steering knuckle.
- Tighten the self-locking ball joint nut.
- Tighten the upper arm axle nut.
- Raise the car and install the wheels.
After replacing the lever and/or silent blocks, it is necessary to re-adjust the wheel camber/toe angles.
Removing the lever
Using a 19 mm wrench, unscrew the nuts securing the transverse link to the suspension arm. Only after this is it necessary to move the axle using a mounting blade and completely remove the lever
Please note that under the axle on which the suspension arm is mounted, there are special washers. With their help, wheel camber is adjusted
Installing the new lower arm is done in the reverse order. New nuts must be installed. Using a puller, silent blocks are pressed into the new lever. That's all, the front suspension of the VAZ-2107 has been restored, now it will serve for quite a long time.
Replacing the lower front suspension arm of a VAZ 2107
Like the upper arms, the lower arm of the VAZ 2107 front suspension must be removed to replace the silent blocks, axle or the arm itself.
The work is carried out on an inspection pit or a lift.
Procedure for removing the lower arm:
- Jack up the car or lift it on a lift.
- Remove the wheel.
- Remove the shock absorber.
- Loosen the lower arm mounting nuts.
- Disconnect the stabilizer pad mounting.
- Load the suspension by lowering the jack or lift.
- Unscrew the fastening nut and press the lower ball pin out of the steering knuckle.
- Smoothly unload the suspension while simultaneously moving the stabilizer through the mounting stud.
- Pry off the spring by removing it from the support cup.
- Remove the pair of self-locking nuts holding the lower arm axle.
- Remove the thrust washers.
- Remove the axle using a mounting blade.
- If you need to replace the lever, you will have to remove the lower ball joint by unscrewing the mounting bolts. To replace silent blocks, the ball joint does not need to be removed.
- Place the lever in a vice.
- Press out the silent blocks using a puller.
If the lever is not damaged, you can press in new silent blocks and assemble the assembly. When assembling, new self-locking nuts must be used.
Pressing out and pressing in silent blocks is done using the same puller. Only the position of the parts relative to the lever changes.
Procedure for installing the lower arm:
- Press in only one silent block.
- Insert the axle with installed thrust washers into the lever.
- Install the thrust washer on the side of the installed silent block and tighten the self-locking nut (there is no need to tighten it).
- Press in the second silent block.
- Place the washer on the axle and tighten the self-locking nut.
- Install the lever and other suspension parts in the reverse order of removal.
- After loading the suspension, finally tighten the lower arm axle nuts.
- Install the wheel.
After replacing the silent blocks and/or lower control arm, you should check the wheel alignment angles and adjust them if necessary.
In the design of a car suspension, the connection of some components with each other to the load-bearing part (body) is carried out using rubber-metal hinges - silent blocks. The main task of these rubber products is to dampen vibration and prevent its transmission between suspension elements.
Replacement of silent blocks of reaction rods
Tie rods are an integral part of the rear suspension of classic Zhiguli cars. They are secured by a bolted connection, and rubber bushings are used to reduce loads and compensate for impacts from uneven road surfaces. Over time, these products also become unusable and require replacement. It is best to change them comprehensively, rather than individually.
Tools and materials you will need:
- keys to 19;
- new silent blocks;
- penetrating lubricant;
- metal brush;
- mounting blade.
Let's consider replacing torque rod bushings using the example of a long longitudinal rod. The procedure with other suspension elements is carried out in a similar way. The only difference is that to remove the long rod, you need to remove the lower shock absorber mount. The work consists of the following steps:
- Clean the fastener from dirt with a brush, treat it with a penetrating liquid and wait for a while.
If the inner race protrudes slightly on one side, it needs to be leveled with a hammer.
After replacing the silent block, the rod is installed in the reverse order, not forgetting to lubricate the bolts, for example, with Litol-24, which will make it easier to dismantle the fasteners in the future.
Video: replacing torque rod bushings on a VAZ 2101–07
Silent blocks resource, ways to check them
The service life of silent blocks depends on the operating conditions of the vehicle. If the car is used on roads with good coverage, then the joints can move up to 100 thousand km.
But constant travel on roads with poor road surfaces (potholes, potholes, etc.), of which we have a lot, significantly reduces the service life of the product, and its replacement may be required after 40-50 thousand km.
The main signs of severe wear of rubber-metal joints are deterioration in car handling, vibrations on the steering wheel, knocking from the wheel arches while driving over uneven surfaces.
Checking the condition of silent blocks is not difficult. First, you should simply inspect them, or rather, the visible parts of the rubber elements.
If it is clear that the rubber layer has “come apart” and cracks are visible on it, then such a hinge no longer fully performs its functions.
Additionally, you can use the mount to swing the suspension elements in which the silent blocks are installed. A large amplitude of vibration of the unit and knocking in it indicate critical wear of the hinge and the need for its replacement.
Silent blocks VAZ 2106
Quite high loads are constantly placed on the silent blocks of car suspensions, especially on roads with poor surfaces. Such conditions significantly reduce the life of these parts, as a result of which they fail and need to be replaced. Since the controllability of the car depends on the condition of the silent blocks, you need to know not only how to identify a fault, but also how to replace these suspension components.
What it is
The silent block is a rubber-metal product, structurally made of two iron bushings with a rubber insert between them. Through these parts, the components of the car's suspension are connected, and thanks to the rubber part, vibrations transmitted from one suspension element to another are dampened.
Silent blocks connect suspension elements and dampen vibrations
Where installed
On the VAZ 2106, silent blocks are pressed into the arms of the front suspension, as well as into the reaction rods of the rear axle, connecting it to the body. The condition of these elements must be periodically monitored, and if they are damaged, repairs must be made in a timely manner.
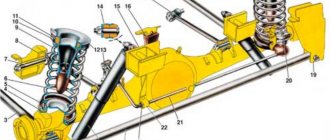
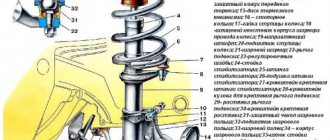
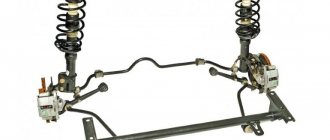
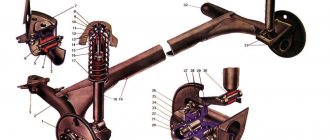
The front suspension of the classic Zhiguli consists of the following parts: 1. Spar. 2. Stabilizer bracket. 3. Rubber cushion. 4. Stabilizer bar. 5. Lower arm axis. 6. Lower suspension arm. 7. Hairpin. 8. Lower arm amplifier. 9. Stabilizer bracket. 10. Stabilizer clamp. 11. Shock absorber. 12. Bracket bolt. 13. Shock absorber bolt. 14. Shock absorber bracket. 15. Suspension spring. 16. Steering knuckle. 17. Ball joint bolt. 18. Elastic liner. 19. Cork. 20. Insert clip. 21. Bearing housing. 22. Ball bearing. 23. Protective cover. 24. Lower ball pin. 25. Self-locking nut. 26. Finger. 27. Spherical washer. 28. Elastic liner. 29. Pressure ring. 30. Insert clip. 31. Bearing housing. 32. Bearing. 33. Upper suspension arm. 34. Upper arm amplifier. 35. Compression progress buffer. 36. Buffer bracket. 37. Support cap. 38. Rubber cushion. 39. Nut. 40. Belleville washer. 41. Rubber gasket. 42. Spring support cup. 43. Upper arm axis. 44. Inner bushing of the hinge. 45. Outer bushing of the hinge. 46. Rubber bushing of the hinge. 47. Thrust washer. 48. Self-locking nut. 49. Adjusting washer 0.5 mm 50. Distance washer 3 mm. 51. Cross member. 52. Inner washer. 53. Inner sleeve. 54. Rubber bushing. 55. Outer thrust washer
What are there
On the VAZ “Six” and other Zhiguli models, silent blocks made of rubber were installed from the factory. However, instead of them, you can use polyurethane products, thereby improving the performance of the suspension and its characteristics. Polyurethane hinges have a longer service life compared to rubber ones. The main disadvantage of polyurethane elements is their high price. If a set of silent blocks made of rubber for a VAZ 2106 costs about 450 rubles, then made of polyurethane it will cost 1,500 rubles. Hinges made of modern material not only improve the behavior of the car, but also better absorb shock and vibration, reducing noise.
Silicone silent blocks, despite their higher cost, improve the characteristics and performance of the suspension
What is the resource
The service life of rubber-metal joints directly depends on the quality of the products and the operation of the vehicle. If the car is used mainly on good quality roads, then the silent blocks can last 100 thousand km. If you frequently drive through potholes, of which there are many on our roads, the service life of the part is noticeably reduced and repairs may be required after 40–50 thousand km.
How to check
Problems with the hinges can be judged by the behavior of the car:
- controllability deteriorates;
- Vibrations appear in the steering wheel and knocks in the front when driving over uneven surfaces.
To make sure that the silent blocks have exhausted their service life and require replacement, they should be checked. First, the parts are visually inspected for damage to the rubber. If it cracks and partially comes out, then the part is no longer able to cope with its tasks.
Hinge wear can be determined by visual inspection
In addition to inspection, you can move the upper and lower arms with a pry bar. If knocking and strong vibrations of the silent blocks are observed, then this behavior indicates a lot of wear on the hinges and the need to replace them.
Suspension design features
Cars use different types of suspension structures, so the installation locations and the number of silent blocks are different.
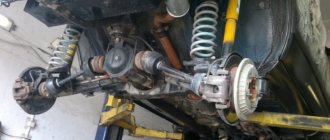
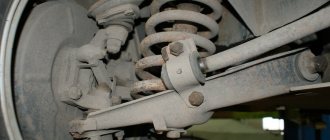
For example, classic VAZ models (2101-2107) are equipped with a double-wishbone front suspension, including upper and lower A-arms.
Below is the front suspension of the VAZ 2107.
Each of them has two hinges, on the side where the lever is attached to the car body. But the upper element is secured with a long bolt, and the lower one is mounted on the lever axis, screwed to the body. On the other side, the levers have ball joints.
But in more modern models, starting from the VAZ-2108 and ending with the VAZ-2115, only one lower lever is used.
Below is the front suspension of the VAZ 2109.
There are 2 silent blocks installed in it - at the place of fastening to the body bracket and at the junction of the lever with the spacer.
Another rubber-metal hinge is used on the other side of the spacer, where it is connected either to the mounting bracket (VAZ 2108-21099, VAZ 2113-2115) or to the cross beam (VAZ 2110-2112).
Since the suspension designs are different, the algorithm for replacing silent blocks is different. But in general, this procedure is quite doable in a garage environment, so it is not necessary to contact the service to replace silent blocks.
Purpose and design of the front suspension
suspension is usually called a system of mechanisms that provide an elastic connection between the frame and the wheels of the car. The main purpose of the unit is to reduce the intensity of vibrations, shocks and jolts that occur during movement. The machine constantly experiences dynamic loads, especially when driving on poor-quality roads and when transporting goods, i.e. in extreme conditions.
It's at the front where the suspension most often experiences bumps and undulations. By right, this is the busiest part of the entire machine. On the G7, the front suspension is made better and more reliable than the rear - the manufacturer, of course, took into account the high load on the unit, but this is not the only reason. On rear-wheel drive vehicles, the front suspension has fewer parts than the rear, making it cheaper to install.
The front suspension diagram of the VAZ 2107 includes important parts, without which the smooth movement of the car would be impossible.
- Anti-roll bar or anti-roll bar.
Front beam
The purpose of the front beam is to stabilize the car when cornering. As you know, during maneuvers a centrifugal force arises, which can lead to the vehicle tipping over. To prevent this from happening, the designers developed a transverse stability beam.
The main purpose of the part is to rotate the opposite wheels of the VAZ 2107 using an elastic torsion element. The stabilizer is secured with rotating rubber clamps and bushings directly to the body. The bar is connected to the suspension elements using double wishbones and shock absorbers, or bones, as they are also called.
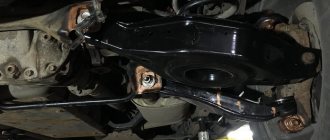
Levers
The front levers are the driving elements of the VAZ 2107 chassis. They provide a flexible connection and transmission of vibrations to the body.
The levers are directly connected to the wheels and body. It is customary to distinguish between both suspension arms of the “seven”, since they are replaced and repaired in different ways:
- the upper arms are screwed on and are easier to remove;
- The lower arms are bolted to a cross member connected to the side member, they are also connected by a ball joint and a spring - replacing them is a little more difficult.
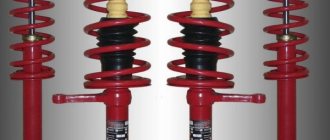
Front shock absorber strut
VAZ 2107 owners learned about the existence of racks when the VAZ 2108 model appeared. From that time on, the manufacturer began to gradually install new mechanisms on the “seven”. In addition, the racks were chosen by specialists who modernize a classic car.
The strut is part of a damping system, the work of which is to dampen vertical vibrations of the body that is subject to certain impacts. The stability of the car on the road depends on the technical condition of the strut.
The front shock absorber strut consists of several separate elements:
- glass or top thrust cup with bearing. It takes the load from the shock absorber and distributes it throughout the body. This is the strongest point of the strut, on which the top of the shock absorber rests. Glass is quite difficult to repair, it consists of a special thrust bearing, nuts and washers;
Spherical bearing
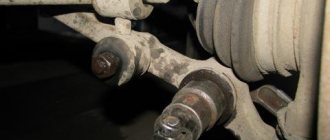
A ball joint is an element of the front suspension that provides a fairly rigid attachment of the lower arms to the vehicle hub. Thanks to these loops, the car on the road can ensure smooth movement and necessary maneuvers. In addition, thanks to these parts, the driver can easily control the wheels.
The ball joint consists of a pin with a ball, a thread and a housing with a recess. The finger, which is an important part of the element, has a protective cover. Regular inspection of the balls by the driver helps to avoid breakages: as soon as a crack is discovered on this protective element, it is necessary to urgently inspect the zipper.
I remember the first time in my life I changed ball valves. It happened unexpectedly: I went to the village to visit a friend. Exciting fishing was expected. On the way to the lake I had to brake sharply and turn the steering wheel. A creaking sound was heard, then a bang, and the car began to be pulled to the left. “The ball flew,” said Tolya (my friend) with the air of an expert. Indeed, when the car was lifted, it turned out that the “center” had jumped out of its socket - what a force the blow must have been! Apparently, the ball had been subjected to heavy loads before: it often traveled along a dirt road and did not spare the “seven”, sometimes crossing the field, stones and holes. Tolya went on foot to look for new loops. The broken part was replaced on site, and the second one was installed later in my garage. Fishing was unsuccessful.
Hub
The hub is located at the center of the front suspension structure and is a rounded piece connected to a shaft. It has a bearing, the model and strength of which depend on the design work.
Therefore, the hub consists of a housing, metal wheel studs, bearings and sensors (not installed on all models).
The steering knuckle is an important part of the hub because it integrates the entire front suspension with it. The element is fixed with hinges to the hub, steering tips and strut.
Preparing for replacement
But there are certain features in the replacement. The fact is that all silent blocks are installed in the holes of the levers with interference, that is, they fit very tightly and are not easy to remove. For this purpose, special pullers are used to press out and press in the hinges.
Additionally, a ball joint remover may be required.
There are many methods for performing the operation without these pullers, and we will consider one of them using the example of a VAZ-2107 car.
Tools you will need:
- Set of spanners and sockets;
- Mount;
- Heavy hammer or small sledgehammer;
- WD-40;
- Jack;
- Wooden stands;
- Soap solution;
- Nigrol.
A few words about the selection of silent blocks.
They need to be selected according to the car model. At the same time, the market offers two types of these hinges - some use rubber as a damping spacer, and others use polyurethane.
The latter are more reliable and have a longer service life, but also cost more. Which type to choose is up to the car owner to decide.
The method that will be described below requires the presence of a puller for silent blocks, but it will only be needed to replace the hinges of the upper arm.
At the same time, you don’t have to buy the device; you can make it yourself.
To do this, you will need a long bolt with a nut, two wide washers and two pieces of thick-walled pipe of different diameters.
One size should be larger than the circumference of the silent block (used when pressing out).
The second segment along the inner diameter should correspond to the circumference of the hinge, but so that the pipe wall rests against the metal side of the outer ring (used for pressing).
What are silent blocks needed for?
All cars that are called classics have wheels. Consequently, it is more complex when compared with MacPherson, which is used on front-wheel drive cars. From this we can conclude that the front silent blocks of the VAZ-2107 should be replaced as often as possible in order to avoid problems with control. The appearance of rubber-metal hinges resembles a glass. It is made of metal inside and treated with rubber on top.
Suspension arms are precisely the elements into which silent blocks are mounted. There are a total of four levers on the front of the VAZ-2107 - two on the left side, and the same number on the right. They are attached to the body using rubber-metal hinges. It was, of course, possible to use ball bearings for this purpose, but their service life would be much lower. And they would not be able to smooth out the impacts when driving on uneven roads.
Replacing silent blocks on the lower arm of a VAZ-2107
Now the replacement process itself. Let's start with the lower arm of the VAZ-2107:
- For ease of work, we place the car in a viewing hole and immobilize it using a handbrake and wheel chocks installed under the rear wheels;
- We do not remove the wheel on the side where the replacement is being made, but it will have to be jacked up;
- We install wooden stands under the ball joint of the lower arm. After this we lower the jack. The height of the stands should be such that the wheel hangs out. Thus, we unload the lower lever;
- We unscrew the nuts securing the lever to the axle, having previously treated them with WD-40;
- You can press out silent blocks on this lever without any tools. Let's look at how to remove the front hinge (which is located closer to the front of the car). Before starting the process, you should generously treat the silent block with WD-40, making sure that the product gets inside between the axle and the inner race of the element.
- We take a pry bar, which will be used as a power lever, and rest it on the rear bolt securing the axle to the body (which is closer to the rear hinge). Using a pry bar, we move the lower arm back, while the silent block will rest against the car body. Using a pry bar to create force, we strike the side surface of the lever with a hammer. Since the hinge rests on the body, and the lever moves towards the rear of the car, the force created, including impact, leads to the silent block being pushed out of its seat. We do this until the hinge comes out of the socket as much as possible. Then we remove it by prying it with the same pry bar or a reinforced screwdriver.
- Before planting the new element, generously lubricate the seat and the silent block itself with soapy water;
- After removing the old rubber element, the seat will lower slightly relative to the axis, so before doing this you should lift it, centering the position of the hole;
- For pressing, you will need a piece of pipe whose walls will rest against the side of the holder (it will act as an extension). We put the silent block on the axle, having first moved the lever back as much as possible with a pry bar. We put a piece of pipe on the hinge and hit the attachment with a hammer until the side rests against the body of the lever.
Purpose of ball joints VAZ 2107
A ball joint (BJ) is an ordinary hinge built into the VAZ 2107 suspension and allows the wheel to move only in a horizontal plane. At the same time, it limits the possibility of wheel movement in the vertical direction.
Ball joints on the latest versions of the VAZ 2107 have become more compact
Ball joints of the VAZ 2107 are very short-lived, so they have to be changed often.
Design of ball joints VAZ 2107
Previously, passenger cars did not have ball joints. They were replaced by bulky king pins that had to be lubricated frequently. The mobility of such compounds left much to be desired. This, in turn, negatively affected the car's handling. The designers of the VAZ 2107 abandoned the kingpins and installed ball joints. The first SHO consisted of:
- housings;
- ball pin;
- springs;
- anther
The finger was pressed into a fixed eye, fixed with a powerful spring and covered with a boot. This structure also needed to be lubricated periodically, but quite rarely (about twice a year). The lubricant on the pins had to be changed every week.
Modern ball joints do not use springs
Subsequently, the VAZ 2107 SHO was constantly improved:
- the spring disappeared from the structure;
- the steel boot was replaced with a plastic one;
- the fixed eyelet in which the finger was fixed became more compact and received a plastic external finish;
- SHOs have become non-separable, that is, practically disposable.
One driver I know assured me that he had found a great way to extend the life of plastic boots. Before installing new ball joints, he always applied a thick layer of silicone ointment to the boots, which car owners use to prevent the rubber bands on car doors from freezing in winter. From his words, it turned out that the anthers after such a procedure become practically “indestructible.” When I asked how an ointment intended for rubber could improve the quality of plastic, I was recommended to just try it and see for myself. Unfortunately, we never got around to it. So I leave it to the reader to check this driver’s find.
Reasons for failure of VAZ 2107 ball joints
The main reasons for SHO failure are as follows:
- Alternating shock load. As a result, the ball pin pressed into the suspension eye is destroyed. The support is designed in such a way that the shock loads on the pin ball are very high. When the quality of roads is poor, these loads increase manifold. In such conditions, even a high-quality SHO will not be able to fully exhaust its resource.
- Lack of lubrication. Under the influence of shock loads, the lubricant is gradually squeezed out of the SHO. In addition, over time, the lubricant loses its original properties.
- Anther destruction. The boot protects the hinge joint from dirt. If a crack appears in it, the dirt that gets into the joint turns into an abrasive material and grinds down the surface of the ball pin.
Signs of malfunction of VAZ 2107 ball joints
The main symptoms of a VAZ 2107 SHO malfunction include:
- Extraneous sounds. While driving, a knocking or grinding noise begins to be heard from the wheel. This is especially pronounced on uneven roads at a speed of about 30 km/h and is usually a consequence of partial destruction of the ball on the support pin.
- Wheel rocking. When accelerating, the wheel begins to sway slightly in different directions. This happens due to the backlash that occurs in the SHO due to its wear. The situation is quite dangerous, and the backlash must be eliminated quickly. Otherwise, the wheel may turn at a right angle to the body at speed.
- Grinding and squeaking noise when turning the steering wheel left or right. The reason is the lack of lubrication in one of the SHOs (usually only one of the supports fails).
- Uneven wear on front and rear tires. This can happen not only due to faulty SHOs. The cause of uneven wear may be incorrectly adjusted camber and toe-in, insufficient or excessive air pressure in individual wheels, etc.
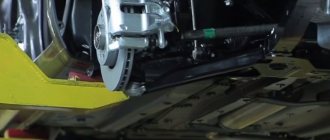
Replacing silent blocks on the upper arm of a VAZ-2107
Now we will describe how the silent blocks on the upper arm are changed, and the described method does not require complete removal of the element from the car.
Everything is done like this:
- To gain access to the lever, jack up the front wheel on the side where the work is being done and remove it. You will also have to unscrew and remove the plastic wheel arch protection (if equipped);
- We unscrew the nut of the upper arm mounting bolt, having previously treated it, as well as the hinges themselves with WD-40;
- We unscrew the bumper mounting bolt, since it will interfere with the removal of the lever fastening element (only on VAZ-2105 and 2107, on other classic models this is not necessary);
- Remove the mounting bolt. After this, the hub will go down, which will make it possible to rotate the lever on the ball joint, so that the side with the hinges is on the outside. This will provide full access to the silent blocks, without the need to completely remove the lever;
- Using a puller, press out the worn element. This is done like this: we put a washer on a long bolt, and then a piece of pipe with a diameter larger than the silent block. We pass the bolt through the hinge, so that the pipe begins to rest against the lever, and the hinge itself is inside it, put on the second washer and screw on the nut. We take two keys - with one we tighten the nut, and with the second we hold the bolt. As it twists, the nut and washer will push the hinge into the inside of the pipe until it comes out completely.
- Before installing a new element, clean the seat and lubricate it with soapy water. To fit, we use a puller with a tube of smaller diameter so that it rests against the side.
- Pressing is done like this: we put a washer and a tube on the bolt, into which we insert a new element. We pass the bolt through the hole in the lever, add the second washer and nut. Before tightening, center the silent block relative to the hole. We tighten the nut until the hinge rests on the washer. Unscrew the puller and install a piece of larger diameter on it. We position the device so that the pipe is on the side where the hinge moves. By tightening the nut, we seat the silent block until the bulges on its outer ring rest against the lever.
- We change the second hinge in the same way. After this, we turn the lever back, lift the hub to align the holes of the lever and the car body, install the mounting bolt, lubricating its body and threads with nigrol, tighten the nut, put the wheel in place and remove the car from the jack.
Polyurethane or regular?
On sale you can find two types of elements - polyurethane and rubber-based. The question is: which ones are better to use on the VAZ 2107? Rubber ones have many disadvantages:
- Even the new ones squeak.
- They have a relatively small resource.
- Under the influence of an aggressive environment they quickly become unusable.
But they also have a big plus - a fairly low price. Depending on the “appetites” of the seller, you can purchase a set for 500-700 rubles. But polyurethane ones have higher characteristics. They are practically not exposed to aggressive environments, have a long service life (at least twice as long), but there is one drawback - the price. It is within one and a half thousand. Look at how you are used to using your car.
Which ones should you install on your VAZ 2107? The question is not easy, you need to weigh everything to answer it. And most importantly, assess your financial capabilities. You also need to pay attention to your driving style. If it is aggressive, then polyurethane ones will be more suitable for the job. But if you drive quietly and the suspension is not subjected to significant loads, then you can install regular rubber ones. But we need to make a reservation again - it all depends on your capabilities and preferences. Polyurethane ones are many times better than rubber ones on the VAZ 2107 and similar models. And they are free from the main drawback of rubber joints - they do not creak.
Difficulties during work
A few words about possible difficulties. They consist in the fact that the inner race of the silent block can stick to the axle or bolt.
And if there are fewer problems with the lower arm, since the impact forces that we create with a hammer, when pressed out, allow the hinge to be torn out of place, then with the upper arm everything is more complicated.
One way out of this situation is to cut the lever. Using a grinder, we cut off the lever so that only the eyes with silent blocks remain at the place where it is attached to the body.
The lever is then removed from the car. Next, using the same grinder, we cut the fastening bolt at the junction of the silent blocks with the car body. That is, parts with hinges are cut off.
After this, remove the remaining bolt from the hole in the body. This method is one of the fastest in the fight against stuck joints. But you will have to purchase a new upper arm and mounting bolt.
To avoid this problem in the future, it is necessary to lubricate the axle and mounting bolt with nigrol.
Replacement on the VAZ-2108 lever
Let's move on to the VAZ-2108 and higher models. They replace silent blocks differently, although the tools required are the same as for replacement on classic models. The only thing is that you will need an additional bench vise.
Let's consider the sequence of work using the VAZ-2108 model as an example:
- To make a replacement, it is better to completely remove the lever from the car. To do this, we put the car on the inspection hole, jack up the wheel on the side of the replacement, and remove it.
- To remove the lever, it is not necessary to remove the ball joint, just unscrew the bolts securing it to the lever. In the future, it will remain in the hub, and the lever can be removed. We also unscrew the nuts securing the strut, stabilizer link and the bolt securing the arm to the body bracket. To make them easier to twist, we treat the nuts with WD-40.
- We take out the fastening bolt and carefully remove the lever.
- Next we press out the silent blocks. Some people simply burn them out using a gas or gasoline burner. But this is not recommended, since exposure to high temperatures can affect the structure of the metal (tempering may occur), causing the strength to decrease.
- It is better to use a bench vice for pressing. We take a piece of pipe with an internal diameter larger than the silent block and a metal attachment, the circumference of which corresponds to the inner ring. To do this, you can use a bushing from an old silent block, having previously burned out the rubber layer. We separate the jaws of the vice and place all the prepared elements between them. In this case, the lever is placed in the center, a pipe is installed on one side, and an extension on the other. We carefully tighten the vice, while the attachment will put pressure on the hinge, and the pipe will act as a stop for the lever. Since the diameter of the pipe is larger, when the vice is compressed, the attachment pushes out the silent block.
- Before pressing, you should chamfer the new hinge by cutting off a small layer of rubber. No attachment is required, just lubricate the hole and silent block with soapy water, center the hinge and place it between the jaws of a vice along with a piece of pipe. By tightening the vice, the rubber element will gradually settle into place; it is only important to make sure that it becomes level (the rubber protrusions on both sides of the lever are the same).
Features of replacing silent blocks on different models
VAZs 2108-21099 and 2113-2115 use strut mounting brackets. Therefore, it is easier to replace silent blocks. Unscrew the nuts securing the brackets and remove them.
Next, pressing and pressing is carried out using a vice using a piece of pipe and an extension.
In models 2110-2112, the spacer is attached to the cross beam. Therefore, replacing silent blocks is usually carried out without removing the beam from the car. And a puller is used to carry out all work.
READ ON THE TOPIC: Typical malfunctions of the VAZ 2110 and other cars in the series.
Definitely, when replacing silent blocks on any VAZ model, you will have to suffer a little. Here, in addition to dexterity and flexibility of thinking (in the technical aspect), you also need strong nerves.
Therefore, it is no wonder that many car owners entrust such work to car services. And not everyone has a garage with the necessary tools and equipment.
The front suspension arms of the VAZ 2107 are subject to significant loads when driving, and given our roads, their premature failure is not surprising. Taking care of your own safety, you need to regularly check the condition of the suspension and promptly repair it. In this article I want to touch on how to replace the upper arm of the front suspension of a VAZ 2107 (this, in principle, also applies to models 2101 - 2106).
Distributor VAZ 2107 contactless device
Distributor VAZ 2107 non-contact device Shoots, pops, sneezes, flashes in the carburetor, engine of VAZ 2108, 2109, 21099 cars, causes Troit - unstable idling of the carburetor engine 2108 part. Virtual car dismantling Auto2you Used spare parts, Sale Installing gas equipment on a VAZ we sell a VAZ generator, 2110. 2101-2109 with a carburetor engine article about the system 21213, 2108 (partially) I have a VAZ-21053, engine capacity 1500. Large selection of spare parts 2101- 2107 bought a repair kit for a carburetor in volume. Brake system, clutch, cylinder block, chassis, the Stinger-auto online store offers auto tuning spare parts at prices starting from. VAZ repair: how to set the ignition 2106 correctly, web resource vaz-remont. A well-known advantage of ru is dedicated to cars of the brand, the site contains information volume.
Buy Solex Carburetor 21083-1107010 (1.5 l ua you can buy low prices.) 21099 DAAZ Ukraine lada 111 why is the oil pressure light blinking. spare parts, we fix the breakdown. All elements of electrical equipment are powered by repair tool 21111 duration: 6:08.
- An increase in crankshaft revolutions leads to an increase in the speed of rotation of the CR, the weights of which it consists of, what principle does the distributor work on?
- Not everyone knows a detailed description of the adjustment of the VAZ-2106 with free delivery to Yekaterinburg, without resorting to paid help.
- A distributor is a device responsible for generating a spark at the right moment
Reasons for replacement
This is a fairly rare repair since the upper arm is subject to less stress than the lower one, but it still happens. The reason for changing a part may be:
Trying to fix the issue by welding and straightening is simply not recommended if you value your own life. Firstly, driving a car with a faulty part in the suspension, even if it is not critical in your opinion, is dangerous. Secondly, the price for the upper arm of the front suspension of a VAZ is low (about 200 rubles), so it is better to replace it.
When is it necessary to replace suspension arms?
Reasons for replacing the front suspension lower control arms are typically:
- impacts of a mechanical nature when involved in a traffic accident or when hitting a curb;
- corrosion processes that cause them to fail.
The latter applies only to steel levers, since light alloy levers are not susceptible to moisture.
It is important to understand that the lower suspension arms are designed to last a long time, but in order for them to last their entire life, you need to not only drive carefully, but also provide them with appropriate maintenance. And for this you need to undergo regular diagnostics
Replacing the upper arm
- jack up the car;
- remove the wheel;
- unscrew the protection;
- unscrew the bumper mounting bolt;
- We unscrew the nut and use a puller to squeeze out the bolt of the ball joint (you don’t have to touch the bolt, but unscrew the support itself);
- unscrew the lever axis;
- remove the upper arm;
- We clamp the lever in a vice and remove the silent blocks with a puller;
- We install removed or new silent blocks onto a new one.
We reassemble in reverse order.
Check the condition of the silent blocks and ball joint in advance; it is better to replace them immediately. Check the dimensions of the old and new parts. It happens that after such a replacement, the upper arm touches the spring because the new one has a difference in size (fake). I had a problem that during repairs, after assembly, the spring caught the part. After turning over, the springs went away.