The chassis of the VAZ 2114 includes two suspensions - front and rear. When driving a car, a large load is applied to the chassis, therefore the level of comfort and safety of the driver, his passengers and the transport around you directly depends on the condition of the suspension.
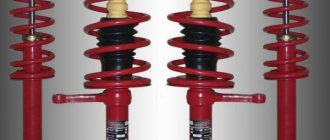
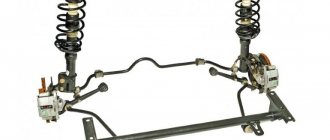
Rack kit
Each suspension performs the same role - it eliminates all kinds of vibrations and makes the ride softer. Plus, it is responsible for reducing roll when entering corners. Trips become smoother and more accurate.
Considering the quality of our roads, the cars really are not to be envied, since the front suspension of the VAZ 2114 experiences incredible loads, just like the rear.
Some people prefer the services of service centers, others do their own VAZ 2114 suspension repairs. What exactly you choose is up to you. Let's just say that on such a car, repairing or replacing suspension elements yourself is not as difficult as it might seem at first glance.
Today we will look at the design of the front suspension of the VAZ 2114, as well as the nuances of replacing it. We will go a similar way with the rear suspension.
Front suspension device
Suspension type: independent, telescopic. Let's take a closer look at the main components and elements that make up the front suspension of the VAZ 2114.
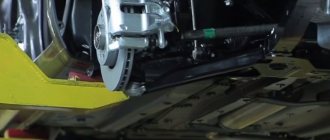
- The basis is the main rotating support element - the front pillar. Assembled into a single unit with a cylindrical spring, a swivel bearing, and upper and lower support cups. The strut is attached to the steering knuckle of the hub with the lower bracket, secured to the body with three bolts at the top and rests against the glass with the upper cup. Has a steering knuckle for attaching a tie rod pin.
- Front hub assembly with ball joint, double row bearing, brake disc and caliper. The ball joint is fixedly screwed to the lower suspension arm, the support pin is inserted into the seat at the bottom of the hub and screwed with a nut.
- The lower suspension arm is attached to a brace, which is attached at both ends to the body side member using two brackets. On one side of the brace there is an attachment point for the anti-roll bar, in which one end is fixed. The second end of the stabilizer is fixed to the suspension extension of the second front wheel, thus connecting them together.
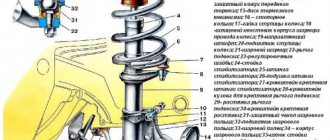
Front suspension diagram for VAZ 2114
The front suspension diagram is shown in Fig. 1. The front chassis works according to the following principle: a strut with a spring plays the role of a supporting and at the same time shock-absorbing element for the front wheel. The stretcher and the lower arm support the entire assembly from below and prevent it from moving along the axis of the car.
The wheel is turned by a steering rod, which pulls the eye on the stand and turns the entire assembly, while at the top it turns on a support bearing, and at the bottom on a ball joint. The anti-roll bar ties the suspension on both sides together and makes it work in sync.
Levers
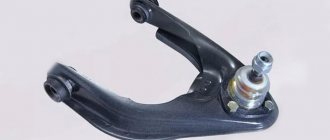
At the front, the VAZ-2114 uses independent wishbone suspension. These elements ensure the transmission and absorption of shocks that occur when the car hits an uneven surface. The front suspension arms of the VAZ-2114 are made of high-strength steel XK-60, so they can easily withstand high loads.
The element is attached with one part to the ball joint, and the other to the body on a bracket. Levers do not have a specific resource. Some don't change them for decades.
Therefore, you need to navigate based on the signs. The main symptom is delamination of rubber on a metal bushing.
Also, the lever must be replaced in case of a serious collision with a hole (in which the disk was bent) and after an accident. Otherwise, due to deformations, there will be problems with wheel alignment, as well as constant tire waste. How is the front suspension repaired on a VAZ-2114?
Usually the entire lever changes, as does the strut. The cost of a new element is from 700 to 1 thousand rubles. The lever is interchangeable with the first generation Lada (that is, the “nine”).
[custom_ads_shortcode2]
Rear suspension
The diagram of this node includes a total of 16 elements:
- Rubber-metal hinge (it serves as the main fastener to the body);
- Bracket. It secures the rear suspension arm to the body;
- Shock absorber housing;
- Compression stroke load buffer;
- Housing cover;
- Support washer;
- Shock cushion;
- Spacer sleeve;
- Solid spring;
- Shock absorber;
- Beam lever;
- Insulation gasket;
- Lever connection element;
- Flange;
- Rack bracket;
- Lever bushing.
Disassembly and replacement
Dismantling is carried out according to the following scheme.
- The machine is driven into a viewing hole or raised using a lift.
- In the trunk, the lining and the belt reel are removed. There is also a fastener for the struts to the body, which is simply loosened a little. There is no need to unscrew it.
- Now the rear wheel pair fasteners are loosened. To do this, the caps are removed and the wheels are dismantled. Make sure that the jacks hold the car properly.
- Remove the brake cables. Here you need to unscrew the cable fasteners to the suspension arms and body. Next, the brake drum is removed, and the cable ends are removed through the manual drive lever. Do not forget to unscrew the flanges from the brake flaps at the same stage.
- At the next stage, the pipes and hoses from the brake system are removed and the drive lever is dismantled. It is used to operate the pressure regulator. To remove the lever, the bracket is disconnected by removing the washer and removing the earring from the wheel axle.
- After this you can disconnect the shock absorbers. Remove the rubber cushions, unscrew the fastening nuts and remove the washer from the body. Next, stops are placed under the front wheels and the rear part rises slightly. This will allow you to remove the buffer, springs and shock absorber housing.
- By unscrewing the body mounting bracket, you can dismantle the entire beam. This gives you full access to the rear suspension and struts. This even allows you to disassemble the shock absorbers themselves, replace them with new ones, and lower the VAZ 2114. Although, given the quality of our roads, this is not recommended. Do not forget that to remove the shock absorber, or rather the springs, you need to use special ties. If you don't have them in your garage, you may be seriously injured if you try to dismantle them without these tools. The spring is under high pressure, so it can easily jump out and cause injury to you.
Kinds
There are three types of A-pillars that are suitable for installation on the VAZ 2114.
- Oil comfortable. If you like a quiet, measured ride, choose oil ones. They are installed on Samara 2 from the factory. They smooth out bumps on the roads well, but at high speeds they behave unstably and the car can sway violently.
- Gas-oil. An average solution that will allow you to ride comfortably at low speeds, but at the same time enjoy a sporty driving style if necessary. The best option for the average driver.
- Gas. If you love tuning and huge speeds, then your choice is exclusively gas struts. But get ready for the fact that every bump and unevenness will be felt under you. In urban conditions, such spare parts will not last long. These are rather track solutions for the corresponding tuned versions of the “fourteenth” model. By installing short-travel struts on a VAZ 2114, you can achieve better aerodynamics and downforce by lowering the suspension. Short strokers are a device with limited rebound travel, in short.
Repair of the front suspension stabilizer of VAZ-2114
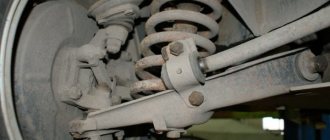
This element of the front suspension of the VAZ-2114 is designed to reduce the roll of the car when cornering. The part does not have a complex structure and consists of a flexible beam, as well as a pair of silicone silent blocks. The element has a small stroke, which ensures vehicle stability on the road.
Attached to the front side members with the central part. The side parts are connected to the suspension arm on the “knuckles”. The stabilizer has a long service life - more than 100 thousand kilometers. Usually it is the silent blocks that fail. But to replace them you need to remove the stabilizer completely. Below we will tell you how to do this.
If your car has lost its former maneuverability and strange noises have appeared in the front end, inspect the condition of the stabilizer. Perhaps the silent blocks in it have worn out. How to replace them? To do this you need:
- raise the front of the car;
- remove the bolts securing the struts from the right and left wheels;
- remove the bracket fixing nuts;
- remove the stabilizer assembly.
Which racks to choose?
You shouldn’t delay repairing the breakdown, because... This rear suspension unit of the vehicle ensures body stability. There are many options in spare parts stores from different companies. Leaking liquid means a complete failure of the element, but in some cases it is possible to pump old parts. For better results, you need to install new spare parts.
For those who like to save on spare parts, there is an option from Patron with article number PSA341824. The price of the stand from Patron is only 1300 rubles. There is no need to talk about the quality of the product. There are a lot of reviews that say that they can withstand no more than 10,000 kilometers.
Disassembling and replacing the front suspension: instructions
- The VAZ 2114 is installed on a viewing hole or raised on a lift. The car must be set to the parking brake. It is necessary to remove the wheel caps, loosen the mounting bolts and unscrew the hub nut. Having secured the front of the car, you can remove the front wheels.
- Next, you need to remove the ball joint pin, which is located in the swing arm of the front strut. The next step is to remove the front stabilizer link (number “24”) from the front suspension arm (number “22”). Next, the stretch marks from the body (30) are removed. Next, you need to completely disconnect the ball joint that is attached to the steering knuckle.
- Now you can remove the front suspension arm. To do this, you need to disconnect it from the body bracket (28). Afterwards the lever is removed along with the bracket and the extension (29, 30). It is also necessary to remove the bolts that secure the pads to the steering knuckle.
- In front of the driver there will be a caliper assembly. To avoid problems with it, you do not need to completely remove it; you need to hang the caliper on a hook in such a way that there is no load on the main hose. The next step is to press the spline shank out of the front wheel hub.
- From the side of the engine compartment, you need to remove the protective fist (“41”). To do this, unscrew the telescopic strut nuts and then remove the solid front suspension strut. It should be together with the wheel hub and steering knuckle. The other front suspension strut is removed in the same way. Next, the racks are removed from the rod.
When removing the bolts that secure the ball joint to the steering knuckle, you must use a socket wrench. Otherwise, the protective cover of the hinge may be seriously damaged, resulting in additional costs.
In the case of the front suspension, its assembly proceeds in the reverse order, with the exception of a few features. When installing the mounting bracket to the VAZ 2114 body, you need to make sure that the threads of the bushings are not damaged. To do this, you must perform operations carefully. Also, longitudinal displacement of the cushions on the bar must not be allowed. This can happen during installation of the anti-roll bar.
What's included in the front suspension?
The front suspension of the VAZ-2114 consists of many elements, but many motorists have encountered repairing them individually, and not as a whole system. The front suspension assembly is replaced if the car is involved in a traffic accident and almost all of its elements are destroyed.
So, it’s worth considering what the car’s front suspension consists of, to see what elements are included.
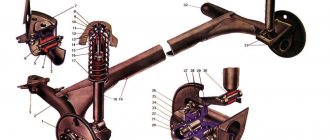
Vehicle suspension device
Design and decoding of VAZ-2114 suspension elements:
1 – upper support of the telescopic stand; 2 – upper support cup; 3 – compression stroke buffer with protective casing; 4 – compression buffer support; 5 – suspension spring; 6 – lower spring support cup; 7 – steering rod ball joint; 8 – steering knuckle; 9 – telescopic stand; 10 – eccentric washer; 11 – adjusting bolt; 12 – rack bracket; 13 – steering knuckle; 14 – front brake protective cover; 15 – brake disc; 16 – retaining ring; 17 – wheel hub nut; 18 – splined shank of the wheel drive hinge housing; 19 – guide pin; 20 – wheel hub bearing; 21 – ball joint; 22 – suspension arm; 23 – adjusting washers; 24 – stabilizer strut; 25 – stabilizer bar; 26 – stabilizer bar cushion; 27 – stabilizer bar mounting bracket; 28 – body bracket for mounting the suspension arm; 29 – suspension arm extension; 30 – bracket for fastening the extension; 31 – protective cover of the ball pin; 32 – ball pin bearing; 33 – ball pin; 34 – ball pin body; 35 – suspension strut rod; 36 – outer body of the upper support; 37 – inner body of the upper support; 38 – upper support bearing; 39 – rubber element of the upper support; 40 – travel limiter of the upper support; 41 – protective cap of the upper support; B - zone for monitoring the suspension joint.
Individual elements of the front suspension
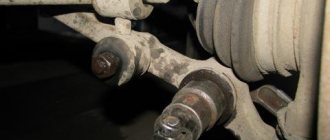
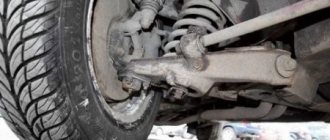
Front suspension elements
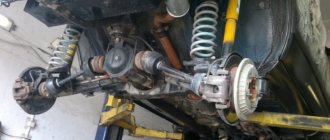
Front suspension view from below
As can be seen from the figure above, the suspension is quite simple, but all elements are interconnected and for repair and replacement, it is often necessary to disconnect other parts. Therefore, we will consider the main elements of the front suspension separately, and also indicate the main purpose of the part.
Front shock absorber strut
Front shock absorbers
The front shock absorber or front suspension strut is one of the main elements. This part provides shock absorption and absorption of uneven road surfaces. Also, it bears all the force that is in the car, including the load.
Usually, if this element is frequently loaded or incorrectly replaced, it has an increased degree of wear. Therefore, all motorists need to know the structure and operating rules of the shock absorber strut.
Let's look at how the shock absorber strut is designed, as well as all the structural elements:
Knocking noise at high speeds.
The reason why a knocking sound appears in the engine at high speeds is detonation. Detonation is the process of combustion of the fuel mixture in the cylinder earlier than expected. As is laid down in the operating principles of any automobile internal combustion engine, all work is based on 4 strokes. Ignition of the fuel must occur strictly at a certain point in time. Sometimes, ignition occurs ahead of time, that is, before a spark appears on the spark plug. At this moment, detonation occurs and, as a result, the engine knocks at high speeds under load.
Detonation can occur for several reasons
- low octane fuel
- early ignition
- unsuitable spark plugs
- heavy carbon deposits in the cylinders
Detansion is the main enemy of an engine, and especially an engine with a turbine.
How to determine detonation?
If you have a knocking sound in the engine that is expressed by a loud and ringing sound when you gain speed, then this is detonation. It appears when the engine is spinning up, and under heavy loads on it. Cases when detonation occurs:
- During acceleration (at high speeds)
- When climbing uphill or when driving with a heavy load
- When the gear is too high for the current speed
Rear suspension
The diagram of this node includes a total of 16 elements:
- Rubber-metal hinge (it serves as the main fastener to the body);
- Bracket. It secures the rear suspension arm to the body;
- Shock absorber housing;
- Compression stroke load buffer;
- Housing cover;
- Support washer;
- Shock cushion;
- Spacer sleeve;
- Solid spring;
- Shock absorber;
- Beam lever;
- Insulation gasket;
- Lever connection element;
- Flange;
- Rack bracket;
- Lever bushing.
Disassembly and replacement
It is necessary to completely disassemble the rear suspension on the VAZ 2114 in cases where you want to fully lubricate the elements or replace some of them.
Dismantling is carried out according to the following scheme.
- The machine is driven into a viewing hole or raised using a lift.
- In the trunk, the lining and the belt reel are removed. There is also a fastener for the struts to the body, which is simply loosened a little. There is no need to unscrew it.
- Now the rear wheel pair fasteners are loosened. To do this, the caps are removed and the wheels are dismantled. Make sure that the jacks hold the car properly.
- Remove the brake cables. Here you need to unscrew the cable fasteners to the suspension arms and body. Next, the brake drum is removed, and the cable ends are removed through the manual drive lever. Do not forget to unscrew the flanges from the brake flaps at the same stage.
- At the next stage, the pipes and hoses from the brake system are removed and the drive lever is dismantled. It is used to operate the pressure regulator. To remove the lever, the bracket is disconnected by removing the washer and removing the earring from the wheel axle.
- After this you can disconnect the shock absorbers. Remove the rubber cushions, unscrew the fastening nuts and remove the washer from the body. Next, stops are placed under the front wheels and the rear part rises slightly. This will allow you to remove the buffer, springs and shock absorber housing.
- By unscrewing the body mounting bracket, you can dismantle the entire beam. This gives you full access to the rear suspension and struts. This even allows you to disassemble the shock absorbers themselves, replace them with new ones, and lower the VAZ 2114. Although, given the quality of our roads, this is not recommended. Do not forget that to remove the shock absorber, or rather the springs, you need to use special ties. If you don't have them in your garage, you may be seriously injured if you try to dismantle them without these tools. The spring is under high pressure, so it can easily jump out and cause injury to you.
Signs of breakdown
It is often stated that the front struts on a VAZ 2114 can last about 60 thousand kilometers. In fact, the figure is not entirely fair, since under the conditions of our roads it is significantly reduced. Sometimes even twice.
Therefore, the car owner’s task is to monitor the condition of the suspension and front struts in particular, identify signs of breakdown in time and replace the units.
Worn out
If your racks are really reaching the end of their service life, you can determine this by the following signs:
- The car behaves unstably on the road;
- When driving over obstacles, the car sways strongly;
- When entering turns and braking, the car is unstable;
- The braking distance increases noticeably;
- There are traces of oil on the body;
- There is a noise or knocking noise from the front of the car.
Some, even with such obvious signs of malfunction, continue to ignore the car’s need to replace the front struts. If you do not take any action, the consequences may be as follows:
- The car will bounce on every bump;
- Controllability in corners will decrease significantly, the car will pull to the side and turn around;
- Tires will lose their quality and wear out in the shortest possible time;
- Soon you will have to go to the wheel alignment.
If the replacement of the front struts on the VAZ 2114 is carried out in a timely manner, these problems and huge financial costs can be avoided.
Principle of operation
This is how the front wheel suspension on the VAZ-2114 is designed.
The system itself works on the following principle - the strut and spring act simultaneously and act as a supporting and shock-absorbing element for the car. Through the use of braces and levers in the system, support is provided for the entire assembly in its lower part. The system is also kept from moving in the longitudinal axis of the car body. The drive wheels can be turned using steering rods - when turning the steering wheel, they pull on special ears located directly on the racks. The entire assembly rotates completely.
Its upper part rotates due to the support bearing, and the lower part rotates due to ball joints. Thanks to the presence of a stabilizer in the system, the front suspension of the VAZ-2114 is connected together and can work synchronously.
Spherical bearing
This is another important element in the suspension design. The ball joint is a balancer that bears all the load and heaviness of the front part of the body. Therefore, the part wears out much more often than the shock absorber strut and levers.
It is worth noting that the ball is not only the fulcrum of the entire suspension, but also the turning mechanism. Thanks to it, the front wheels are controlled by means of a rack, rods and a fist.
If you do not monitor the serviceability of the element, it may fall out. Because of this, serious consequences are possible - the wheel simply breaks out of its fastenings while driving, and the car loses controllability. At the same time, other suspension elements are damaged and cannot be restored:
- constant-velocity joint;
- rounded fist;
- levers;
- stand and its fastening elements.
In other words, the car will need a complete front suspension replacement. The VAZ-2114 will undergo expensive and lengthy repairs. Therefore, at the first sign, this part needs to be changed.
[custom_ads_shortcode1]
Rear suspension
The diagram of this node includes a total of 16 elements:
- Rubber-metal hinge (it serves as the main fastener to the body);
- Bracket. It secures the rear suspension arm to the body;
- Shock absorber housing;
- Compression stroke load buffer;
- Housing cover;
- Support washer;
- Shock cushion;
- Spacer sleeve;
- Solid spring;
- Shock absorber;
- Beam lever;
- Insulation gasket;
- Lever connection element;
- Flange;
- Rack bracket;
- Lever bushing.
Disassembly and replacement
Dismantling is carried out according to the following scheme.
- The machine is driven into a viewing hole or raised using a lift.
- In the trunk, the lining and the belt reel are removed. There is also a fastener for the struts to the body, which is simply loosened a little. There is no need to unscrew it.
- Now the rear wheel pair fasteners are loosened. To do this, the caps are removed and the wheels are dismantled. Make sure that the jacks hold the car properly.
- Remove the brake cables. Here you need to unscrew the cable fasteners to the suspension arms and body. Next, the brake drum is removed, and the cable ends are removed through the manual drive lever. Do not forget to unscrew the flanges from the brake flaps at the same stage.
- At the next stage, the pipes and hoses from the brake system are removed and the drive lever is dismantled. It is used to operate the pressure regulator. To remove the lever, the bracket is disconnected by removing the washer and removing the earring from the wheel axle.
- After this you can disconnect the shock absorbers. Remove the rubber cushions, unscrew the fastening nuts and remove the washer from the body. Next, stops are placed under the front wheels and the rear part rises slightly. This will allow you to remove the buffer, springs and shock absorber housing.
- By unscrewing the body mounting bracket, you can dismantle the entire beam. This gives you full access to the rear suspension and struts. This even allows you to disassemble the shock absorbers themselves, replace them with new ones, and lower the VAZ 2114. Although, given the quality of our roads, this is not recommended. Do not forget that to remove the shock absorber, or rather the springs, you need to use special ties. If you don't have them in your garage, you may be seriously injured if you try to dismantle them without these tools. The spring is under high pressure, so it can easily jump out and cause injury to you.
Front suspension device
The main element of the front chassis of the VAZ 2114 is the shock absorber strut, which is designated as number “9”. It is attached to the steering knuckle with two bolts. Compared to the rear system, the front suspension has a more complex design, which can be understood by the number of parts. Number “11” indicates a bolt that passes through the holes of the rack bracket; it has an eccentric washer and an eccentric collar. When the steering gear turns, the top bolt turns. The result is that the car turns. Most often, shock absorber struts fail, since they do the main job.
Malfunctions and solutions
Knowing the running gear, you can do the repairs yourself. When driving, the heaviest load falls on the front struts; as a result, they quickly fail when compared with other structural parts. Repair involves replacing worn racks with new parts. To install new VAZ 2114 racks, you can use the article in the corresponding section of the site. As for the tools, you will need for work:
- Set of keys and sockets.
- Spring ties.
- Screwdriver Set.
- Special puller for pushing out rods. This tool will also be required for pressing out various parts (balls, silent blocks).
Wear of elements such as hubs is rare. Other operational defects are associated with the failure of consumables, these include bearings, silent blocks, balls, and boots. Having repaired the chassis yourself, you need to visit a car service center, where specialists will perform a wheel alignment.
Replacing springs as a tuning step
When replacing shock absorbers, it is also recommended to pay attention to the springs. This suspension element also prevents swaying and increases vehicle stability. Springs are made from special steel. Domestic versions last less, have low rigidity, and do not cope well with uneven roads. This causes the vehicle to sway.
There are quite a few springs that can be purchased and installed on a VAZ 2114 car. Among all the possible options, the sporty version is the most popular. It has greater rigidity. You should also pay attention to the ability to raise or lower the car by selecting a spring of a certain length.
When choosing a spring, you should pay attention to the fact that it must match the previously selected shock absorber. Otherwise, the shock absorber will fail quite quickly.
vote
Article rating
Part selection
When the replacement process is considered, we proceed directly to the selection of the part. So, in addition to the original part, there are a number of substitutes that can be installed on a car.
Original
– original catalog number of the silent block manufactured by AvtoVAZ. This part is of average quality, but is still recommended by the manufacturer for installation on a car. The average cost is rubles.
In addition to the silent block itself, there are a number of consumables:
- – thrust washer for securing the silent block.
- – silent block adjusting washer.
These two parts can be included with the spare part, but as practice shows, they must be purchased separately.
Analogues of silent blocks
In addition to the original part, there is a list of analogues that can be installed on the VAZ-2114. Chamomile produced by Stellox Let's look at which spare parts are suitable from which manufacturers:
| Manufacturer's name | Catalog number | Cost, in rubles |
| Ruville | ||
| TRACK | SBST-104 | |
| Patron | PSE1434 | |
| Trialli | SB 108 | |
| Fulcrum | ||
| LYNXauto | C8854 | |
| Herzog | HL8 4046 | |
| VTR | LADA0105RP | |
| SS20 |