Mechanical damage to the VAZ 2105 suspension occurs as a result of prolonged physical exertion. Not the least important role here is played by driving style, the quality of the road surface and the regularity of preventive inspections at service stations. Each of these points or their combination is the reason for lengthy and expensive repairs.
Components of driving safety
It is impossible to delay its implementation, otherwise traffic safety will be in question. The main task of the 2104 or model 05 suspension is to ensure the smooth running of the “iron horse”. At the moment of making a maneuver or turning, the suspension acts as a controller for the resulting roll. That is why, at the slightest malfunction in its operation, driving becomes difficult.
Drivers who are forced to travel on the highway for a long time need to pay special attention to the front suspension. The better the unit is adjusted, the more stable the 2105 or 04 behaves on the highway in any weather conditions. In order to monitor its technical condition, you need to know the main components:
- body spar;
- bracket securing the rod;
- lower arm axis;
- protective cover for the ball pin;
- adjusting nut;
- hub cap;
- race liner, bearing and lower ball joint pin;
- front wheel hub bearing;
- lower spring support cup;
- shock absorber securing bolt;
- spring suspension;
- seals and washers;
- adjusting nut;
- rubber bushing of the hinge.
The rear and front suspension of a vehicle is an important link between the body and the wheels. It is thanks to them that the wheel receives a driving moment, forcing the “iron horse” to move from one point to another.
Chassis
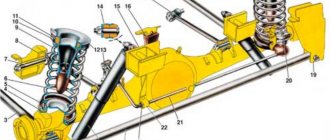
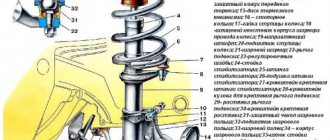
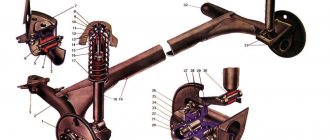
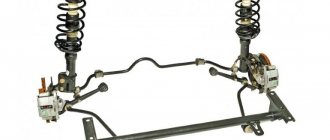
The front suspension is independent, on two wishbones on each side, with coil springs, telescopic shock absorbers and a stabilizer bar.
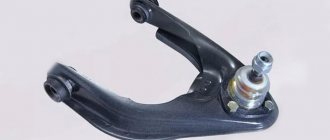
The upper 13 and lower 36 suspension arms are connected to the steering knuckle by 10 ball joints. The upper ball joint 14 is attached with three bolts to the upper suspension arm. The hinge body contains a bearing 12, the base of which is resin, and the friction surface is Teflon fabric, tightly fitting the spherical surface of the pin 9. The hinge parts are protected from contamination by a reinforced cover 11. The conical part of the pin fits into the conical hole of the steering knuckle and is secured with a self-locking nut.
The lower ball joint 45 is connected to the steering knuckle and suspension arm in a similar manner to the upper joint. In the hinge body 46 there is a pin 49 with a hemispherical head. A metal-ceramic bearing 48 with a hemispherical surface is mounted on the pin rod. An insert 47 made of oil-resistant rubber is inserted into the lower part of the housing with interference fit. A plastic layer (a mixture of nylon and molybdenum sulfide) is applied to the surface of the liner in contact with the hemisphere of the finger 49. There is a hole in the lower part of the hinge housing through which the hinge is lubricated. It is closed with a stopper.
The upper arm 13 of the suspension is connected by an axis 22 to the front pillar, and the lower arm 36, by means of an axis 35, is suspended by bolts 37 to the cross member 30 of the suspension, which is attached to the side members by brackets 29. Spacer 28 and adjusting 27 washers are installed between the axis of the lower arm and the cross member. By changing the number of washers 27, the longitudinal angle of inclination of the turning axis and the camber angle of the front wheels are adjusted. Both suspension arms are connected to the axles through rubber-metal suspension joints, ensuring a backlash-free connection of these parts. Such a hinge includes a rubber bushing 25, an outer 24 and an inner 23 metal bushing. A thrust washer 26 is installed between the hinge and the nut.
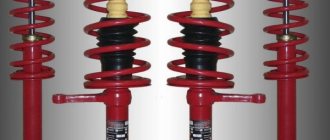
Spring 38 with its upper end rests through the support cup 21 with rubber gasket 20 on the front pillar of the body. The lower end of the spring rests on the support cup 44 of the lower arm. According to their length under a load of 435 kgf, the front suspension springs are sorted into groups A and B. Springs of group A are marked with yellow paint on the outside of the coils, and springs of group B are marked with green paint. The upward travel of the front wheel is limited by the stop of the upper lever 13 in the rubber buffer 15 installed in the bracket 16.
The lateral roll of the body when turning the car is reduced by a stabilizer bar made in the form of a rod 33 made of spring steel. The ends of the rod are attached to the brackets of the lower suspension arms with clips 39 through rubber pads 32. The rod itself is attached to the side members 34 by two brackets 31, in the holes of which rubber bushings are located. Shock absorbers 40 are attached to the lower suspension arms. The shock absorber rod passes through the hole in the support cup 17 and is secured with a nut. Rubber cushions 18 are installed between the shock absorber casing and the cup, as well as between the support washer 19 and the cup. The shock absorber is attached to the lower arm using a bracket 43 and bolts 41 and nuts 42.
Replacement of rear suspension rods on a VAZ 2105 car is carried out in case of mechanical damage from corrosion or deformation due to impacts. The rods are also removed to replace the rubber bushings. To carry out repair work, the vehicle must be driven onto an inspection pit, overpass or lifts. Prepare a standard set of tools, and then perform the following sequence of actions: Using a wrench […]
VAZ 2105 - replacing rear suspension shock absorbers
07 September 2013
Replacement of rear shock absorbers on a VAZ 2105 car is carried out in the event of a violation of its tightness, when oil begins to leak, any mechanical damage or due to temporary wear. Depending on the brand of shock absorbers installed, they are either replaced immediately with new ones, or their functionality is restored with a repair kit if they are dismountable. It is also removed to perform other work in which [...]
VAZ 2105 - replacing rear suspension springs
06 September 2013
The main reason for removing and subsequently replacing rear suspension springs on a VAZ 2105 car is their mechanical damage, subsidence, or when performing various repair work in which their presence will interfere, for example, when replacing rear shock absorbers. New springs vary in length, thereby grouping them into classes, so when purchasing, check which ones you need. […]
VAZ 2105 - replacing the front wheel hub bearing
August 11, 2013
If the adjustment cannot be made, then it is necessary to replace the front wheel hub bearing on a VAZ 2105. We also carry out replacement if a lubricant leak is detected from under the hub nut, which indicates a failure of the oil seal. It is also worth keeping in mind that bearings are replaced in pairs on each side. To carry out repair work, prepare a standard [...]
VAZ 2105 - adjusting the wheel bearing
August 10, 2013
Adjustment of the front wheel hub bearings on a VAZ 2105 car is carried out in the case of increased play in the bearing, when it wears out until it is completely replaced. A characteristic sign indicating the need for adjustment is the presence of play in the front wheels, which is felt when simply rocking the wheel. If the play is not eliminated in time, this will lead to rapid wear [...]
VAZ 2105 - replacing anti-roll bar bushings
August 10, 2013
During the operation of the car, natural wear and tear occurs on the elements of the anti-roll bar on the VAZ 2105, namely the rubber bushings and brackets. The rod itself also wears out under the bushings, which manifests itself in the form of wear. In addition, the stabilizer is replaced in case of deformation due to strong impacts. To carry out repair work to replace stabilizer elements and […]
VAZ 2105 - replacing the silent blocks of the upper suspension arm
August 10, 2013
Removing the upper front suspension arm on a VAZ 2105 car is performed either to replace worn silent blocks, arm fastening elements, or to completely replace it in case of serious mechanical damage. To carry out repair work, prepare a standard set of tools, and then perform the following sequence of actions: Set the car on the parking brake and, for prevention, place wooden […]
VAZ 2105 - replacing front suspension springs
Replacement of front suspension springs on a VAZ 2105 car is carried out in case of mechanical damage, subsidence or to replace rubber cushions. Dismantling also takes place when performing various repairs, in which their presence will interfere with the progress of its implementation. To perform repair work, prepare a standard set of tools and perform the following sequence of actions: Drive the car […]
VAZ 2105 - replacing front shock absorbers
Before replacing the front shock absorbers on a VAZ 2105, you need to check their performance. As a rule, in the event of a shock absorber failure, the springs take on the entire load and, as a result, the damping of body vibrations stops. To check, you need to swing the front side from the side being checked vertically with all your might, that is, with all your might [...]
VAZ 2105 - replacing the silent blocks of the lower arm
During the operation of the car, it is periodically necessary to replace the silent blocks of the lower arm of the front suspension on a VAZ 2105 car. The main sign indicating the need for this repair is the presence of cracks on the surface of the blocks when the rubber has dried out or become very compressed. To carry out repair work, prepare a standard set of tools and perform the following sequence of actions: After the lever […]
VAZ 2105 - replacing the lower front suspension arm
Removing the lower front suspension arm on a VAZ 2105 car is performed either to completely replace it in case of any serious mechanical damage, chips or cracks, or to replace its fastening bolt, bushings and silent blocks. To carry out repair work, prepare a standard set of tools and perform the following sequence of actions: Secure the car with the parking brake and place it under the rear wheels […]
VAZ 2105 - replacing ball joints
A characteristic sign indicating the need to replace ball joints on a VAZ 2105 is the appearance of a dull metallic knock in the front part of the suspension. This knocking noise occurs due to increased play in the ball joint, which means replacement is required. It is recommended to carry out this repair on both sides, changing the upper and lower supports. To carry out the work, prepare a standard set of tools, so [...]
Theme Options
- Subscribe to this topic...
Search by topic
REPLACING SHOCK ABSORBERS
The shock absorber is a non-separable paired part. That is, if one of them fails, then both change.
In order to replace the shock absorber, you need to carry out the following steps:
- Unscrew the fastening nut on the rod;
- Remove the washers along with the upper cushion made of rubber;
- We unscrew the bracket with which the shock absorber is connected to the lower arm;
- The broken shock absorber can be removed through the slot in the lever housing;
- The bracket is removed from the shock absorber and a new shock absorber is installed in the reverse order.
Diagram of the anti-roll bar on the VAZ-2112
The stabilizer is an important part, but you can drive without it. The absence of a stabilizer is not a reason to remove the car from service.
Stabilizer and traction rod
The unit consists of a rod and two rods. Articles:
- 2110-2906050 – thrust or stand;
- 2110-2906010 – assembly assembly;
- 10516870 – spring washer;
- 2110-2906040 - pillow;
- 10519601 - washer;
- 2108-2906042 - bracket;
- 2110-2906016 – rod;
- 2110-2906078 – upper rod bushing;
- 15971321 – M10 screw;
- 12164711 – nut M10;
- 16104111 – self-locking nut M8;
- 2108-2906079 – lower rod bushing.
To get rid of the stabilizer, remove the parts shown in the list.
Polyurethane or regular?
On sale you can find two types of elements - polyurethane and rubber-based. The question is: which ones are better to use on the VAZ 2107? Rubber ones have many disadvantages:
- Even the new ones squeak.
- They have a relatively small resource.
- Under the influence of an aggressive environment they quickly become unusable.
But they also have a big advantage - a fairly low price. Depending on the “appetites” of the seller, you can purchase a set for 500-700 rubles. But polyurethane ones have higher characteristics. They are practically not exposed to aggressive environments, have a long service life (at least twice as long), but there is one drawback - the price. It is within one and a half thousand. Look at how you are used to using your car.
Which ones should you install on your VAZ 2107? The question is not easy, you need to weigh everything to answer it. And most importantly, assess your financial capabilities.
You also need to pay attention to your driving style. If aggressive, then polyurethane will be more suitable for the job.
But if you drive quietly and the suspension is not subjected to significant loads, then you can install regular rubber ones. But we need to make a reservation again - it all depends on your capabilities and preferences. Polyurethane ones are many times better than rubber ones on the VAZ 2107 and similar models. And they are free from the main drawback of rubber joints - they do not creak.
Carrying out technical inspection
The list of common technical malfunctions of the VAZ 2104 suspension opens with a violation of the steering function. As a result of mechanical damage or physical wear, maneuverability and lateral stability deteriorate. As the crack grows, the transmission of torque from the engine to the wheels deteriorates.
If we talk about the position of the wheels of the VAZ 2104 relative to the road surface, then here, too, an incorrectly adjusted suspension will negatively affect the quality of driving. To carry out initial diagnostics, you need to drive onto the overpass. An inspection is carried out using a flashlight. If the problem could not be detected, but external manifestations make themselves felt, you should seek qualified help at a service station. The suspension is inspected using high-precision equipment.
Often the front suspension works worse due to a broken upper control arm connection. In the place where it approaches the front body pillar, large and small cracks often form. The speed at which they appear depends on the intensity of loads on the chassis of the VAZ 2104. If you regularly visit a service station, a problem of this kind will not cause long-term downtime.
Deformation of the ball joint or individual elements of its fastening. Such a malfunction manifests itself with a characteristic knocking sound. Then the knocking will be supplemented by more complicated control of the car using the steering wheel. This all ends in an accident that arose as a result of the inability to control the position of the car in space.
Manufacturing defects in the lower ball joint. This may include the results of poor quality repairs. The problem does not manifest itself immediately. That is why it is quite difficult to take the necessary measures. Regular visits to a service station will help you get out of this situation.
Computer diagnostics allows you to see the microscopic structure of the material. As a result, defects are immediately visible. In this case, there is no point in delaying repairs, as has already been said.
How to check the chassis on the "seven"
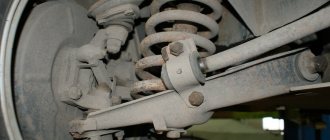
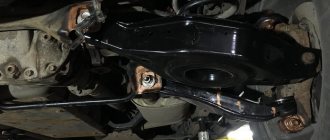
Self-checking the chassis of a VAZ is a relatively simple and quick procedure. No special tools are required, but you need to drive the car onto an overpass or pit.
Checking the chassis involves a visual inspection, so you will need to take care of good quality lighting. During the inspection, it is necessary to carefully examine all suspension components, paying special attention to:
- the condition of all rubber elements - they should not be dry or cracked;
- the condition of the shock absorbers - there should be no traces of oil leakage;
- integrity of springs and levers;
- presence/absence of play in ball joints.
This check is quite enough to find the problematic part in the chassis of the car.
Diagnostics
In order to identify faults in the crosspiece, appropriate diagnostics are carried out. To do this, the following type of operations is carried out:
- the car is driven into a viewing hole;
- we grasp the driveshaft with one hand, and with the other we hold the flange of the drive gear, which is located near the gearbox;
- holding the connection tightly, we try to turn or twist the parts in different directions.
Attention: If you can turn it even an iota, then there is play in the connections and, accordingly, the crosspiece has a defect. It is clear that there is no point in delaying repairs and, as happens with a sick person, the car should be urgently put in order. If everything is done on time, you will only have to change the cross
Otherwise, this can lead to more expensive repairs, which include replacing the outboard bearing.
If everything is done on time, you will only have to change the cross. Otherwise, this can lead to more expensive repairs, which include replacing the outboard bearing.
Do-it-yourself silent block remover
The VAZ 2107 hinge puller can be purchased ready-made or made by yourself. If you have the right equipment and materials, every car enthusiast can make the tool. It is also worth considering that the quality of purchased devices today leaves much to be desired. You can replace the rubber-metal hinge without special tools, but this will require much more time and effort.
Sequencing
To make a homemade puller you will need the following:
- a piece of water pipe 3 cm long with an internal diameter of 40 mm and an external diameter of 50 mm;
- washer with an outer diameter of at least 50 mm;
- M12 bolt 7 cm long with washers;
- two pieces of pipe 10 cm long and 40 mm in diameter;
- vice;
- hammer;
- lubricant
The puller manufacturing process consists of several stages.
- By striking with a hammer, they ensure that a 40 mm pipe section has an internal diameter of 45 mm, i.e., they try to rivet it. This will allow the lower arm joint to pass freely through the pipe.
- Two more sections are made from a 40 mm pipe - they will be used for installing new parts.
- To press out old hinges, take a bolt and put a washer on it, the diameter of which is between the diameters of the inner and outer races.
- The bolt is inserted from the inside of the lever, and a large diameter mandrel is put on the outside. Thus, it will rest against the wall of the lever. Then put on the washer and tighten the nut.
- As you tighten it, the mandrel will rest against the lever, and with the help of the bolt and washers, the hinge will begin to squeeze out.
- To install a new product, you will need mandrels with a diameter of 40 millimeters. A silent block is placed in the center of the eye in the lever and a mandrel is placed on it.
- On the reverse side of the eye, a mandrel of larger diameter is placed and rested against the anvil.
- The product is pressed into place with a hammer by striking the mandrel.
- To remove silent blocks from the lower arms, install a large extension, then place a washer and tighten the nut. The lever axis itself is used as a bolt.
- If the hinge cannot be torn off, hit the side of the lever with a hammer and try to pull the rubber-metal product out of place, after which the nut is tightened.
- Before installing new parts, the seating area of the lever and axle is cleaned with sandpaper and lightly lubricated. The lever axis is inserted through the eyes and new hinges are inserted, after which small-diameter mandrels are placed on both sides and first one and then the other part is pressed in with a hammer.
In order to drive your car confidently and without accidents, you need to periodically inspect and repair the chassis. Wear of silent blocks affects driving safety, as well as tire wear. To replace damaged hinges, you will need to prepare the necessary tools and perform repairs in accordance with step-by-step instructions.
Tools and accessories
There are not so many tools that will be required to replace all consumables, but some of them are specific.
So, you will need:
- Set of keys, heads, knobs;
- A set of new oil seals and bushings;
- Device for pressing out and pressing in silent blocks;
- Puller for ball joint;
- Jack;
- Stops;
- Vise;
- Hammer and wooden spacers;
- Soap solution.
Device for pressing out and pressing in silent blocks.
You can buy it or make it yourself.
The simplest homemade device consists of a long bolt with a nut, pieces of pipe with different diameters and several thick washers.
The principle of operation of such a device is very simple.
To press out the silent block, take a bolt and put a washer on it, the size is slightly smaller than the diameter of the rubber part of the silent block.
The bolt is passed through the bushing of the silent block. On the other hand, a piece of pipe with a diameter equal to the diameter of the seat, for example, a lever, is thrown onto the bolt.
That is, the pipe will have to rest against the circumference of the seat in the lever.
Next, another washer is put on the bolt, its circumference larger than the diameter of the pipe, and then the nut is screwed on.
Pressing out is done like this: the nut, when screwed on, will pull towards itself the washer resting on the silent block.
The installed tube will allow it to come out of the seat and not rest against another washer.
Pressing is done in exactly the same way, with the only difference that it is not necessary to use a piece of pipe, since the silent block will rest against the thrust washer when it sits in place.
You can even press-fit without using a device; it is enough to have only a vice, between the jaws of which a new silent block and lever are installed, so that it and its seat are on the same axis.
Next, the vice compresses and the consumable itself falls into place. But in this way you can install silent blocks only on the lever and stabilizer struts, but on the cross member you will still need a device for replacement.
DAAZ carburetor design
DAAZ carburetor design
Adjusting the VAZ 2105 carburetor is not difficult if the car owner knows its structure and is familiar with the location of the main components. The device of the DAAZ 1107010 model is a symbiosis of several main systems, subordinate to each other and operating sequentially.
- Fuel level maintenance system. Performs the function of a constant fuel level in a special chamber.
- Warm-up starting system. Necessary for reliable starting of a cold engine. Here a mixture highly enriched with liquid fuel is prepared.
- Idle system. Necessary to ensure idle operation at minimum crankshaft speed. Provides a uniform and stable supply of liquid fuel at low speeds. The main DS does not work.
- Accelerator pump system. Designed for short-term enrichment of the fuel-air mixture with fuel at the moment of sudden opening of the throttle valve (for example, during sudden acceleration of the car). Thanks to it, the engine runs evenly, without interruptions during acceleration.
- Fuel dosing system (main). Regulates fuel supply while the vehicle is moving and at different engine loads.
- Econostat system. This is an additional system for enriching the fuel mixture in case of full engine load.
All these systems are consistently supplied with fuel through a special device - fuel nozzles. The jets determine the amount of fuel required for mixing the fuel assemblies. That is, the nozzle is a kind of calibration mechanism that regulates the size of the liquid fuel supply channel.