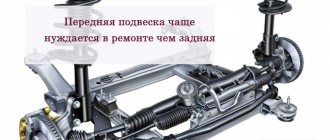
The front suspension is the weak point of any car. Many owners of domestic cars are interested in how to replace the front suspension of a VAZ 2106 with their own hands. There is nothing difficult about this if you follow the instructions and use a good set of tools.
The quality of roads in our country has always not been of high quality, and it especially deteriorates after winter. After the snow melts, numerous potholes and cracks are found in the asphalt. As you know, the VAZ 2106 suspension is designed to soften vibrations transmitted from potholes on the road to the vehicle body. Over time, the chassis wears out and requires repairs, which you can do yourself.
Replacing shock absorbers
Having found out that the shock absorbers of your “six” have served their purpose and need to be replaced, you need to know in what sequence to carry out this procedure. It is also worth considering that dampers are replaced in pairs, i.e. if the right element on one axis fails, then the left one must also be replaced. Of course, if a shock absorber breaks down with a short mileage (up to 1 thousand km), then only that can be replaced. As for the repair of the products in question, almost no one does this at home due to the complexity or impossibility of carrying out the work due to the lack of necessary equipment. In addition, shock absorber designs are not collapsible at all.
Which ones to choose
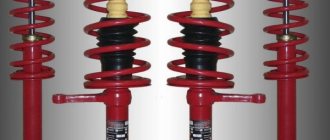
You have to think about choosing damping devices for the front and rear suspension not only when they break down. Some owners of the VAZ 2106 and other classic Zhiguli cars are not satisfied with the soft suspension. For better vehicle stability, it is recommended to install shock absorbers from VAZ 21214 (SAAZ) on the front end. Often original products are replaced with imported analogues precisely because of excessive softness.
Table: analogues of front shock absorbers VAZ 2106
| Manufacturer | vendor code | price, rub. |
| KYB | (oil) | 700 |
| KYB | (gas) | 1300 |
| Fenox | A11001C3 | 700 |
| SS20 | SS20177 | 1500 |
Kayaba shock absorbers are one of the most common when installed on classic Zhiguli
cars. To improve the performance of the rear suspension, instead of standard shock absorbers, elements from the VAZ 2121 are installed. As in the case of the front end, there are foreign analogues for the rear.
Table: analogues of the rear shock absorbers of the “six”
| Manufacturer | vendor code | price, rub. |
| KYB | 343098 | 1400 |
| KYB | 443123 | 950 |
| Fenox | A12175C3 | 700 |
| QML | SA-1029 | 500 |
How to replace the front shock absorber
To dismantle the front shock absorbers, you need to prepare keys for 6, 13 and 17. The process itself consists of the following steps:
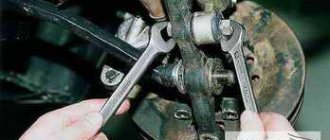
- Open the hood and unscrew the shock absorber rod fastening with a 17 key, holding the axle from turning with a 6 key.
- Remove the nut, washer and rubber elements from the rod.
- We go down under the front end and use a 13 key to unscrew the lower fastening.
- We remove the damper from the car by removing it with the bracket through the hole in the lower arm.
- We hold the bolt from turning with one wrench, unscrew the nut with the other and remove the fastener along with the bracket.
- We install the new shock absorber in the reverse order, replacing the rubber cushions.
Video: replacing front shock absorbers on a VAZ “classic”
How to replace a rear shock absorber
To remove the rear damper you will need the following tools and materials:
- 19mm wrench and head with ratchet and wrench;
- hammer;
- WD-40 or any other penetrating lubricant.
We dismantle the elements in the following sequence:
- We place the car on the inspection hole and tighten the handbrake.
- Using two 19mm wrenches, unscrew the lower damper mount.
- Remove the bolt from the sleeve and eye.
- Remove the spacer sleeve from the bracket.
- We move the shock absorber to the side, remove the bolt and remove the bushing from it.
- Using a key of the same size, unscrew the top fastening.
- We remove the washer and the shock absorber itself with rubber bushings from the axle.
- Installation is carried out in reverse order.
How to bleed shock absorbers
The shock absorbers must be bled before installation. This is done in order to bring them into working condition, since during transportation and storage in warehouses they are in a horizontal position. If the shock absorber is not pumped before installation, the piston group of the device may fail during vehicle operation. The pumping procedure is mainly carried out on two-pipe dampers and is done as follows:
- We turn the new element over with the stem down and gently compress it. We hold it in this position for a few seconds.
- We turn the device over and hold it in this position for a few more seconds, after which we extend the rod.
- We repeat the procedure several times.
The dampers of the front and rear suspension of the VAZ 2106 rarely fail. However, driving a car on poor quality roads significantly reduces their service life. Finding faulty shock absorbers and carrying out repairs will not require much effort and time. To do this, you will need a minimum of tools, as well as familiarization and following step-by-step instructions.
Goals of suspension tuning
VAZ-2109 front suspension repair, features
Only ignorant citizens are sure that tuning is carried out only with the aim of increasing the level of aesthetics of the car. In fact, such manipulations are carried out in order to ensure a comfortable, safe ride, excellent maneuverability, increased speed, and a hard landing.
Many have encountered a situation where they felt uncomfortable, simply because the section of the road along which they were driving was not perfectly smooth. Unfortunately, very often such trips end in, at best, abrasions, hematomas, and sometimes bruises.
If the car owner wants to make at least a little changes, for example, tuning the VAZ-2106 suspension, the same section of the road will no longer provoke the same negative emotions, since the “six” will behave differently.
It is for this reason that many are actively thinking about tuning the rear suspension of the VAZ-2106.
Goals of tuning
It is very important to understand that tuning of the VAZ-2106 chassis and suspension must be systematic. It is impossible to replace only some parts, forgetting that they are tightly connected with other components
In particular, if the owner of the “six” decides to replace the springs by installing sports springs instead of the factory standard, but at the same time ignoring the replacement of shock absorbers and silent blocks, it will not be possible to achieve the desired result. In addition, it is absolutely impossible to call such manipulations tuning the rear suspension, since there will definitely be no improvements.
It is for this reason that experienced car owners strongly recommend that those who are thinking about how to improve the suspension of the VAZ-2106 make only system replacements, and carry out all actions in a complex.
During such activities, it is possible to improve the front strut, stabilizer, power unit support, as well as the rear beam bar.
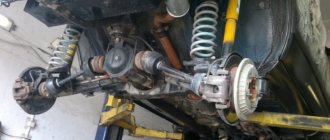
Front suspension
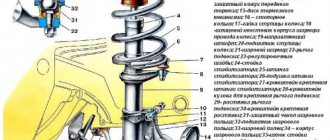
The front end of the VAZ “six” has a more complex suspension design, since the front wheels are steerable and it is on this part of the car that heavy loads fall. The front suspension of the car is an independent double wishbone with coil springs, hydraulic shock absorbers and a stabilizer bar.
Front suspension diagram of VAZ 2106: 1 - hub bearings; 2 — hub cap; 3 - nut; 4 — steering knuckle axle; 5 - cuff; 6 — hub; 7 — brake disc; 8 — protective cover of the upper ball pin; 9 — upper ball pin; 10 — bearing (liner) of the upper support; 11 — upper lever; 12 — compression stroke buffer; 13 — spring insulating gasket; 14 — shock absorber; 15 — shock absorber mounting pad; 16 — axis of the upper arm; 17 — rubber bushing of the hinge; 18 — outer bushing of the hinge; 19 — adjusting washers; 20 — suspension cross member; 21 — stabilizer bar cushion; 22 — stabilizer bar; 23 — axis of the lower arm; 24 - lower arm; 25 — clip for attaching the stabilizer bar; 26 - spring; 27 — rubber bushing of the shock absorber spring; 28 — lower spring support cup; 29 — steering knuckle; 30 — lower ball pin race insert; 31 — lower support bearing; 32 - lower ball pin
Cross member
The front beam is the strength element of the volumetric structure. The material used to manufacture the product is steel. The cross member is located in the engine compartment below. The power unit is fixed to it through the cushions, as well as the lower arms of the shock absorption system.
The cross member is the power element to which the engine and lower suspension arms are attached
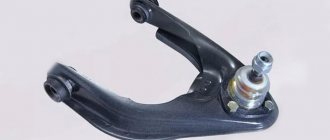
Levers
The front suspension consists of four levers - two upper and two lower. The lower elements are fixed to the crossbar using an axle. Between the beam and the axle there are washers and shims that change the camber and angle of the front wheel steering axis. The upper arm axle is a bolt that goes through the mudguard post. Rubber-metal products are installed in the holes of the levers - silent blocks, through which the suspension elements in question can move. Using ball joints, the steering knuckle (trunnion) is mounted to the levers. The wheel hub with the brake disc is fixed on it using tapered roller bearings. The hub is tightened on the axle with a nut, and on the right the fastener has a left-hand thread, and on the left it has a right-hand thread.
The front suspension arms connect and hold the elements of the shock-absorbing system
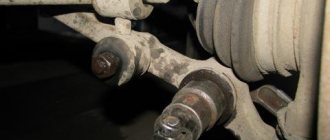
Shock absorbers
Shock absorbers ensure a smooth ride of the car, i.e., eliminating bouncing on uneven surfaces. Damper devices of almost identical design are installed at the front and rear. The difference lies in the size, mounting methods and whether the front shock absorber has a buffer. The front dampers are mounted with their lower part to the lower arm, and mounted on the top on the support cup.
The shock absorber in the suspension design ensures a smooth ride of the car
Table: parameters of the “six” shock absorbers
| vendor code | Rod diameter, mm | Case diameter, mm | Body height (excluding stem), mm | Rod stroke, mm |
| 2101–2905402 2101–2905402–022101–2905402–04 (front) | 12 | 41 | 217 | 108 |
| 2101–2915402–02 2101–2915402–04 (rear) | 12,5 | 41 | 306 | 183 |
Springs
The “six” is equipped with cylindrical springs, the upper part of which rests against the rack through the gasket and support cup, and the lower part rests against the recess of the lower arm. The purpose of the elastic elements is to provide the necessary vehicle clearance and smooth out shocks while driving on uneven roads.
Springs are an elastic element that provides ground clearance and smoothes out shocks when driving over uneven surfaces.
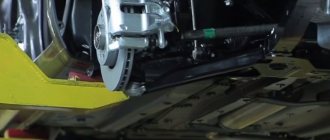
Stabilizer
The stabilizer is a part that reduces body roll when cornering. It is made of special steel. In the middle, the product is fixed to the front side members through rubber elements, and at the edges - to the lower arms.
To reduce roll when cornering, the suspension uses a transverse stabilizer
Spherical bearing
The ball joints of the front suspension are a hinge, thanks to which the car is able to maneuver and move smoothly. In addition, these elements make it easy to control the front wheels. The support consists of a housing with a ball pin and a protective element in the form of a rubber boot.
The front suspension contains 4 ball joints that connect the arms and the steering knuckle to each other
General information
Front suspension
- Upper arm ball joint pin.
- Rounded fist.
- Upper arm ball bearing.
- Upper lever.
- Upper arm ball joint.
- Compression progress buffer.
- Bracket for compression stroke buffer.
- Rubber gaskets for fastening the shock absorber rod.
- Washer for the rubber gasket of the shock absorber rod.
- Shock absorber support cup.
- Upper arm axis.
- Rubber bushing of the hinge.
- Lower arm axis.
- Crossbar.
- Bracket for fastening the cross member to the spar.
- Bracket for attaching the stabilizer bar to the side member.
- Anti-roll bar.
- Spar.
- Lower arm.
- Bolts securing the lower arm axle to the cross member.
- Stabilizer bar mounting bracket.
- Spring.
- Shock absorber.
- Lower arm ball joint bushing.
- Front wheel rotation limiter.
- Wheel hub.
- Ball joint boot.
- Lower arm ball joint pin.
- Hub nut cap.
- Adjusting nut.
- Steering knuckle axle.
- Brake disk.
The front suspension is independent, with hydraulic shock absorbers (double-acting) and coil springs (elastic elements).
The steering knuckle is connected to the upper and lower suspension arms by ball joints. The ball joints are secured to the arms with three bolts. The support housing houses a bearing protected from contamination by a rubber boot. The ball joint pin is installed in the hole in the steering knuckle and secured with a self-locking nut.
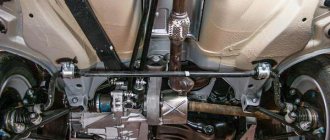
To reduce body roll when cornering and improve vehicle handling, the front suspension is equipped with an anti-roll bar. The stabilizer is fixed by two brackets on the body side members and two brackets on the lower arms.
Rear suspension
- Spring.
- Compression stroke buffer support.
- Cup.
- Upper spring gasket.
- Upper spring seat.
- Upper longitudinal rod.
- Pressure regulator drive lever rod.
- Shock absorber mounting stud washer.
- Rubber bushing for shock absorber head.
- Shock absorber mounting bracket.
- Additional compression progress buffer.
- Bracket for fastening the upper longitudinal rod to the rear axle beam.
- Spacer sleeve of the upper longitudinal rod.
- Rubber bushing of the upper longitudinal rod.
- Spacer washer.
- Spacer sleeve of the lower longitudinal rod.
- Rubber bushing of the lower longitudinal rod.
- Bracket for fastening the upper longitudinal rod to the rear axle beam.
- Lower longitudinal rod.
- Shock absorber.
- Bracket for attaching the transverse rod to the body.
- Rear brake pressure regulator.
- Protective cover for pressure regulator.
- Pressure regulator drive lever axis.
- Pressure regulator mounting bolts.
- Torsion lever for pressure regulator drive.
- Attaching the lever support sleeve.
- Support sleeve.
- Cross rod.
- Bottom spring gasket.
- Cross bar mounting bracket support plate.
- Bracket for securing the parking brake cable.
- Lower spring seat.
- Compression progress buffer.
- Bracket for fastening the upper longitudinal rod.
- Bolt securing the upper longitudinal rod.
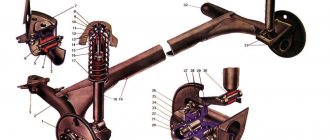
The rear suspension is dependent, with hydraulic shock absorbers (double-acting) and coil springs (elastic elements).
The rear suspension consists of four longitudinal and one transverse rods. The longitudinal and transverse rods are connected to the body and the bridge beam by rubber-metal hinges.
The upward stroke of the rear axle beam is limited by two main compression stroke buffers installed in a spring and one additional one mounted on a bracket on the underbody.
Source
Polyurethane or regular?
On sale you can find two types of elements - polyurethane and rubber-based. The question is: which ones are better to use on the VAZ 2107? Rubber ones have many disadvantages:
- Even the new ones squeak.
- They have a relatively small resource.
- Under the influence of an aggressive environment they quickly become unusable.
But they also have a big advantage - a fairly low price. Depending on the “appetites” of the seller, you can purchase a set for 500-700 rubles. But polyurethane ones have higher characteristics. They are practically not exposed to aggressive environments, have a long service life (at least twice as long), but there is one drawback - the price. It is within one and a half thousand. Look at how you are used to using your car.
Which ones should you install on your VAZ 2107? The question is not easy, you need to weigh everything to answer it. And most importantly, assess your financial capabilities.
You also need to pay attention to your driving style. If aggressive, then polyurethane will be more suitable for the job.
But if you drive quietly and the suspension is not subjected to significant loads, then you can install regular rubber ones. But we need to make a reservation again - it all depends on your capabilities and preferences. Polyurethane ones are many times better than rubber ones on the VAZ 2107 and similar models. And they are free from the main drawback of rubber joints - they do not creak.
Some useful tips
Before starting the installation process, the working rod is pulled out to the full length of the working stroke. Before assembling the upper part of the mount, it is necessary to lower the car from the lift so that it creates a force equal to its weight, that is, the VAZ 2106 must be completely free.
If, when installing a new shock absorber, the rod does not protrude outward enough, then an additional cushion washer should be put on it.
The nut is screwed in such a way that the rod can then be extended to its maximum length, resting on the mudguard.
So, the work is completed, which means that we can sum up its results. As you can see, replacing the shock absorber in this case is extremely simple. In fact, during its implementation, various kinds of troubles may arise associated with the oxidation of one or another part, but this is rather an exception to the rule. Replacing front shock absorbers on a VAZ 2106 should not cause any difficulties
even for inexperienced car enthusiasts.
Do-it-yourself replacement of VAZ-2106 silent blocks video instructions
Silent blocks are used in the construction of cars of all models. They are rubber inserts between suspension parts; they are used to absorb vibration and, accordingly, to prolong the uninterrupted operation of the machine’s chassis. The silent blocks themselves are subjected to very high loads, which leads to their frequent failure.
In this article we will talk in detail about how to replace silent blocks on a VAZ-2106 car, we will provide step-by-step instructions and useful recommendations, thanks to which you can perform this rather complex procedure with your own hands, without involving car service specialists.
Tools and accessories needed to replace silent blocks
First of all, you will need to prepare all the necessary tools. Without them, it will be quite difficult to get to the silent blocks in a VAZ-2106 car and dismantle failed parts. So, for high-quality and convenient repairs you will need:
- special tools for dismantling ball joints, the upper arm, removing and installing a new hinge made of metal and rubber, as well as for unpressing the far steering tips;
- open-end, ring and miter wrenches for 13, 22 and 24 millimeters;
- jack;
- set of mounts;
- a thin and sharp chisel that will allow you to carefully dismantle the lower silent blocks without removing the lever;
- hammer.
Additionally, you will need to prepare the new suspension components that will be installed on the vehicle. Today it is best to buy polyurethane silent blocks, which differ from ordinary ones in their service life increased several times.
But if your goal is to carry out repairs at minimal cost, then you can get by with traditional rubber parts.
Step-by-step instructions for replacing upper control arm silent blocks
If the entire tool is already ready for use, we begin to replace the rubber-metal hinges, which is performed according to the following scheme:
- jack up the car and remove the wheel from the side on which the work will be done;
- unscrew the nuts holding the silent block and the steering tip;
- Unscrew the fastening nut of the ball joint;
- using a special puller, press out the bipod support pin;
- remove the nut holding the upper arm;
- we take out the lever, carefully clamp it in a vice and change the silent blocks using a special device;
- We install the lever in the reverse order. After this, all that remains is to mount the wheel and remove the jack. The same work is performed on the other side.
It is much easier to replace the silent blocks of the lower arm:
- after removing the nut holding the lever itself, we take a special device and press out the rubber-metal hinge;
- We carry out preparatory work. During this process, it is necessary to remove dirt and carefully lubricate the seat for the new silent block, as well as the lever axis and threads. This, firstly, will greatly facilitate subsequent procedures, and secondly, it will ensure stronger fixation of the part;
- press in a new silent block;
- install the steering ends and insert the cotter pins that secure these parts;
- tighten the nuts of the upper and lower arm.
The procedure for replacing silent blocks must be carried out under load. It is best to first seat your acquaintances or friends in the car, and also place a load weighing 40 or more kilograms in the trunk.
The nuts of the upper and lower arms must be tightened until they stop only after the new silent blocks have been installed. Otherwise, serious problems with the operation of the car suspension may arise.
Tools and materials
To carry out the entire scope of work, a limited number of tools and materials will be required. First of all, you need to acquire:
- shock absorbers;
- key at 6, 17, 13, 19;
- locksmith tool.
This is quite enough
to do all the work efficiently. Before starting it, you should think about installing the car on an observation deck or lift. This is the only way to easily reach the element being replaced. The car must be on wheels, and the distance from its bottom to the ground should be approximately 50 cm.
replacing the front door pillar of a VAZ 2106.
| VAZ 2106 front door pillar replacement |
| Making a new stand and all the accompanying patching and strengthening. |
| Tags: |
| Replacement of VAZ2101 front pillar with trim and strengthening of windshield frame |
| Windshield pillars What's inside!LOP ULA STAND LET'S SEE WHAT'S INSIDE Life channel!—- … |
| Tags: |
| Zhiguli Repair of the windshield pillar “Zhiga” (5 hours) |
| Click to view | The windshield pillars on the VAZ 2106 were torn off. Repair of the windshield pillars of the VAZ Life channel!—- … |
| Tags: |
| The windshield pillars of a VAZ 2106 were torn off |
| Today I decided to replace the glass. |
| Tags: |
| how to replace a VAZ classic glass |
| Click to view | Lada sedan-buckle jean - replacement of door pillar repair inserts. VAZ-21 06. |
| Tags: |
| Lada sedan-aubergine-replacement of door pillar repair inserts.VAZ-2106. |
| Click to view | how to replace the front suspension spring of a VAZ without ties and is it even possible? VKontakte group... |
| Tags: |
| replacing the front glass of a vaz classic |
| Click to view | Top 5 Zhiguli modifications in my opinion. The top is based on personal experience. Drive2 blog-Drive2 ... |
| Tags: |
| Replacing the front spring without a puller or zip ties. |
| Click to view | The video shows the process of replacing the lower arm on a VAZ 2106 car. All videos on repairing VAZ 2101-2107 ... |
| Tags: |
| TOP 5 UPDATES FOR ZHIGULI, WHAT YOU NEED TO DO WITH A CLASSIC |
| Click to view | vaz #lubrication for doors #poorly closed two and Cleaning and lubrication, maintenance and adjustment of locks... |
| Tags: |
| Replacing the lower arm of a VAZ 2106 |
| Click to view | The car was redone after a previous repair. We changed the threshold, amplifier, threshold connector, lower middle... |
| Tags: |
| The doors of VAZ 2104, 2105, 2106, 2107, NIVA do not close well. Part 1 |
| Reanimation of VAZ 2101. Part 4. I cook the sills and spar. The beginning of the repair can be seen here: Reanimation... |
| Tags: |
| VAZ 2107 Replacement of threshold left Ch 2. +repair of bottom, amplifier, connector, B-pillar, fender, arch |
| Click to view | one of the reasons why it is not possible to set the wheel camber of the front suspension of a VAZ classic. groups... |
| Tags: |
| Reanimation of VAZ 2101. Part 4. I cook the sills and spar. |
| Click to view | Tools for car repairs with your own hands Discounts on tools in Chinese stores... |
| Tags: |
| The camber is not set, one of the reasons. |
| smoothly even, normal)) for the search engine Rikhovka ZAZ VAZ spotter slipway Merc Ford pfp dfp ford benz… |
| Tags: |
| How to eliminate play in VAZ door hinges and adjust the door |
| Click to view | Korch a year later... The car was built as a weekend sports equipment for... |
| Tags: |
| door pillar hood. doors. gaps. |
| Click to view | Video from 2006. Drag repair: who will change the front shock absorber on a VAZ-2105 faster? |
| Tags: |
| Additional Front Shock Absorbers for 2101-07 (cross cramp) 4 series |
| Click to view | Replacement of VAZ2109 rack. |
| Tags: |
| Repair with partial replacement of the front door pillar of a VAZ 2109 |
| Click to view | Replacing the rack for a VAZ 2109. |
| Tags: |
| Replacing the front shock absorbers of a VAZ classic |
| I do welding, straightening and painting of cars! Subscribe to my channel! It only gets more interesting! |
| Tags: |
| Replacing the front door pillar on a VAZ 2109 |
| Click to view | The racks are rusty and need to be replaced. |
| Tags: |
| Replacing the front strut on a VAZ 2109 |
| Click to view | Replacement of thresholds on Lada VAZ Kassika Do-it-yourself repairs. |
| Tags: |
| repair of the front pillar and doorways of the VAZ 2106 part 2 |
| Click to view | Replacement of the front and middle pillars, complete painting of the car with acrylic enamel Duxon ○ VAZ 21099○ Cut out the whole… |
| Tags: |
| Zhiguli 2106. Replacement of the front pillar. |
| How to replace the silent blocks of the lower arms on a VAZ classic car without the help of a puller. groups... |
| Tags: |
| Replacing the threshold of a VAZ classic 2101-07 (body repair) |
| When removing doors on a Zhiguli, owners very often encounter this problem - the fasteners do not unscrew... |
| Tags: |
| Replacing the A-pillar and B-pillar Painting VAZ 099 |
| Click to view | We improve your Lada. |
| Tags: |
| How to replace the silent blocks of the lower arms of a VAZ without a puller. |
| Click to view | Video about massage. |
| Tags: |
| How to remove the door on a Zhiguli (classic) VAZ. Useful thing” rel=”spf-prefetch |
| Description missing |
| Tags: |
| REPLACING REAR SHOCK ABSORBERS FOR VAZ 2106 (CLASSICS)” rel=”spf-prefetch |
| Click to view | Description missing |
| Tags: |
| Strengthening the roof rigidity of the VAZ 2101-07. (part 1)” rel=”spf-prefetch |
| Description missing |
| Tags: |
| 2106. Welding window frame cracks.” rel=”spf-prefetch |
Two shock absorbers for classics
In this article I would like to share with you a very useful tuning of the rear suspension of VAZ classic cars. What will the installation of two shock absorbers on each side give us? The first is rigidity, the second is stability, and as you know, these are very important indicators for motor sports, be it drifting, rallying or circuit racing. This system is also used in tuning for jeeps, namely on fields that are used for off-road driving. Well, from words to action, let's look at the process of installing double shock absorbers on a classic. What you will need for this modification:
- 4 rear shock absorbers (preferably new)
- various tools, sockets, screwdrivers, hammers
- welding machine or welder)
Replacing silent blocks in the upper control arm of a classic with your own hands.
So, let's begin! In rear-wheel drive VAZs, the silent blocks in the upper arm can be changed without even driving into a hole and without removing the arm from the ball (provided that you have a remover for silent blocks). But first you need to determine whether the bushings of the silent blocks are stuck to the bolt securing the lever to the body. To do this, jack up the car and remove the wheel.
Arrows point to bolt and nutWe loosen the nut securing the upper arm with a 22mm wrench and try to turn the bolt. If it spins and the bushings stay in place, then you're in luck! But if this bolt rotates with great effort and the bushings rotate with them, then as they say: “Houston, we have problems!” Next we will consider both cases.
If the silent blocks are not stuck.
Further actions depend on whether you have a puller for silent blocks. If there is one, then you don’t have to remove the lever completely, but just unscrew the nut 22 to the end, take out the bolt and turn the lever towards yourself (for the convenience of further repairs).
We turn the lever for convenience.
Next, take a puller and press out the silent blocks.
Removing the silent block using a puller
And with his help we press in new silent blocks. Before pressing, the mounting hole must be cleaned and preferably lubricated with lithol. In the upper arms, silent blocks are pressed into place up to the ribs, as shown in the photo below.
The new silent should be pressed in exactly like this.
But what to do if you don’t have a silent block remover? Then you will have to completely remove the lever. We take out not only the bolt securing the upper arm to the body, but also take out the ball from the hub (this is faster than unscrewing 3 bolts securing the ball to the arm). Detailed removal of the ball joint is written here.
We removed the lever, put the lever ear on a pipe or on a yew tree (as in the photo), the main thing is that the silent block does not rest against anything, and knock it out with a hammer.
To press in new ones, we need a mandrel (old bearing, piece of pipe, nut head). The inner diameter of the mandrel must be equal to the diameter of the skirt of the new silent block. And we begin pressing in new parts using this mandrel, having previously lubricated the seat with lithol. Reassemble in reverse order.
Important: we pull the bolt securing the lever to the body only under the load on this wheel! Those. The car should not be on a jack, but on all wheels!
If the silent blocks are stuck to the bolt.
This is a very difficult case, since you will have to spend a long time trying to get the bolt that secures the front upper arm to the body.
For those who want to save themselves a lot of time and are ready to fork out a little, I advise you to buy a new bolt, this lever from disassembly and just cut off the old bolt with a grinder.
Well, if you have time and nerves, then we take a gas burner in our hands and burn out the silent block. Follow fire safety precautions! After all the rubber has burned out, you can begin to knock out the bolt. Get ready to do this for a very long time. After you remove the bolt, knock out the remaining clip of the burnt silent tape from the lever and follow the instructions written above.
Replacement of rubber bushings of rear suspension links
The need to replace rubber hinges arises when they are damaged or worn out and require the removal of the longitudinal and transverse rods. The “six” rear suspension links are attached at one end to brackets installed on the floor of the car, and at the other end to brackets installed on the rear axle beam. The “classic” rear suspension diagram will help you better understand the location of its parts.
To carry out repair work you will need 19mm wrenches. Dismantle the parts in this order:
- Remove the top (short) links. To do this, unscrew the nuts and knock out the bolts.
- Remove the long reaction rods. To dismantle them, you need to disconnect the lower hinge of the rear shock absorber and move it to the side. Then you need to unscrew the fastening nuts, remove the spring washers and bolts that secure the rods to the beam.
- To remove the transverse link, you need to unscrew the fastening of this element to the body bracket and rear beam and knock out the bolts.
All rubber joints that are used in the rear suspension links of the VAZ 2106 are similar to each other, although they differ in size. They are pressed into the eyelets of the rods with an interference fit, so to replace them you will need: special mandrels for installation, a brush, a solution of soap in water and a large bench vice. The work should be done like this:
- Remove the metal spacer sleeve from the rubber joint using a vice and a mandrel, and then press the rubber joint itself out of the rod.
- Moisten the inside of the tie rod eye, the inside cavity, and the outside of the rubber joint with soapy water. Also wet the spacer sleeve.
- Using mandrels and a bench vice, first press the hinge into the rear link, and then the spacer sleeve into the rubber hinge itself.
- Similar repairs are carried out for all removed parts. It is important not to confuse the rubber elements intended for short and long rods, so it is better to check the catalog numbers.
When repairing a car, you can do a little tuning of the rear suspension of the “sixth model”. To do this, the metal spacer bushings must be shortened by 2mm. With the help of such a simple improvement, you can increase the life of the articulated joint by 2-3 times, while the stability of the rear axle is significantly increased.
Installation of the rods on the car is carried out in the reverse order.
Replacing the front suspension springs of a VAZ 2106
When the integrity of the spring is compromised, damage and cracks appear, you need to urgently replace it. You can replace the front suspension springs of a VAZ 2106 car with your own hands; we will tell you in more detail below.
Consequences of faulty springs:
– The smoothness of the ride deteriorates. – There is a clear distortion of the front part of the body – A significant (noticeable) difference in height between the front and rear. – Clear traces of coils hitting each other.
We will need the following tool:
– Keys to “22″ and “13″. – Two jacks (screw and hydraulic). - Bolonnik. – Metal brush. - Hammer.
Replacing the front suspension springs of a VAZ 2106 with your own hands
1. While the car is “on wheels,” tear off the wheel mounting bolts with a bologna.
2. Jack up the car with a screw jack on the side where you are going to remove the suspension spring.
3. Next, you need to hang the wheel and completely remove it from the car.
After this, remove the shock absorber, this is done as follows:
4. To do this, use the key at “6, 13, 17 and 19”.
5. The rod must be kept from turning with a key.
6. Next, loosen the tightening of the nut and remove it.
7. Also remove the cushion washer, spring washer and upper shock absorber mounting pad.
8. Unscrew the two fastening nuts of the bracket to the lever and remove the spring washers.
9. Remove the shock absorber from the bottom using the mounting hole in the arm.
10. Loosen the mounting nuts that secure the lower arm to the axle, but do not rush to remove them. We take a second jack, preferably a hydraulic one.
11. Place it under the lower control arm, then raise it slightly to load the suspension and level the lower control arm.
12. Remove the stabilizer bar.
13. Unscrew the nuts of the stabilizer bracket and remove the bracket with the rubber cushion.
14. Unscrew the nut that holds the pin in the ear of the steering knuckle, but now you can remove the lower ball joint.
15. Lower the jack and knock out the support pin with a hammer; to do this, hit the lower ear of the steering knuckle several times.
16. With the lower ball joint removed, reinstall the jack under the lower control arm, but there is now no need to load the suspension.
17. After this, you can unscrew the ball joint pin nut completely, slowly, and carefully lower the lower arm down. Help yourself with a mounting spatula by moving the stabilizer to the side so that it does not catch the bracket mounting studs.
18. Now completely unload the suspension and move the jack to the side.
19. Prepare a strong rope or wire, with its help you need to pull the upper arm as high as possible in order to provide yourself with access to the front suspension spring.
20. Take a pry bar and use it to pry the lower end of the spring, then carefully remove it from the lower arm support cup.
21. Remove the suspension spring, remove the spring gasket from the upper support cup.
Now that nothing is in the way, the front suspension spring can be replaced.
How to install a spring correctly
1. Take a new spring, attach a gasket to it (use regular electrical tape for this) and install it in place.
2. Install the mounting blade into the hole for the shock absorber and, holding the spring with it, fix the lower coil. By looking at the surface of the lower arm, you can see a helical surface indicating the correct position of the spring. Helping yourself with mounting, you need to adjust the correct position of the spring in relation to the screw surface.
3. Having set the correct position of the lower coil, install the jack under the lever and create a load on the spring, then use a mounting blade to finally seat the spring on the screw surface.
4. Increase the load on the spring and, using a mounting tool, install the stabilizer bar into a position between the two mounting studs of the stabilizer bracket.
Assembly is carried out in reverse order. Let us remind you that the previous article was about replacing the VAZ 2106 clutch with your own hands.
Steering knuckle and front wheel hub
Renault Logan Front Suspension DIY RepairRenault Logan Front Suspension DIY Repair
1 – bearing; 2 – nut, 73–90 N•m; 3 – stand;
4 – steering knuckle; 5 – tie rod end; 6 – nut, 15–34 N•m; 7 – front wheel hub; 8 – brake disc; 9 – nut, 220–260 N•m; 10 – brake shield; 11 – nut, 60–72 N•m; 12 – bolt, 65–75 N•m; 13 – retaining spring ring. Removal PERFORMANCE ORDER 1. Raise the car and remove the front wheel. 2. Unscrew the drive shaft securing nut. 3. Remove the caliper and secure it to the front strut with soft wire. 4. Remove the speed sensor from the steering knuckle. 5. Remove the cotter pin and unscrew the nut securing the tie rod end ball joint to the steering knuckle. Using a puller 09568–34000, press the ball joint pin out of the steering knuckle.
6. Mark the position and remove the bolts securing the lower part of the front suspension strut to the steering knuckle.
7. Use a nylon hammer to knock the drive shaft out of the front wheel hub. If the drive shaft is tightly seated in the front wheel hub, spray impregnating spray solvent into the spline area and then rethread the flange nut until it is flush with the end of the shaft. Using a brass hammer, hit the nut to knock the drive shaft out of the hub. 8. Using a puller 09568–34000, disconnect the ball joint of the lower arm from the steering knuckle.
9. Remove the steering knuckle along with the front wheel hub. 10. Installation is carried out in the reverse order of removal. Disassembly PERFORMANCE ORDER 1. Remove the brake disc from the front wheel hub. 2. Remove the snap ring.
3. Install special tools as shown in the picture.
4. While turning the special tool, remove the front wheel hub from the steering knuckle. 5. Remove the special tool and dust ring. 6. Using a special tool, remove the inner bearing race from the hub.
7. Using a special tool, remove the outer bearing race from the steering knuckle.
Check PERFORMANCE ORDER 1. Check the hub for cracks and wear. 2. Check the brake disc for wear and damage. 3. Check the hinge for cracks. 4. Check the snap ring for cracks or damage. Assembly PERFORMANCE ORDER 1. Apply a thin layer of grease to the hole in the steering knuckle and to the outer ring of the bearing. 2. Using a press with a mandrel of the appropriate diameter, press in a new wheel bearing.
Warning Do not apply pressure to the inner race of the bearing. 3. Install the dust ring. 4. Using a press with a mandrel of the appropriate diameter, press the hub into the wheel bearing.
Warning Do not apply pressure to the outer race of the bearing. 5. Install the brake disc. 6. Using a special tool, screw the hub to the steering knuckle, tightening the bolt of the device to a torque of 240 N•m.
7. Rotate the hub several times to ensure the bearing elements are in place. 8. Measure the torque that must be applied to rotate the bearing. Torque: 1.3 N•m 9. If the torque is 0 N•m, measure the end play of the hub bearing.
10. If the torque exceeds the required value, it means that the bearing is not installed correctly in the steering knuckle and on the hub. Disassemble the steering knuckle and reassemble it. Bearing axial play: 0.08 mm
11. Remove the special tool.
Replacing silent blocks on a VAZ 2106 car
The design of silent blocks looks like a rubber insert that is pressed inside two connected metal bushings. The part in question must be replaced in case of critical wear or damage. They are connecting elements of fastenings of various components and mechanisms from the car suspension to the transmission. The silent block absorbs harmful vibrations and dampens them. Since it can withstand enormous loads, it is not at all surprising why its failure is a fairly common event.
If during the next maintenance of your vehicle it was discovered that the silent block filler was squeezed out and a web of cracks formed, then it is necessary to replace this unit in order to avoid subsequent problems. Malfunctions of the upper and lower control arms have a significant impact on vehicle control. In addition, the tread of the front tires begins to wear very badly.
Sequence of work
First you need to remove all the fastening elements of the shock absorber. First you need to loosen the nut and remove it, and then remove all the other elements. We are talking about special pillows, as well as a spring pressure washer. Now you can lift the car, if of course the work is done on a lift.
The bracket is in any case attached to the system lever. In order to separate them you only need to unscrew a couple of nuts.
After this, the spring washers should be removed. Now access to the old shock absorber is completely open. It is removed through a special mounting hole in the lever. The pillow must also be removed. The car's shock absorber is tightly fixed to the bracket. To remove it, you will have to perform a number of manipulations.
In fact, it all comes down to unscrewing one single fastening nut. When it is removed, you can easily and simply pull out the mounting bolt and, accordingly, remove the shock absorber itself.
In principle, all work related to removing the old shock absorber has been completed, which means that installation of a new one can begin. It is installed in reverse order. A new shock absorber with a rubber-to-metal hinge is installed.
Sources
- https://avtovx.ru/podveska-stoiki-amortizatory/zadnjaja-podveska-vaz-2106-217/
- https://smotri-dtp.ru/voprosy-i-otvety/chertezhi-kronshtejnov-dopolnitelnogo-zadnego-amortizatora-vaz-2106.html
- https://motorchina-online.ru/novosti/kreplenie-amortizatora-vaz-2106.html
- https://workoutcrew.ru/verhnee-kreplenie-zadnih-amortizatorov-vaz-2106/
- https://avto-mekhanik.ru/hodovaya-chast/remont-verhnego-krepleniya-zadnego-amortizatora-vaz-2106.html
[collapse]
Lower arm of the front suspension VAZ 2107
The VAZ 2107, popularly known simply as the “Seven,” is the latest rear-wheel drive representative from the model range of the popular domestic manufacturer. Unlike front-wheel drive cars, the front suspension here has fewer parts, so diagnosing and repairing it is much easier and you can handle everything yourself, without involving expensive specialists.
The “Seven” has an independent front suspension, the main parts of which are two levers: upper and lower. The lower arm connects the hub or steering knuckle to the car body. Due to the front suspension arms, the wheels are held in a vertical position, and the lateral forces that arise while the vehicle is moving are dampened.
Lower arm housing
The lower arm is fixed to the suspension cross member, which is mounted on the front side members. A ball joint is attached to it, and a spring also rests on the lower edge. All this makes it difficult to replace this suspension element, but even a novice car enthusiast can cope with such a task with his own hands. It is enough to determine the cause of the breakdown, and then act in accordance with the developed rules and recommendations of specialists.
Spherical bearing
A ball joint is securely fixed directly to the lower arm. This is a hinge element that connects the lever and the hub.
The ball joint absorbs all the impacts that occur when the wheel hits uneven roads, so special attention is paid to its strength
Serviceable ball joints limit the swing of the wheel in the vertical direction, but at the same time allow it to move freely in the horizontal plane. When a ball joint breaks, the wheel turns spontaneously, and if this happens while driving, it can lead to an accident.
This element is a hinge, the main part of which is a ball rod, on one side there is a ball, on the other there is a thread. The rod is securely pressed into the eye with a plastic liner, after which the entire structure is covered with a boot to prevent moisture and dust from entering the friction points. Modern manufacturers usually use transparent boots, which allows you to assess the condition of the hinge without removing this element.
Since the ball joint is a very important and responsible part of the suspension, if it needs to be replaced, you need to purchase only high-quality products. Some of the most reliable and popular manufacturers of ball joints are the following brands: “TRACK”, “KEDR”, “BELMAG”, LEMFORDER (German company)
In addition, any major manufacturer offers reinforced versions of such parts; they are also called sports: “Track-sport”, “Cedar-trial-sport”, etc.
Silent block
The silent block is a part that allows the lever to rotate on an axis. It consists of two metal bushings, between which there is a rubber insert.
Modern industry offers silent blocks made of rubber and polyurethane. Nowadays, basically everyone is switching to polyurethane silent blocks, since they have a longer service life, but their cost is several times higher than their rubber counterparts.
Replacing rubber silent blocks on a VAZ 2107 with polyurethane ones allows you to:
- reduce deformations occurring in the suspension;
- improve car handling;
- remove the squeezing that is typical of rubber products;
- reduce noise and vibrations that occur while driving.
Axle bolt
The axis of the lower arm is rigidly connected with two bolts to a beam fixed to the front side members. On the axis, the mobility of the lower arm is ensured by the presence of silent blocks.
Removing the upper arm of the VAZ front suspension is necessary in three cases:
- Replacing the lever.
- Replacing silent blocks.
- Replacing the lever axis.
The procedure for removing the lever is as follows:
- Place the car on a lift or inspection hole.
- Remove the wheel using a wheel wrench and a jack (the latter is only needed in a pit).
- Remove the bolt securing the front bumper bracket.
- Disconnect the upper ball joint by unscrewing the self-locking nut and mounting bolts.
- Unscrew the self-locking nut of the lever axle, holding the axle with a wrench.
- Remove the axle.
- Remove the upper arm.
Method for checking the technical condition of the rear suspension
To check the serviceability of parts, the car is placed on an inspection hole or overpass.
During a visual inspection, mechanical damage (cracking, ruptures, etc.) is unacceptable on rubber products. If the silent blocks of the rear suspension of the Zhiguli are a rubber mass squeezed out of the eyelets of the rods, they also need to be replaced. Be sure to inspect the attachment points of the rod brackets to the body for cracks. Defective areas must be welded. To determine the condition of the rubber hinges of the longitudinal rods, put the car on the handbrake and rock the body in the longitudinal direction. Play in the connections will indicate worn bushings. The wear of the longitudinal thrust elements is checked by rocking the rear of the vehicle in the transverse direction. Repairing the rear suspension of a VAZ 2106 does not require special knowledge, but some metalworking skills are still needed.
Replacement of the rear wheel bearing of VAZ-2101, VAZ-2104, VAZ-2105, VAZ-2106, VAZ-2107, Classic
In this article we will look at how to change the rear wheel bearing of a VAZ-2101, VAZ-2104, VAZ-2105, VAZ-2106, VAZ-2107, Classic and how to check the rear wheel bearing of a VAZ.
It was time to change this bearing a long time ago, but for some reason I only got around to it now. On the highway the car still behaves normally, but on the off-road the rear of the car began to wobble, and it began to creak when cornering.
The easiest way to check the rear wheel bearing is to press the outside of the wheel with your foot to wiggle it (you will hear a distinct thump). The wheel will simply dangle.
One thing can be said, if you drive carefully, these spare parts will last a long time, if you don’t drive carefully, you will gouge everything, even those spare parts that cost 100 rubles more. The most important thing to understand is that careful driving extends the life of any part and the car as a whole. The bearing must be well filled with grease. Now let's start removing the wheel and see how to change the rear wheel bearing of a VAZ-2101, VAZ-2104, VAZ-2105, VAZ-2106, VAZ-2107, Classic. Changing the rear bearing is very easy, not like the front wheel bearing.
1. We begin to remove the wheel. We tear off the bolts when the wheel is on the ground, it’s more convenient. And there is no need to put it on the handbrake, since you will have to remove the brake drum.
2. When you lift the car with a jack, be on the safe side. The picture shows that the car rested against the jack and the safety stump. If the jack falls out, the box will rest against a stump. Even if the box bends, it’s okay, but you will remain alive.
We remove the drum.
Unscrew the nut.
We knock out the bearing (the blows should fall on the inner race, since the outer race is very thin and will crumble).
6. All that remains is to hammer in the new bearing. In order for the bearing to seat well, lubricate the walls of the cage with oil. Align the wheel bearing as level as possible. And carefully hammer the bearing evenly, the main thing is that it does not warp. If the bearing is installed level, it will easily go into place. Install the retaining ring and screw it back on.
If you hit the hub, the inner part of the bearing race will come out, this cannot be allowed. Therefore, we score with light blows using a pipe. All that remains is to tighten the nut so that nothing dangles. The bearing must be tightened, the tighter the better. Tighten tightly and loosen a little, and seal.
8. All that remains is to install the wheel. The wheel will no longer dangle. 2 years should be enough.
Replacing the rear wheel bearing of a VAZ-2101, VAZ-2104, VAZ-2105, VAZ-2106, VAZ-2107, Classic can be done with your own hands, it is not difficult.
Diagnostics of the upper ball joint
To carry out the work you need to use help. Place an assistant in the car, behind the driver's seat, so that he squeezes the brake. Only in this case will you eliminate the possibility that during diagnostics you will be able to feel the wheel bearing being displaced.
Use sharp movements to rock the front wheel. If suddenly there is even the slightest play in the ball joint, you will definitely feel it. When pushing back and forth, the wheel will move freely. It is possible that there will be a creaking or crunching noise coming from the upper ball joint.
Problems when paying with bank cards
Sometimes difficulties may arise when paying with Visa/MasterCard bank cards. The most common of them:
- There is a restriction on the card for paying for online purchases
- A plastic card is not intended for making payments online.
- The plastic card is not activated for making payments online.
- There are not enough funds on the plastic card.
In order to solve these problems, you need to call or write to the technical support of the bank where you are served. Bank specialists will help you resolve them and make payments.
That's basically it. The entire process of paying for a book in PDF format on car repair on our website takes 1-2 minutes.
If you still have any questions, you can ask them using the feedback form, or write us an email at