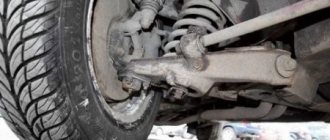
Front suspension device for VAZ 2109
The front suspension of the VAZ 2109 takes on the main load of the car. Therefore, it is necessary to maintain special control over it. The front suspension is subject to load even at rest.
Components of the vehicle chassis:
- Frame.
- Wheels.
- Front suspension.
- Rear suspension.
If you diagnose your car in a timely manner, you can avoid many problems with your car.
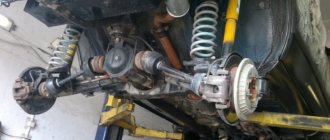
The front suspension of the VAZ 2109 is the front independent element of the car.
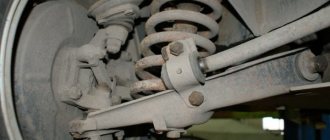
The main device of the front suspension of the VAZ 2109 is shock-absorbing struts on which springs are mounted.
Rear suspension
The central beam is the main element of the rear-wheel drive system of the VAZ 2109 - repair of the rear suspension often requires replacing the entire beam. So:
- To do this, you need to lift the rear of the car, place shoes under the front wheels and engage the gear.
- After removing the wheels, remove both shock absorbers, disconnect the hand brake cables and remove the ends from the brackets.
- When disconnecting the brake hoses, you need to think about how to cover the holes to avoid brake fluid leakage. After unscrewing the nuts securing the beam, knock out the bolts and remove the beam.
VAZ 2109: rear suspension repair
If you disassemble the beam, it is better to loosen all connections that are tightened with a large torque in advance. It may be enough to replace the silent blocks or bearings and install the beam in place. If you are not sure that you can determine the cause of the malfunction yourself, trust the specialists.
Front suspension of the VAZ 2109 and what parts are included in it
In addition to shock absorber struts, the front suspension structure includes a rotary cam. It connects to the top and bottom.
Front suspension device for VAZ 2109
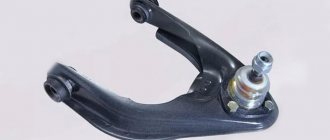
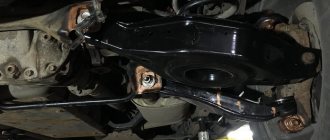
Also the main parts of the front suspension are:
- Lever arm.
- Spring.
- Shock absorber.
- Ball joints.
- Stretch joint.
- Brackets.
Description of design
The front suspension is independent, with telescopic hydraulic shock absorbers, coil springs, lower wishbones with braces and a stabilizer bar.
The basis of the suspension is a telescopic hydraulic shock absorber strut. Its lower part is connected to the steering knuckle with two bolts. The top bolt that goes through the hole in the strut bracket has an eccentric collar and an eccentric washer. By turning this bolt, the camber of the front wheel is adjusted.
The telescopic strut is equipped with: a coil spring, a polyurethane foam compression stroke buffer, as well as an upper strut support assembly with a bearing.
The upper support is secured with three self-locking nuts to the body mudguard strut. Due to its elasticity, the support allows the rack to swing during suspension movements and dampens high-frequency vibrations. A bearing pressed into it allows the rack to turn along with the steered wheels.
Parts of a telescopic hydraulic shock absorber are mounted in the strut housing. If it fails, a repair cartridge can be installed in the rack housing.
The body of the VAZ-2108 rack is slightly longer than the VAZ-2110, so using an externally similar cartridge from the VAZ-2110 is impossible.
The lower part of the steering knuckle is connected to the lower suspension arm through a ball joint. The support is secured with two “blind” bolts. When unscrewing these bolts, be careful: with significant force they often break, so before disassembling, tap their heads in the axial direction.
Braking and traction forces are perceived by longitudinal braces connected through rubber-metal hinges to the lower arms and brackets. At the connection points (at both ends of the brace), adjusting washers are installed for the longitudinal inclination of the steering axis.
A double-row angular contact ball bearing of a closed type is secured in the steering knuckle with two retaining rings. The wheel hub is installed with tension in its inner rings. The bearing is tightened with a nut on the shank of the outer wheel drive joint housing and is not adjusted during operation. The wheel hub nuts are the same, with right-hand threads.
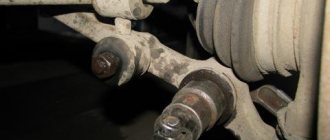
Anti-roll bar - spring steel rod. The ends of the stabilizer are connected to the lower suspension arms through struts with rubber-metal hinges. The middle part of the rod is attached to the body with brackets through rubber pads.
The main problems of the VAZ 2109 front suspension
The front suspension of the VAZ 2109 requires constant monitoring. The main problems in the front suspension are considered to be abrasion of the hinge covers. This problem is mechanical. Also, an equally important problem with the front suspension is unevenness in the lever. This problem may lead to incorrect operation.
All these parts must be constantly inspected and, in case of breakdown, must be replaced with new ones.
The main problems of the front suspension can be:
- Breakage of racks (it is necessary to urgently begin repairs or replace the part).
- Loosening the bolts (they need to be tightened).
- The tension cushions are worn out (they should be replaced immediately with new ones).
- The upper elements are not secured sufficiently (the nuts need to be tightened).
- The supporting element has collapsed (urgent replacement of the part with a new one).
- The hose supports are worn out (it is necessary to replace the part with a new one).
- The ball joint is worn out (the part needs to be replaced with a new one).
- Wheel imbalance (urgent balancing required).
- The spring or compression buffer is broken (urgent replacement of parts with new ones is required).
Repair of the front suspension and replacement of parts with new ones may be required for such problems as:
- Significant difference in tire pressure on the front suspension (the broken part should be adjusted).
- The mounting angles in the wheels are broken (the angles need to be corrected).
- The rubber element on the support post is deformed (it is necessary to urgently replace the part with a new one).
- The difference is in the spring and tire indicators (it is necessary to urgently find the breakdown and replace the part with a new one).
In order to avoid frequent breakdowns of the front suspension of the VAZ 2109, you must adhere to several tips: do not overload the car beyond the maximum load, do not accelerate or brake with sudden movements, and most importantly, do not exceed other indicators, information about which is in the instructions for your car.
Front strut assembly!
Hello everyone, are you done with the holidays? How do you like your first week at work? And I have the first week of vacation, on Thursday I was able to devote time to “Reconnaissance 086 USSR” and began assembling the front suspension. Before this the temperature was -20 degrees. To begin with, I decided to open a couple of books and read, to refresh my memory, so to speak. But the books don’t really cover assembly; they describe the entire process of disassembling the rack. And then I realized that I forgot to buy a travel limiter for the upper strut 2108, so in the morning I went to the store and decided to buy new nuts and washers for the rotary supports
.
I took out one support and realized why these cheerful red SEVI caps did not fit on the supports; there was not enough limiter on top.
Now you can unpack the goodies you bought
The springs came first.
When I bought all these spare parts Buying the front suspension I looked at other BZs and saw that the sound insulator is put on the cup 08, I spied on finn2108 Replacing the suspension and here is another option from a-gennadich and Rebuild suspension But everything just didn’t fit in my head so I just bought one set of sound insulators so that you can figure it out at home and decide whether to install it or not. I’ll say this, I tried it on and didn’t like this idea. When I loosen the ties, the spring will probably fall into place, but I decided not to do that. Although I’ll say right away: The guys have already broken in their racks and everything is fine. I went differently. I bought a protective braid for the spring coil SS-20, so I decided to put it on the top coil
. Yes, there is no such option in the instructions either, but I liked the idea. I note that it’s almost the same on my Agent 070, only on the lower turn. Replacing the front suspension
The next step was to peel off all the stickers - barcodes, Kote came to my aid, as I don’t see “Planet Auto” even though I worked there for some time, the bosses force me to put barcodes on every detail, and on some things they don’t stick and for this First wrap the tape. In reality, it took about 30 minutes to peel off, no less.
Then I put the sound insulator on the stand, it turned out to be a funny combination. I pumped the rack 5 times before installation, the movement is very soft, without jamming or sagging.
Now let's look at the spring.
The books don't say anything about this.
And it seems like it doesn’t matter which side you put it on. But I started looking and realized that on one side the edge of the coil is smoother
and on the other side it is slightly bent, this place is clearly visible
And the top cup just has a protrusion and it’s better to lay down in an even turn
And the gap remains bent
Naturally, at the end I installed it in an even coil in the cup, but more on that later. We clamp the springs in a yew and use zip ties to compress it. With the first spring it worked only 3 times, although there is nothing difficult, the main thing is that the ties do not come off. We try on the compressed spring on the stand, install the cup, the rotary support, the upper limiter and tighten the nut with a special tool.
Remove the tie spring. The first rack is ready. I decided to put what was standing next to it.
Then we assemble the second rack much faster
Now it’s ready, you can install it in place.
How to replace the front suspension arm of a VAZ 2109
The lever is one of the main elements of the entire unit in the front suspension of the VAZ 2109. The lever must be replaced, as a rule, only in the event of severe collisions of the vehicle, or if it falls into a hole or hatch. The lever should be changed using a special pit; in such conditions it will be more convenient for you to work and see all the details. But if this is not possible, then you can use a regular jack.
Replacing the lever is not a very difficult process, and it is quite possible to replace it yourself. First you need to remove the wheel and at the same time secure the car by resting it on something stable. The next step is to unscrew the ball nut and remove it from the lever. Next, loosen the rear nut and unscrew the stabilizer strut mount. Then unscrew the bracket. Then you can pull out the lever with a slight movement.
Next, inspect the condition of the front suspension and check it for other defects and breakdowns. Then replace the joints and the entire lever. In the same sequence, only in reverse order, screw all the parts back.
Diagnostics
It would be wisest if you do not wait for a breakdown and diagnose the chassis. There is no consensus on its timing - each specialist has his own opinion on this matter. The mileage recommended for vehicle maintenance varies from ten to thirty thousand kilometers. First of all, you need to focus on operating conditions - if you drive on broken country roads, this figure will be minimal. So:
- The diagnostic procedure includes checking the degree of wear of the shock absorbers. In car services, it is done with a special device that checks the elasticity of the spring. It is impossible to determine the degree of wear visually. Springs that have lost their elasticity may break.
- Be sure to inspect the spring cups, which may also have defects and damage. They check the play in the VAZ CV joint - a torn boot can create problems. Inspection of ball joints and tie rod ends is also necessary.
- Silent blocks are connecting elements between the frame and suspension; due to this worn-out part, the smoothness of the car is lost. Both brake pads and wheel bearings are subject to inspection, and the tightness of the hoses is checked.
- Computer diagnostics makes it possible to identify and promptly eliminate even minor faults, which will protect parts from more significant damage.
- When you fall into a hole or hit a curb, the rims are the first to suffer. The rim of the disc may bend, which will certainly be felt when moving. An iron or cast disk can be rolled, but a forged one cannot be repaired. It will simply burst upon impact.
- The wheels of any car need periodic balancing and checking tire pressure. It must be as prescribed in the operating instructions. When changing wheels seasonally, you need to alternate their installation from the front to the rear axle, which will balance out tire abrasion.
Wheel balancing
If these simple rules are not followed, not only the tires will wear out, but also the steering, braking system and transmission elements. Timely maintenance of the chassis is the key to your safety on the road.
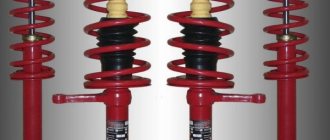
Replacing shock absorbers on the front suspension of a VAZ 2109
It is enough when repairing the front suspension of a VAZ 2109; it is also necessary to replace the shock absorbers. You can understand that it is time to change the shock absorbers by hearing shocks while driving. Most often this indicates that the springs have broken or the shock absorber has lost its elasticity. Springs and shock absorbers can only be replaced in pairs.
Replacement process:
- First you need to remove the front strut. Then take it apart. However, it will not be possible to repair the wheel corners.
- You need to remove the wheel and turn the steering wheel all the way. Unscrew the nut with a wrench while removing the cotter pin.
- Remove the stand holder. Remove the plug and loosen the shock absorber rod nut.
- Place a mounting mark on the bolt. Remove the bolt.
- When reassembling, it is necessary to achieve alignment of the marks, then the deviation of the wheel angles will be less.
- Next, unscrew the upper and lower bolts and remove the adjusting washer.
- Unscrew the nuts that connect the strut support and the body. Install two zip ties onto the springs. In this case, the ties must be opposite to each other.
The front suspension of the 2109 can often break down, causing a lot of trouble for its owner. To avoid problems and frequent breakdowns of the 2109 suspension, it is necessary to promptly diagnose your car and, in the event of any malfunction, urgently check and inspect it, and if it is severely damaged, replace it. If you yourself are not able to repair the front suspension of the VAZ 2109, it is better to take the car to a car service center, where experienced technicians will quickly and efficiently repair your car. If this is not done in a timely manner, bad consequences may occur.
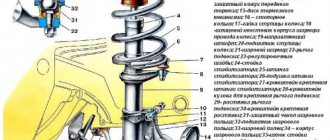
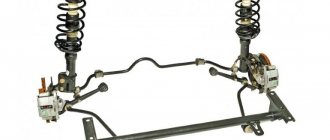
Scheme
The diagram below will allow you to determine what components the assembly is divided into and what it represents in the assembly. The table will help you figure out where each suspension element is located.
Node diagram
| Item number | What is |
| 1. | Upper shock mount |
| 2. | Spring support cup (upper) |
| 3. | Compression stroke buffer with protective cover |
| 4. | Compression Buffer Support |
| 5. | Spring |
| 6. | Spring support cup (lower) |
| 7. | Tie rod joint (ball) |
| 8. | Swivel lever |
| 9. | Strut (shock absorber) |
| 10. | Eccentric washer |
| 11. | Adjustment bolt |
| 12. | Shock absorber bracket |
| 13. | Rounded fist |
| 14. | Brake disc guard |
| 15. | Brake disk |
| 16. | Retaining rings |
| 17. | Hub cap |
| 18. | Splined shank of the wheel drive joint housing (outer) |
| 19. | Guide pin |
| 20. | Wheel bearing |
| 21. | Control arm ball joint |
| 22. | suspension arm |
| 23. | Adjusting washer |
| 24. | Shock absorber (strut) of anti-roll bar |
| 25. | Anti-roll bar |
| 26. | Barbell cushion |
| 27. | Rod fixation bracket |
| 28. | Body bracket for fixing the suspension arm |
| 29. | Lever stretch |
| 30. | Stretch Fixation Bracket |
| 31. | Suspension arm joint bushing (rubber) |
| 32. | Suspension arm joint bushing (spacer) |
| 33. | Shock absorber rod |
| 34. | Upper strut housing (outer) |
| 35. | Upper shock mount housing (inner) |
| 36. | Support bearing |
| 37. | Rubber top support component |
| 38. | Travel limiter for upper shock absorber mount |
| 39. | Protective cap for upper shock absorber mount |
| 40. | Front joint bushing |
| 41. | Front joint cushion |
| 42. | Washers |
| 43. | Stabilizer link joint |
| 44. | Rear joint extension |
| 45. | Joint housing (ball) |
| 46. | Joint bearing (ball bearing) |
| 47. | Ball pin |
| 48. | Ball pin protective cover |
Bottom view
It’s not enough just to know the name and location of the suspension elements. Be sure to understand how the entire system works and how all the components interact with each other.
Signs of wear or damage to the undercarriage
- Leaks under the car in the area where suspension parts are located. Cars of the VAZ 2109 model, as a rule, already have a long service life (and the design of the hydraulic cylinders is designed for a certain resource, which they may have exhausted a long time ago). There is a high probability that the oil seal or shock absorber rod mirror may wear out, so pay attention to possible leakage of hydraulic fluid (in principle, you need to be careful about any leaks from the car);
- Knocking when driving, yawping along the road is the most common sign of a malfunction. As a rule, this indicates wear or loosening of the components; carefully inspect the suspension, or best of all, contact a workshop;
- When acting on the suspension (try pressing on the hood or, conversely, lifting your car, experienced auto mechanics, when first getting acquainted with passenger cars, not only the VAZ 2109, roughly assess the condition of the chassis), the suspension does not provide sufficient resistance - the first sign of malfunction hydraulic cylinders. There can be many reasons - insufficient amount of fluid, leakage due to wear of the seals, fluoroplastic bushing, wear of the rod, malfunction of the valve mechanism. It is necessary to replace worn parts, replenish the oil in the cylinders, or eliminate the malfunction of the valve mechanism;
- When driving (especially on uneven roads), hard shocks with a characteristic sound occasionally appear, which can even be felt on the steering (the so-called “breakdown” of the suspension). The appearance of this symptom indicates that the springs (most often the rear chassis) have lost their properties due to metal fatigue; hydraulic shock absorbers may also not work properly. In any case, it is necessary to inspect the structure of your suspension and make repairs.
DETAILS: Adjusting the clutch cable VAZ 2110
We have not yet mentioned the uneven
- if your wheels are adjusted for wheel alignment and balanced, and the CV joints (since the VAZ 2109 is assembled according to a front-wheel drive system) work correctly, then the reason is the chassis, there is a breakdown somewhere, excessive play or wear.
In conclusion, it should be noted that although the chassis of the VAZ 2109 is not subject to such overloads as a similar truck unit, its design is still quite complex and requires constant attention; fortunately, the suspension design allows for maintenance and repair without large material costs.