Unlike other brands in the budget segment, the Chevrolet Lanos is equipped with an autonomous heating system. Heating of the windshield and interior with a flow of warm air together with the air conditioning system. This design has advantages and disadvantages. Let's take a step-by-step look at why the stove on a Chevrolet Lanos does not heat well.
Why does the Lanos stove heat poorly?
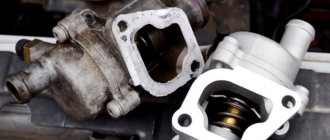
The standard thermostat says 86 degrees Celsius, but it often leaks coolant earlier, at about 80 degrees. This is all because the full opening of the thermostat occurs at 86 C. Consequently, the coolant at normal temperature has not yet passed through the entire engine, but the opening of the thermostat has already occurred and the flow of coolant went into a small gap even before the full opening.
This is why it turns out that the Lanos heater does not heat well, because the coolant gets into the chevrolet lanos heater and the heater is poorly heated. This reason is clearly manifested when the engine is warming up, when the thermostat first opens, air blows out of the diffusers colder than.
The stove will work much better after opening the thermostat several times, because by that time the coolant will warm up to 87 degrees Celsius, and the main radiator fan will sometimes start turning on.
To prevent the thermostat from opening early, you can set another one marked 92 degrees Celsius. With it, the engine will not overheat, you can worry about this, because the thermostat will begin to open slightly at degrees Celsius. Over time, any thermostats begin to open earlier and earlier, far from reaching the required temperature - accordingly, the stove begins to heat less and less.
Partial passage of cold air past the stove radiator. When the air flow is directed by the damper towards the radiator or past it, the heater weakly heats the direction overlap, which leads to partial entry of cold air into the air duct, which is located behind the radiator and is not sufficiently heated.
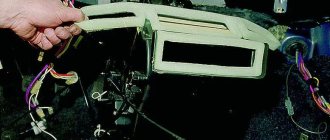
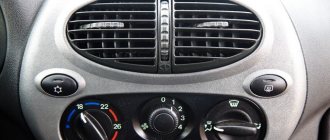
Cool air begins to blow from the diffusers as cold air mixes with heated air. The position of the lever determines whether the damper is closed. The duct from which it comes is located in the glove compartment area on the left side. It is possible to get to it, but it is quite inconvenient.
The heater on a Chevrolet Lanos does not heat well. Main reasons
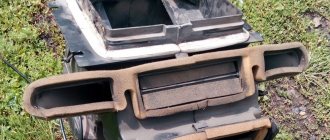
To do this, it is better to remove the glove compartment. First, the position of this lever on the climate control panel is noted when the switch regulating cold and heat is in the extreme right position. As a result, all the air that was in the system will escape through the open expansion tank. What to do? In cars produced this year, the chevrolet lanos latches often break; the heater heats the heater radiator poorly. As a result, it warps a little, and the bulk of the warm air simply passes by.
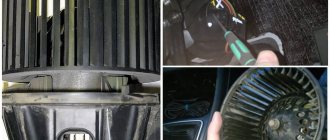
Chevrolet Lanos heater radiator The second more complex breakdown is a clogged radiator. To treat the mounting of the Lanos heater radiator you will need: Move the center console In the photo it turned out more clearly, the chevrolet lanos heater heats up weakly with your hand, it turned out to be a mobile phone camera.
For easy access to the bottom of the radiator, simply remove the lower air duct directing hot air to the feet by unscrewing 3 screws. When removing the air duct, a bunch of wires hanging on the clips will interfere; you just need to pry one of the right ones with a screwdriver and remove it from the hole.
You also need to first unscrew the screws and move back the plastic of the center console, the one between the seats. Move the gearshift lever to position 2 or 4. Chevrolet Lanos heater heats up weakly, thereby pushing the plastic of the center console to the maximum.
Not a tricky tool Heat the knife on a gas burner and simply insert the tip of the blade into the plastic, slowly cutting it along the contour of the intended hatch. You should not push the knife deep; if you overdo it and insert the blade deep into the air duct housing, you can damage the radiator itself. The very movement of a hot knife in plastic goes like butter. After cutting out and bending the hatch, cut off a piece of rubber hose according to measurement, making a v-shaped cut on one side with a knife; the Chevrolet Lanos stove heats poorly will rest against the edge of the radiator tank.
I inserted a short screw or bolt into the inside of the hose to prevent deformation of the hose itself from high temperature.
Replacement without removing panel
The traditional method is only suitable if we are only changing the radiator. If you decide to carry out a complete inspection of the heater, and in addition to the heat exchanger itself, check and adjust the dampers, change the seals, then in this case you will have to remove the front panel to provide full access to the housing for disassembling it.
Tools and equipment
To perform the replacement using a method that does not involve removing the front panel, you will need:
- a new radiator (repairing a Chevrolet Lanos radiator is impossible and therefore it is easier to purchase and install a new part);
- rubber tubes of the stove (with which the heat exchanger is connected to the cooling system);
- set of keys and sockets (standard sizes);
- screwdrivers (phillips, flat, long, short);
- rags;
- antifreeze;
- flashlight.
To simplify disassembly, the presence of a flexible extension cord, a set of Phillips and flat bits, and a wrench with a ratchet mechanism (found in tool kits for car repairs) will make it possible. Using a flexible extension, you can easily reach and unscrew fasteners located in hard-to-reach places.
Technology of work execution
Having prepared the necessary equipment, we begin to work. At the same time, one of the disassembly stages involves working under the car, so an inspection hole is also needed.
Video: Replacing the Lanos stove radiator
Replacing a Lanos radiator is done as follows:
- We de-energize the on-board network (disconnect the terminal from the battery).
- Drain the antifreeze from the engine.
- From the side of the engine compartment, we disconnect the coolant supply pipes to the stove (they “stick” to the radiator pipes, but if there are replacement pipes, you can cut them off).
- We climb under the car. We find the connection between the gearshift lever rod and the gearbox, unscrew the clamp and disconnect the rod.
- We move to the salon. We dismantle and remove the front seats.
- We dismantle the lining of the central tunnel (first the rear, then the front).
- We unscrew the 4 mounting bolts that secure the gearshift lever to the central tunnel. We remove the lever together with the rocker, pulling it towards the rear seat, and pull it out of the cabin.
- We unscrew the fastenings of the two racks installed between the center console of the panel and the tunnel and remove them. It is better to cover the floor under the panel with a piece of plastic film (so that during further disassembly, coolant residues do not get on the wiring running through the tunnel).
- Behind the center console below we find the lower cover of the stove housing, which is additionally a distributor of air flows to the foot area. This cover is fixed on 3 screws (2 on the front, 1 on the back), which we unscrew and remove the cover.
- The lower housing cover is located under the distributor. It is attached with 8 self-tapping screws around the perimeter (some fasteners are difficult to reach, and a flexible extension is useful here). We unscrew the screws.
- Further actions depend on the configuration of the car. On models without air conditioning, the bottom cover can be removed without problems. But in versions with air conditioning, the drainage pipe prevents removing the cover. And here you can do two things: forcefully pull the cover towards the interior and down (but this can damage it) or cut off the drainage pipe (during the assembly process we will replace it with a piece of tube).
- When we remove the cover, we will have access to the radiator itself. It is held in front by a spring clip, and in the back by a self-tapping screw. Having removed the fasteners, we remove the leaking or clogged heat exchanger and install a new one in its place.
We assemble the interior in the reverse order.
Although some stages of disassembly are difficult and inconvenient, replacing a Lanos radiator without dismantling the panel allows you to complete the work in one day and on your own.
How to fix poor heating of the stove on a Chevrolet Lanos
Hi all. I think all Lanos owners are familiar with this problem, or have had one, or are currently experiencing this problem. There are many articles, many videos on this topic... Very often they advise simply changing the thermostat... In this article I will share the way I managed to solve the problem of why the stove in Lanos does not heat?
I read this method from one good blogger, for which I THANK him SO MUCH. There is no point in copying or rewriting the article; later I will give a link to his post, everything is written there in detail, what and how to do. I just decided to publish this article on my blog, for my readers, perhaps someone, like me before, was still looking for the reason... If my post helps anyone, I will be sincerely glad
Interesting article, I recommend it. I warn you in advance about the presence of many letters
Stove repair in Lanos
Many owners have probably already noticed that the stove on Lanos does not heat well. The reason for this, as a rule, is the heating design, which is designed for a milder climate compared to the Russian one, therefore, even if all components in the system are working properly, you should not hope for special warmth. Moreover, in comparison with the Zhiguli radiator, the dimensions of which are 225x285 with a thickness of 85, here it has dimensions of 220x228 with a thickness of 28 millimeters.
Even if it occurs to someone to replace the standard radiator with a more powerful one, nothing will come of it, since another “thicker” radiator simply will not fit here. Of course, you can try, but to do this you will need to remove the panel and ventilation duct. And here you cannot do without depressurizing the air conditioning system. Then it will still be necessary to rework the internal structure of the stove boxes. In general, you will have to do almost everything again.
1. An internal blockage of the heater radiator has occurred. If such a malfunction occurs, the hoses in the stove begin to produce a completely different temperature. The thermostat starts to open quite often and the same thing happens when the radiator fan turns on.
You can also check at home how much antifreeze parameters affect cooling. Liquid is poured into two containers of up to 50 milliliters, then soda (a pinch) is poured into one container, and any acid (a few drops) into the other. There is no need to worry about the cleanliness of the cooling system if no reaction occurs in both containers.
2. The heater radiator is clogged from the outside. This malfunction is accompanied by the same temperature of the stove hoses and a reduced air flow that exits through the diffusers. Moreover, this blockage does not occur overnight, but over time, and often the decrease in air flow is not noticeable, so the malfunction is better checked when compared with another machine.
This car does not have a cabin filter installed, so the heater radiator and air conditioner evaporator can easily become clogged with various leaves, fluff, and so on. This blockage prevents air from passing through the radiator. Also, the air conditioner may develop a putrid odor over time if there is no filter.
This is caused by dust that settles on the evaporator, thereby creating a comfortable habitat for putrefactive bacteria to multiply. Passengers sitting in the car not only smell an unpleasant odor, but also rot spores enter their lungs. Large debris is easily collected with a vacuum cleaner.
3. There is airiness in the heater radiator. The temperature of the hoses on the stove with such a malfunction is very different, the radiator fan turns on frequently and the thermostat opens quite often. At the same time, completely expelling air from the radiator is quite a difficult task, since it is located in the ventilation duct at an angle of about thirty degrees.
In the event that the procedure for expelling air is not carried out specifically, the heating of the radiator is reduced and the Chevrolet Lanos stove does not heat well. You can try to expel the air almost completely if there is a steep hill on which the car will stand at approximately an angle of thirty degrees, maybe even more.
When it falls, many tiny air bubbles dissolve in the coolant, then all this enters the engine cooling system and then into the heater radiator. Air then begins to accumulate at the top of the radiator. Many car owners have noticed that after the first year after purchase, the Lanos stove hardly heats up.
Such a malfunction, as a rule, has two reasons, the main of which is the stock coolant, which contributes to deposits in the honeycombs, and bubbles in the coolant. There is also a way out in this situation! To do this, move the throttle heating return hose under the reservoir, insert a tee there and replace the coolant.
Failure of fastening
The fifth reason is the most interesting. The design of the heater radiator mounting itself fails. High temperatures, poor quality plastic and heavy loads lead to the fact that the fixing bracket wears out and the radiator gradually breaks off from the air duct. It is not difficult to imagine that cold air then enters the cabin through the cracks. Here, no matter how hard your stove tries, there will be a glacier in the cabin.
At service stations, the reason why the stove on Lanos does not heat well is encountered quite often. Therefore, experts advise not to let things get into trouble and to additionally secure the fastening with self-tapping screws or hooks in advance. Please note that everything must be done carefully so as not to break the honeycomb. Then, if the stove on Lanos starts to heat up weakly, you won’t have to worry about the fastening breaking off.
Now you know almost all the probable reasons why the stove on a Chevrolet Lanos does not heat well, and you understand the intricacies of the heating system of this car no less than an expert. Having checked all the points indicated in the article before the onset of cold weather, you can with almost 100% probability not be afraid that your “swallow” will let you down in winter.
How to replace coolant on a Chevrolet Lanos
Important! According to the manufacturer's instructions, only antifreeze based on ethylene glycol should be poured into the Chevrolet Lanos cooling system. Under no circumstances should you use antifreeze, much less water.
The cooler must be replaced if the car has been in use for more than four years or the mileage has exceeded 40 thousand kilometers.
Replacement can be made earlier if you notice that the color of the antifreeze has darkened or acquired a brown tint. This is an obvious sign that it needs to be replaced urgently.
For Chevrolet Lanos, according to the instructions, the volume is seven liters. However, according to the experience of many car enthusiasts, five will be enough. The design of the Chevrolet Lanos cooling system is designed in such a way that the entire volume of antifreeze cannot be drained.
Suspension tuning
The Chevrolet Lanos suspension has decent characteristics designed for the average driver. Many owners want to customize the car to suit themselves and their driving style. Therefore, they resort to suspension tuning.
Table - Chevrolet Lanos suspension tuning
| Suspension tuning option | The main advantages of modernization | Negative sides of suspension tuning |
| Increased clearance | Improving the cross-country ability and carrying capacity of the vehicle | Increased risk of losing control of the car |
| Reducing ground clearance | Creating a sporty car look | The emergence of difficulties in overcoming obstacles on the road surface |
| Increased rigidity | Increased load capacity and reduced rollability | Reduced ride comfort |
| Adding softness | Comfort when driving on roads with potholes and potholes | Vehicle sagging when loading cargo and roll when cornering |
| Air suspension | The ability to adjust the suspension to your driving style and road conditions | High cost and lack of reliability |
Adjusting the dampers
A fairly common problem for Lanos is that cold air only partially passes past the radiator. The result is that the temperature in the cabin drops. The air supplied is not warm enough.
The likely cause is that the damper is stuck somewhere in the air duct.
We fix the problem and tell you how to get to the Lanos heater damper. This is quite difficult to do. The air duct is located on the far left of the driver's front part of the cabin. For easy access you need to remove the glove compartment. We visually identify the cause. Most likely, the damper simply rested against the partition and bent. An additional reason may be a damaged radiator mount. By the way, in Lanos it is far from perfect. All these problems can be easily fixed. Such repairs do not cause any difficulties. There is no point in talking about this in detail.
Let's move on to the issue of adjusting the throttle position sensor (TPS). To do this, you will need a simple set of tools and accessories: a knife, a multimeter, a round needle file and electrical tape.
- We clean the sections of the blue and red wires that fit the connector. We do this to subsequently measure the voltage with a multimeter.
- We start the engine and measure the voltage between the sensor wires (not to be confused with the signal wire and ground). If there is a deviation from the parameter of 0.55–0.56 V, we adjust it.
- Using a file, we bore the sensor mount until it becomes possible to rotate it around its axis.
- We install the sensor in its extreme position. It's quite easy to adjust. If you are guided by a mechanical watch, then when you turn the sensor in the direction of movement of the arrow, the voltage on the wire will increase, and when turned against, it will decrease. Next, we adjust until we reach a value of 0.55–0.56 V.
- We attach the sensor and carry out a control measurement. We wrap the cleaned areas with electrical tape.
Functions, structure and principle of operation of the stove radiator
The radiator (convector, heat exchanger) of the stove is the most important component of the interior heating system of any car. The stove ensures the creation and maintenance of a comfortable temperature for the driver.
This is especially true during the cold season. In addition, the heater prevents fogging of car windows.
The heating system consists of the following components and parts:
- frame;
- stove radiator;
- heat exchanger pipes;
- control valve;
- fan;
- electric fan motor;
- air ducts and distribution dampers.
The heating system heats the air entering the cabin
The role of coolant is played by antifreeze circulating through the cooling system.
When the power unit is warmed up and the coolant temperature reaches 50 °C, it can be used to heat the passenger compartment. Depending on the position of the tap, a certain amount of hot antifreeze enters the radiator. The fan directs air flow from the engine compartment into the passenger compartment. This air passes through the radiator honeycombs, receiving heat from the heated antifreeze. The more antifreeze passes through the heat exchanger, the more heat is transferred to the air. The flow of heated coolant in the radiator can be adjusted using a tap.
The Chevrolet Lanos heater radiator has a fairly simple design
Depending on the car model, the air temperature in the cabin is regulated in various ways - by a control valve, fan rotation speed and the position of the air dampers. The heated air flow is regulated and distributed in different directions. By directing warm air onto the windshield and front side windows, you can prevent them from fogging up. Using the flaps, you can direct air to the area of the legs, face and certain places on the side windows. Blowing the windshield is also necessary to create slightly increased pressure so that dust and dirt from the street do not enter the cabin. This ensures the most comfortable microclimate for the driver and passengers.
The design features of the heater somewhat limit its operation.
So, the stove cannot be turned on when the engine is cold. You need to wait until the coolant heats up to 50–60 °C. Otherwise, the engine will take much longer to warm up, especially in severe frost. In addition, due to the increased humidity in the cabin, the windows will begin to fog up. Therefore, water and air heaters are sometimes installed as additional ones. This depends on the design features of the heating system of a particular car model.
air duct Cold
The air, before entering the radiator heaters of the car, passes through a rather long air duct along the path. During cold periods of the year, its walls are cooled to such an extent that they directly reduce the temperature in the cabin no worse than an air conditioner.
To minimize this effect, it is enough to cover the air duct as much as possible with heat-insulating material. Ideally, this work should be carried out after the tightness problems have been eliminated. The process itself is simple, but it requires preparation in the form of removing the panel. You can, of course, try to avoid these difficulties, but the result may turn out to be disappointing and you will have to redo everything all over again. 8. Lack of tightness in the radiator itself. The reason that the heater in the Chevrolet Lanos does not heat well may be a defect itself, and the radiator is insufficiently tight. This is especially true for models in which the inlet and outlet openings are located on the same side. Normally, they should be separated by a solid partition, otherwise the air will simply pass from the incoming fitting to the outgoing one, without increasing the temperature of the radiator itself.
Possible reasons for poor heating system operation
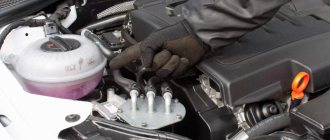
To understand this issue well, we will highlight the main reasons for unsatisfactory operation of the heater: • Low level of coolant in the system. The solution may be to add a trivial amount of coolant slightly above the limit of the expansion tank. Before embarking on more serious activities, you should start this way. • Damage to the radiator mounting. This is the most common breakdown, why the stove does not heat the Chevrolet Lanos well. To determine enough damage in the engine compartment, strongly move the heater hoses in different directions. If instability is felt, assume that the radiator is damaged. In this case, the tightness of large gaps is greatly compromised, the flow of cold air does not enter the radiator, and the radiator hoses remain practically the same temperature due to the lack of heat transfer. • Violation of the radiator tubes. It is very easy to identify this problem - just at low temperatures, for a long time with a warm engine and the heating turned on, place, at most, your hand on the supply hose. Normally, you won’t be able to hold your hand on it for a long time due to the high temperature, but you can hold it for a long time - there is a blockage with a problem. There is a chance that the radiator is simply contaminated. You can eliminate the air lock in the following way: drive the car up an incline at least as high as the radiator (30° is located approximately at this angle, and its position becomes strong) and apply the gas horizontally. If you're lucky, the plug should come out.
If this method does not work quickly, then the result is that the radiator is clogged with various deposits. In this case, flushing with a citric acid solution can help, but the chances are 50/50, and you may just have to replace the radiator with a new one. Let's consider the optimal design of the cooling flushing system: 1) completely drain the antifreeze and thoroughly rinse the radiator with water several times; 2) prepare a solution of citric acid (dissolve 400 grams of citric acid in one liter of warm water, add 3 liters of cold water and mix everything thoroughly) and pour it into the radiator; 3) warm up and watch the engine for air pockets to come out, add fluid to the required level as needed; 4) with this solution we travel 200 - 300 kilometers, ideally in a few days; 5) drain the solution and thoroughly rinse the radiator with regular water; 6) fill the system with standard antifreeze, get rid of air pockets and test the operation of the heater for several days. We observe what we receive and rejoice at the result, if it is positive. However, a negative effect from the procedure is also possible (constant formation of black sediment in the expansion tank, risk of damage to the pump). that So, those who want to wash with citric acid should think twice about whether it is worth it at all. Deformation. • make separate parts (dampers, partitions) for the ventilation duct inside. According to experts, deformation of the partitions and dampers is one of the main reasons that the Lanos stove does not heat, in addition to fixing the damage to the radiator. The main determining sign of something is that the radiator holds the hoses when jerking, but firmly with a well-heated engine, everything is almost the same temperature.
Similar Bad:
- articles the stove on the VAZ 2114 heats up:...
- do what if it doesn't work...
- How to replace a radiator...
- Dismantling and replacement of the main…
- Replacing VAZ thermostat 2114
- The operating principle of a thermostat in...
Poor sealing
most of One common reason for low temperatures in the car interior in winter is insufficient tightness of the ventilation joint box. It is enough to check this at: just a low temperature outside, turn the heater fan control to position 4, direct the windshield air flow onto the glass and simply run your hand at the joints of the ventilation duct parts. If we feel cold in certain places, then you can be sure that there is a strong cooling of the interior with cold air from outside. The problem is solved without any difficulty: we simply coat all the seams accessible with any sealant, and for maximum effect the damper lever can be attached to the axis (the corrugation can come from the handle for changing the position of the mirrors, you will have to struggle a little with the installation, but a stationery knife and a little sealant will help you ).
Flushing the Lanos heater radiator yourself
If you do not monitor the condition of the stove radiator, then one day it will give you a surprise and stop performing its functions.
Golden House of Nero. Shaman Alexander Yakut goes to Moscow to expel Putin Putin considers himself Koshchei the Immortal: You can’t wait! #OPR Yakut is coming to save Russia.
It gets clogged both outside and inside, and on Lanos the radiator mounts can break off. As a result, the stove begins to heat poorly. In this case, it is preferable to clean the element and wash it. Before doing this, drain the coolant from the system. You can flush the radiator by removing it from its place or without doing so.
Some parts of the cooling system had been replaced, so I needed replacement parts.
If you want to do a quality flush, it would still be better to remove the radiator. Some people use special cleaning agents for washing, and maybe this makes sense. However, I preferred to use citric acid.
The latter can be bought at any grocery store. After dismantling the radiator, we rinse it with plain water.
Individual feature
Probably, only this model has a tendency to break off the radiator mount, which is a bracket that presses it to the air duct. After such an incident, cracks appear, and cold street air begins to flow into the cabin, bypassing the heated radiator. You can check your assumption by moving the radiator pipes under the hood - they must be motionless, otherwise you have the indicated situation.
The Chevrolet company orders the removal of the torpedo to eliminate the accident. However, many owners complain: such actions, in addition to being labor-intensive in themselves, often lead to problems with the reinstallation of removed elements. Complaints about the return of air ducts to their original location are especially strong. Craftsmen have developed a technique that allows for a minimum of dismantling.
During reassembly, the same bolt adjusts the distance so that the expansion is stable and tight. After this, your radiator will never fly out of place, and if you again have to figure out why the Chevrolet Lanos heater is not heating well, failure of the fastening can be excluded from the list immediately.
Chevrolet Lanos heater does not work
If in winter the stove on a Chevrolet Lanos does not heat well, then a lot of troubles arise. You have to carry out repairs, spend money and time. Experts note that in the new model the stove works very well and there are no interruptions. After a year of operation, drivers are faced with minor problems; they have to devote more time to heating
Of course, you can ignore this and move around without a stove. But if it comes to the winter period, the driver quickly gets sick and may end up in an emergency situation.
The heater on a Chevrolet Lanos does not heat well - the problem occurs quite often, especially on used models. Because of this, a lot of troubles arise; the driver can not only get sick, but also get into a traffic accident. Frozen windows are to blame, the view is reduced very sharply, it is impossible to see anything. Of course, you can constantly stop and wipe the glass, but this is not very convenient. It’s easier to contact a specialized service and repair the heating system. For all the work you will have to pay not a very large amount.
The first step is to check the vehicle's coolant. As a rule, this is where the main problem of all heating system problems lies. There are two options in total:
- The coolant is not able to reach the required temperature. All this happens due to the thermostat installed in the vehicle. It breaks down very quickly and without any problems; regular inspection is required. The main signs of thermostat failure include: lazy movement of the coolant temperature gauge, even on a warm engine, and a cold pipe that connects the radiator and thermostat. If there is a malfunction of the thermostat, the pipe will either heat up quickly or remain cold at all;
- Poor flow of coolant through the radiator. To determine this problem, you need to touch the inlet and outlet hoses. If they have different temperatures, then the problem lies in clogging of the channels. There is an urgent need to flush the radiator system using a flushing solution. It is passed through the entire system several times to get rid of unpleasant substances. If the problem lies in the radiator, then repair is required;
- An equally common cause is airing of the radiator. Because of this, the movement of liquid through the system is difficult; it is not able to break through the air plug. To fix the problem, you need to drive the Lanos into the inspection hole, unscrew the expansion tank cap and rev it up several times. Thanks to these actions, the problem will disappear.
Many car owners have noticed such a feature that over time the radiator mount breaks off and an unpleasant gap appears. Because of this, cold air enters the vehicle interior, bypassing the radiator circuit. To test your hypothesis, you need to look into the engine compartment and move the radiator pipe. If everything is in order, then it should be motionless. Otherwise you will have to do the following:
- Wrap steel wire around the base of the pipes and pull towards the floor. Due to such actions, the stove will move upward, you will not have to spend a lot of time on additional unscrewing;
- Get rid of the standard casing, which is located between the driver and passenger seats;
- Using a screwdriver, remove the screws and remove the lower distribution cover. It is responsible for directing the warm air flow;
- Remove all bolts that hold the bottom box in place. Lower the front part slightly;
- Next, take a metal strip and make several holes. Install bolts of the same size, secure everything with a lock nut to prevent movement;
The thermostat has failed
The second reason why the stove does not heat well on a Chevrolet Lanos is a broken thermostat. This device is quite fragile and easily breaks down. How to recognize that the thermostat is broken? When the engine is warm, the antifreeze temperature needle will rise very slowly and not reach the desired value. Also touch the pipes connecting the radiator and thermostat. They will either heat up very quickly (although the stove, according to the sensors, has not yet warmed up), or will remain cold. There is only one solution - replacing the thermostat.
Heating system elements
- Radiator: warms up the air flow by circulating cooling system fluid inside the heat exchanger.
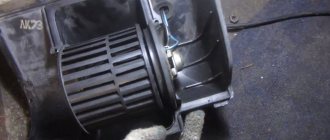
- Electric drive – supercharger: takes air flow into the car interior. Sometimes it is called an impeller or a motor. The preset regulator allows you to mechanically select the optimal position and number of revolutions.
- Heater damper: air flow regulator, with its help we increase or decrease the air temperature inside the cabin.
- Distribution regulators: adjust the airflow to a specific area or the interior as a whole.
Chevrolet Lanos heater device
The third possible failure is air in the system. Diagnosing this is also easy. In this case, in the engine compartment, the temperature of the inlet and outlet pipes of the heater radiator varies greatly. The fan turns on frequently. Removing air is not difficult. Go up the hill (by car, of course, at about an angle of 30 degrees), remove the expansion tank cap and press the gas pedal all the way down several times. Experts warn that after about a year, air may accumulate again, so carry out this procedure every autumn to avoid freezing in winter.
Other improvements in heating methods
In some cases, an increase in temperature can be achieved by installing an additional pump for increasing the volume of liquid cooling the stove. However, it is unlikely that the effect will be very noticeable, because no matter how you accelerate the movement of a coolant at a low temperature, you will not get much heat out of it. Installing an additional radiator complete with Useful may become more effective. With the pump, the radiator area will become larger and heat transfer will improve several times. However, it is worth remembering that it is not always possible to install an additional radiator without the accompanying complex structural components. changes, a good result can be obtained by using the method of taking air from the engine radiator directly. After all, heating already warm air is much more practical than cold air from the street. here, however, there are significant drawbacks: in the event of any engine failure, accompanied by unpleasant air, odors in the cabin will become unsuitable for even breathing and dangerous. It is also believed that the stagnant area in the zone of the fourth cylinder has a negative effect on the heating system. However, troubleshooting this problem is quite a painstaking task, requiring certain qualifications, so we will not dwell on it now.