The heating, ventilation and air conditioning systems of the Vesta interior are completely different models compared to similar systems operating in other Lada models. Moreover, both the design itself and the control method in these three systems are strikingly different. To begin with, we will conduct an overview analysis of the design of the Vesta stove, which will allow us to verify its effectiveness. VENTILATION AND HEATING SYSTEM
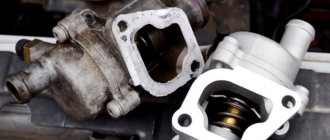
The heater radiator, designed to heat the interior of the car, is located inside the housing on the left side. If it needs to be replaced, it will be necessary to remove the upper frame (lining) of the panel (dashboard).
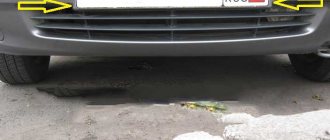
The cabin filter, which is located in the heater unit on the passenger side, functionally cleans the air entering the cabin. Unlike models such as Granta, Kalina or Priora, where the cabin filter is replaced from the engine compartment, on Vesta similar work is carried out from inside the car. In addition, the resource of the filter element is not the usual 15 thousand km, but 30,000 km, which is much more preferable.
Air temperature indicators in the cabin and outside send their measurements to the engine control unit (ECU). The control unit for the stove (heater) and air conditioner (SAUKU) is capable of monitoring parameters associated with temperature fluctuations in the air in the cabin, changes in the speed and direction of air flows, as well as heating controls. Depending on the configuration, the SAUKU can have three varieties:
- SAUKU with air conditioning;
- SAUKU without air conditioning;
- SAUKU with climate control (will be installed on cars a little later).
INTERIOR VENTILATION DIAGRAM Air ducts coming from the side of the stove body direct air jets to the windows, into the passenger compartment and legs. In turn, if the central deflectors are capable of controlling air flows in different vectors, then the power of these devices can be adjusted with a wheel located horizontally under them.
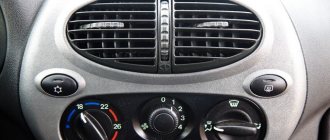
As for the implementation of the Vesta driver’s foot airflow system, in practice AvtoVAZ introduced an innovation by placing the air duct nozzle above the right foot, and not on the side. Some owners of the new sedan believe that such a mechanism is not entirely adequately selected, since the fingers are heated worse than the feet themselves. It is noted that the front passenger will not experience similar difficulties due to the fact that the air duct itself is closer to the wall of the engine shield. Also worthy of special attention is the option called “Cooled Glovebox”, which allows, on versions of the car with air conditioning, to cool any food or items in the glove compartment, which is achieved by connecting a small air duct to this small storage area. CONTROL ALGORITHM FOR OVEN AND AIR CONDITIONER “Classic” block without air conditioner The left regulator (No. 9) is designed to control the temperature of the supplied air. In turn, the right one (No. 17) controls the air flow. Accordingly, the buttons (No. 11-16) allow you to direct the air stream in a given mode. “Comfort” unit with air conditioning An additional advantage of this system is that if the left regulator (No. 18) makes it possible to operate the air conditioner, then the right one (No. 19) activates the air recirculation function. As for such parameters of the “Comfort” system as control of the supply air temperature, fan speed and air flow distribution, they are no different from the “Classic” version.
If you need LPG, then contact the exclusive representatives of TM Torelli in Ukraine, the Milano Ukraine company, read more on their website. “Luxe” unit with climate control Two buttons on the control unit have undergone changes: • In the “Defrost MAX” mode (No. 24), both the air conditioning (under favorable conditions) and the electric heating system are turned on forcibly, the power of which blows on the glass surfaces from the front and rear, as well as side mirrors. At the same time, the air temperature and the maximum maximum speed are set, after which the entire air stream is directed into the blower ducts of the windshield and front side windows. • In the “AUTO” mode, the activation of which depends on the external air temperature, automatic installation of parameters related to the temperature of both the cabin air and the coolant of the engine cooling system occurs, as well as the power of the air stream (fan speed) and changeable modes of air flow distribution . The information display (No. 10) can please motorists with its changes, as well as the temperature scale, in which convenient numbers have appeared instead of the usual measuring scale.
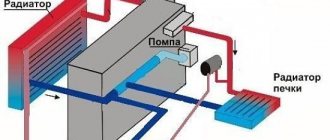
DIAGRAM OF CLIMATE INSTALLATION LADA VESTA/XRAY
Air conditioning system Lada Vesta/XRAY: 1, 2, 5 — air conditioning system pipelines; 3 — air conditioning compressor drive belt; 4, 15 — hoses of the engine cooling system; 6 - engine; 7 — air conditioning filter; 8 — air conditioner electric fan; 9 — air conditioner evaporator; 10 — air conditioner housing; 11 — radiator of the heating system; 12 — heater radiator supply hose; 13 — heater radiator outlet hose; 14 — air conditioning compressor; 16 — fan of the engine cooling system; 17 — radiator of the cooling system; 18 - air conditioner condenser.
CHECKING THE OVEN FAN
fan speed control knob to alternately switch four speeds. We check how it blows from the air ducts as the fan speed increases.
- If the stove does not work (the fan does not rotate at all), check the fuse in the mounting block (F45).
- If only one or more fan speeds do not work, then the cause may be a faulty auxiliary resistor or vehicle wiring.
- If the stove blows poorly (the air flow intensity is low), it means that the air intake grille or the cabin air filter .
We advise you to read our articles
Problems
Stove motor During operation, the device may become unusable or reduce its efficiency.
We check the fan at all four speeds:
- if the fan stops rotating, look at the safety element in the control unit;
- if one of the speeds does not work, the reason is a breakdown of the additional resistor or car wiring.
- When the fan operates at low intensity, you need to clean the air intake grille or filter.
We check the dampers - at maximum speed, use the keys to change the distribution modes:
- if they do not move, the problem is in their electric drive;
- If the Lada Vesta heater dampers squeak, you should lubricate them with silicone grease.
We warm up the engine to operating temperature, then watch how the pipes are heated. The problem lies in the different temperatures of these elements:
- minimum antifreeze level is likely;
- you need to force out the air plug through a specialized valve;
- If the radiator is clogged, replacement is necessary.
CHECKING HEATING EFFICIENCY
We start the engine and warm it up to operating temperature . We check that the inlet and outlet pipes of the heater radiator are heated and have approximately the same temperature. If the pipes have different temperatures, then it is possible:
- low coolant level in the expansion tank (which antifreeze is better)
- An air lock has appeared in the engine cooling system (air can be released through a special valve)
- Heater radiator clogged (replace)
We install the temperature regulator on the stove control unit all the way to the red zone. We make sure that the temperature of the air leaving the panel deflectors begins to rise. If it blows cold, it means:
- The damper drive is faulty (the damper does not open,
- preventing the passage of air through the heater radiator)
- The heater control unit is faulty (how to remove)
Articles about tuning Lada Xray
Why does the Lada Vesta, XRAY stove blow cold air - 2 reasons
Question about the Lada Vesta car, XRAY: “Please, why on the Vesta did the stove start blowing cold air from the right side? And from the left side there is warm/hot air. What could be the reason?". As it turned out, many owners of this car face a similar problem. There may be several reasons.
Glove compartment cooling
There is a damper in the left wall of the lid box, from which cold air flows in to cool its contents. During winter, this valve should be closed by turning it.
Also make sure that the hose leading to the damper is tight. There are cases when the glove compartment cooling tube has cracked. The problem can be solved by replacing the tube or modification.
Heater radiator
If hot air is blowing from the left air ducts (including into the legs), and barely warm or cold air from the right ones (for the front passenger), then the possible cause is the heater radiator. Even on short runs it can become clogged, which impairs the circulation of antifreeze and reduces the efficiency of the stove.
Solution
: If the car is under warranty, contact the dealership with the problem. There were cases when the heater radiator was replaced under warranty and the engine cooling system was cleaned. You can perform these same procedures yourself.
Spring for the damper?
They also put a spring on the heater damper so that it presses it better in the “frontal-legs” mode:
It is believed that some of the air was blown onto the windshield to prevent fogging. This modification to the springs can lead to wear of the climate damper servomotor, and then its further failure.
WHY DO GLASSES FOG?
The car windows should not fog up while the heater is operating If this happens, then the cause may be:
- heater core leaking
- cabin filter is clogged
- The electric recirculation air damper actuator is faulty
No matter what AVTOVAZ PR people say, the LADA Vesta, in accordance with the traditions of the Soviet automobile industry of the last century, turned out to be a “crude” car - with a lot of design flaws and quality defects. One of the global “jambs” that causes a lot of complaints - the clutch and manual gearbox - AVTOVAZ has already begun to change it to “more different ones”. It is not yet known whether this step will remove the claims of car owners about their reliability and smooth operation. It’s good that the company, although a year late, is trying to make its car better.
The heating, ventilation and air conditioning system of the Vesta's interior differs from similar systems of other Lada models. The difference is not only in its design, but also in the control method. Let's look at the design features of the Vesta stove, and also evaluate its effectiveness.
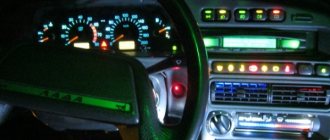
Dashboard Lada Vesta
On a Lada Vesta, the instrument cluster is very different from older Lada models. Therefore, this description will help you understand the meanings of indicators and instrument readings.
Tachometer. Shows the engine crankshaft speed (x1000 min-1). The presence of the tachometer needle in the red scale area warns of increased engine speed. To prevent damage to the engine, its maximum speed is limited by the electronic engine management system software. Above approximately 6200 min-1 the fuel supply will be limited. Possible interruptions in engine operation and jolts in the movement of the vehicle are not a malfunction. When the rotation speed decreases, the fuel supply will resume. Also, do not allow the engine to operate when starting and while driving at an engine speed below 800 min-1
(ATTENTION! It is prohibited to operate the engine in a dangerous mode (at engine crankshaft speeds above 6200 min-1 and below 800 min-1). “Seat belt” warning light “Airbag system” warning light “Brake failure” warning light “Electric power steering” warning light “Engine malfunction” Alarm “Battery” Alarm ABS Speedometer Alarm “Hood Unclosed” Alarm “Hazard Alarm” Alarm “Doors Unclosed” Alarms right and left turn signal LCD indicator with functions Indicator “Coolant temperature”
Operating a vehicle with a faulty warning light is prohibited.
"Seat Belt" Warning Light "Airbag System" Warning Light "Brake Failure" Warning Light "Power Steering" Warning Light "Engine Malfunction" Warning Light "Battery" Warning Light ABS Warning Light Speedometer "Hood Unclosed" Warning Light "Hazard Alarm" Warning Light "Doors Unclosed" Warning Light Right and left turn signal indicators Liquid crystal indicator with functions “Coolant temperature” indicator. Operating a vehicle with a faulty warning light is prohibited.
When the operating temperature of the coolant is exceeded (more than 115 °C), the indicator lights up red constantly, and a short-term intermittent buzzer sounds. Do not allow the engine to overheat
(WARNING: Do not operate the vehicle with an overheated engine. The vehicle must be taken to a dealer to determine and correct the cause of the engine overheating.)
"Fuel level" indicator and indicator "Parking lights" indicator "Dipped beam headlights" indicator "High beam headlights" indicator "Front fog lights" indicator "Rear fog lights" indicator "ESC" indicator "ESC OFF" indicator
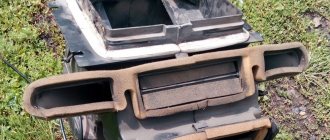
Elements of the ventilation and heating system
The stove body (in Fig. No. 5) is located in the car interior under the instrument panel frame. Inside the case there are:
- heater radiator;
- electric fan;
- fan speed controller (RFV) or additional resistor;
- air flow distribution damper;
- gear motor that regulates the dampers;
- air filter.
The heater radiator releases heat to heat the interior. Located inside the case on the left side. To replace it, you will have to remove the upper frame (lining) of the panel (dashboard).
Interior ventilation diagram
Air ducts run from the stove body, which direct air flows to the windows, into the interior and legs. The central deflectors can adjust air flow in different directions, and its strength is controlled using a horizontal wheel underneath them.
AvtoVAZ has implemented airflow for the Vesta driver’s feet in a new way. The air duct nozzle is located not on the side, but above the foot of the right foot. Some owners of the new sedan believe that this design is not very successful, because It warms the toes worse than the foot itself. For the front passenger, the air duct exits closer to the wall of the engine shield and a similar situation will not arise.
Worth o. On versions of the car with air conditioning, a small air duct fits into the glove compartment, which can cool, for example, a water bottle.
see also
Comments 26
The cabin filter is probably clogged. I changed it and it helped. We have minus 40 in winter. The bottom left button is on.
Found a video as a solution to the problem
As an option. Haven't you tried it? Because this feature infuriates me. All the way to the feet and the fan in the middle. It blows like a scribe.
Found a video as a solution to the problem
And there really is a bad wind in my legs. It became noticeable especially with the cold weather.
I'll tell you my observations. The coolant temperature is maintained at 82 degrees. When moving, it can drop to 75. I installed YarPlast winter protection on the lower part. The temperature became higher than 82 - 95 degrees. It has become much warmer in the car, but it works up to - 8 -10 It should be noted that turning on the first fan speed is 100 and turning it off is 96. This suggests the thought that the engine is operating in incomplete warm-up mode...
I'm also not happy with the heating. precisely the fact that when translated “blowing at the feet” it also blows on the glass. This Feature of AvtoVAZ is annoying... If you turn it on your feet and yourself. and closing the deflectors is fine. Are there any ways to overcome this feature?
And I have a luxury. It blows wherever I want.
It's not true. Most likely you didn't check. I checked this with my manager on 3 machines with different configurations. There's a little bit of an uplift on everyone! turn on the airflow only for the legs, and the fan to medium, and then to maximum. You will be convinced!
That's not what I was talking about. In the suite you can turn on all the buttons at the same time.
In short, the answer was here. Only at AvtoVAZ this is a feature. I checked and compared the algorithm of work on the Test Drive West with full stuffing and on the empty one. It's the same everywhere. The manager's answer sounded like this: Either you get used to the car and drive, or you get rid of it. On AvtoVAZ this feature is specifically designed to prevent the windows from fogging up. He also confirmed that this does not happen on other cars. For me, such an algorithm is bullshit. Since there is a separate button for turning on the windshield and foot airflow.
Departing from the topic, I’ll say one more piece of news: the driver’s lower air duct has now been changed (for better airflow of the driver’s right foot).
Heater and air conditioner control
“Classic” block without air conditioning
Left regulator (No. 9) – supply air temperature control; Right (No. 17) - air flow regulation; Buttons (No. 11-16) - setting the direction of air flow.
Comfort unit with air conditioning
The left regulator additionally has the function of turning on the air conditioner (No. 18), and the right one has the function of turning on air recirculation (No. 19). Otherwise, the control of supply air temperature, fan speed and air flow distribution of the Comfort version of the system is similar to the Classic version.
Luxe unit with climate control
Two buttons are replaced on the control unit:
- “Defrost MAX” mode (No. 24) - the air conditioning is forcibly turned on (if conditions permit), electric heating of the windshield and rear windows and side rear-view mirrors. The entire air flow is directed to the blower nozzles of the windshield and front side windows, and the maximum speed and air temperature are set.
- “AUTO” mode - in this mode, the air flow intensity (fan speed) and one or another air flow distribution mode are automatically set depending on the outside air temperature, the cabin air temperature and the coolant temperature of the engine cooling system.
The information display (No. 10) has also undergone changes; the air temperature scale has been replaced with numbers.
Reviews about the Vesta stove
The first reviews from Vesta owners about the stove are generally positive. No significant deficiencies were identified. The car warms up quickly. It blows quite strongly from all the air duct nozzles. In cold weather at -25 degrees, the car interior is warm and comfortable. When using the control unit and adjusting the deflectors, the cost of the parts is not visible; in terms of quality, it resembles a foreign car.
To improve the efficiency of the heater, close the glove compartment cooling in winter:
Let us remind you that with the first cold snap we were also able to test the operation of the heating. You can find other information about Vesta that interests you in this content. By the way, problems with the operation of the stove can be caused by an air lock in the cooling system.
How does your Vesta’s stove heat? In the comments to the article we leave impressions and notes about the efficiency of the heater.
The Lada Vesta car has a stove heater…
...designed to heat the car interior. The stove is also actively used during rain or cold weather.
The heater is also activated if necessary to quickly remove fogging from the windows or warm up passengers. In the “Lux” configuration, the car is additionally equipped with air conditioning, which creates a favorable temperature for a person.
The most common malfunctions of the Lada Vesta heater radiator: leakage, fan noise, engine vibration. The replacement process is not complicated, but requires care on the part of the repairman.
Dismantling
To remove the radiator of the Lada Vesta stove, you first need to prepare the car. It will be more convenient to carry out work in an inspection hole or with a lift. If such an opportunity exists, then you should not miss it. After this, you can proceed to dismantling the radiator mechanism.
- Disconnect the negative terminal from the battery pack.
- We remove the engine protection and the front bumper.
- Now you can move on to the front bumper beam, which also needs to be dismantled.
- We press out the clamps.
- Disconnect the pipe from the air intake from the air deflector.
- We release the clamps and disconnect the temperature sensor from the air deflector mechanism.
- We press out the latches that make it difficult to dismantle the air deflector panel.
- We drain the coolant that fills the heater radiator of the Lada Vesta.
- We open the fastening clamps to be able to disconnect the supply hose from the thermostat pipes and the pipe that supplies the water pump. And it is also worth disconnecting the steam removal hose, which connects to the pipe on the expansion tank. You will need pliers here.
- We cut the clamps that secure the hoses to the upper cross member on the radiator frame.
- Disconnect the connectors on the wire bundle in front from the connectors on the fan, sound and radiator fan relay unit.
- We cut the clamp of the front bundle of wires, which is attached to the fan casing.
- Owners of cars with an air conditioning system should release the locking elements, turn it off and move it to the side. This is the only difference in replacing the radiator of models with air conditioning from conventional cars.
- Rotate the radiator mounting clips, which then need to be removed from the brackets.
- We remove the radiator along with the fan and hoses.
- We press out the clamps that hold the cooling system fan of the power unit.
replacing the heater radiator Kalina
How the stove works on Lada Vesta. Device
- The heater radiator is connected to the system main via rubber pipes. The heat emitted by the internal combustion engine is transferred to the heating system.
- The heating system radiator distributes heat throughout the car interior using an electric fan.
- A preset resistor online regulates the fan rotation speed.
- The air flow is circulated and cleaned by a mesh and cabin filter (see diagram).
- With the help of installed dampers, the driver and passengers regulate the air flow flowing to them.
- The gearmotor rotates the damper based on the readings of the regulator and heater sensors.
Typical stove malfunctions
The most common problems with the stove on Lada Vesta are the following:
- the actual temperature does not correspond to the set one - low level of antifreeze (antifreeze), clogged radiator pipes or the formation of an air lock, which causes cold air to blow;
- vibration appears during operation - the electric motor is loose;
- insufficient air flow from the deflectors - clogging of channels and air ducts;
- the heater is inactive when it is activated on the dashboard - failure of the fuse (No. 14) of the mounting block.
Checking the stove fan
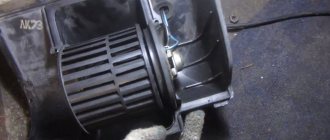
During the circulation of the air flow, dust particles settle on the surface of the impeller, as a result of which it begins to make noise and extraneous sounds appear.
To clear the fan blades of debris, it is necessary to provide access to the unit.
- Unsnap the glove box.
- Remove the filter element.
- On the right is the furnace mechanism. We press the plastic clips and turn the impeller counterclockwise.
- We remove the motor.
- We wipe the drive with a rag.
- Install the parts in reverse order.
Checking the stove dampers
Dampers are installed in the area between the deflectors and the fan. During operation, they fail, become deformed, and become damaged. Checking the serviceability of the damper on your own is quite simple: you need to activate the stove at maximum speed. If it doesn't blow well, it means the air duct is clogged. Change the damper positions. If you hear squeaking or noise, lubricate the moving parts with silicone grease.
Foggy windows when the heater is activated is the first sign of a ventilation problem. This problem provokes a sharp decrease in visibility on the road and an increase in the risk of an emergency. As soon as fogging is detected, check the condition of the ventilation; most likely, the air ducts are clogged.
Checking heating efficiency
Carry out prevention before the onset of winter. Be sure to check:
- heating the air;
- changing speed modes when switching the control lever, if necessary, replace the brushes of the stove motor;
- absence of extraneous noise, whistling in fan operation;
- the need for a time interval to warm up the air ducts.
The heater does not turn on
Lack of response to turning on the heater means: failure of the switch, the fan itself, or a blown fuse. First you need to make sure the integrity of the latter. To do this, open the block cover in the lower left part of the panel and find fuse F25 (30A), indicated in the photo:
If it is burned out, replace it with a similar one - 30A. But before this, it is strongly recommended to find out the reason; perhaps the “dying” fan motor was the culprit for the blown fuse.
Also, if the fan operates only in the last, fastest mode, the resistor unit is to blame.
(2 ratings, average 4.5 out of 5)
Replacing a stove radiator with your own hands on a Lada Vesta
Preparation of the workplace, necessary tools:
- rags;
- Phillips head screwdriver;
- flashlight to increase visibility;
- new radiator.
How to remove a radiator. Replacement sequence:
- We turn off the engine, turn off the ignition, and squeeze the parking brake.
- Open the hood and remove the terminal from the battery.
- We grind off the antifreeze from the system. The plug is located at the bottom point of the radiator (key 17).
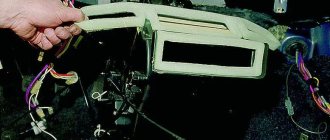
- We remove the decorative trim on the instrument panel.
- Remove the top decorative trim above the glove box. Let's take it out.
- We dismantle the metal dashboard support on the driver's side.
- Remove the air pipe.
- Open the stove lid.
- We remove the heater.
- We install a new heater radiator.
- We assemble the structure in reverse order.
Replacement instructions
For the procedure, you should use an overpass or inspection hole. To raise the car, you can use a jack, lifting the front end and placing it on supports. Replacement is carried out only on a cold machine.
Required Tools
Replacing a timing belt and chain is a complex and lengthy procedure. To complete it as quickly as possible, you need to properly prepare for it and prepare in advance:
- a set of keys;
- set of heads;
- knob;
- screwdriver
To make consumables last longer, you should buy originals.
Stages
- First, turn off the power to the car by removing the negative terminal from the battery.
- If protection is installed, it must be removed.
- Then you need to drain the coolant from the system.
- At the next stage, you need to dismantle the radiator, cooling system fan, and pump pulley.
- Then you need to remove the drive belts for the power steering, air conditioning compressor, and generator.
- Next, unscrew the spark plugs.
- Then we remove the distributor protection screen and disconnect the tube connecting it to the timing belt from the air collector sleeve.
- By turning the crankshaft by the bolt securing its pulley, you should set the marks. The mark on the timing belt pulley must coincide with the casting on the camshaft; accordingly, the installation mark on the crankshaft gear must align with the mark on the oil pump housing. In the video you can see how to set the tags correctly.
- Using a special tool, you need to unscrew the mounting bolt and remove the crankshaft pulley.
- Then you need to remove the lower and middle timing protection covers.
- By unscrewing the tensioner mounting bolt and turning it counterclockwise, we loosen the tension on the timing belt and remove the latter.
- Now you should change the roller and start tightening the VAZ 2105 timing belt.
Changing the tension roller
Before doing this, all parts should be cleaned of dirt.
- The belt should first be pulled onto the crankshaft pulley, then onto the oil pump drive pulley, and lastly onto the camshaft pulley.
Pulling the belt onto the camshaft pulley
- Having put the belt on the tensioner, you need to tighten the bracket and install the spring.
When installing the timing belt, do not rotate the camshaft and crankshaft so as not to knock off the marks.
- After turning the crankshaft two turns, you need to check that all installation marks match, tension the belt and tighten the tensioner bracket mounting bolts.
- Next, assembly is carried out in reverse order.
After the procedure for changing the timing belt or chain of the VAZ 2105, you should start the car and check the performance of the engine.
Review of Manufacturer Prices
Dimensions: 184x133.5x26 mm.
| Serial number/item | Price in rubles |
| LUZAR 271153553R (original) | From 5000 |
| STELLOX 10-35126-SX | From 4500 – 4700 |
| FENOX RO0004C3 | From 4500 – 4700 |
| RO0003O7 | From 4500 – 4700 |
| AVA QUALITY COOLING RTA6398 | From 4500 – 4700 |
| VALEO 812374 | From 4500 – 4700 |
| NISSENS 76512 | From 4500 – 4700 |
| MAGNETI MARELLI 350218221003 | From 4500 – 4700 |
| *prices are as of May 2022 | |