VAZ 2107 TIMING CHAIN DRIVE - DESCRIPTION
The VAZ 2107 timing chain transmission has a long service life, but someday it’s time to replace it. The need for this arises as a result of stretching of the links, when the chain tensioner can no longer cope with the functions assigned to it. In addition, the parts responsible for the normal operation of the timing drive also wear out over time.
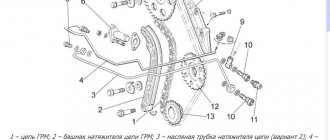
The main elements of the VAZ 2107 timing drive are a chain, a damper, a shoe, a tensioner and sprockets
SOOTHER
In the chain drive of the VAZ 2107 gas distribution mechanism, a damper is used to dampen jerks and vibrations of the chain. Without this part, as the vibration amplitude increases, the chain may fly off the gears or break completely. A chain transmission break is most likely at maximum crankshaft speed, which happens instantly. At the moment of a break, the intake and exhaust valves fail. After such damage, the engine will at best require a major overhaul.
The chain damper is designed to dampen vibrations of the chain drive during engine operation.
By its design, the damper is a plate made of high-carbon steel with two holes for fastening. Another element that is simultaneously responsible for calming and tensioning the chain is the shoe. Its rubbing surface is made of high-strength polymer material.
The tensioner shoe provides chain tension, eliminating sagging
TENSIONER
Based on the name, you can understand that the device is designed to prevent sagging of the timing chain while the engine is running. There are several types of such mechanisms:
- automatic;
- mechanical;
- hydraulic.
Automatic tensioners appeared not so long ago, but have already managed to show their positive and negative sides. The main advantage of the product is that there is no need to periodically adjust the chain tension, since the mechanism keeps it constantly taut. The disadvantages of the auto tensioner include quick failure, high cost, and poor tension, as evidenced by reviews from some car owners.
Hydraulic tensioners operate as a result of the action of oil under pressure, which is supplied from the engine lubrication system. This design does not require intervention from the driver in terms of adjusting the chain drive, but the mechanism can sometimes jam, which negates all its advantages.
The most common tensioner is mechanical. However, it has a significant drawback: the product becomes clogged with small particles, as a result of which the plunger jams and the mechanism is unable to perform its functions during tension adjustment.
The tensioner provides chain tension and allows for adjustments when needed.
CHAIN
The timing chain in the VAZ 2107 engine is designed to connect the crankshaft and camshaft: they have gears on which the chain is put. After starting the power unit, synchronous rotation of the indicated shafts is ensured through a chain transmission. If synchronization is disrupted for any reason, the timing mechanism malfunctions, resulting in the stable operation of the engine being disrupted. In such a situation, power failures, deterioration in dynamics, and increased fuel consumption are observed.
The timing chain in the VAZ 2107 engine is designed to connect the crankshaft and camshaft
As the vehicle is used, the chain stretches as high loads are placed on it. This indicates the need for periodic adjustment. Otherwise, the sagging will lead to the links on the gears jumping, which will disrupt the operation of the power unit. To prevent this from happening, the factory recommends adjusting the chain tension every 10 thousand km. mileage
What is the sequence of actions when replacing?
First, remove the cylinder head cover. This will be required in order to correctly determine the chain tension at the very end.
- Remove the air filter housing from the carburetor. Then we disconnect the throttle linkage from the roller.
- Then you need to remove the lever with rods.
- And finally, we disconnect the fuel hose from the bracket that goes from the fuel pump to the carburetor.
- Using a 10 mm tubular wrench, remove the cylinder head cover. This must be done so that you can check the chain tension by hand.
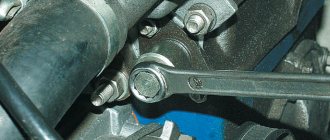
- The VAZ 2107 timing chain tensioner is located on the right front side of the engine. First, using a 10mm wrench, unscrew the tensioner mounting nuts.
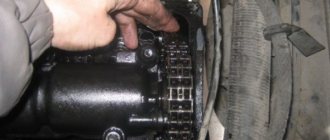
- We take it out of the engine. There should be a gasket between the engine housing and the tensioner. Try not to damage or lose it, since a new gasket is almost always sold only complete with the tensioner. Sometimes it can start to “etch”, and in order not to purchase a kit to replace it, save the old gasket.
- We fix the new automatic tensioner vertically in a bench vice. Then use a 13 mm wrench to loosen the cap nut. After this, the plunger became movable and moves freely in the tensioner body.
- Now we “charge” the tensioner plunger. To do this, we place it vertically (the place where we place it is shown by a blue triangle). Then press vertically downwards with force (pressure points are shown in red). The plunger is “recessed” into the body.
- Now you need to continue pressing on the body and holding the plunger “cocked” and tighten the nut back with a 13 mm open-end wrench.
- Now we install the “cocked tensioner” together with the gasket into the engine housing. Using an open-end wrench 36-38 (the VAZ 2107 may have either a nut or a ratchet, so the sizes are different), turn the crankshaft clockwise by an average of one and a half to two turns. When the greatest resistance to movement arises, then the chain will be stretched to its maximum. The main thing is to ensure that the crankshaft does not turn back due to compression and that the chain tension does not weaken. If you don’t have a key for 38, you can turn on the ignition and turn the crankshaft with the starter.
- We tighten the nut back, holding the crankshaft from “shock absorption” back. Then we check the tension result by pressing the chain with our hand again. There should be no deflection. Now we install the block head cover in place.
- Only after the chain is tensioned should you loosen the tensioner cap nut. The plunger will release and "shoot", causing the shoe to seal tightly against the chain. At this time, a click will be heard. Only after a click does the tensioner cap nut need to be tightened tightly.
How to install roller damper and rockring
- First, you need to make sure that the bike frame supports the “calm” setting. To do this, on the right side of the frame, on the carriage assembly, there must be special mounting ears with holes for bolts. If there are any, then the frame supports the installation;
- After making sure that installation is possible, it is necessary to remove the crank (connecting rod) from the bicycle frame along with the sprockets from the fastener side, and also dismantle the carriage or carriage cup, if this is possible. For this stage you will need a connecting rod puller, which requires a wrench and a carriage puller, depending on the type of which you may need a wrench;
- After this procedure, install the structure according to the mounting holes. It is worth remembering that after installing the carriage stabilizer, the chainline changes, so when installing the carriage in the seat, it is necessary to adjust this indicator using spacer rings. For this step you will need hexagons or a Phillips screwdriver, depending on the type of bolts on the bicycle carriage;
- After installing the carriage and adjusting it, you should reinstall the crank with stars. At this stage, the rockring is installed, which is installed instead of or on top of the outermost drive sprocket of the bicycle. In order to put on the rockring, you need to unscrew the bonnets with hexagons (the bolts that secure the front stars together), and then return them to their place;
- Next, put the chain on the bike and adjust the “calm down” rollers so that its operation is correct;
- Depending on the type of “changeguide” design, the installation of the chain occurs in the assembled or unfastened state, where in the latter it will be necessary to pull the chain through the roller. At this stage, you will need screwdrivers to adjust the rollers and other parts of the damper;
- After all installations and final checks have been completed, the chain tension should be checked. To do this, you need to switch from one speed to another, thereby finding out whether it is necessary to lengthen or shorten the length of the chain so that the “calm down” adequately performs its function.
When is stretching necessary?
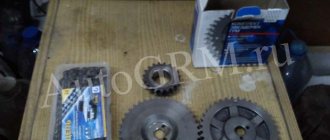
The gas distribution mechanism on the VAZ 2107 injector consists of the following elements:
- intermediate and crankshaft gears;
- camshaft and intermediate shaft;
- rocker;
- sedative;
- intake and exhaust valve;
- tensioner;
- shoe;
- timing chain drive.
The photo shows timing parts.
Thanks to the timing belt, the air-fuel mixture is supplied and exhaust gases are removed. Its operation is carried out using a chain drive or belt. They transmit torque from the crankshaft to the camshaft.
The shafts must be in a certain position. To do this, special marks are placed on the crankshaft pulley and the camshaft sprocket, which must be set correctly. If the marks do not match, serious problems with the engine may occur, including major engine repairs.
During operation, the chain drive and belt are under constant tension, so after a while the chain gradually stretches - its pitch increases. In this case, the engine begins to idle unstably, the speed begins to fluctuate, and the engine may stall.
If metallic sounds appear when increasing or decreasing speed, this is a sure sign of stretching of the chain drive or wear of the damper. To eliminate these sounds, you need to tighten the chain or replace the damper. Chain drive tensioning should also be done after replacing any timing parts, including the guide rail and shoe.
The chain drive on the VAZ 2107 injector is adjusted using a tensioner, which can be a mechanical, automatic or hydraulic tensioner. To install a hydraulic tensioner on a VAZ 2107, you need to redo the timing belt. Instead of the standard one, an automatic tensioner is often installed; it is more reliable.
How to correctly replace a chain guide on a VAZ-2107
To correctly carry out the procedure for replacing the timing chain guide, you need to prepare the tools for the job:
- Screwdriver Set;
- a set of keys;
- set of socket heads;
- long tweezers (you can use a wire hook instead).
In addition to tools, you will need a new damper, engine head cover gasket and special sealant for cars.
This procedure can be performed independently in a garage. In this case, the following conditions must be observed:
- spacious room;
- bright lighting;
- absence of dust (it should not get on the parts of the gas distribution mechanism when the cover is removed).
The first step is to remove the chain guide. This process consists of several steps (with the car in running mode at neutral speed):
Remove the engine head cover by first unscrewing the eight mounting bolts (note: the gasket must not be damaged, otherwise it will need to be replaced). Align the camshaft sprocket (the mark on it should coincide with the boss on the camshaft housing). Partially unscrew the tensioner cap nut for the timing chain structure (it should be loosened slightly without unscrewing completely). Press the tensioner shoe using a suitable screwdriver to loosen the tensioned timing chain structure. Screw the cap nut into place to secure the chain in the loose position. Hook the tensioner with tweezers or a hook (the hooking tool must be inserted into the technological hole) so that the dismantled part does not fall into the engine oil pan during dismantling. Unscrew the chain guide mounting bolts (there are two of them). Dismantle it.
If the damper breaks, it can be removed with tweezers or a stiff wire hook. If during dismantling this part fell into the engine crankcase pan, it will be necessary to remove this pan to remove the damper.
The second stage is the installation of a new chain guide. The procedure is the reverse of that described above. When performing this, several important points should be taken into account:
- Be sure to tension the chain structure to the required level.
- The location of the engine shaft marks - crankshaft and camshaft - is monitored.
- All seats for bolted fastenings are coated with automotive sealant (this measure is necessary to prevent engine oil from seeping through).
If it is difficult for a car enthusiast to carry out the procedure for replacing the chain guide on his own, he can always seek help from qualified car mechanics at a service center for the repair and maintenance of cars of this model.
Chain tensioner malfunctions in Nissan
A hydraulic tensioner is installed on the machines. This means that the force on the rod is generated due to the oil flow, which goes under pressure into the working cylinder. As a result, the rod extends and rests against the chain. All this leads to the timing chain being tensioned automatically.
Where does the lubricant come from so that the hydraulic tensioner can function? It comes from the oil circuit of the internal combustion engine. Why might it be necessary to replace the chain tensioner in a Nissan?
Let's look at the most common cases:
- The car owner changes the lubricant irregularly; this is the main reason that can lead to a problem. Over time, when the mileage reaches 8,000–10,000 kilometers, the lubricant changes its original properties, and many engine wear products accumulate in it. Due to the fact that the plunger pair in the tensioner is adjusted 100% accurately, the service life of the mechanism is reduced as a result of microdamage on the cylinder walls or on the plunger. However, it is not only the plunger pair that suffers. If you do not change the lubricant in time, the thrust shoe will quickly fail, and it is the one that comes into contact with the chain. Grooves appear on this part to level out wear, and the rod has to extend more.
- Oil starvation occurred. This problem can lead to serious consequences. When the system depressurizes, when an air lock gets into the tensioner cylinder, the tension becomes insufficient.
- The motor is overheating. If the operating temperature of the lubricant is exceeded, oxidative processes in it will proceed much faster. As a result, sludge build-ups will remain throughout the pipeline. Moreover, this will also happen in the plunger pair of the hydraulic tensioner.
- The mechanism wears out over time. The specialists who created the chain motor were unable to develop a hydraulic tensioner whose service life would be as long as that of the chain. That is why replacing the chain tensioner in Nissan is required quite often.
If you want the need to replace the chain tensioner in your Nissan to arise as rarely as possible, you should regularly fill the engine with new lubricant.
If the power unit on your car has a belt drive, then it can break at the most inopportune moment. When the roller starts squeaking, the driver will probably notice it. If the belt has become unusable, you will not be able to determine it yourself.
However, this breakdown does not occur with motor chains. When the chain tension becomes insufficient, the driver hears a specific rustling sound and the mechanism begins to rattle. Sometimes at idle you can notice a rattling noise, like on diesel cars. But as soon as the engine warms up, the extraneous sounds disappear. This sign indicates that the chain tensioner in your Nissan needs to be replaced in the near future, as it is not functioning normally. Do not delay repair work, as this may lead to more serious damage.
When the chain continuously rumbles and rustles, the timing gear drive should be diagnosed. If during the inspection it is revealed that the chain is within tolerance, the Nissan chain tensioner should be replaced.
If on a Nissan car the valve timing shifts because the chain on the sprocket teeth has jumped or the drive has broken, something irreparable will happen: the valves will meet the pistons. That is, when the valves open, the pistons will rest against them. Both elements will be destroyed.
Note!
If this happens, it will be impossible to restore the engine. The chain tensioner in your Nissan should be replaced in a timely manner so that the car is in good condition.
TYPES OF CHAIN DRIVE
The VAZ “Seven”, like other “classics”, is equipped with a double-row timing chain. However, there is a single-row chain that, if desired, can be installed on a Zhiguli.
SINGLE ROW CHAIN
A chain drive with one row has less noise when the engine is running compared to two rows. This factor is one of the main factors in favor of choosing single-row chains. Therefore, some VAZ 2107 owners decide to replace the timing drive. The lower noise level is due to the fact that fewer links are driven. Plus, it is easier for the entire engine to rotate such a chain, which has a positive effect on the increase in power. However, due to the low noise level when such a chain is stretched, it is not always clear that the part needs tension.
Single row timing chain has lower noise levels
DOUBLE-ROW CHAIN
Despite the advantages of a single-row chain, a chain drive with two rows is the most common, since it is characterized by high reliability and if a link breaks, the entire chain does not break. In addition, the load on the timing drive parts is distributed evenly, as a result of which the chain and gears wear out more slowly. The life of the part in question exceeds 100 thousand km. Although recently, in order to reduce the weight of power units, automakers have been installing chains with one row.
The double-row chain, despite its higher noise level, has a long service life
REPLACING A DOUBLE-ROW CHAIN WITH A SINGLE-ROW CHAIN
If you are thinking about replacing a double-row chain drive with a single-row one, you will need to purchase the following parts:
- crankshaft, camshaft and oil pump gears for single row chain;
- sedative;
- shoe;
- single-row chain;
- automatic tensioner.
To install a single row chain, you will need to replace the gears, chain, guide and timing chain tensioner
All of the listed parts are taken, as a rule, from the VAZ 21214. Replacing the chain should not cause difficulties. The only thing that is required is to replace the sprockets, for which you unscrew the corresponding fasteners. Otherwise, the steps are similar to the procedure for replacing a conventional double-row chain.
VIDEO: INSTALLING A SINGLE-ROW CHAIN ON A VAZ
Despite the fact that replacing the timing chain drive on a VAZ 2107 is not an easy process, every owner of a Zhiguli can do it if you follow the step-by-step instructions. The main thing is to correctly set the marks upon completion of the work, which will ensure synchronous operation of the crankshaft and camshaft.
Signs of stretching
The symptoms of this problem are specific. And it will be very difficult to confuse them with something else.
In some cases, the damper breaks. In this case, only replacing it will help. How to tension a chain on a VAZ-2107 (injector)? Photos of the process are in our article.
By the way, on a VAZ-2107 with a carburetor power system, unlike injection engines, to turn the crankshaft it is enough to turn the ratchet. But let’s not get ahead of ourselves and consider several ways to tighten the motor chain on a VAZ-2107.
Procedure for tensioning or replacing the timing chain
As the vehicle operates, the timing chain, which operates under high voltages, is gradually stretched. Because of this, the chain pitch may change and the engine begins to operate unstably at idle. Floating speeds appear. It is even possible for the chain to jump several links and then the internal combustion engine will begin to stall. To prevent this, experts recommend periodically adjusting the chain tension. If the driver heard that the VAZ 2107 chain is rattling, this is a sure sign that on the VAZ 2107 chain tension is simply necessary.
How to tension a chain on a VAZ 2107 - this can be done in several ways. Car enthusiasts choose any of them based on experience and time available for work.
To begin with, you need to place the car on level ground and secure the wheels with chocks so that it does not move, and also set the gearshift knob to the “neutral” position. Before starting work, you need to prepare a tool - a wrench for “13” and “36”, sockets for “8” and “10”, pliers and a screwdriver. To gain access to the chain, you need to remove the drive cover by unscrewing the bolts holding it in place.
We tighten the timing chain on the VAZ 2107:
— slightly loosen the chain tensioner located next to the pump;
- using a special wrench or a 36 socket, turn the crankshaft two turns;
— tighten the tensioner until it stops;
— after starting the engine, check the chain tension;
— close the drive cover, tightening all the bolts and nuts well.
If the work done does not bring results and extraneous noise is heard in the drive area, there is another way to tighten the timing chain:
— this requires, in addition to the drive cover, to remove the valve cover from the cylinder head; this frees the camshaft sprocket and the chain tension can be checked manually
- loosen the tensioner slightly
- turn the crankshaft two turns and tighten the tensioner completely
- check the chain tension manually, there should be no sagging in any places, the chain should be elastic
— install the valve cover and the side cover of the drive
Experts know that patience is required when adjusting chain tension. The fact is that the desired result may not be achieved the first time; moreover, this procedure can be done several times until the characteristic ringing in the timing drive area disappears.
In addition, it is necessary to remember that it is necessary to make similar adjustments after any repair work, during which the timing drive was manipulated up to the point of removing the chain.
After such work, mandatory adjustment of the chain drive tension is required. A car enthusiast who owns a VAZ 2107 should have a good idea of how to tension a chain, since a preventive check of its condition should be carried out every 10 thousand mileage:
— first you need to release the pressure in the tensioner and unscrew the nut;
- as soon as the nut is loosened, the tensioner shoe should snap off;
- if this does not happen, then you need to knock on the tensioner, the plunger is probably stuck in it, the shoe should snap off;
- use the key to make two turns of the crankshaft, it should stop itself when it feels the greatest resistance;
- using a wrench to fix the crankshaft in this position, tighten the cap nut;
— having connected the tensioner and checked its fixation, put the cover in place;
- finally, start the engine and check the operation of the drive.
Since the standard engine configuration of the car requires constant monitoring of the timing drive, you can buy and install an automatic VAZ 2107 chain tensioner. The big advantage of installing the ANC is that it does not require an oil line, and the overall drive circuit is simplified. This device itself monitors the tension and adjusts the shoe forces as the chain is pulled.
If, upon inspection of the drive elements, mechanical damage is detected - chips, scuffs or cracks, then replacement of the failed spare part is required. And, as a result, removal or complete replacement of the chain.
When removing the chain, you must remember that before starting all work, the camshaft and crankshaft sprockets must be aligned with the existing marks on the bearing housing and cylinder block. If there is a need to remove the sprockets themselves, then under no circumstances should the shaft rods be turned; to do this, marks must be placed on them in advance.
How to check chain tension
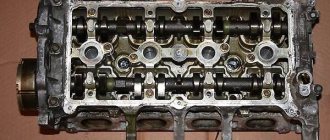
The VAZ 2107 timing chain is located in the front part of the engine. It is closed on top by the cylinder head cover, on the bottom by the engine sump, the middle part runs inside the block and can only be reached by removing the chain.
To check the chain tension, simply remove the cylinder head cover. To do this, you need to unscrew the 8 fastening nuts. After removing the cover, the gasket must be replaced. It is inexpensive, but if this is not done, after installing the cover with the old gasket, it is almost guaranteed that oil will begin to ooze from under it.
When the "valve cover" is removed, the top of the chain is exposed. You can check the tension with your hands, but it is better to use a large screwdriver. It must be inserted between the chain and the cylinder block body and, using it as a lever, try to bend the chain. In this case, the chain should not bend. The tension must be checked on both sides - on the left and right sides of the engine. A chain that is taut like a string and does not bend when pressed with a screwdriver or fingers is a sign of its correct tension. Otherwise, it must be tightened or replaced.
Important: Do not apply too much force by pressing the chain as hard as you can. This can lead to deformation of the chain links. Therefore, it is necessary to press “half-heartedly.”
The physical process of installing a timing chain on a VAZ 2107
The actual procedure for replacing the timing belt with a metal chain does not seem complicated. This process is actually carried out according to the same criteria by which the timing belt is changed. The chain is installed on the same rollers, tensioners and other devices of this unit. The chain size is chosen to be the same as the timing belt size. Everything corresponds to factory parameters, except for one aspect - you are installing an element of the engine system that was not specified by the factory. Moreover, this element is quite important and is one of the most important guarantees of engine safety. The replacement procedure is as follows:
- remove the timing belt cover under which the timing belt operates;
- remove the belt, lowering the tensioner to the required parameters;
- replace all rollers and other mechanisms of the system with those corresponding to the chain
- put the previously purchased timing chain in place of the belt;
- loosen the cap nut using a 13mm wrench;
- Using a crankshaft wrench, turn the pulley several turns;
- The pulley should be stopped when it provides maximum resistance;
- hold the crankshaft from rotating and tighten the cap nut, put the tensioners in place.
Make sure the chain is properly tensioned and does not have excessive tension. You can regulate the tension process by adjusting the tensioner. There is a special device in the form of an automatic tensioner, which independently adjusts to the operating characteristics of the system. This is a very good purchase for a VAZ 2107 with a timing chain, since the chain can stretch. If you do not notice this stretching in time, the chain may well fly off and cause trouble that will be difficult to fix. Improper installation or poorly thought out parts will cause you to spend a fortune on your car to restore it. Bent engine valves are the simplest thing that can happen to a car when a belt or chain breaks.
Installing an automatic tensioner
If you decide to replace the standard tensioner with an automatic one, then the removal sequence does not differ from that described.
But the automatic tensioning mechanism must be installed correctly.
It is already on sale with the rod fully retracted into the body, and it is secured with a pin in this position.
This pin is located in the outer end part of the element.
Before removing the rod fixation, the tensioner must be installed on the car and secured with nuts.
And only after this, the locking pin is removed with pliers, after which the spring will push the rod out, and the pawl will not allow it to go back.
All that remains is to screw the bolt into the hole in the end to prevent the spring from falling out. This bolt must be included with the tensioning mechanism.
This completes the work of replacing the standard tensioner with an automatic one.
In general, the operation of replacing a timing chain tensioner, whether standard or automatic, is not difficult if only the tensioning element itself is changed.
By the way, the work on the injection VAZ 2107 is identical.
Why is it necessary to replace the tensioner?
As the name implies, the function of the device is to tension the timing chain. Since it weakens during prolonged use, its links are stretched. In this case, unstable engine operation appears, the valve timing gradually shifts, and increased heating and wear of the cylinder-piston group parts occurs.
This is indicated by the appearance of a high-pitched ringing sound with a metallic tint from the front side of the engine, in the end part, or a knock from under the valve covers. This can be heard clearly when the engine revs up.
In this case, the chain is tensioned first, since no spare parts are needed for this. However, if it turns out to be ineffective or short-lived, then most likely the tensioner has stopped fixing the chain and needs to be replaced. The tensioner shoe may also need to be replaced.
Let's consider a simpler option for replacing the chain tensioner, which does not require replacing the shoe. Replacing the shoe requires significant preparation work, such as removing the crankcase guard, alternator belt, fan casing, crankshaft pulley, etc.
When to check chain tension
If you need to tighten the chain, it is not necessary to check the tension. It is enough to use a chain tensioner (this will be discussed below). Checking the tension is necessary if the chain has been replaced or if the chain continues to knock after tensioning. The knock of a loose chain is easy to distinguish from other noises: when the engine speed increases, it disappears.
To check this yourself, you need to open the hood and start the car. Then ask an assistant to press the gas pedal or independently pull the cable that controls the throttle valve with your hand. If the knocking noise at the front of the engine has disappeared, the cause is low chain tension. It needs to be tightened up.
Timing phases and when to set them according to marks
Valve timing refers to those moments at which the piston in the engine moves up and down over a certain interval. When irregularities in the valve timing occur, the pistons move incorrectly along the interval, resulting in uneven engine operation on the VAZ-2107.
If the driver notices that the car’s power decreases, fuel consumption increases, and engine interruptions occur, then it is necessary to resort to setting the valve timing according to marks. How to set marks on a VAZ 2107 carburetor and injector, we will learn from this material, since the design of the timing mechanism is identical.
How to set timing timing marks
The procedure involves performing the following manipulations:
- The VAZ 2107 needs to be placed on a hard surface, with chocks placed under the wheels and the hand brake pressed all the way. The gear shift lever must be set to neutral mode.
- The cover is removed from the cylinder head by first unscrewing all the fixing nuts to “10”. It is better to replace the gasket with a new one, even if the old one shows no signs of damage.
- Using a key set to “24”, you need to turn the crankshaft on a VAZ 2107 car. This is done in order to be able to align the marks on the moving and stationary parts of the mechanism. To carry out these actions, it is recommended to use good lighting or use a flashlight. The crankshaft rotates until the mark on the pump and generator drive belt pulley coincides with the long mark marked on the block.
- Combining these risks, the mark on the sprocket should eventually coincide with the ebb on the camshaft bed. If the mark ends up at the bottom, then you should rotate the crankshaft 360 degrees.
- If you can’t make sure the labels match, then proceed to the next steps, which are described below.
- The crankshaft is rotated until the marks on the star and the bed ebb align.
- Using the key at “13”, you need to loosen the tensioner. The 2 nuts securing the tensioner are unscrewed, after which this device is removed.
- The bolt that secures the sprocket to the camshaft is unscrewed. To do this you will need to use the key at “17”.
- The sprocket is removed, after which it must be rotated until the marks on the VAZ-2107 timing belt pulley coincide with the long mark on the block. The star fastening bolt does not need to be unscrewed, since after removing the tensioner the camshaft star rotates.
- We put a chain on the sprocket, if it was decided to unscrew it, and install it in place. Finally, the tensioner is installed, for which you should tighten it with 2 nuts to “10”. You can install the tensioner first, but later you will need to use a crowbar or pry bar to get the sprocket into place. Finally, screw the tensioner nut to “13”.
This relative arrangement of the parts allows the piston of the 4th cylinder to be positioned at top dead center TDC.
Features of servicing the timing mechanism
After the timing marks are installed on the VAZ-2107, you need to perform the following actions:
- The timing chain of the VAZ-2107 is being tensioned.
- Adjusting the valves, or more precisely, the thermal gap between the camshaft cams and the rocker arm.
- Setting up the ignition system.
The process of adjusting the valves on the VAZ-2107 is carried out according to the following scheme: initially 6 and 8 valves are adjusted, the report must be carried out from the radiator. After they are adjusted, you need to start adjusting valves 4 and 7, then valves 1 and 3, and finally valves 2 and 5.
How to adjust the valves on a VAZ-2107 car can be found out in more detail in the relevant material on this site. In conclusion, it is worth noting that VAZ-2107 cars are one of the most reliable vehicles, the production of which began back in the 90s.
Annotation on setting up the ignition system of the VAZ 2107 with your own hands
The Zhiguli “classic” VAZ 2107 does not belong to modern cars, manufactured with the latest technology and stuffed with sophisticated electronics. This is its beauty - there is no need to contact car service specialists for any reason; most of the car maintenance work can be done by the owner himself. This also includes the procedure for the ignition option, which anyone can perform, having previously studied the detailed instructions.
Why is the device replaced?
With prolonged use, the VAZ 2107 chain tensioner weakens (the spring loses its elasticity), which leads to improper operation of the device. This has a negative impact on the operation of the engine, since the valve timing gradually shifts, which contributes to increased heating and wear of the cylinder-piston group parts.
If it is no longer possible to tension the chain, then it may be time to replace the chain itself or one or both shoes, but perhaps only the VAZ 2107 chain tensioner has become unusable and you can only get by by replacing it, without expensive repairs. In the material we will consider the question of how to replace the chain tensioner on a VAZ 2107 car without affecting the tensioner shoe.
What is required for the work
To replace the tensioner on a VAZ 2107, you will need to use simple tools:
- Open-end wrenches for “10” and “13”.
- Key for turning the crankshaft.
After making sure that the above tools are available, you can begin work.
How much does a new product cost?
For the VAZ 2107, a tensioner from classic VAZ models is suitable, so you can choose any one that is available on the market. The average cost of this device is 600-700 rubles. Experienced drivers recommend giving preference to devices from the Tolyatti Automobile Plant, which are supplied in blue packaging. The package contains the packer's number, as well as a special sticker with a code underneath. If you send this code to the number, you will receive an SMS message with confirmation.
It is important to know! Purchase products only from certified stores to avoid purchasing counterfeits.
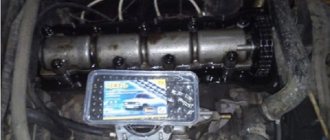
The Pilot brand device is also receiving positive reviews. It has its advantages compared to the standard one, and at the same time it is considered maintenance-free and more reliable. Below is the packaging of the ANC “Pilot”.
Once the Pilot or standard chain tensioner has been purchased, you can proceed to the replacement procedure. The advantage of the “Pilot” is the fact that it is an automatic chain tensioner for the VAZ 2107, which independently regulates and maintains the degree of chain tension on the seven.
Product replacement principle
To replace a worn chain tensioner on a VAZ 2107 with a new one, you will need to perform the following steps:
- The battery is removed from the car to provide access to the element being removed.
- The device is located on the right side of the front of the engine. Using a “10” wrench, you need to unscrew the 2 nuts securing the device.
- In the next step, we remove the device from the engine with our hands.
- We take a new tensioner, loosen the cover nut with a wrench to “13”, then press the protruding plunger into the tensioner itself until it stops, and tighten the same nut. To make this procedure easier, you can use a vice. This must be done to facilitate installation of the device into the engine.
- Once the device is installed, it can be installed in place, not forgetting about the gasket. We fasten the product using fastening nuts. The device is discharged; to do this, release the cap nut. At the same time, the plunger will become free and shoot, thereby causing a tight fit of the shoe to the chain.
- Using a 36-38 wrench or a pipe wrench, you need to turn the crankshaft clockwise 1.5-2 turns. At the moment of greatest resistance during rotation, we stop. It is important to ensure that the crankshaft remains in this position and does not move a millimeter against the stroke, otherwise the chain will sag.
- After this, you will need to tighten the cap nut tightly to “13”.
- Finally, start the engine and listen.
Repair of the tensioner on Lada cars is usually not carried out, so if it stops tensioning, it needs to be replaced. You can see the process of replacing the device in question in more detail in the video above.
Main elements of the timing chain tensioning system
The timing chain in the engine is supported not only by the three sprockets mentioned above. It is supported by several other important devices.
The timing chain tensioning system consists of several critical elements
Let's look at them in more detail.
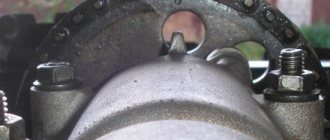
Timing chain stop pin
The timing chain in the VAZ 2107 engine is supported by a complex tensioning system. One of the elements of this system is the limiting finger. This is a small cylindrical part screwed into the wall of the cylinder block. The pin is located next to the crankshaft sprocket. The purpose of the pin is as follows: if the timing chain tension suddenly weakens, the pin will prevent the chain from jumping off the crankshaft sprocket.
The design of the restrictive pin is extremely simple - it is a regular bolt with a head truncated on the sides
At the same time, the chain will begin to touch the limiter with a characteristic ringing sound, which will certainly attract the driver’s attention, since this sound will be heard even in the cabin. If the chain breaks, the limiter will not allow it to completely fly off the sprocket and break the nearby oil pump and timing shaft sprockets.
If the timing chain is tensioned normally, it does not touch the limiting pin, since in this case there is a constant gap of about 1.5 cm between it and the pin.
About timing chain tensioners
The purpose of the timing chain tensioner is easy to guess from its name. He must constantly tension the chain, preventing it from sagging. If the chain sags by even half a centimeter, it may fly off one of the sprockets (although this happens quite rarely, much more often there are situations when the chain remains on the sprocket, but at the same time jumps several teeth forward, as a result of which the uniformity of its tension is completely disrupted , and the sagging increases even more). At different times, different types of tensioners were installed on the VAZ 2107.
Mechanical tensioners
In a mechanical tensioner, the force required for the tension shoe to press on the chain is created by a conventional spring. It presses on the rod, it moves out of the body and presses on the shoe. And the shoe, in turn, puts pressure on the chain, constantly dampening its vibrations.
The main element of the mechanical tensioner is the plunger spring
The spring in such a tensioner is adjusted with a conventional plunger nut. If the driver needs to tighten the chain a little, he simply tightens the nut slightly, eliminating any slack.
Mechanical tensioners for VAZ 2107 are reliable and simple in design
Automatic tensioners
Automatic tensioners were installed on later models of the VAZ 2107. Unlike mechanical devices, the design of this tensioner includes a toothed bar with a ratchet.
The main element of the automatic timing chain tensioner is a toothed bar
The plunger spring presses on this bar, and the bar transmits this force to the shoe. The ratchet prevents the bar from returning to its original position. This keeps the timing chain tension constant.
Finding automatic tensioners for VAZ 2107 on sale has become increasingly difficult lately.
Hydraulic tensioners
These tensioners were installed in the latest VAZ 2107 models. The main difference between these devices is the principle of their operation. The force in the hydraulic tensioner is created not by a spring, but by oil pressure. It is supplied to the tensioner through a reinforced high-pressure hose.
Oil is supplied to the hydraulic tensioner through a special reinforced hose
Timing chain tensioner
The timing chain tensioner is another indispensable element of the tension system, without which uniform operation of the timing chain is impossible. The damper is a metal plate that is attached to the wall of the cylinder block.
The timing chain adjuster on the “seven” is a simple metal plate held on by two bolts
This plate is located opposite the tensioner, that is, the damper acts on the second half of the chain. Since the tensioner presses the chain very sharply, the opposite side of the chain inevitably begins to vibrate. To dampen this vibration, a damper is needed. The chain, touching the damper plate, loses some of its energy and the amplitude of its oscillations decreases significantly. Without the restraining effect of the guide, the chain will stretch much faster.
Features of the tension mechanism and its possible malfunctions
Tensioner is a drive element that provides a certain tension to the timing chain.
The “native” device of this car is a plunger type. That is, in the design of this element there is a spring-loaded plunger, which, due to the pressure of the spring, provides the necessary tension.
This element works in this way - the spring pushes the plunger out of the body, it rests on the shoe and pushes it until the plunger stops the resistance of the chain, while the slack is removed from it by a powerful tensioner spring, the chain is tensioned.
But its design is such that after taking out the slack in the chain, the plunger is fixed with a cracker.
However, over time, the chain stretches more and more and its additional tension is required, for which it is necessary to remove the lock nut fixation of the plunger with a cap nut so that the spring makes a selection again.
One of the main disadvantages of such a tensioner is the possibility of debris getting between the plunger and the body, which can cause it to jam.
Sometimes jamming can be eliminated by lightly tapping the body, but not always. Damage to the housing always leads to the need to replace it.
It is not always convenient to periodically sample chain slack, so instead of a standard tensioner, you can install an automatic one, which performs the sampling itself.
At the same time, the design of such a tension mechanism is very simple and the possibility of jamming is practically excluded.
Removing the camshaft
The engine must be cold when replacing the camshaft. You will need:
- New camshaft;
- Set of levers with bolts;
- Wrenches for 7, 8, 10, 13, 17 and 24;
- Small and large screwdriver;
- 3 spare lever springs;
- Rail;
- Valve cover gasket;
- Torque wrench
- Remove the air filter, separate the tip, cable and throttle linkage.
- If you have a carburetor engine, remove the fuel hose from the bracket; if you have an injection engine, disconnect the vacuum hose, air supply hose and remove the fuel filter from the bracket.
- Remove the cylinder block cover.
- Align the mark on the camshaft sprocket with the top dead center of the 4th cylinder. If you have a carburetor engine, you can turn the crankshaft with a special wrench. And if there is an injector, then you need to jack up the car, engage fourth gear and spin the rear wheel.
- Remove the gasket.
- Bend the camshaft sprocket washer with a chisel.
- Engage fourth gear to lock the crankshaft.
- Remove the tensioner.
- Unscrew the nut and remove the star. Tie the chain to the sprocket so that the links do not jump to other teeth.
- Unscrew the nuts and pull out the camshaft.
- Remove the rocker, bolts and springs.
If the camshaft fails
The camshaft on the VAZ 2106 model is rarely dismantled. Typically during repair or disassembly. Sometimes to replace it.
Signs
First, let's talk a little about the signs that indicate that the camshaft is faulty, its journals or beds are worn out. It is difficult to determine whether the shaft or something else is knocking in the VAZ 2106 engine, but it is possible. The knock of the camshaft is dull and clearly audible. As engine speed increases, the knocking becomes more frequent.
Some drivers determine knocking in this unit using a stethoscope or a stick through the valve cover. But often it is difficult for an inexperienced driver to do this. Therefore, the best way to diagnose the camshaft is to remove it, wash it and inspect it.
If the camshaft is faulty, the following symptoms may occur:
- a dull knock, reminiscent of hammer blows;
- it is impossible to adjust the valve clearances; while the crankshaft is turning, the camshaft is constantly in different positions.
This video shows how you can eliminate longitudinal runout of a camshaft.
The most reliable method for diagnosing problems with the VAZ 2106 camshaft is to dismantle it from the car and wash it. You can wash it in gasoline or other cleaning liquid. Next, you need to hold the shaft and hit the bed, when you hear the slightest knock, we determine whether the mechanism is worn out. Be sure to make sure that the shaft does not move in bed, because when it hits the limiter it will make a dull knock.
Removed shaft
The camshaft has a great influence on the pressure in the lubrication system. If the gaps between the bed and the camshaft are large, then the pressure will be low, and as a result, unsatisfactory lubrication of other parts.
Causes
The main malfunctions that result in the need to replace the camshaft are its wear, the appearance of various scuffs and grooves on the bearing journals. Likewise, replacing the camshaft is necessary if it is found to be deformed or cracked. When such malfunctions occur, the power unit loses power and also begins to function intermittently. Problems with the camshaft are identified by a knocking sound in the cylinder head.
The camshaft on the “six” is rarely removed. In addition to the above reasons for replacing and reconfiguring the power unit. After this, you can notice a significant increase in power, like in sports cars.
Suitability test
After removing the part, you need to check the element for clogging. Oil can carry small particles and other contaminants that can negatively affect the performance of the device in question. Their excessive accumulation causes unstable operation of the plunger rod and its jamming.
You can clean the tensioner yourself without much effort. Place the part in a tank of gasoline for several hours, rinse and dry it thoroughly. When inspecting the case, you need to pay attention to the presence of dents, cracks and scratches. The plunger mechanism is checked in the same way. If no visible damage is detected, check the functionality of the device.
The device is taken in one hand, and with the other we try to move the plunger rod in the frame. It should move freely without getting stuck. If movement is difficult, the washing process must be repeated. If this does not help, the part must be replaced. The element is installed in the reverse order of removal.
Before starting work, it is better to place the car on a flat surface and put it on the handbrake. The gearbox knob is placed in neutral position.
You will need a number of tools, namely:
If the listed keys are available, you can proceed directly to tensioning the chain.
For a carburetor (performed if it is necessary to determine the integrity of the damper): remove the air filter housing from the carburetor and disconnect the “gas” draft from the roller;
Disconnect the traction lever;
Disconnect the bracket hose;
For injection (performed if necessary): remove the throttle cable and breather hose.
Using a 10 mm tubular wrench, remove the cover from the cylinder block;