What you need to know about the gas distribution mechanism (GRM) of the Chevrolet Niva
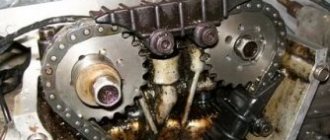
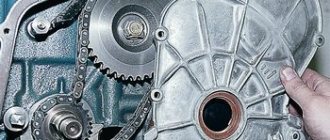
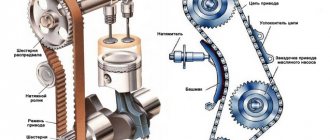
The Chevrolet Niva engine has one camshaft, which alternately opens 8 valves. It is driven by the crankshaft through a chain that rotates on their pulleys. The stable operation of this element is ensured by the tensioner and damper.
In order for the intake and exhaust valves to open at the required stroke, the crankshaft and camshaft must move synchronously - the camshaft rotates twice for one revolution of the crankshaft. You can evaluate the coordinated operation of both units by the marks that are installed on the pulleys.
(Timing) Chevrolet Niva
Product description
Branded developments:
Innovative USPK technology was used in the production of oil and petrol resistant rubber:
BNKS-28AMN (synthetic butadiene-nitrile rubber) is used in the recipe.
Benefits for the car enthusiast:
Warranty 2 years unlimited mileage
- Availability: In stock
- Length: 16 cm x Width: 6 cm x Height: 3 cm
- Weight: 0.45 kg
- Product code: 4877
- Cash upon receipt (cash on delivery)
- Online payment by bank cards without commission
- Electronic wallets
- According to the organization's account (excluding VAT)
- Post office
- SDEK | DPD | PEC
- Business Line
- Energy | GTD (KIT)
- Baikal Service
- ZhelDorExpedition
- Dispatch from 1 day
- Delivery from 2 days
- Product didn't fit? Easily return it within 14 days
- Read about other store guarantees
Source
How to determine the offset of the timing chain marks?
A chain is more reliable than a belt. It does not slip; in practice, there are practically no cases of breakage. But over time, it can stretch, which leads to changes in valve timing due to a shift in the position of the crankshaft relative to the camshaft and to a later opening of the valves.
The malfunction can be identified by the following signs:
- A metallic knock at idle is the initial stage of a stretched chain. At first the sound appears “when it’s cold” and as it progresses it becomes disturbing.
- Loss of power and difficult starting - appears when the operation of the gas distribution mechanism is disrupted. If adjustments are not made in time, the engine will stop starting.
Sometimes the valve timing shifts “by one tooth” due to damage to the pulleys, which can play and weaken the timing chain. Do not rush to agree to a major overhaul, but check the marks and carefully inspect the sprockets.
Build process
- The front cylinder head cover is installed and a layer of sealant is applied.
- The bolts are tightened.
- The air filter is installed, sealant is applied and the pan is screwed on.
The fitting is unscrewed to bleed air from the block before filling with coolant. Pour liquid into the radiator. After it leaks out of the fitting, the lamb is screwed into place. Filling the engine oil. The hose and crankcase ventilation tube are connected to the fittings, and the copper wires are connected to the ignition coils.
The tips of the high-voltage wires are connected to the spark plugs. It is possible that after unscrewing the spark plugs, the remaining water in the wells penetrates the cylinders. Using a long knitting needle and a clean rag, it is easy to remove moisture from them.
Evaluating the position of the marks and setting the valve timing
To start work, you will need the following tools: keys for “8”, “10” and “13”, installation and a special key for cranking the crankshaft.
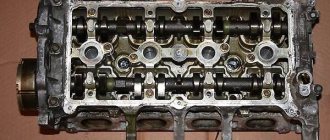
It is possible to accurately determine the need to replace the timing chain only after the fact. You need to remove the valve cover, set the piston of the 4th cylinder to top dead center (TDC) and look at the marks.
Step-by-step instructions for diagnosing and setting valve timing:
- We remove the negative terminal from the battery, put the car on the handbrake and engage neutral gear.
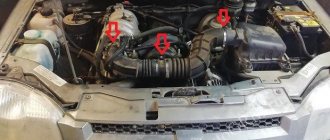
- Preparation - unscrew the air duct from the mass air flow sensor to the throttle assembly, disconnect the accelerator cable, the hose of the vacuum brake booster and crankcase ventilation. Remove the valve cover along with the rubber band by unscrewing the fasteners.
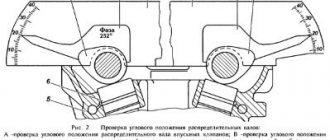
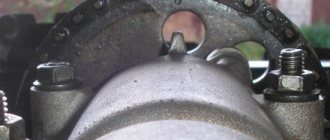
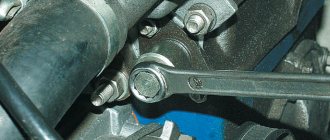
- We set the 4th piston to TDC - use a wrench to turn the crankshaft so that the mark on its pulley coincides with the mark on the engine cover, and the mark on the camshaft sprocket matches the pointer on the valve cover. If the marks on both sprockets match, the valve timing is normal. If not, we continue working.
- To fix the crankshaft, put the car in first gear. Unbend the tabs of the camshaft pulley bolt lock washer.
camshaft pulley
- Unscrew the bolt and remove it along with the lock washer. Be careful not to drop them into the engine pan.
- Press the tensioner plunger with a pry bar and loosen the chain. Then remove the pulley from the camshaft and carefully move the chain in the desired direction by 1 tooth.
- Place the sprocket on the camshaft and tension the chain. If the hole on the camshaft pulley no longer aligns with the locating pin in the flange, rotate the crankshaft slightly to the side until synchronized.
- Screw the bolt and washer back, but do not tighten it. Rotate the crankshaft 2 turns and check the marks. If they do not match, repeat the procedure the required number of times.
When finished, tighten the camshaft bolt and bend the petals of the support washer, putting the car in first gear. Assembly is carried out in reverse order.
When reassembling, do not forget to install a new valve cover gasket, even if the old one has no external damage. The chain tensioner can be replaced with a mechanical “Pilot” with a longer service life.
When to use low gear
For what purposes is a transfer case even needed, when does it make sense to engage the locking and downshift? Such seemingly simple, but at the same time serious questions will become clear when considering the following example. When driving on a country road on a hard surface, fourth gear is engaged. Suddenly, a large puddle with a soft, unreliable surface appears in front of the car. In such an obstacle the car can easily “sink”. To prevent this, you should engage a lower gear and slowly overcome such an obstacle without haste. This gear is designed specifically for driving on soft road surfaces, when even in first gear the car feels “hard”.
Low gear
It is worth noting that in order to engage a lower gear on a Niva Chevrolet, you need to stop - this is how the car’s differential is designed. But you don’t need to stop at all to turn the lock on and off. But is it worth using such additional and, without a doubt, useful functions of the machine often? Experienced drivers recommend using them in places where the dirt is not located on level ground, but with various potholes and the like.
Thus, the low gear of the Chevrolet transfer case is designed for comfortable off-road driving and overcoming various obstacles. In such a gear you need to drive slowly, you cannot accelerate sharply, because at this moment the wheels will receive a large load, as a result of which a real hole can form, from which it will be very difficult for the car to get out.
With this driving style, the motorist will better feel the movement of the wheels, as a result of which, when they “bury”, as evidenced by the chaotic movement of the car, it will be possible to immediately do something after overcoming the obstacle. Most often, this is done by changing the trajectory of the car.
It is also worth noting that when driving through sticky mud or deep puddles, you should never suddenly engage second downshift. At the same time, the torque increases, as a result of which the car can simply “choke”, stalling at the most inopportune moment.
Removal
Changing a chain on a Chevrolet Niva is much more difficult than replacing a belt. To do this, you should do the following:
- We drive the car into a pit or overpass
- For ease of work, remove the engine protection with boot, this will also help remove the timing belt mounts
- We fix the car with the handbrake, put supports under the wheels
- Drain the antifreeze and remove the radiator with fan
- From the air duct pipes and from the valve covers, disconnect the accelerator cable that goes to the air filter.
- We remove the crankshaft sensor, and then loosen the bolt that secures the generator
- We move the generator and loosen the belt tension.
- We remove the belt, unscrew the bolts that secure the water pump to remove it.
- Unscrew and remove the belt bypass and tension roller.
- We remove all pipes that interfere.
- To prevent debris from getting into the cylinder head, it is advisable to cover it with something.
- We unscrew the bolts that secure the gear and camshaft, and after removing the cover, remove it.
- We remove the hydraulic tensioner with the shoe, having first removed the oil pipe.
- Together with the chain, we remove all the gears, oil pump, camshaft and crankshaft.
- We install a new oil seal on the timing cover
Step-by-step instructions for replacing the timing belt yourself
Repairs begin by preparing the car for partial engine disassembly . To do this, the machine is placed on a pit or a lift. Remove the engine protection, drain the antifreeze from the radiator, dismantle the main radiator with cooling fans. Loosen the fastening of the power steering pump and generator, remove the drive belts.
With an air conditioner, there are 2 options : drain the refrigerant and dismantle the radiator, or carefully move it to the side and hang it so as not to break the hoses. We disconnect all the cooling system hoses that interfere with the repair area. Remove the air filter, throttle cable, air pipe. In this semi-disassembled form, you can proceed directly to replacing the timing chain.
Consequences of untimely replacement
Often the cause of repairs is an imperfect design of the hydraulic tensioner. To avoid this, many people replace the Chevrolet Niva chain tensioner from hydraulic to mechanical. Otherwise, operating the timing chain longer than expected can lead to disruption of the normal operation of the engine, and in advanced cases, to its overhaul.
The increased functional life of the components and simple replacement allow you to regularly replace the timing mechanism yourself. In combination with high-quality oil, this will significantly extend the life of the engine, and will save the car owner money and nerves.
Which camshaft is better to install?
One way to avoid main engine noise is to replace them with adjusting bolts. In this case, it is also necessary to purchase a 213th camshaft, which can improve engine performance.
Problems with the shaft itself include:
- bearing wear;
- bullying in bed;
- cracks, fractures, axial deformation;
- seal damage.
Video 1, the shaft burst 2 times in a row.
Installation
After removing all elements of the system, you need to carry out proper installation and configuration, for this you need to do the following:
- Install the mounting bolt on the shoe.
- We check that the shoe does not move on the axis, tighten the bolt
- We install new gears, they must clearly coincide with the existing marks
- We install the clamp, if it does not sit in its place, you can file it a little
Before installing the chain, take engine oil and lubricate it, then put it on the new elements as follows:
- We put it on the crankshaft gear
- Then to the oil pump
- Then to the camshaft
After replacement, the tensioner is installed in place, the marks of which must coincide with the chain tension; after checking, we tighten all the bolts. Lubricate the gasket with sealant located on the timing cover and install it in place. We install the pulley and two belt rollers in place and tighten the bolts that secure them. Engage 4th gear and tighten the pulley nut. We install all existing pipes, hoses, radiator, fan in their place, and fill in antifreeze. We start the engine for a couple of minutes and check how it works; if everything works properly, we install the protection with the boot in place.