Quick replacement of the timing chain on a Chevrolet Niva
Recently, an old friend of mine came to see me in his old Chevrolet Niva with the characteristic sound of an extended chain.
In addition to the timing kit, I had the foresight to purchase even a front cover gasket, a crankshaft oil seal and a kilo of marinated meat. I could not refuse such an offer. So, Niva Chevrolet replaced the timing chain and front crankshaft oil seal.
First, let the engine cool to an acceptable temperature. Remove the pipe by unscrewing the bolt by 10 and loosening the clamps.
Next, we unscrew the eight nuts by 10 and move aside the throttle cable and all the pipes that will interfere with us, remove the valve cover.
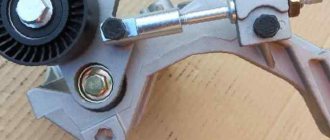
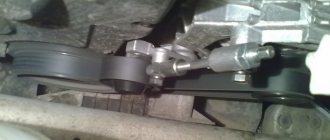
Remove the air conditioner belt by unscrewing the bolt 13 of the tension roller.
Then loosen three 13mm nuts and one bolt of the generator belt tension roller and remove it.
Now comes the fun part. To unscrew the pulley nut, we need a 38mm socket. Since the elongated head does not fit under a regular wrench (the radiator is in the way, but we don’t want to remove it), we use a pry bar, carefully sawed off from the hub key of some large car.
Everything fits perfectly. Unscrew the nut and remove the crankshaft pulley.
Unscrew the deflection roller.
We dismantle the reinforcing plate.
We unscrew the six nuts securing the front timing chain cover to the block and the three bolts securing it to the pan and remove it.
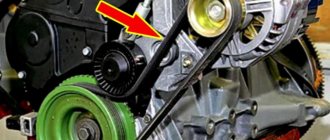
Set the top dead center. The key on the crankshaft should align against the mark on the block.
The mark for the camshaft sprockets is against the ebb of the camshaft housing.
Next, unscrew the oil supply pipe and two nuts 10 of the chain tensioner.
Next, unscrew the tensioner shoe, damper and remove the timing chain.
Compare the new and old timing chain. It could be worse.
New timing kit.
Reinstall the chain, guide and tensioner shoe. We tighten the chain by hand and check that the marks match.
To make it convenient for us to check the marks after installing the front timing cover, we find the factory mark on the crankshaft pulley and mark it with a white marker. This mark at TDC should be opposite the center of the crankshaft sensor.
We install the front cover, crankshaft pulley and tensioner. Let's check the marks again. We install all the removed parts in the reverse order of removal. Fill with fluids, start the engine and enjoy.
Spare parts for changing the timing drive
To upgrade the timing unit on the Korean Kia Rio, you will need the following consumables:
Timing chain kit
- current KiaRio 3 timing chain (the original comes with article number 24321-2B200);
- tensioner (catalog number of the original part 24410-2B700);
- pump DOLZ (number H226);
- pump housing gasket (25124-2B000);
- guide strips - right (24420-2B000) and left (24431-2B000);
- cover gasket with spark plug well rings (22441-2B000);
- cylinder block o-ring (21142-2B000);
- front crankshaft oil seal (21421-2B020);
- Abro gasket sealant (13ABR).
Here is an extensive list, since the work of replacing the chain is labor intensive and allows you to update multiple worker nodes at the same time. If some parts are suitable for the car owner in terms of resources and degree of wear, they cannot be changed.
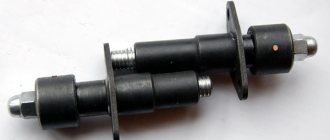
Mechanical chain tensioner. Main manufacturers.
main chain tensioners for -214 engine
The photo shows three main options common in Russia. The first product is made by the people and on the forums of the ANC “auto pilot”. The second product is manufactured by Rusmash, usually called the pilot. The third tensioner belongs to the designer Isaev, colloquially Isay. My team and I personally have installed several dozen of each type of tensioner on cars, so I have the right to talk about statistics and operating features. Something from behind the scenes. The first two tensioners belong to the pen of one person. Designer Igor Medvedev. On motor forums under the nickname Rhodes-M. As far as I know, patents for these inventions or utility models are registered in his personal name. I work together with this person on other projects, so the information about the designs and manufacturing features is first-hand.
Autopilot.
Principle of operation. Rack. Of the three, this is the undisputed leader. I have not noticed any shortcomings in operation. Cars with mileage of more than 150 thousand have already arrived where I installed autopilots from the very first batches. It is very convenient to work when replacing the camshaft; it does not need to be removed from the cylinder head. Flaw. It is difficult to find an “original” that has passed quality control. Medvedev left and the quality of input immediately dropped greatly. The cost of production has become cheaper.
Pilot.
The operating principle is a toothed rack. Good quality tensioner. The big brother of "autopilot". Stable quality. It is also possible to work without removing it from the cylinder head. The main disadvantage is the huge percentage of fakes on the market. This tensioner was the first successful design, and the Chinese grabbed it. If Autopilot is completely impossible to find, then Pilot is very difficult to find “original”. Based on the St. Petersburg market, I estimate the prevalence of counterfeits for this tensioner at 70%. I work with Rusmash directly, so this as a “minus” is insignificant.
Isaiah.
The operating principle is a clock spring. To avoid questions and insinuations, I contacted the designer directly and in 2022, we installed several dozen of them. The main disadvantage of the product, which the designer passes off as its advantage, is that there are no precision parts. When the rod doesn't move out too much, everything is fine. When the chain is worn out and the rod goes beyond half, it “walks” quite a lot. If we are talking about a production engine without “pretensions” for tuning, this may be acceptable. If the engine is “more serious” this is unacceptable. The tolerance for axial “walking” of the chain and sprockets in the timing tract is only 0.3 mm.
Summary
. We try to install Autopilot (if available) on tuned cylinder heads. For the most part, we work with Pilot, but if a client, based on forums or his own views, asks to install Isai, then we do not dissuade him. For double-row chains and -213 engines the situation is similar.
chain tensioner Pilot for 21213
Characteristics of the VAZ 2106 chain drive
The function of the timing chain is based on the connection between the timing shaft and the crankshaft in the engine of the car. They are both equipped with sprockets with special teeth, due to which the chain is fixed. As soon as the engine starts, the above-mentioned shafts begin to rotate synchronously thanks to the presence of this chain. A violation of synchronicity against the background of any kind of circumstances provokes a malfunction in the functioning of the timing belt.
Malfunctions in the functioning of the cylinders are also possible, dips in engine power invariably form, fuel consumption increases significantly, and the vehicle itself does not respond well enough to activation of the gas pedal.
Classic VAZ cars are equipped with timing chains of the same length, the only difference is the number of links. As for model 2106, we are talking about a chain with 116 links with a length of 7.2 mm each. High quality alloy steel is used to make pins, which, thanks to this material, demonstrate increased wear resistance and strength.
Pros of the drive
Timing chain drive has been used for a very long time, but this does not mean that such a system is a relic of the past. Even today, due to its advantages, it is actively used by modern leaders in the automotive industry.
Among the advantages are:
- high resistance to any type of load;
- the ability to operate under conditions of noticeable temperature changes, as well as at extremely low or high temperatures;
- The operating life of the drive can reach 200 thousand km with proper operation.
Disadvantages of the drive
Along with the advantages, it is worth considering the disadvantages:
- the weight is significant, so the auxiliary elements of the mechanism must correspond to it in terms of quality;
- the noise during operation is quite noticeable, higher than that of other types of gears;
- replacing and tensioning a VAZ 2106 chain requires performing related procedures that inexperienced drivers may not be aware of;
- the forced use of compensating elements in the system significantly complicates the drive;
- the design is quite complex, which causes increased production costs; therefore, consumables and parts are relatively expensive.
The mentioned disadvantages cannot be called critical, since because of them there was no global refusal to use this mechanism. The classic VAZ auto industry to this day focuses on precisely this technology.
How to install a hydraulic tensioner on a 409 engine
The engine has two hydraulic tensioners of the same design - for the upper and lower chains
Since hydraulic tensioners constantly keep the chains in tension, regardless of chain stretch and shoe wear, there is no need to adjust chain tension during operation.
The hydraulic chain tensioner device is shown in Figure 1.
Plunger 4 is installed in housing 5. A spring 6 is inserted into the plunger, which is compressed by a screw plug 1.
A check ball valve 2 is installed in the plug.
The plunger is fitted with locking ring 3 and retaining ring 7. In the figure, the hydraulic chain tensioner is shown in an inoperative (“charged”) state, when the locking ring keeps the plunger from moving.
In order to bring the hydraulic tensioner into working condition (“discharge” it), you need to press the end of the plunger so that the locking ring moves into the groove of a smaller diameter on the plunger, then under the action of the spring the plunger will move out of the body.
The hydraulic tensioner is installed on the engine in a “charged” state.
Under the action of the spring and oil flowing through the valve from the engine lubrication system, the plunger presses on the tensioner shoe and maintains the chain in tension.
As the chain stretches and the tensioner shoe wears, the plunger moves further out of the body, the locking ring moves into the next annular groove on the body, preventing the plunger from moving in the opposite direction.
When the chain hits the tensioner shoe (for example, when the engine operating mode changes), the plunger moves back into the body to the width of the groove under the locking ring. At the same time, it compresses the spring.
In addition, the valve closes and additional damping occurs due to the fact that oil is squeezed out through the gap between the plunger and the body.
You will need: a 12mm wrench, a screwdriver.
1. Holding the hydraulic tensioner cover (it is pressed from the inside by the tensioner), use a 12mm wrench to unscrew the two bolts.
2. Remove the cover and take out the hydraulic tensioner.
We install the hydraulic tensioner in a “charged” state, lubricating the channel in the cylinder head and, if necessary, replacing the torn gasket.
After installation, we bring the hydraulic tensioner into working condition - “discharge”.
“Charging” the hydraulic tensioner
If there is no mandrel for assembling the hydraulic tensioner or it is not possible to make one, you can assemble the tensioner as follows.
1. We bring the jaws of the vice together, leaving a gap of 19 mm between them.
Do not clamp the tensioner body in a vice.
When disassembling two hydraulic tensioners at once, do not confuse their plunger pairs, since they are selected with a certain clearance.
2. Install the tensioner body in a vice, like in a wrench, using a screwdriver with a wide blade.
3. turn out the valve.
4. Remove the spring from the housing
5. Remove the plunger.
We wash all parts in gasoline or kerosene, blow with compressed air and lubricate with engine oil.
6. From a steel sheet 0.8-1.0 mm thick, cut out a strip (10-15 mm wide and 25 mm long).
Using round-nose pliers or a mandrel, bend it into a ring with a diameter similar to that of a plunger.
7. Using the manufactured mandrel, we press the spring in the hydraulic tensioner housing.
8. Install the plunger into the body.
9. If necessary, use a thin screwdriver to guide the locking ring.
10. Use a screwdriver to press the bottom of the plunger until it stops.
11. We install a spring in the plunger, and the body itself in a vice.
12. Overcoming the resistance of the spring, we wrap the valve into the hydraulic tensioner housing.
13. For a correctly charged tensioner, the plunger should be completely inserted into the body.
Use a screwdriver to tighten the valve, holding the body in a vice (as during disassembly).
Do not press on the protruding end of the plunger, and after installing it in the channel of the block head, do not press on the tensioner itself.
Discharging the hydraulic tensioner
After installing the hydraulic tensioner on the engine, it must be brought into working condition - discharged. For this:
1. Using a 12mm wrench, unscrew the plug from the hydraulic tensioner cover.
2. Using a screwdriver through the hole, press the tensioner, which, when “discharged,” will push it out.
3. Put the plug in place.
This is what an “undischarged” hydraulic tensioner looks like.
Source
Do-it-yourself features
You can make your own bicycle chain tensioner of varying complexity and degree of reliability.
To do this, you will need a small sprocket as a tensioner pulley. As a fastening, you can use a part of the reflector, an aluminum plate in which holes are drilled for attaching the sprocket and bolts holding it to the frame.
But there are also unusual solutions, for example, a tensioner made from a bicycle wheel spoke.
From a knitting needle
An old, unreliable, but working method.
A bicycle spoke is bent into a spiral and attached to the rear axle. Its end should pull the chain and point with its tip upward away from the chainstay and towards the direction of movement of the bicycle.
This design is only suitable for transmissions with a foot brake, otherwise the links will be blocked by the spoke when the pedals are rotated in reverse.
Made from aluminum plate
An aluminum plate is used as the base. It is bent in half or cut into 2 parts. A roller is attached at the end between them. On the other, holes are made for fixing to the frame with bolts.
If the plate is curved, a rubber gasket is installed at the bend. The curved plate catches the nib and is clamped around it. The rubber gasket prevents the plate from damaging the paint layer and helps firmly fix the homemade lever.
From the reflector
The reflector mounts, as well as the aluminum plates, serve as the basis for the tensioner pulley. This design is installed on the feather next to the rear or front sprocket.
The soft material used in the manufacture of reflector mounts has good elasticity and strength characteristics. This gives an advantage to those who like hard riding.
From the rear speed switch
An exhausted rear derailleur will still be useful if you cut off the lower part of the old derailleur: the roller and the tab. The latter must be secured to the rooster or dropout and the tension adjusted correctly. This is the simplest but most reliable way to make a homemade tensioner, because... the original parts were produced in specialized production facilities.
Replacing the chain tensioner on VAZ 21213, VAZ 21214, VAZ 2131
Welcome! Chain tensioner - as is already clear from its name, it is only needed to tension the chain so that it does not loosen while the engine is running, but over time this part breaks for various reasons, this happens, sometimes the tensioner simply cannot withstand very heavy loads breaks, for example, if you keep the engine speed in the red zone for a long time, the tensioner cannot withstand and breaks, but it can also break because it is not very durable, for example, there are a lot of very bad tensioners on the market at the moment qualities that really fail very quickly and after that they will need to be replaced with a new one, and you will learn how to do this from this article.
Note! In order to replace the chain tensioner, you will need to stock up on: A basic set of wrenches, which will contain the most basic keys that you use almost everywhere in the car!
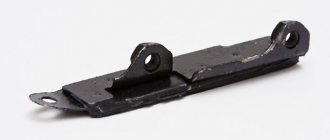
Where is the chain tensioner located? It is located on the side of the engine, it can be easily found by the way if you approach the car from the right side of the engine compartment (The countdown starts from the rear of the car to the front), there is also a battery installed nearby and there is a standard injection receiver in the form of curved pipes ( It is white), so when you stand on this very right side, look for the place indicated in the photo, this is the same tensioner.
Note! In the photo above there is one nuance, there is a completely different tensioner that was never installed on Niva cars, so don’t pay much attention to the shape of this tensioner, but just find out approximately where it is and that’s it! (There will still be a tube coming from the original tensioner, you will immediately understand, just take a closer look and it is all located almost in the middle part of the engine)
When should you change the chain tensioner? It changes only if it has become unusable, but how can you understand this, you ask? In general, when the tensioner becomes unusable, the car’s engine begins to run significantly louder, because the chain is weakened and thus there is such a roar as if you started the car with a diesel injection system, and not with a gasoline one, so if you hear something rattling in the engine, vibration may also appear, and by the way, this knocking should become less as the speed increases, that is, if the engine is noisy at idle and the chain rattles, then just give a little gas and if this knock goes away (the higher the speed, the weaker it should be knocking) then it is most likely really the tensioner, although many other parts could be to blame for this, but first you need to check it, since it is removed very quickly and is also checked accordingly.
How long does a chain last?
It's amazing how many different myths and fairy tales you can learn about the chain:
- The chain is unreliable and stretches up to 100,000 (in fact, the original chain does not expand, but counterfeits and duplicates do).
- In Rio this is a weak point, you need to constantly check the chain tension. (It is not true).
- Easily torn. (Only if on a car before 2013, when accelerating until it turns off, a downshift is accidentally engaged. And this is not a fact).
- Easy to jump. (Isolated cases).
- The chain likes to shake. (No).
In practice, since 2012, ONLY more than one chain has broken, and with one skid - only a few cars.
By modern standards, the chain is eternal. I don’t remember any other machines with a similar resource. Today there are already many Rios with huge tracks and still with a home track. If in numbers, then up to 300 thousand km is not even worth thinking about. About 450 thousand km you can already try out the scheme. We focus on these numbers only if you are sure of the mileage. If the car is purchased, but you should not be guided by the odometer numbers. Today there are many cars with winding paths. Such a service on the market costs only 500 rubles. Twist, usually in the middle of the stroke. Therefore, it is necessary to check the condition of the circuit.
Is it possible to repair the old one?
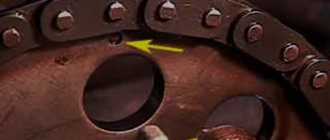
An old hydraulic chain tensioner can be repaired in 60 percent of cases. But first you need to make sure that it is faulty. To do this, press the spherical end of the element with your finger. If it does not press, then the tensioner is jammed.
View gallery
This occurs due to the skew of the locking ring. It has small burrs at the ends of the cut. They are the ones that interfere with the operation of the element. The disassembled tensioner must be thoroughly washed in kerosene and the locking ring replaced. Its outer diameter is 16.6 by 3 millimeters. The ring can be made from spring wire. It happens that the ball valve fails - it allows excess oil to pass through. To check its tightness, you need to remove the plunger and spring from the housing. Insert the latter with the end (spherical) part into the housing hole. Press the opposite end of the element with your finger. If there are large traces of oil leakage, the part must be replaced. From the factory, small discharges are allowed through two marks on the end of the tensioner housing. They serve to remove air from the inside of the mechanism. You can try to wash the element, thereby restoring it. But the result is not always effective. To do this, you need to wash the ball valve in gasoline or kerosene, pressing it with a thin wire through the oil hole. If flushing does not produce results and the element still leaks oil, it should be replaced.
Criterias of choice
On bicycles with multi-speed transmissions, tensioners are included in the rear derailleur design. When choosing, you should be guided by the type of bike: for a road bike, models with 1 elasticity mode are suitable; for a mountain bike, it is better to choose ones with 2 ranges (low elasticity for smooth roads, high elasticity for extreme riding).
Bicycles for hard disciplines should have a chain tensioner installed. On a single-speed or planetary-shift bike, you can install a free-standing Shimano Alfine tensioner.
Replacing the cylinder head gasket on a Niva Chevrolet car
- We remove the battery wiring and drain the antifreeze.
- We free the carburetor from cables and hoses.
- We dismantle the controller with voltage wires.
- Carefully remove the starter screen and heater tube from the manifold.
- Remove the antifreeze temperature sensor.
- Remove the brake booster hose.
- Remove the hoses from the cooling system and heater.
- Disconnect the camshaft and valve levers.
- We dismantle the chain and secure it.
- We unscrew the fasteners and remove the cylinder head with the pipe, carburetor and manifold.
According to reviews from Chevrolet Niva owners, you need to pay attention to the following subtleties:
- you should buy a metal seal as it is more durable and of higher quality;
- If the head fastener does not unscrew, you need to tap it with a hammer - this way you will minimally damage the surfaces and the key will not turn.
As you can see, replacing a gasket is not an easy task; you can do it yourself only if you have good general technical knowledge, skills and abilities. Remember, this is still the engine, the main part of the car. Before you do this, study the engine diagram well, the features of your car, do everything slowly, preferably in the morning with a fresh mind, because replacing a gasket is a feasible thing, but it requires attentiveness, scrupulousness and accuracy.
In what cases is it necessary to change the cylinder head gasket on a Niva?
In principle, the element of the main cylinder block in question does not have a certain resource, that is, the gasket is replaced when it is damaged, which, however, usually occurs after 60,000 or 80,000 km. A breakdown is indicated by:
- air entering the antifreeze circulation system;
- lack of operating pressure in the combustion chamber of the air-fuel mixture;
- the presence of coolant in the lubricant or, conversely, the latter in the antifreeze (an oil film appears in the expansion tank).
All these problems lead to unstable operation of the Chevrolet engine.
In these situations, the gasket must be replaced immediately.
How does it work?
The principle of operation of the element is based on the operation of a spring. As oil from the line flows through the valve body, the plunger presses against the plastic tension shoe. Some engines use a lever with an asterisk. Thus, continuous contact of the surface of the working element is ensured. When engine speed changes, the element plunger moves back. The spring is compressed. Damping of vibrations occurs due to the flow of lubricant through the plunger and body. The oil pressure is controlled by the hydraulic tensioner ball valve. When the chain is pulled, a plunger is pulled out of the housing. The retaining ring moves along the grooves to ensure proper tension. The unit also compensates for thermal expansion that occurs as the engine warms up.
Manual chain tension
To eliminate the characteristic knocking sound of the chain drive in the valve cover area without changing the element itself, you can manually tighten the part. Let's look at how this procedure is performed using the example of a VAZ-2106 car. Here a sprocket is used in the tensioner.
View gallery
So, first you need to remove the air filter with housing and casing. Next, unscrew the tensioner (not all the way) and make 2-3 revolutions of the crankshaft. This can be done with a regular key, setting it to the third position. After several rotations of the crankshaft, the chain drive is engaged. Next, check the level of its tension by pressing your finger on the links. It should not sag by two or more centimeters. When the chain is properly tensioned, the hydraulic tensioner is tightened and the attachment is assembled in the reverse order. This procedure must be repeated whenever knocking noises appear in the engine compartment.
Popular manufacturers and models of devices: description and cost
Chain tensioners and stabilizers are in the portfolio of all major manufacturers - Shimano, SRAM, Campagnolo, Reverse Components, MRP.
Chain tensioners and stabilizers from popular manufacturers.
Prices range from several hundred rubles to tens of thousands and depend on the purpose, reliability, and weight. For example, rollers on derailleurs without bearings are cheap (Shimano Tourney), in contrast to expensive ones that can withstand shock and vibration loads (Shimano Deore, Sram X5). The most expensive ones are electronic speed switches, which are physically easier to use. In them, the signal is transmitted not through cables, but through a system of sensors.
Shimano
The company is a leader in the production of sports goods. As a result of competition, the former European market leader, Campagnolo, completely abandoned the production of mountain bike equipment.
The Shimano range includes lines of components for road bicycles, MTB, and extreme disciplines. Parts of this brand are present in the top versions of bicycles, which can be seen at international championships, and on bicycles for fans of the Stealth and KhVZ (Kharkiv Bicycle Plant) brands.
Replacing the hydraulic tensioner.
When a chain stretches, you cannot limit yourself to just replacing the tensioner. For high-quality repairs, it is also necessary to change the gasket seals and chain.
To replace, you will need the following procedure and set of tools:
- a 10mm wrench to disconnect the fitting of the oil supply tube to the hydraulic tensioner.
- After this, the fitting is loosened and the tube is pulled upward.
- Using a 10mm wrench, remove the nuts that hold the tensioner.
- After this, the device can be removed and a new one installed.
- An old timing belt tensioner cannot be repaired. Before installing a new spare part, the seat must be coated with sealant to prevent oil leakage.
Installing a new part is carried out in the reverse order:
- The tensioner is inserted into the seat. The part must be identical to that recommended by the manufacturer.
- Tightened with two nuts. When tightening, you do not need to exert excessive force so as not to break the thread.
- We fix the tube for supplying oil to the hydraulic tensioner.
It is important to remember that without replacing the timing chain, the problem may not be corrected, since the chain may be stretched so much that this wear will not be compensated by a new tensioner. https://www.youtube.com/watch?v=Rs7i0Ox25pk
How to change?
If the symptoms described above are observed, an urgent replacement of the hydraulic chain tensioner is necessary. To do this we need a new element, as well as a set of heads. Using a 10mm wrench, unscrew the fitting of the cylinder head cooling tube and move it upward.
Next, we find two fastening nuts for the tensioner itself. We unscrew them with the same key. We take the protruding part of the mechanism with our hands and remove it from the seat. It is worth noting that the hydraulic chain tensioner has its own gasket, which also needs to be replaced. Before installing a new element, carefully coat the seats with silicone sealant. Install the gasket and tighten the bolts. By the way, before installation you need to remove the transport stopper. This element is needed to prevent the tensioner from discharging (so that the plunger does not come out of the body) during transportation. To “charge” the element and bring it into working condition, after assembly you need to press the negative screwdriver onto the part with great force. As a result, the hydraulic tensioner housing, under the action of the spring, will move into the cover until it stops.
The plunger itself will produce the proper chain tension through the sprocket or shoe (depending on the design features of the engine). Before “charging” you need to carefully tighten all the bolts. Otherwise, this will lead to premature wedging of the element. Don't forget to reinstall the fitting. After installation, start the engine and check it for extraneous sounds.
Removing the cylinder head cover
Place the machine on a pit or ramp.
First, the holders of the brake booster pipe and the throttle valve drive cable should be disconnected from the cylinder head cover. They are mounted on special brackets on the left and right sides of the block.
Next, use a 10mm wrench to unscrew the bolt securing the air duct couplings. Move it aside. Next, using a screwdriver, slightly loosen the clamp of the crankcase ventilation pipe, which connects it to the air duct. Now use a 10mm socket to unscrew the bolts holding the cylinder head cover. The order is not important here.
OLYMPUS DIGITAL CAMERA
After that remove:
- brackets for the throttle cable and motor screen;
- lid pressure washers;
- ventilation and air hoses.
Next, all that remains is to remove the cylinder head cover.
Hydraulic chain tensioner for VAZ 21214 device and principle of operation
general information
It has long been known that the quality of car parts produced at the AvtoVAZ plant is not of a high level. And timing parts are no exception. The chain has to be constantly tightened, almost every thousand kilometers. A hydraulic chain tensioner will help get rid of this problem. It is this device that we will talk about in this article. Let's look in detail at the operation scheme and replacement of the device.
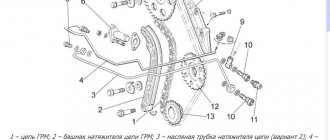
Scheme of work
The figure below shows a diagram of the operation of the spring-hydraulic chain tensioner of the VAZ 21214 car. 1 – camshaft star; 2 – timing chain; 3 – chain damper; 4 – auxiliary device drive star; 5 – crankshaft star; 6 – tensioner “shoe”; 7 – hydraulic chain tensioner; 8 – line fitting; 9 – oil line; 10 – adapter fitting; 11 – oil pressure sensor (emergency).
Replacing the drive chain hydraulic tensioner
Detailed instructions with photos for replacing the hydraulic chain tensioner: The hydraulic tensioner is located under the cooling pipes in the front of the cylinder head.
Assembly is carried out in reverse order. If after all the manipulations you start the engine and still do not hear the rattle of the chain, then everything has been done correctly.
Prices for hydraulic tensioner VAZ 21214 range from 400 rubles. up to 900 rub. Depending on the region. But there is no shortage of this device on store shelves.
Timing tensioner pulley: belt tension is under control
» Articles » Timing belt tensioner roller: belt tension is under control
For normal operation of the timing belt drive, it is necessary that the belt always have a certain tension. This is achieved by introducing a special device into the timing drive - a tension roller. Read everything about tensioning devices, their existing types, design, operating principles and replacement in this article.
What is a timing belt tensioner?
The timing belt tensioner roller (tension roller, tensioner) is an auxiliary component of the timing belt drive, providing the belt tension necessary for normal operation of the drive. Additionally, this device can perform the functions of a deflection roller.
The timing belt drive is sensitive to belt tension. Excessive tension leads to intense wear of timing parts - pulley bearings (water pump, generator, tensioner, etc.), the belt itself, and others. In addition, a tight belt stretches faster and its service life is reduced. Too weak a tension is fraught with more serious problems - slipping of the belt along the timing pulleys of the camshafts, which leads to disruption of the valve timing and deterioration of the entire engine.
Therefore, a tensioning device is introduced into the timing drive in the form of rollers of one design or another, which maintain optimal belt tension during engine operation.
Types, design and principle of operation of tension rollers
Timing belt drive with one tension roller
Structurally, all timing belt tensioners combine two elements:
- Stretching device;
- Video clip.
A roller is a plastic or metal pulley with a smooth surface mounted on a single or double row deep groove ball bearing. The roller rests on the back of the belt, and while the engine is running, it rotates freely under the influence of the belt running along it. The rollers may be smooth or have a shoulder(s) to prevent belt movement.
Timing drives use one or two tension pulleys depending on the length and configuration of the belt. Rollers can have common or individual tensioning devices.
Tensioner is a mechanism that ensures the positioning of the roller in such a way that the required belt tension is achieved. Tensioners are of two types:
- With manual setting of belt tension;
- With automatic setting of belt tension.
The first type includes tensioners of two types:
- Eccentric;
- Sliders.
In eccentric devices, a bushing with an offset axis, placed inside the roller, acts as a tensioner. When such a tensioner rotates around its axis, the roller changes its position relative to the belt, thereby achieving tension with the required force.
In slider devices, the roller can move along the slider perpendicular to the belt, providing the necessary tension. The roller position is usually adjusted with a screw. Tensioners of this type are rarely used today, since eccentric devices are compact, simpler and more reliable in operation.
Eccentric and slide tensioners have a number of disadvantages:
- The need to manually adjust the belt tension, for which you need to use a dynamometer;
- Uncontrolled change in belt tension over time due to its stretching and wear;
- The need to periodically adjust the tension.
All these problems are solved by automatic tensioning devices. These tensioners have a mechanism that provides automatic belt tension when installing the drive, and subsequently compensates for changes in tension due to belt wear, changes in engine operating mode, changes in temperature and humidity, manufacturing tolerances in timing drive parts, etc. In addition, automatic tensioners, due to their design features, act as dampers that reduce the amplitude of belt vibrations, absorb shocks and shocks, etc.
Today there are two main types of automatic tensioners:
- Mechanical - spring;
- Hydraulic - oil.
Spring timing tensioner Hydraulic timing tensioner
Spring devices, in turn, also come in two types:
- With compression spring;
- With torsion spring.
The first type of tensioner uses a conventional coiled spring that works in compression, which ensures that the roller is pressed against the belt. The second type of tensioner uses a short coiled spring, the lower coil of which is fixed to the base, and the upper coil acts on the roller, pressing it against the belt. In both cases, the spring tension force is set at the manufacturer, so when installing the tensioner on the engine there is no need to make adjustments - the roller itself will take the required position.
Hydraulic timing belt tensioner
Hydraulic tensioners are the most complex and expensive, but also the most effective devices, providing not only automatic setting of belt tension, but also compensating for changes in tension within a very wide range. The basis of this type of device is a hydraulic cylinder, which can be installed in two ways:
- On one bracket with a roller - in this case, the cylinder rod rests against a support bracket or against a special stop on the engine block;
- On the engine block - in this case, the cylinder rod rests against a movable bracket with a roller.
Today there are many designs of cylinders, but they are all built on the same principle. The cylinder has two communicating cavities separated by a plunger, a rod and a valve connected to the plunger. The working fluid can flow between the cavities through the plunger channels and the valve.
Normal belt tension is ensured by equal oil pressure in the cavities and the spring. When the belt tension is weakened or increased, the plunger moves under the influence of the spring, as a result of which oil flows from one cavity to another, and the plunger is balanced in the new position, providing the necessary belt tension.
The operation of different cylinder models may differ, but in general terms it corresponds to the above.
It should be noted that new automatic tensioners (both hydraulic and spring) are supplied in a compressed state for ease of installation, their rod or spring is secured with a pin. The device is mounted on the engine, then the pin is removed and the roller takes its working position, providing the necessary belt tension. In this case, there is no need to make any additional adjustments.
Correct selection, replacement and adjustment of the timing tensioner pulley
Depending on the type and design, timing belt tensioners have a different service life and require replacement or repair at different mileage. Conventional mechanical rollers (eccentric and sliding) are the least durable; they are recommended to be replaced every time the timing belt is replaced or after one maintenance. This is why timing belts are often sold complete with a idler and tension pulley. Automatic tensioners are more durable; they can last the entire life of the engine; replacement is often required only in the event of a malfunction.
Replacement process and tightening torque
Required Tools
To carry out this work on replacing the cylinder head gasket of the Niva Chevrolet and tightening the cylinder head bolts, you should prepare:
- Phillips and slotted screwdriver;
- set of open-end wrenches;
- torque wrench.
Without the last element, tightening the cylinder head pulleys will be impossible.
Step-by-step instruction
- Initially, of course, you need to dismantle the cylinder head cover itself.
- Then place a container under the bottom of the car to collect the waste refrigerant. Unscrew the drain plug and drain the antifreeze.
- Then you should disconnect the throttle cable from the receiver and assembly.
- After this, the timing pulley should be removed along with the bearing housing.
- Next, we dismantle the valve lever, and then unscrew the lever supports themselves. Also dismantle the engine fluid supply ramp to the hydraulic supports.
- Now you need to disconnect the cable harness from the TPS. In the same way, disconnect the wiring from the idle speed sensor and antifreeze.
- You need to squeeze the plastic clip and then disconnect the connector with the wires that are designed to power the injectors. Here you also need to remember to disconnect the wiring harness from the knock sensor.
- Now disconnect the high voltage cables from the spark plugs. Also disconnect the cable that powers the engine temperature control device.
- Slightly compress and disconnect the exhaust pipe from the intake manifold. Then the upper screw securing the inlet tube spacer and, slightly loosening the lower screw, the spacer should be moved to the side.
- The clamp should be loosened slightly, then the adsorber purge pipe should be disconnected from the throttle assembly.
- The clamps must be loosened and the cooling system pipes must be disconnected from the cylinder head.
- Using open-end wrenches, you now need to disconnect the fuel lines. To do this, unscrew the nuts of the fuel hoses intended for draining and supplying gasoline.
- Now use a wrench to remove the top screw that secures the rear intake tube brace. The bottom screw should also be loosened a little. After these steps, the spacer must be removed to the side.
- When all the above steps have been completed, the camshaft pulley drive chain tensioner should be removed.
- Then dismantle the brackets that secure the power steering device.
- Now you can remove the chain with the timing pulley star.
- After this, using a socket with an extension, you will need to unscrew the screws securing the cylinder head, and then dismantle it.
- The cylinder head gasket can now be removed. Mount a new component in its place, having previously lubricated its perimeter with sealed glue. Actually, at this point the work on replacing the cylinder head gasket in the Chevrolet Niva can be considered completed. All further work on assembling the power unit must be performed in the reverse order. But that is not all. To ensure a reliable fit of the cylinder head to the block itself, you need to correctly tighten the screws and maintain the tightening torque.
- The procedure itself consists of several stages. First of all, using a torque wrench and following the order indicated in the diagram, you need to tighten the screws from the first to the tenth. In this case, the tightening torque of the Niva Chevrolet cylinder head should be 20 Nm.
- Next, when all the bolts are tightened in turn, you need to tighten all the cylinder head screws again. The tightening torque should now be 69.4–85.7 Nm. The last, eleventh pulley needs to be tightened to 31.4–39.1 Nm.
- After these steps, the screws marked with numbers from one to ten need to be turned 90 degrees, and then, when they are all screwed, you should repeat the procedure and turn them again 90 degrees. At this point, the screw tightening procedure can be considered complete.
6. Remove the cylinder head gasket and replace it. If all the steps were performed correctly, then after replacing the component you will no longer have the problem of engine fluid getting into the antifreeze and vice versa. But keep in mind: everything must be done according to the steps specified in this manual.
If the screw is not tightened, the cylinder head will not fit tightly to the block. This is fraught with engine fluid leakage. If, on the contrary, you overtighten the pulleys, this can cause cracks to form on the power unit. If microcracks appear, then you will have to either weld the cylinder head or replace it. Therefore, before you begin such repairs, think carefully - can you do everything right?
Replacing the hydraulic chain tensioner on Niva
The new model Nivki, which is better known to us as the Chevrolet Niva, cutting through domestic roads, inherited the above-mentioned disease from its older brother, the VAZ 21214, which, in turn, is now proudly called Lada 4x4. But the problem is not as scary as its description. In order to keep the power unit in good condition, it is enough to always keep your finger on its pulse: listen to extraneous sounds, regularly carry out maintenance after 60-100 thousand kilometers and not let the problem take its course.
Please note that simply replacing a used VAZ 21214 hydraulic tensioner with a new one is not the right way out of this situation. At a minimum, it is necessary to change the timing chain, which is clearly in critical condition, disposable rubber sealing gaskets in the form of rings and oil seals
And, if replacing such a simple device as a hydraulic tensioner does not present any particular problems on a VAZ 21214, then as for the timing chain, this is already a reason for a separate article.
The part designed to regulate the chain tension in a Niva Chevrolet car is called a timing belt (gas distribution mechanism) hydraulic tensioner. In the Chevrolet Niva timing system, the hydraulic tensioner performs a very important function, so engine operation without such a part is simply impossible. Over time, all parts of a car tend to wear out.
Rotating parts of cars are especially prone to wear, weakening, stretching and breaking. This part includes the timing chain, which stretches over time and wears out. Chain stretching is normal but must be addressed. It is to eliminate chain stretch that a hydraulic tensioner is installed in the timing system. It has a wear property that is detected by loosening the chain to half the sprocket tooth.
1 – tensioner body; 2 – valve unit; 3 – check valve ball; 4 – limit pin; 5 – tensioner plunger; 6 – volume limiter; 7 – plunger spring; B – working cavity; C – installation groove; D – hole; E – reserve cavity.
Oil from the lubrication system through tube 3 (see Fig. 2-11) enters cavity “E” (Fig. 2-46) of the tensioner, then through hole “D” and valve assembly 2 enters working cavity “B” and presses onto plunger 5. In tensioner body 1 there is a hole with a diameter of 1 mm for bleeding air from cavity “E”.
The diametrical gap between body 1 and plunger 2 should be 0.018–0.024 mm and is measured as the difference between the maximum measured diameter of plunger 2 and the minimum measured diameter of body 1.
During repairs, the tensioner body and plunger form a pair in which replacing one part with another after selecting the gap is not allowed. Plunger 2 must move in body 1 without jamming by a stroke of 16 mm.
When installed on the engine, the tensioner must be free of oil, pin 4 must not protrude from the housing.
As can be seen in the figure, the device has a cylindrical shape; it is screwed on the outside with a lid with a small hole through which oil flows. Inside the device there is a small ball and a spring, which ensures free flow of oil in one direction and does not release it in the opposite direction.
Inside the device body there is a cylinder with rings. On the inside of the housing walls there are spiral notches that have an inclined shape. When the chain is loosened, the piston, under pressure in the housing, moves to a certain notch on the housing wall. When the tension occurs, the body notches do not allow the piston to take its original position. It is carried out by engaging the piston rings with one-sided notches. This is how the tension device works.
When to change?
The main signs of wear on the part will help you figure out when to change the timing chain of the Kia Rio 3:
- the engine idles unevenly and roughly (the timing phases have changed);
- you can hear rustling and chirping (always at low speeds due to low pressure in the internal combustion engine lubrication system);
- the maximum power of the tensioner is visually determined, the condition of the gears is unsatisfactory (the teeth are worn out);
- When the tester checks the phase sensor, the error result is displayed.
What do you need to know about the Kia Rio 3 timing chain? The resource of the party responsible for the operation of the timing mechanism can reach 300,000 km. The condition of the circuit requires regular monitoring, and extraneous noise from the internal combustion engine should raise suspicions. The manufacturer notes that the unit may make noise when operating in cold conditions; After heating the noise disappears.
It is important to follow the maintenance schedule and change the engine oil on time. This will ensure normal lubricant pressure, on which the correct operation of the chain tensioner depends. When replacing, it is best to use original consumables (or proven analogues). Along with the chain, it is necessary to change the sprockets, guides, and tensioner, since these parts also wear out when using the Kia Rio 3.