Print this article Font size 16
VAZ 2109 cars use a liquid cooling system, which includes a block jacket, a liquid pump (pump), pipes, an expansion tank, a thermostat, a temperature sensor and two radiators - the main one and the interior heating system.
Although this system performs a serious function - maintaining the optimal temperature regime of the power plant, all elements are structurally quite simple.
One of the most common problems with this system is bursting or jumping of pipes and radiator leaks. Less often, but it also happens that the thermostat gets stuck in one position, the temperature sensor malfunctions, and the pump fails.
Carrying out repairs
So, to make everything clearer, let's break the entire procedure into small points:
- Remove the plastic cover by unscrewing the three bolts with a “10” key.
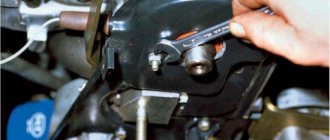
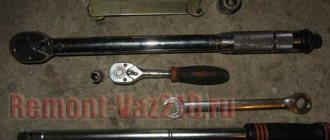
- Loosen the belt tension with the key set to “17”.
- Remove the belt from the camshaft, pump and roller pulleys.
- Drain the fluid from the system, allowing the engine to cool.
- Using a “10” wrench, unscrew the three bolts securing the liquid pump housing.
- Using a chisel and hammer, carefully press the pump body out of its place.
- Clean the seat in the engine block.
- When installing a new VAZ 2109 pump, you can apply a small amount of silicone sealant to the gasket.
- Tighten the bolts evenly.
- Install and tension the timing belt (check that the marks match).
- Install the protective cover.
- Pour fresh fluid into the system.
That's it, just 12 steps you need to go through to change your pump. There are no tricks to repair; all you need from a special tool is a wrench to adjust the belt tension. But you can do without it, just have a couple of screws and a screwdriver. Place self-tapping screws (or bolts of suitable thickness) into the holes, and a screwdriver between them so that you can turn the roller around the axis.
If you are only replacing the liquid pump of a VAZ 2109, then you do not need to remove the wheel and hang out the entire right side, you just need to open the hood. But if you are carrying out a full repair described above, you will have to lift the right side and remove the generator belt. And most importantly, in order not to damage the pump housing, it is necessary to press it into the engine block using a wooden spacer.
Repairs of all front-wheel drive VAZ cars are carried out similarly, not only the 2109 model. Even on more modern Priors (which have 16-valve engines), the procedure is not much different. Of course, the belt is longer and there are two rollers, but in general the differences are not as significant as they might seem at first glance. Therefore, if you can do this procedure on a VAZ 2109, you can do it on a Priora without difficulty.
Necessary equipment
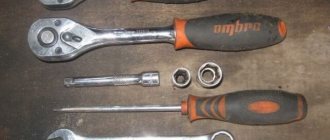
To carry out the work of replacing the liquid pump on a VAZ-2109, not much equipment will be required. All you need to have is:
- Open-end and ring wrenches for “10” and “17”;
- Heads with collars of the same sizes;
- Powerful flat screwdriver;
- Knife;
- Container for draining working fluid;
- Rags;
- Sealant;
- Jack;
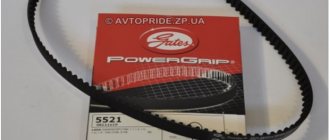
- New liquid pump and gasket;
It is also better to carry out all work in the garage. Having collected the necessary tools and purchased a new pump, you can begin the replacement.
How to replace the water pump on a VAZ 2108-VAZ 21099?
How to change the vacuum on a VAZ 2109
Note! When the timing belt is removed from the upper pulleys, do not under any circumstances turn the pulleys, otherwise you will disrupt the valve timing (In principle, you can install them, but it’s better not to touch them, but they are placed according to marks, you will learn more about these marks when you read one of the articles to which a link is given in this article), well, even if the valve timing can be set again, this does not mean that the pulley can still be turned, there are simply some engines (They were installed on nines) that bend the valves, so if If you sharply turn the pulley on the removed timing belt, the valves will be slightly deformed, and this will cost a lot of money!
Removal: The pump is not easy to change, but if you have the skill, then everything is simple, if you don’t have it, then most likely you will be replacing it more than once, in general, let’s start by first removing the minus terminal and then draining the coolant from the engine (How to drain fluid, read the article: “Replacing the coolant on a VAZ”, and about how to remove the minus terminal, read the article: “Replacing the battery on a car”), when this operation is done, remove the timing belt from the tension roller and then itself roller from the car (How to remove the roller, you will find in the article entitled: “Replacing the tension roller”), then remove the camshaft gear (How to do this, read “here”) and unscrew several bolts and nuts (There are about five of them, all of them on the photos below are shown) that secure the back cover and then separate it from the base so that there is access to the pump (there is no other way to remove it), and as soon as access appears, use a screwdriver to remove the pump by picking up its pulley as shown in the small photo .
Note! If the pump comes out, but the body gets in the way or something else (you can’t remove it completely, for example), then in this case ask an assistant to move the engine a little, to do this, just let him grab a convenient place (It must be made of metal ) and using force, tilt the engine in the desired direction, and at this time you pull the pump out of the hole in the car engine!
Installation: The new pump is installed in the reverse order of removal, before you buy it, be sure to compare the markings with the old one, we recommend that you take exactly the same one and don’t forget about the gasket that is between the pump and the engine (see small photo), be sure to look at that the place where the pump was adjacent to the engine, if there are pieces of this gasket left there, then you can scrape them off with a screwdriver and buy a new gasket, putting it on the pump instead of the old one.
Note! When you buy a pump, we recommend taking one with an impeller made not of plastic but of metal, look at the top photo in this article, it clearly shows the impeller and you can clearly see that it is made of metal, and by the way, if you suddenly notice that the impeller has changed its color (For example, it has started to rust), then in this case, replace the pump with a new one. When installing, keep in mind that the marking should be directed upward (see photo 1), and the camshaft pulley must be installed with the protruding part towards the car engine (see photo 2) , well, after that, align everything according to the marks, tighten the timing belt (it is tensioned with a tension roller) and pour coolant into the car engine!
Additional video: You can see the process of replacing the water pump in more detail and clearly in the video below:
How to remove the coolant pump?
It may be difficult to remove the pump yourself if you are doing it for the first time:
- Disconnect power from the battery (disconnect the negative terminal).
- Drain all coolant.
- After this, remove the timing belt along with the tension rollers. If necessary, replace them with a functional one.
- Remove the camshaft gear.
- Then unscrew the five nuts to gain access to the pump.
The final removal of the pump must be done carefully, as the pump may be damaged. Clean the threads from metal shavings and corrosion residues. If necessary, restore the thread.
Installing an additional pump on a VAZ 2109
How to change the heater tap on a VAZ 2109 yourself
In this article we will learn how to install an additional pump on a car like a real auto electrician. The VAZ 2109 is a car that allows you to constantly modernize and improve something, however, like all models of this family. Let us present to the reader two algorithms on how to mount a pump from Gazelle and from Bosh.
Installing a Gazelle pump
As mentioned above, this is the most common option for installing an additional pump. Tools and materials:
- The Gazelle pump is standard. Costs about 1000 Russian rubles.
- Relay with normally open contacts. Standard relays from the starter or ignition will do, where you just need to bridge the necessary contacts.
- Some reinforced hose.
- 2 liters of coolant (regular antifreeze).
- Medium-sized clamps in the amount of 5 pieces.
- We wait until the coolant in the system cools down. The antifreeze is drained from the tank into some clean container if its reuse is intended. If you intend to use new antifreeze, then you can drain it for recycling.
- On top of the pump we see 4 screws. They will need to be unscrewed to get to the rubber seal of the impeller. We lubricate this gasket with a sealing compound.
- We assemble the pump, but instead of standard self-tapping screws we install long thin bolts, on the advice of an auto electrician. The VAZ 2109, by the way, is a car in which the Gazelle pump is quite successfully installed.
Auto electrics for VAZ 2109 – electric pump
- Unclench the iron clamp.
- We install the pump with a horizontal pipe towards the block.
Now you need to think about how to establish a connection. It is most practical to transfer the connection to the recirculation button. If not, then you can put it on the SAUO unit or on heated mirrors.
Two wires are disconnected from the recirculation valve: with a white-blue stripe and a yellow-blue stripe.
- We connect the blue-white wire to one terminal of the relay.
- Yellow-blue to the second relay terminal.
- We connect the third terminal of the relay to the wire of the electric pump.
Now it's time to check how the pump works. When you press the button, the pump should begin to hum and blow air. If this does not happen, then something was done wrong. We continue with the installation:
- Disconnect hose 1, which carries coolant to the heater from the outlet pipe.
- We connect it to the horizontal pipe of the pump (the length is enough, if anything).
- Now you need to connect hose 2 to the vertical pipe of the pump, which itself consists of 2 S-shaped pipes (it is located between the tap and the heater radiator). As a last resort, instead of this hose, you can use another one of a suitable size and type.
- The second end of this hose must be pulled to the block head, from where hose 1 was removed.
- Tighten the clamps.
- Be sure to tighten the drain plug in the block.
- Fill coolant to the maximum mark.
- We turn over the engine.
- Visually inspect the pumps for leaks.
- Then we turn on the ignition again and check for leaks, which we fix if found.
- We tighten the clamps.
- Let the engine run for about 30 minutes.
- Refill coolant to the required level.
service-193 › Blog › Almost retro. Replacing the pump on a VAZ-2109
Replacing the pump on a VAZ 2107
Sometimes we get our hands on cars of a rather archaic design. This time the car turned out to be a VAZ-2109 with a carburetor engine and a complaint about leaking antifreeze. An inspection showed that the water pump (aka water pump) was loose and leaking, and therefore needed to be replaced. Although the Internet is full of manuals on this topic, mine will obviously be the best. Let's go.
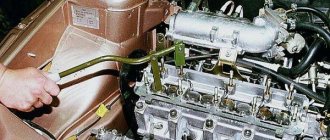
We jack up the car, take off the right front wheel, and open the hood. The timing belt cover has already been removed during the diagnostic process, so we are not considering its removal. By the way, it can be seen that the belt is positioned on the gear a little crookedly. Apparently, some misalignment is already present:
We need to remove the timing belt, since the pump is driven by it. Before removing the belt, you need to align the camshaft and crankshaft to the marks. Here is the camshaft mark:
The crankshaft mark is more difficult. In principle, you can look at the mark on the flywheel through the window on the gearbox. But in our case, the mark there was clearly out of step with the mark on the camshaft, and it was decided to follow the mark on the crankshaft gear. To access it, you need to remove the alternator belt (unfortunately, it’s not included in the photo, but how to do this is also described in many places). After this, you need to unscrew the bolt and remove the pulley from the crankshaft. We had a cheat code in the form of an air impact wrench, but if there is none, then the simplest thing is to engage fifth gear and hold the brake while the second participant in the process unscrews the bolt. Another option is to lock the flywheel through the same window that has already been mentioned.
After removing the pulley, you need to make sure that the mark on the crankshaft gear matches the mark on the housing (the point on the gear in the upper part opposite the cutout):
If the mark does not match, you can screw the bolt into place (without installing the pulley) and rotate the crankshaft using it.
After this, you can loosen the tensioner. To do this, you need to unscrew the nut circled in red a little (literally a turn or two):
That's it, the belt can be retracted:
It would seem that here it is, the pump under the tensioner pulley, remove it and go. Alas, everything is more complicated. The pump body is covered with a metal plate of complex shape. This plate prevents the pump from being removed. And to remove the plate you need to remove the camshaft gear. Why this was done is not known for certain, but I cannot call this decision correct. So, we fix the gear with something (you need to insert some kind of screwdriver into the slots on the gear, and ideally a special pulley clamp), and unscrew the bolt. In our case, the gear came off the shaft quite easily. If it comes off with difficulty, you can try passing a rope/wire through the same holes and try to pull it towards yourself - as a rule, it helps to make dismantling easier. The main thing is not to lose the key. This is what the shaft looks like with the gear removed (it is clear that the camshaft oil seal is leaking, it is recommended to change the belt the next time you replace it):
The gear itself (the groove for the key is visible):
Now you need to unscrew the plate. It is mounted on a stud (you need to unscrew one nut next to the camshaft), on one bolt nearby, and three more bolts securing the pump. You need to unscrew all of them, and then try to pull out the plate:
Alas, we were unable to remove it without any complications. I had to unscrew one engine mount:
After that, jack up the motor and play the puzzle by turning the plate out in the appropriate way. After this, you need to remove the pump in the same way. It is held on by the same three bolts, as well as on a gasket that has become stuck over the years, so to move it out of place, you will need the intervention of a screwdriver. In this case, about three liters of antifreeze will spill out; it is recommended to substitute a basin. It’s no easier to pull it out than a plate, but here’s the result:
Camshaft oil seal from a different angle:
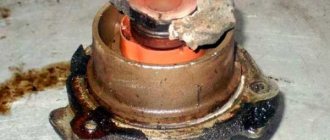
Old pump (completely uninformative photo):
After that, all that remains is: 1) Clean the pump seat. 2) Show miracles of resourcefulness by putting it and the plate in place. 3) Reassemble everything in the reverse order. 4) Tension the belt with the correct force (we overtightened it out of habit, of course). The criterion for correct tension is that the belt is pressed quite freely with your finger on a long branch (straight between the camshaft and the crankshaft). 5) Completely assemble everything, fill in antifreeze, start the engine with the expansion tank cap open, make sure there are no air pockets in the system (the thermostat opens, the radiator warms up , the fan turns on).6) Joyfully go about your business.
This is an excursion into history. But just fifteen to twenty years ago, the average car owner could do this procedure without any instructions! Such is the change of era. In fifteen years, we will be drawing up instructions on what a car without an autopilot is and how to drive it manually.
Also check out
- Self-replacement of the VAZ 2110 CV joint
- Self-adjustment of VAZ 2110 headlights at home
- How to independently modify the VAZ 2107 stove by installing a VAZ 2108 “snail”
- Remove the wheel to gain access to the bottom bolt that secures the plastic casing.
- In the case we are considering, the timing belt is in good condition and does not need to be replaced. Therefore, the pump was replaced without removing the generator drive belt.
- It was necessary to dismantle the plastic casing and also remove the pulleys with the camshaft rollers. This can be done if the tension rollers are loosened and the timing belt is removed from them.
DIY diagnostics and replacement of the pump on a BAZ 2110
- Lock the camshaft gears using something flat. Unscrew them carefully so as not to damage their soft teeth.
- After dismantling the pulleys, you can remove the plastic casing. One fastening bolt will have to be unscrewed from below through the space near the wheel. After this, access to the pump is free.
DIY diagnostics and replacement of the pump on a BAZ 2110
- The VAZ 2110 water pump is attached using three hexagon mounting bolts. Unscrew them. After this, lightly knock on the pump body and try to pull it out.
DIY diagnostics and replacement of the pump on a BAZ 2110
- Place a container to drain the coolant.
- The new VAZ 2110 pump must be well lubricated. In addition, it is better to apply a thin layer of sealant to the paper gasket and let it dry.
After this, all the parts are assembled in reverse order:
- Reinstall the water pump.
- Place the plastic casing.
- Secure the camshaft pulleys in place.
- Using the previously made marks on the camshaft, put on the timing belt.
- Use the wheel to turn the engine, adjust the correct tension and position of the belt. Upon completion of installation, add coolant.
- Check the work.
Replacing the pump
Replacing the pump on a VAZ 21093, as well as on a VAZ 2109, is performed when the engine has completely cooled down. The procedure is as follows:
- Disconnect the battery terminals
- We drain the coolant (into a substitute container), pouring antifreeze onto the ground, you pollute the environment with toxic substances
- If you have recently replaced the fluid (antifreeze or antifreeze in the cooling system) (the price of antifreeze is decent), then the fluid should be collected in a container and reused after repair operations are completed
The instructions prescribe the next step, removing the electric generator drive belt:
- Since you will have to remove the pulley during operation to gain access to the timing belt, you must definitely remove the generator drive belt
- The belt can be easily removed, release the upper locking bolt on the bar, slightly loosen the lower bolt (if it is tightened) and move the electric generator to the motor
- In this way, the drive belt of the electric generator weakens, and we can remove it
- Next, you need to set the gas distribution mechanism according to the marks
First of all, we install the crankshaft at the mark:
We turn the crankshaft and look through the clutch housing hatch so that the mark on its housing coincides with the mark on the crankshaft flywheel. The coincidence of the marks indicates that the piston in the first cylinder has reached the upper position, and when we install the timing belt back, it will be much easier for us to adjust the phases The most important thing to remember is that the gas distribution mechanism rotates twice as slow as the crankshaft, so you need to make sure that the mark on the timing shaft gear coincides with the mark on the casing
Now, after the marks match, you can begin to remove the timing belt:
Release the tensioner roller and move it to the side, thus loosening the timing belt tension
Release the tensioner roller and remove the belt
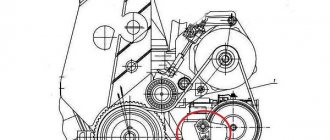
We unscrew the bolts securing the pump (they are indicated by arrows in the photo)
Unscrew the bolts indicated by the arrows
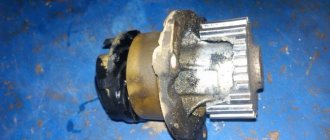
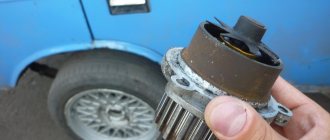
We remove the pump from the motor, then check the blades of its impeller for safety
We remove the pump and inspect the impeller blades
- The bolt threads and holes should be cleaned of old sealant and traces of corrosion.
- We select a new pump in accordance with the required dimensions and markings
- We remove old sealant and gasket residues from the mating surfaces of the pump and motor, and then wipe the surfaces with a rag soaked in acetone
- Then we lubricate the surfaces with fresh sealant and install a new gasket
- So, the replacement of the VAZ 21093 pump is almost complete
- The new pump must be carefully placed in place.
- Screw in the fastening bolts and tighten by hand
- Before tightening the bolts, they must be lubricated with sealant
- Make sure the guide pins are in place
- The fasteners can now be tightened using the required force.
- We collect all the removed parts back, then pour the coolant that was drained at the very beginning into the system
- It is also necessary to remove any air pockets from the system.
- After this, you can start the engine and check for leaks from the coolant system
Replacing the pump on a VAZ 2109 is not a difficult process; it is only important to choose the right tool and replacement components. For more information about checking and replacing, watch our video
Replacing the unit: procedure
Replacing a VAZ 21099 pump requires a number of special preparatory manipulations. All actions should be started only when the car engine has cooled down to the optimal temperature. Basically the progress of the work is as follows:
- the first step is to disconnect the negative cable from the battery;
- remove the cooling liquid, and if the procedure for replacing the liquid was carried out not so long ago, then after changing the pump the drained liquid can be reused;
- then all drive belts are removed;
- the next step depends on the engine specification: on a SOHC type mechanism, be sure to block the pump pulley using a special strap wrench, then unscrew the 4 mounting bolts, the timing belt flaps and the inner pulley;
- on a DOHC engine, you first need to remove the special roller bracket for the belt in the drive, then remove the timing plugs and the tensioner cover for the main chain, then turn the crankshaft counterclockwise to loosen the chains on the pump sprockets;
- remove the mounting bolts and remove the pump from the device, then inspect the blades for corrosion;
- clean the bolt holes, remove all debris, corrosion residues, and, if necessary, restore the threads;
- select a new pump strictly according to the required standard sizes;
- remove dirt and outdated dried sealant from all mating surfaces of the engine block, and wipe the entire surface with a rag soaked in gasoline or acetone;
- Apply a new, specially selected sealant or rubber O-ring.
Now the problem with removing and replacing the VAZ pump from a car has been solved.
The newly purchased device should be installed very carefully in the right place. All mounting bolts are inserted and tightened without the use of tools and are lightly treated with sealant. Be sure to pay attention to the location of the pins. If everything is in its correct place, you can begin tightening. It is worth remembering: if you overtighten the fastening, you can damage the pump. The new mechanism is quite expensive, so keep an eye on this point.
After completing the procedure for replacing the VAZ pump, you can proceed to assembling the remaining components in exactly the reverse order. Next, add coolant to the required level into the vehicle’s cooling system. When the replacement of the VAZ pump is completed, you can start the updated engine and carefully check for possible leaks.
Source
Replacing the VAZ-2109 pump
To carry out the replacement, it is necessary to remove the timing belt protective cover. It is held in place by 3 bolts - unscrew them with a 10 mm wrench. Next, the cover is dismantled and placed next to it, since there are marks on it that help set the TDC of the first cylinder.
Now, holding the crankshaft by the pulley, turn it until the notch on the camshaft gear coincides with the convex point located on its rear cover. Upon completion of the described manipulations, the casing is returned to its place, but not screwed, since you only need to make sure that the marks on it coincide with the position of the pulley.
It is also advisable to look into the inspection slot of the clutch housing - there the notches should similarly coincide. If this does not happen, you will have to turn the crankshaft some more.
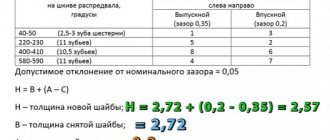
At the next stage, arm yourself with a 17 mm wrench and use it to unscrew the nut holding the tension roller. The last element must be completely removed - be sure to check its functionality (unimpeded rotation and absence of play indicate serviceability).
Remove the transmission belt from the camshaft gear and throw it down. Now, using the same 17 mm wrench, remove the bolt holding the above-mentioned sprocket. To prevent it from spinning, wedge it with a screwdriver
Carefully remove the gear and be careful not to lose the locking key.
All that remains is to remove the nut and 3 more bolts that secure the rear camshaft cover - here you will need a ten key. After dismantling the named part, the pump can be removed quite easily - you just need to unscrew the elements that secure it.
Proceed to remove the pump - you will not be able to do this with your bare hands. First, it is pryed up with a screwdriver and torn from its place, and then a jack is placed under the engine (exactly where the failed unit is located). The 2109 engine is raised a little - this allows you to increase the gap between it and the fender liner, without which it is simply impossible to move the pump.
When the assembly is dismantled, the installation site should be cleaned, since often part of the old sealing gasket sticks and peels off. This can be done conveniently with a regular knife. Upon completion of the action, everything must be wiped thoroughly with a dry, clean cloth.
The new unit is mounted with the marking facing up (it is located at the end). Tighten the retaining bolts thoroughly, but be careful - they are screwed into the aluminum. Further work is performed in the reverse order to that described.
Replacing the water pump on VAZ 2108 and 2109
Even an inexperienced car enthusiast can repair and replace the pump on a VAZ 2108/09. You will need a standard set of tools - open-end and socket wrenches (10 and 17), screwdrivers, etc. If you plan to replace the pump, you should purchase a kit consisting of the pump assembly itself and a sealing gasket, and silicone sealant. In addition, for work you will need rags, acetone solvent and a canister of fresh antifreeze.
The repair kit for the water pump must contain a new gasket
As already noted, the pump is built into the bore of the engine cylinder block. The pump drive pulley is rotated by the timing belt. Therefore, to dismantle the pump, you must first remove the belt protective cover and the belt itself. But before this you need to perform a number of preparatory operations.
- The negative terminal of the battery is disconnected.
The negative terminal of the battery is indicated by a pictogram on the lead contact
The drain hole is located at the bottom of the cylinder block
The tension roller is loosened by unscrewing the fixing screw
After removing the belt, you can proceed directly to dismantling the pump. Using a 10mm wrench, unscrew the three mounting bolts and remove the pump. This is not always easy to do. The pump may “stick” to the landing site. In this case, you will need a chisel and a hammer, with the help of which the layer of old sealant in the socket is carefully torn off. After this, the pump can be easily removed.
The pump is secured with three bolts to the cylinder block body
It is impossible to completely remove the pump in the normal position of the car - the body gets in the way. You need to raise the motor slightly. To do this, the right side of the car is lifted on a jack - the engine is tilted.
If you have an assistant, you can do without hanging the body. One person forcefully pulls the motor in the direction opposite to the direction the pump exits the socket. Another person pulls out the pump at this time.
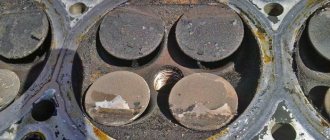
After removing the water pump, the impeller blades are inspected. They may break off or crack. This happens if the engine has been severely overheated, or the impeller is made of poor quality material. Small blade fragments usually fall out of the drain valve.
Chips on the impeller sharply reduce pump performance
To be completely sure that the cooling system is clean, it is recommended to flush it using the following algorithm.
- Remains of sealant, dust and debris are removed from the engine surface with a rag and solvent.
White spirit cleans the surface well from sealant residues
Professionals recommend replacing the tension roller along with the water pump. To check the serviceability of the roller, rotate it by hand. If the roller rotates with difficulty or a crunching sound is heard, it needs to be replaced.
It is generally accepted that the water pump should be changed every 90 thousand km of the car. However, this figure is conditional, depending on the operating conditions of the vehicle. Obviously, in the city cycle with constant traffic jams and limited speed, the cooling system will wear out faster than on the highway. Therefore, the need to replace the pump should be assessed based on its actual condition.
Video: disassembling the water pump of a VAZ 2109/08 car
Signs of pump wear
As for the latter, the main problems with the pump are leakage of working fluid from under the housing and severe wear of the bearing.
And if the presence of leaks only affects the fluid level, in the presence of such a malfunction you will have to constantly monitor the fluid level and periodically top it up. Moreover, over time the leak will increase.
But bearing wear can lead to more serious consequences. With slight wear, at first there will only be increased noise.
If you do not pay attention immediately, wear will quickly increase until the bearing fails. In this case, the pump will jam and a strong grinding noise will appear.
All this can lead to rupture of the drive belt and damage to the valves.
The design of the pump is such that it is non-repairable, and if any malfunction occurs, it must be replaced.
A positive fact in the design of the power plant of this car is that this element is external equipment, so replacing the VAZ-2109 pump is not a particularly complicated operation and does not require significant disassembly of the engine. Almost no other elements of the power unit, for example, a carburetor or generator, are affected.
Methods for checking device status
Checking the condition and presence of a pump malfunction can be done using several methods:
- The first hose, which is located near the radiator, is compressed when the engine is heated to the desired temperature. If the device is working properly, you will notice shocks of the coolant. However, it should be remembered that when doing such a check, you should be very careful, since there is a possibility of touching the fan wings in the cooling system device and injuring your hand.
- If a breakdown of individual bearings on the pump shaft suddenly occurs, then such a problem can be noticed during operation. A long hum will be heard from the front of the engine. To find out the degree of bearing wear, you should check the shaft play when swinging the drive star at the pump.
- If the oil seal deteriorates during operation, liquid oozing from a special test valve or hole will be noticeable. In this case, you need to remove the timing cover and look at this hole. If there are brownish smudges and deposits near the valve, the seal must be replaced. This operation is quite simple, but, nevertheless, it is very important for the operation of the entire system.
- If there are no visible signs, this does not mean that there are no problems. In any case, you must remove the device. This procedure is carried out specifically for external visual inspection and inspection of the unit. It often happens that there is large damage on the back side of the rotor due to corrosion of the blades. This problem significantly degrades the operation of the node.
Return to contents
Instructions for replacing the water pump
Repair work should only be carried out when the engine is completely cool. Drive the car into the garage in the evening and replace it in the morning. Use the following algorithm when performing repairs:
- Drain the liquid from the radiator expansion tank into a clean canister. To do this, open the tap at its bottom.
- Using a spanner, remove the protective cover from the timing belt.
- Rotate the timing belt pulley until it loosens, then remove it.
- Use a screwdriver or other wrench to secure the camshaft gear and unscrew the nut that holds it in place.
- Remove the inner part of the timing case.
- The pump is hidden under it. Carefully remove it from the cylinder block using a screwdriver. Remove from the seat.
- Clean the seat, replace the gasket, coat the pump with sealant and install a new spare part.
- Reassemble in reverse order, fill with antifreeze.
A problem may arise at the stage of removing this unit. The easiest way to get it out of its seat is to hit the attachment block with a hammer. Often the pump is filled with sealant, in which case several blows may be required. You need to beat until you can reach the water pump with your hands.
Even novice car enthusiasts can do this type of repair. You just need to find a garage and have a minimum of tools. If you have any difficulties, watch the instructional video on replacing this unit.
With the water pump installed on VAZ 2108, 2109 and 21099 cars, problems such as bearing wear and coolant leakage may occur. It is very difficult to repair the structure, so it is much more reasonable to install a new part instead. We will talk about how to replace the VAZ 2109 pump in this article.
Basic cooling system malfunctions
The main indicator of the performance of the cooling system is the engine temperature sensor. It is located on the dashboard inside the car.
The engine temperature sensor on the dashboard of the VAZ 2108/09 is located to the right of the fuel sensor
If the engine overheats, the gauge needle is in the red zone. There may be several reasons.
- Insufficient coolant level or leakage in the system.
- Problems with the water pump.
- Temperature sensor malfunction.
Thermostat failure.
First of all, you should lift the hood and inspect the cooling system. The very fact of a coolant leak is easily determined by the liquid level in the expansion tank. It is much more difficult to find the exact location of the leak. This often requires a thorough inspection of all areas of the engine compartment.
The most unpleasant option is a breakdown of the gasket under the valve head and coolant entering the oil sump. A symptom of this development of events is a change in the color of the oil. It turns dull white with rainbow streaks caused by ethylene glycol.
Sometimes the cooling system hoses leading to the interior heater are damaged. This usually happens after severe frosts or prolonged inactivity of the machine. In this case, the coolant leak should be looked for under the “dashboard”, lifting the floor mats and removing the interior trim. The leaking liquid accumulates under the floor mats or is absorbed by the interior insulation.
Overheating of the engine often occurs due to the fact that the radiator honeycombs become clogged. Dirt, dust and fine sand, falling on the front plane of the radiator while driving, form a dense crust, which prevents engine cooling. In this case, it is enough to clean the radiator with a jet of water under pressure. It is not recommended to use a wire brush.
A clogged radiator honeycomb leads to engine overheating.
A thermostat failure, as a rule, does not lead to engine overheating. The valve that falls on it opens a large circle of coolant circulation, thereby reducing the temperature of the liquid.
Installing an additional pump
The disadvantage of the first front-wheel drive VAZ cars was the poor performance of the interior heater. Until the engine warms up to operating temperature, the cabin is cold. This is due to the design of the small circulation circuit, into which coolant enters in small quantities. The problem is solved by installing an additional electric pump from GAZelle.
An additional electric pump is installed in the stove pipeline
To install an electric pump, you must purchase:
- four-pin relay;
- multi-core wires and a two-pin connector;
- fuse socket;
- hoses and clamps for connection to the cooling system;
- electric pump from a GAZelle car.
The pump is placed on a homemade bracket, screwed to one of the bolts on the mounting flange of the gearbox. The antifreeze is first drained and the thermostat is removed, which will interfere with the installation of an additional pump. This is especially true for the injection model VAZ 21099.
To turn on the pump, a small circuit with a relay is assembled
The insertion is made into the return pipe coming from the cabin heater. In this case, the electric pump will create a vacuum in the heater radiator. To turn on the pump together with the ignition and from a separate button, a simple electrical circuit is assembled. A relay with a fuse is placed in the cabin under the dashboard, and any free button is selected as a switch.
Video: installing an electric pump
Checking the functionality and replacing the water pump on a VAZ 2108–099 is quite simple. Don't forget about preventive measures. You should periodically check the technical condition and lubrication of the pump, and also change the coolant in a timely manner. Under these conditions, the pump will last as long as possible.
Additional electric pump for “nine”
Now the cold weather has arrived and the owner of the VAZ 2109, living in Russia, will again have to face the problem of the stove. Indeed, either the domestic manufacturer initially did not take care of its normal functioning, or this car should have such a system, but the VAZ 2109 with an electric pump, which is installed independently, is more suitable in winter in our country. On a VAZ 2109, installing an electric pump will not take much time and it is enough to know the basic algorithm for carrying out the operation, which will be discussed in our article.
Why and where to install an electric pump on a VAZ 2109
It is clear that no owner wants to freeze in his car all winter. And passengers are unlikely to want to sit in a kind of “refrigerator”, where instead of warming up, you freeze completely. The standard stove of this car, of course, warms, but it does it reluctantly and as if on debt. It's all about its low efficiency, especially at idle, when you're stuck, for example, in traffic jams. Installing an additional electric pump, in this case, solves the problem immediately. In fact, there are many ways to make the interior of your “nine”, but modifying the car’s cooling system by installing an electric pump is the most rational solution.
Pump location
Currently reading
The water pump is installed on the right (in the direction of travel) side of the engine under a plastic cover. There is also a gas distribution mechanism that drives the pump toothed pulley through a belt. This arrangement creates a number of problems.
To inspect the pump you have to remove the plastic casing. Due to a leaky seal and a small leak, antifreeze gets onto the belt, which quickly fails. If the bearing is severely worn, the shaft may jam, and the timing belt may jump off or break. In 90% of cases this leads to pistons hitting the valves, and subsequently to expensive repairs.
The coolant pump is installed on the right side of the engine
For these reasons, it is necessary to periodically (every 10–15 thousand kilometers) inspect the gas distribution mechanism for belt tension and pump performance.
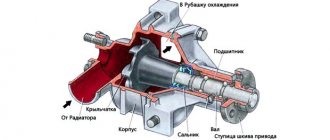
Purpose and design of the pump
The water pump is the most important element of the engine cooling system. Its main function is forced circulation of coolant through two circuits - small and large. On an unheated engine, antifreeze circulates in a small circle - from the water jacket of the engine to the radiator of the cabin heater and the carburetor cooling unit (or the throttle valve on the VAZ 21099 injector). When operating temperature is reached, the thermostat opens a large circuit and coolant begins to circulate through the main radiator.
The water pump impeller, driven by the timing belt, forces antifreeze to circulate through the cooling system.
If the pump fails, the movement of coolant through the channels will stop, and the engine will inevitably overheat. Aluminum pistons expanding in volume will damage the cylinder walls and compression will be lost. In this case, a major overhaul of the engine will be required, which is several times more expensive than the cost of a new pump.
The water pump has a fairly simple device
The VAZ 2108 water pump consists of a housing with a flange attached to the cylinder block with three bolts. Inside the pump, a shaft with an impeller and a drive gear in the form of a toothed pulley is installed on bearings. To prevent antifreeze from flowing out through the pump shaft, the device is equipped with an oil seal.
The service life of the pump depends on the performance of two parts - bearings and oil seal. As soon as one of these elements fails, it must be replaced or repaired.
Roller bearing life determines pump longevity