Owners of a VAZ-2115 with an injector regularly contact the service center to carry out vehicle maintenance. The same situation occurs when it is necessary to adjust the valves.
This is essentially a definition of the clearance, which is the space between the top of the valve stem and the camshaft cam. The gap is needed to compensate for valve expansion in different temperature conditions of engine operation.
An incorrectly adjusted gap has the following consequences:
- The increased space will prevent the valve from opening completely.
- A small gap will not allow the valve to close completely.
In this article we will look at the features of valve regulation on the fifteenth model, and you will see that this process will take you more than half an hour. Thus, you will learn how the work is performed and decide for yourself whether to do everything yourself or contact a service station.
VAZ 2115 2114 2113 8-valve valve clearance adjustment. Video instruction
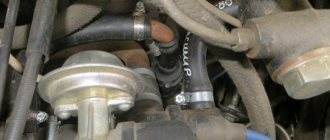
We will show you how to adjust the valve clearances on an 8-valve engine of a VAZ 2115 VAZ 2114 VAZ 2113 with your own hands. Open the hood, unscrew everything that will interfere with us.
Jack up the right front wheel. We engage 4th gear, spin the wheel, and set a mark on the camshaft gear: Here is the adjustment diagram for a better understanding:
Let's rotate the gear 2.5 teeth from the set mark:
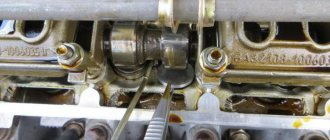
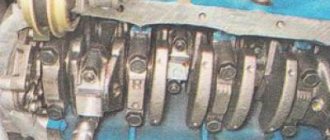
We check the gap on the first exhaust valve, it should be 0.35 plus minus 0.05. In our case, the probe at 0.30 does not pass, which means the valve is clamped, we try the probe at 0.25, it also does not pass, it passes at 0.20. We use a special device for adjusting the valves; you can buy it at any specialized store. If oil interferes, it can be pumped out using a syringe. Using our special tool (or a screwdriver if you don’t have one), press on the valve and fix it with a “hatchet”. Use tweezers to remove the adjusting washer. We look at the size of the washer (ours is 2.72). Let's calculate the size of the new washer:
We install a new washer with the calculated size 2.57 written down (so that it does not wear off). After installing the washer, measure the gap again. Now let's measure the gap on the third intake valve, it should be 0.20 plus minus 0.05. The probe at 0.20 does not pass, the probe at 0.15 passes freely, which means there is approximately 0.18, which is acceptable.
We turn another 11 teeth from the last position of the gear:
We check valves 5 and 2 in the same way. We turn it 10.5 teeth, check the gaps on valves 8 and 6.
Video adjustment of valve clearances in an 8-valve VAZ 2115 2114 2113 engine:
Backup video on how to adjust valve clearances in an 8-valve VAZ 2115 2114 2113 engine:
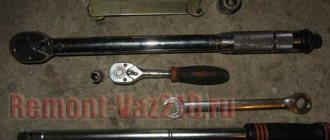
Tools for repairs
The first step is to measure the gaps on a cooled engine with old washers. Then, using the formula, calculate what the thickness of the new shims should be. Next, you need to purchase new elements with the calculated thickness. To work you will need the following set of tools:
- Open-end wrenches.
- Key for removing spark plugs.
- Probes (preferably a fan).
- A device for squeezing valves (you can make adjustments without it, just have a good flat-head screwdriver).
- Adjusting washers (can be a set of different sizes).
- Gasket under the cover.
- Rags.
The cost of the set is at least 2000 rubles, so it will be cheaper to purchase individually. One washer costs 30-35 rubles. You may need a maximum of 8 pieces for adjustment, that is, no more than 300 rubles. And the cost of adjusting valves on a VAZ-2114 at a service station is 2-3 times more. Think, maybe you should overpay a little and entrust the work to professionals?
Guide to adjusting valves on VAZ 2110-2115
If you are the owner of a VAZ 2110-2115 with a conventional 8-valve engine, then you probably know about such a procedure as adjusting the thermal valve clearances. Of course, if you have a 16-valve engine, then you don’t need to do this, since you have hydraulic compensators installed and no adjustments are made.
So, for conventional internal combustion engines, which are not much different from the VAZ 2108, this procedure is not carried out so often. After purchasing a new car, you can drive about 100,000 km without it, but this is not always possible and not every owner is so lucky. This type of maintenance of the VAZ 2110 can be performed either at a service station, having paid a certain price for the work, or independently, having understood this work. If this is your first time doing this, the guide below will help you with this.
Adjustment instructions.
1. First of all, disassemble the air filter down to the housing itself.
2. Disconnect the pipes located between the valve cover and the filter, and the crankcase gas exhaust pipe.
3. Remove the cylinder head valve cover.
4. Remove the front timing belt cover, behind which there is a camshaft gear and a toothed belt on it.
6. After using the mounting bolt of the generator pulley, turn the crankshaft in a clockwise direction so that the marks on the rear cover of the toothed belt and the pulley coincide. And then a little more, about 3 teeth of the camshaft gear.
7. Using a set of feeler gauges, check the gaps between the pusher of the first intake and third exhaust valves (start from the drive pulley) and their ends. The first should be about 0.2 mm (+/- 0.05 mm, no more), the second - 0.35 (the error is the same).
8. If the actual size of the gap does not coincide with the stated values, it must be adjusted. To do this, push the pusher down, secure it in the lower position, and then remove the adjusting washer from there and replace it with a suitable one.
9. Next, sequentially turning the crankshaft half a turn, alternately measure and, if necessary, adjust the clearances of the fifth exhaust and second exhaust, eighth exhaust and sixth exhaust, fourth exhaust and seventh exhaust valves.
10. Upon completion of adjusting the VAZ 2114 valves, install the removed parts in the right places in the reverse order.
Work procedure and instructions with photographs
So, before we begin, we will need to install the engine crankshaft and camshaft according to the gas distribution marks. More details about this procedure are written here.
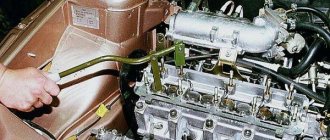
Then we completely remove the valve cover from the engine, after which you can install the rack and fix it on the studs that secure the cover itself, as is clearly demonstrated in the photo below:
There is no need to rush to remove the washers, since it is first necessary to check the thermal clearances between the camshaft cams and the adjusting washers. And this is done in the following sequence:
- When we find the crankshaft and camshaft according to the marks, we check the gaps in those valves whose cams are directed upwards. These will be valves 1, 2, 3 and 5.
- The remaining 4,6,7 and 8 valves are adjusted after turning the crankshaft one revolution
Preparatory work
To prepare for work, you will need to perform a number of actions:
- Place the car on a level surface.
- Let the engine cool to 20 degrees. If you need to do this quickly, you can use a household fan for blowing.
- Remove the side plastic cover covering the timing gear drive. To do this, use a 10mm wrench and unscrew the three fastening bolts.
- Remove the top metal cover from the block head.
- Wipe surfaces to remove excess engine oil.
- Inspect the camshaft, cams, and pulley for scoring, signs of wear, and other defects.
- To make it easier to crank the crankshaft, unscrew all the spark plugs.
How to adjust the valves of a VAZ-2115 injector 8 valves
Owners of a VAZ-2115 with an injector regularly contact the service center to carry out vehicle maintenance.
The same situation occurs when it is necessary to adjust the valves. This is essentially a definition of the clearance, which is the space between the top of the valve stem and the camshaft cam. The gap is needed to compensate for valve expansion in different temperature conditions of engine operation. An incorrectly adjusted gap has the following consequences:
- The increased space will prevent the valve from opening completely.
- A small gap will not allow the valve to close completely.
In this article we will look at the features of valve regulation on the fifteenth model, and you will see that this process will take you more than half an hour. Thus, you will learn how the work is performed and decide for yourself whether to do everything yourself or contact a service station.
Adjustment procedure
The procedure for adjusting the valves on all modifications of the 8-valve vase is the same. There are differences only in injection Grant cars, Kalina 2 with a Grant engine. They have a lightweight piston group and metal-ceramic seats. In this regard, the gaps differ upward by 0.05 mm. Knowing the order and adjustment scheme, you can adjust the valves yourself. The downside is the lack of a set of washers for adjustment. It’s expensive to go to the market to buy them every time, and it’s also expensive to buy the entire range.
Here is a detailed diagram of valve adjustment for VAZ 2108, 2109, 2114, 2115
- First you need to cool the engine. You can use an additional cooling fan from any VAZ car. Place it on top so that the airflow is towards the internal combustion engine and turn on the 12 V power supply;
- When adjusting 8 valve engines (11186, 11113 oka, 1118, 1111) with a mechanical throttle assembly, unscrew the throttle cable from the intake manifold receiver;
- Disassemble the valve cover, timing belt side casing. Disconnect the large and small breather hose going to the throttle body pipe;
- Pump out the oil near the valve cups using a syringe or bulb. It is most convenient to use a regular medical syringe with a white silicone hose at the end;
- Install a device for adjustment - a rack for pressing the valve, also called a ruler;
- Set the first adjustment position. Turn the camshaft clockwise to the mark and tighten 2-3 teeth. For cars with a lightweight piston group (Granta, Kalina 2, Priora), turn strictly by the crankshaft. If you turn the camshaft, the timing belt may slip, and if this is not noticed and the engine is driven, the valves may bend;
- Adjust in the following sequence: 1 outlet and 3 inlet valves;
- Rotate the camshaft 90 degrees. Adjust 5 outlet and 2 inlet valves;
- Rotate 90 degrees. Adjust 8 exhaust and 6 inlet ports;
- We make the last turn by 90 degrees and adjust the 4th exhaust and 7th inlet valves;
- Reassemble in reverse order. We install a new gasket under the valve cover to prevent oil from leaking out.
- On carburetor engines, everything is done in a similar order. First you need to unscrew the filter housing and the suction cable. The frequency is the same as on the injector 30,000 km.
Checking the gaps is also required after repairing the cylinder head. Especially after replacing the guides. When replacing bushings, the seats are countersunk with a special tool and deliberately recessed into the head. Accordingly, you need to follow the sequence, set the optimal gaps and repeat after 1000 km.
Adjusting the 8kL engine for gas increases the mileage between adjustments. If the engine is not intended to operate on gas equipment, the seats and valves will quickly burn out, and in order to somehow extend the service life, the clearances should be made a little larger than standard. Usually they do +0.05 mm. If the gap is not set, that is, does not expand, then the saddle is sunk a decent distance into the head. In this case, you need to measure how much the gap needs to be increased, disassemble the cylinder head and file the end of the valve. The second option would be to replace the seat or the cylinder head itself.
Why are thermal gaps needed?
Almost all car owners use the phrase “valve adjustment”, but if we speak correctly, the work process is called adjusting the thermal gap between the camshaft and the valve end. But, as practice shows, this name is used only in specialized technical literature. A common term is used among people.
As noted above, the thermal gap is the space between the end of the valve and the camshaft cam.
This gap is designed for high-quality closing/opening of the valve in any temperature conditions of the internal combustion engine.
It is necessary to measure the gap on a cooled motor at a temperature of no more than 20 degrees Celsius. For this, a special probe is used, which is placed in the space between the fist and the pusher adjusting washer. It is important that the camshaft cam is at the top of the pushrod.
When this gap changes, as a rule, characteristic knocking noises appear when the engine is running. Accordingly, if you notice a similar phenomenon, you need to adjust this gap.
By doing all the work yourself, you immediately save money up to one thousand rubles. All you need is to purchase special tools that you will use during your next work on the car.
When to make adjustments
The price of valve adjustment on a VAZ-2114 depends on the technician, usually around 700-1000 rubles. Takes a little time if the required sizes of washers are available. The gaps change due to increased friction in the gas distribution mechanism. As a result, engine power decreases as the valve timing changes. Fuel consumption increases significantly; starting the engine is sometimes impossible.
In some cases, it is possible that the engine will start normally and run without problems until it warms up. But as soon as it warms up to 90 degrees and above, problems begin - the engine stalls, stalls, and traction decreases. There is a feeling that the access of air or gasoline to the fuel system has been blocked. The VAZ-2114 1.6 valves are adjusted every 60 thousand km according to the maintenance card.
How to adjust the thermal gap
All work is carried out using specialized washers, which must be folded in the area between the fist and the end of the valve.
On the fifteenth VAZ model, all work is done with the engine idling. The whole process is quite simple, but if you do not have even minimal experience in car repair, the best solution would be to contact a service center. In addition to standard tools, you need to prepare:
- A set of measuring pliers for determining the gap.
- A device with which you will recess the valve tappet.
- Before purchasing washers, it is recommended to take measurements so as not to take unnecessary elements that you do not need at all.
The work execution looks like this:
- First of all, the valve cover is removed. To do this, remove the air filter, loosen the pipe going to the cylinder head and disconnect it. Next, dismantle the throttle valve control device and carefully remove the cylinder block cover.
- Unscrew the spark plugs.
- Remove the cover that protects the gas distribution system.
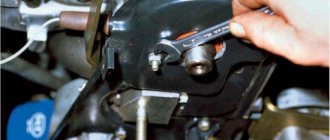
- Rotate the engine crankshaft clockwise until the mark on the timing pulley aligns with the mark on the rear cover. The shaft can only be turned using a wrench using the bolts that secure the generator pulley.
- If you miss the mark, crank the engine in the same direction a few more revolutions.
- As soon as the marks come together, rotate the crankshaft a few more teeth of the gas distribution system.
- Now measure the clearance of the exhaust valve on the first cylinder and the intake valve on the third cylinder. According to the standard, the gap at the inlet should be about 0.2 mm, at the outlet 0.4 mm.
- If the clearances coincide with the recommended values, lower the cylinder piston to the bottom position using a special tool and remove the washer.
- Now measure the size of the washer you need. This is done by subtracting the thermal gap from the recommended value, and then adding the thickness of the washer used to the resulting number.
- Measure the thermal clearance for each valve in turn with each crankshaft half turn.
- Place washers of appropriate sizes and repeat all measurements.
Checking clearances
Before you start adjusting the valves on the VAZ-2114, you need to check the gaps. To check the clearances in the gas distribution mechanism, you will need:
- Align the mark on the camshaft pulley with the protrusion on the cylinder head casing. This will place the first cylinder at top dead center.
- To rotate the crankshaft, you can use a 19mm wrench. Or you can do it simpler - lift the right side, engage fifth gear and rotate the wheel.
- For convenience, opposite the mark that is already on the pulley, make another one with chalk or a marker. The main thing is that it is clearly visible.
- In this position, measure the gaps, counting from the camshaft pulley, on valves 1 (exhaust) and 3 (intake). To do this, install a 0.35 feeler gauge into the first gap. It should enter barely touching the metal surfaces. You don't need to apply force for this.
- Then you need to check the second and fifth valves - rotate the camshaft pulley 180 degrees.
- Rotate the camshaft another 180 degrees and check the clearances in valves 6 and 8.
- The last to be checked are 4 and 7 - to do this, turn the camshaft another half a turn.
Adjusting the clearances in the valve drive
To compensate for the thermal expansion of the valve, a gap is structurally specified between the end of the valve stem and the camshaft cam. With an increased gap, the valve will not open completely, and with a decreased gap, it will not close completely.
The gap is measured with a feeler gauge on a cold engine (at a temperature of +20 ° C) between the camshaft cam (the cam should be directed upward from the pusher) and the valve pusher adjusting washer.
The nominal clearance for the intake valve is (0.2±0.05) mm, for the exhaust valve - (0.35±0.05) mm. The gaps are adjusted by selecting the thickness of the shims. Spare parts are supplied with washers with a thickness of 3 to 4.5 mm every 0.05 mm.
Counting from the camshaft drive belt, valves 1, 4, 5 and 8 are exhaust, valves 2, 3, 6 and 7 are intake.
The order in which the gaps are adjusted does not matter.
You will need: a device for adjusting the gaps in the valve drive, a set of feeler gauges for checking the gaps, shims.
1. Remove the cylinder head cover (see “Replacing the cylinder head cover gasket”).
2. Set the piston of the first cylinder to TDC on the compression stroke. To do this, turn the crankshaft so that the mark on the camshaft pulley coincides with the mark (antennae) on the rear camshaft drive cover. Then turn the crankshaft another 40-50° - the camshaft cams will turn from the pushrods.
3. Using a set of feeler gauges, measure the clearances in the drive of those valves whose cams are directed upward from the pushers (in this case, these are the 4th, 6th, 7th and 8th valves). It is necessary to replace the adjusting washers of those valves whose clearances differ from the nominal ones. Record the measured clearances.
4. To make it easier to remove the adjusting washer, two grooves are made in the pusher. Using a screwdriver, turn the pusher by the groove so that it is convenient to pry off the washer. For ease of operation, remove oil from the top of the cylinder head (around the pushers).
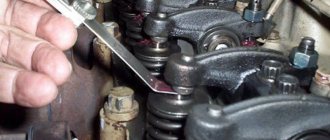
5. Install a special device for compressing the valve springs on the head cover mounting studs.
6. Place the washers on the studs, turning them over so as not to crush the flange on them, and tighten the cap nuts.
7. Pressing down the lever of the device, press down the pusher on which the adjusting washer is being replaced, and insert the lock under the camshaft so that...
8. ...the protrusion on the clamp 1 fixed the pusher 2 in the recessed position.
9. Use a screwdriver to pry up the adjusting washer and, using, for example, tweezers, remove the washer from the pusher.
10. Write down the thickness of the shim - it is marked on one of its sides. If the inscription is not visible, measure the thickness of the washer with a micrometer.
11. Calculate the thickness of the new adjusting washer using the formula (all values in mm) H = B+A-C, where A is the value of the measured gap; B - thickness of the old washer; C—nominal gap; H is the thickness of the new washer.
For example (for inlet valve):
A=0.26 mm, B=3.75 mm, C=0.2 mm, then H=3.75+0.26-0.2=3.81 mm.
Within the tolerance of the gap (±0.05 mm), we select the closest washer in thickness to 3.8 mm.
12. Install a new washer into the pusher with the thickness calculated according to the formula with the inscription facing down (towards the pusher). Press the pusher with the tool and remove the lock.
13. Check the gap with a feeler gauge. If it differs from the nominal value, repeat the adjustment.
14. Turn the crankshaft one revolution (360°) and adjust the clearances in the drive of the 1st, 2nd, 3rd and 5th valves in the same order. Then fill the top of the block head with oil if it was removed.
15. Check the condition of the head cover gasket and replace it if necessary.
16. Install the removed parts in the reverse order of removal.
Why is valve adjustment necessary?
Valve design and adjustment diagram Adjustment of the valve, or rather the valve clearance, is carried out so that the valve bevel fits tightly to the seat. This is due to many factors such as:
- increased gasoline consumption;
- exhaust emissions;
- prevents excess air from entering the combustion chamber;
- exhaust gases do not enter the timing mechanism or the intake manifold (see “Replacing the intake manifold gasket manually”);
- other consequences.
It becomes clear that under no circumstances should the valves "click" as this signals the need for adjustment.
Why adjust the valves in the VAZ 2115?
Most owners of a VAZ 2115 car with an injection engine, in the event of even such a fairly simple operation as the need to adjust thermal clearances, decide to seek help from a car service center. The clearance between the camshaft lobe and the end of the valve stem was created by the designers to compensate for thermal expansion of the valve. Moreover, if the fuel gap is increased, the valve will not be able to fully open, and if the thermal gap is very small, it will not be able to fully close. Today we will try to show you that the process of adjusting the valves on a VAZ 2115 car is a completely simple process, and it will take no more than thirty minutes. This article contains answers to the following fairly common questions:
- What is the process of adjusting thermal clearances on a VAZ 2115 with an injector engine?
- Why are thermal clearances needed on a VAZ 2115 car?
Brief description of the procedure
Nowadays, any modern car, except electric ones, has an internal combustion engine with a gas distribution mechanism. A lot of parameters depend on the proper operation of this system. And they include fuel consumption, engine response, environmental characteristics and other equally important indicators. The normal function of the gas distribution mechanism is ensured by the correct adjustment of the gaps between the valve and its pusher.
If the gap is too large, the camshaft cam will hit the pusher plate with force, and all this will lead to serious damage to engine components and mechanisms. In addition, the valve will not fully open when needed, thereby blocking the movement of exhaust gases or the fuel-air mixture, depending on the type of valve. Intakes are responsible for the supply of fuel, exhausts are responsible for exhaust gases directed to the exhaust manifold.
Operating principle of the valve mechanism
On the contrary, if the valve is tightly clamped, then mechanical damage to engine parts will be less than if the gap is too large. But the engine operation itself will be much worse. It is for good engine performance that it is necessary to carefully adjust the valves on VAZ cars. This procedure is carried out in several ways. The first is that the pusher is moved under the influence of the nut on the rod. The second is the selection of gasket washers of the required thickness. The third is automatic, regulated by engine oil pressure into hydraulic compensators.
Why are thermal clearances needed on a VAZ 2115 car?
In everyday life, the term valve adjustment is used, but it would be more correct to call this process this way: adjusting the thermal gap between the camshaft cam and the end of the valve stem. But usually such a slightly abstruse name is used exclusively in technical literature, and in colloquial speech people who at least understand something about cars use the wording - valve adjustment.
As you already understand, there is a thermal gap between the camshaft knuckle and the end of the valve stem, which is measured at the manufacturer. This gap is called thermal, and it is intended to ensure smooth closing and opening of the valve at any engine temperature. The thermal gap on a VAZ 2115 car is measured using a special probe on a cold engine, that is, at a temperature of up to +20 degrees between the camshaft cam and the pusher adjusting washer. Please note that the camshaft cam should be located at the top of the pusher. When changing the size of the thermal gap, a certain metallic knocking occurs when the injection engine is operating. That is, if there is some knocking on the valves of the injection engine, then valve adjustment is necessary.
The process of adjusting the valves on a VAZ 2115 car cannot be delayed, since if the fuel gap is increased, the valve will not be able to fully open, and if the thermal gap is very small, the valve will not be able to close completely. If such a breakdown occurs, you should not immediately go to a car service center, as you can try to carry out such a fairly simple procedure yourself.
If you carry out this procedure yourself, you can save about a thousand rubles, since this is exactly the amount of money that is requested at car service centers. Believe me, this procedure is not so complicated that you need to pay that kind of money for it, because for this you will only need to purchase a special set of tools.
Setting the gap on the VAZ 2114
In our case, on a VAZ 2114 car, this procedure is performed in the second way, using adjusting washers and a special tool.
Firstly, you need to understand that correct adjustment on the VAZ 2114 can only be performed at an ambient temperature of 20 degrees Celsius, when the metal is at rest and is not subject to thermal expansion as on a warm engine. Secondly, for each specific car there is a table of the dimensions of the gaps with the camshaft cams raised.
For the fourteenth model the following dimensions are used:
- For intake valves - 0.2 mm with an indication error of 0.05 mm;
- For exhaust valves - 0.35 mm with an indication error of 0.05 mm.
Before making adjustments, cool the space under the hood; you can use an ordinary fan. After this, dismantle the valve cover, pipes, mounting clamps, and side protective casing of the timing belt. After unscrewing the nut securing the accelerator pedal cable, carefully disconnect it. To make work easier, remove the air filter housing assembly. Before dismantling, be sure to place wheel chocks under the wheels and engage neutral gear. The hand parking brake must also be set.
Preparing for work
To adjust the valves yourself, you need to prepare the following “tool package”:
- Wrenches and socket set from 8 to 13 mm;
- Special clamp for valve lifter springs;
- A set of feeler gauges for measuring valve clearances;
- Micrometer or caliper;
- A set of special adjusting washers.
Note: adjusting washers for VAZ-2114 engines and the like are calibrated from 3 (three) to 4.5 (four and a half) millimeters with an interval of 0.05 mm, the price of one such washer is about 20 rubles. Clamping pushers - about 100 rubles.
A caliper or a micrometer - I don’t indicate prices, because in the car market you can save used ones for pennies. You may need it, the size is not indicated on the old type of washers, but on the new ones it is even laser-burned and the “bar” is not required at all.
How to properly adjust valves on Lada Samara engines?
What is the correct adjustment of thermal clearances in a car’s gas distribution mechanism or what is affected by valve adjustment
The main advantage is lower fuel consumption (which is important given the ever-increasing price of gasoline). The engine runs quieter and smoother and accelerates faster
How to determine and why valves are knocking
If the valves are not adjusted, characteristic signs appear. The engine operates with a certain noise; a knocking sound is heard on a cold VAZ 2115 engine, similar to a metallic clatter. The reason for this is the gap between the levers and the camshaft cams.
This gap is set by the manufacturer, its value is the same for all engines of the same type. In this vehicle system, the gap increases or decreases, both of which have a bad effect on engine performance and can lead to more serious damage.
Basically, this breakdown occurs due to the use of low-quality fuel. A good fuel is one with an octane number of at least 93.
How often do you need to adjust the valves of VAZ 2114, 2115, what do the manufacturers say?
Factories and car manufacturers recommend checking thermal clearances every 15-30 thousand kilometers. Even if, in your opinion, the engine is working well, then such a procedure will never be superfluous, especially since you can do it yourself.
How are valves located in VAZ 2114, 2115 cars?
VAZ 2114 cars are available with an engine with eight or sixteen valves.
Note! Adjustment of the valve clearance of the VAZ 2114 is carried out only for an 8-valve engine, since hydraulic compensators are installed on the 16-valve engine. The valves in the gas distribution mechanism are designed so that when fuel is injected through one, exhaust gases are released through the other.
The valves in the gas distribution mechanism are designed so that when fuel is injected through one, exhaust gases are released through the other.
How to adjust clearances on VAZ 2114, 2115
In order for the valve adjustment of the VAZ 2114 injector 8 valves to be effective, it must be done on a cold engine. The gap size on the intake valve should be 0.2 mm, and on the exhaust valve - 0.35 mm.
Note! The permissible error in both cases is 0.05 mm
Preparing tools
To adjust the valves of a VAZ 2115 injector 8 valves, we will need the following tools: a set of wrenches for adjusting VAZ valves, a device for valve pusher springs, feeler gauges, a caliper or micrometer, and shims.
Adjustment of valves
- Remove the cylinder head cover.
- Remove the air filter and the front timing belt cover.
- Unscrew the candles and carefully fold them. They are removed to make it easier to turn the crankshaft.
- Remove excess oil from the top of the head.
- Turn the crankshaft clockwise so that the marks on the pulley and the rear cover of the toothed belt match.
- Using a set of feeler gauges, we check the gaps between the end of the valve and the pusher. According to principle:
the first outlet and the third inlet, the fifth outlet - the second inlet, the eighth outlet - the sixth inlet, the fourth outlet - the seventh inlet.
Valve numbers are calculated from the drive pulley.
If it is necessary to adjust the VAZ 2114 valve, you need to use a device to recess the pusher and, fixing it in the lower position, remove the adjusting washer and then replace it.
Important! The crankshaft must not be turned in the opposite direction. auto.today
auto.today
Work order
Now the sequence of actions:
- We install the VAZ 2114 on a flat surface, the engine must cool completely so that there is no error in the measurements due to metal expansion;
- Remove the valve cover, as well as the side cover under which the timing belt is located. The surface under the lid must be wiped of oil. You should also carefully inspect the timing shaft for burrs, holes, and signs of significant wear. If there are any, the shaft will have to be replaced;
- We unscrew the spark plugs to make it much easier to turn the crankshaft in the future.
- We combine the mark on the camshaft drive gear with the protrusion on the cylinder head, that is, we set the TDC on the first cylinder. This can be done using a wrench, which we use to rotate the crankshaft by the pulley bolt. But some car enthusiasts do things a little differently - jack up the front wheel on the left and engage 4th gear. Then they simply rotate the wheel, and since the gear is engaged, this rotation will be transmitted through the transmission to the engine;
- After aligning the marks on the camshaft gear, strictly opposite the existing mark, we make another one with chalk. This will make future work somewhat easier.
- We use a feeler gauge to measure the gaps on valves 1 and 3 (you need to count from the camshaft gear. The 1st is exhaust, and the 3rd is intake);
- The gap on 1 valve should be 0.35 mm, but an error is allowed. That is, we take a feeler gauge 0.35 mm thick and insert it between the shaft cam and the adjusting washer. If the probe moves with little effort, then the gap is normal, but if the probe does not enter or is very loose, then adjustment is required. We do the same check on valve 3, but the gap on it should be 0.2 mm.
- The adjustment of the valves is carried out as follows: we attach the device for pressing the valves to the studs securing the cover. This device has a curved lever that we place between the cam and the washer. Using the handle of the device, we press on this lever, as a result of which it will press on the pusher. This device comes with a special clamp, which we place between the camshaft and the pusher. After releasing the handle, the latch will hold the valve in a squeezed state, while the washer will not be pinched and can be removed with tweezers.
- Let's look at an example of what kind of washer will need to be installed in order for the gap to be correct. For example, when checking the exhaust valve, it was found that it was not 0.35 mm, but 0.42 mm, that is, it was increased by 0.07 mm. Next, remove the washer that was installed. There should be a mark on it indicating its thickness (for example, 3.65 mm); if there is no such mark, then you will have to measure the thickness with a micrometer. Now we add to the thickness of the washer the value by which the gap is increased, in our case - 0.07 mm, as a result we get the value of the thickness of the washer for installation - 3.65 + 0.07 = 3.72 mm. But since a washer with such a thickness is not included in the kit, we install a new washer with a thickness as close as possible to the obtained value, that is, 3.7 mm. This is why an error of 0.05 mm is allowed.
- We install the washer of the required thickness in place with the size mark down (towards the pusher). Next, use the lever of the device to press the valve again and pull out the latch. This completes the adjustment.
- Next, the remaining valves are adjusted, but for this you need to know the order. After checking valves 1 and 3, turn the camshaft half a turn (for ease of installation, we made a mark on the gear in advance) and check valves 2 (intake) and 5 (exhaust). Then we turn it another half turn and adjust 6 (intake) and 8 (exhaust). To check the 4th (intake) and 7th (exhaust) valves, you still need to turn the camshaft half a turn once.
After all the work, we replace the removed covers and are satisfied with the smooth operation of the timing belt and the engine as a whole.
Sources
- nadomkrat.ru/ustroistvo-avtomobiley/dvigatel/regulirovka-klapanov-vaz-2114
- ladaautos.ru/vaz-2114/kak-regulirovat-zazory-klapanov-vaz-2114-8-klapanov.html
- diagnozbibike.ru/regulirovka-klapanov-vaz/
- drive2.ru/l/7209941/
- vazhelpgid.ru/remont-vaz-2115-2114-2113/remontiruem-dvig/422-vaz-2115-2114-2113-8-klapannyy-regulirovka-zazorov-klapanov-video-instrukciya.html
Adjustment procedure
The procedure for adjusting the valves on all modifications of the 8-valve vase is the same. There are differences only in injection Grant cars, Kalina 2 with a Grant engine. They have a lightweight piston group and metal-ceramic seats. In this regard, the gaps differ upward by 0.05 mm. Knowing the order and adjustment scheme, you can adjust the valves yourself. The downside is the lack of a set of washers for adjustment. It’s expensive to go to the market to buy them every time, and it’s also expensive to buy the entire range.
Here is a detailed diagram of valve adjustment for VAZ 2108, 2109, 2114, 2115
- First you need to cool the engine. You can use an additional cooling fan from any VAZ car. Place it on top so that the airflow is towards the internal combustion engine and turn on the 12 V power supply;
- When adjusting 8 valve engines (11186, 11113 oka, 1118, 1111) with a mechanical throttle assembly, unscrew the throttle cable from the intake manifold receiver;
- Disassemble the valve cover, timing belt side casing. Disconnect the large and small breather hose going to the throttle body pipe;
- Pump out the oil near the valve cups using a syringe or bulb. It is most convenient to use a regular medical syringe with a white silicone hose at the end;
- Install a device for adjustment - a rack for pressing the valve, also called a ruler;
- Set the first adjustment position. Turn the camshaft clockwise to the mark and tighten 2-3 teeth. For cars with a lightweight piston group (Granta, Kalina 2, Priora), turn strictly by the crankshaft. If you turn the camshaft, the timing belt may slip, and if this is not noticed and the engine is driven, the valves may bend;
- Adjust in the following sequence: 1 outlet and 3 inlet valves;
- Rotate the camshaft 90 degrees. Adjust 5 outlet and 2 inlet valves;
- Rotate 90 degrees. Adjust 8 exhaust and 6 inlet ports;
- We make the last turn by 90 degrees and adjust the 4th exhaust and 7th inlet valves;
- Reassemble in reverse order. We install a new gasket under the valve cover to prevent oil from leaking out.
- On carburetor engines, everything is done in a similar order. First you need to unscrew the filter housing and the suction cable. The frequency is the same as on the injector 30,000 km.
Checking the gaps is also required after repairing the cylinder head. Especially after replacing the guides. When replacing bushings, the seats are countersunk with a special tool and deliberately recessed into the head. Accordingly, you need to follow the sequence, set the optimal gaps and repeat after 1000 km.
Adjusting the 8kL engine for gas increases the mileage between adjustments. If the engine is not intended to operate on gas equipment, the seats and valves will quickly burn out, and in order to somehow extend the service life, the clearances should be made a little larger than standard. Usually they do +0.05 mm. If the gap is not set, that is, does not expand, then the saddle is sunk a decent distance into the head. In this case, you need to measure how much the gap needs to be increased, disassemble the cylinder head and file the end of the valve. The second option would be to replace the seat or the cylinder head itself.