The rings are metal elastic spring elements placed on the upper part (head) of the piston - in grooves specially provided for this. Most often, rings are made of steel (or high-strength cast iron) and coated with an alloying material to give greater strength and wear resistance. The end part of the rings in contact with the cylinder mirror can be coated with tin to facilitate running-in during the initial period of engine operation (or after its overhaul).
The full name for the rings is piston rings. There are compression rings (the top and second in a row - intermediate) and oil scraper rings (the bottom one).
Replacing piston rings
On VAZ cars, as well as on all other models of passenger cars, it is advisable to change only the piston rings only if:
- there is no exhaust in the cylinders;
- there are no signs of damage to their inner surface.
If the liners are significantly worn, they need to be bored, and if the last size was already used before, the cylinder block needs to be relined. You can replace the PC on any VAZ engine without removing the internal combustion engine; this will require removing the cylinder head and oil sump. PCs are replaced if the gap at the joints does not exceed 1 mm.
For example, let's consider replacing piston rings on a VAZ-2114 car with an 8-valve internal combustion engine; such work must be carried out on a pit or a car lift:
- turn off the ignition, put the gearbox in neutral, disconnect the negative terminal from the battery;
- drain the antifreeze, remove the air filter housing along with the pipe (injector corrugation);
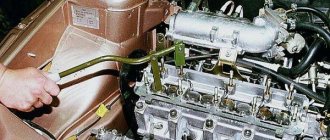
- remove the valve cover, camshaft, loosen the timing belt and move it to the side;
- disconnect the wires and cooling system pipes from the cylinder head, unscrew the head bolts;
- unscrew the nuts of the exhaust pipe of the muffler;
- We completely free the cylinder head from all fasteners that prevent it from being removed, and we remove the cylinder head;
- if there is protection under the engine, remove it;
- place a container under the engine sump, unscrew the plug on the crankcase, drain the oil;
- remove the lower hatch of the gearbox housing (three bolts);
- Using a 10 mm wrench or a socket wrench, unscrew all the oil pan bolts;
- dismantle the pan, remove the oil receiver;
- Unscrew the connecting rod nuts, remove the lower connecting rod caps, and carefully knock the pistons and connecting rods upward. Pistons should be knocked out through a soft metal drift or through a wooden block. First, you need to carefully knock out the connecting rod bolt without damaging the threads on it, then place the drift on the end of the connecting rod - in no case should you hit the bearings or the seat underneath them;
- It is recommended to remove the connecting rods one at a time, and immediately attach the caps to them; the caps should not be confused with each other, they are placed back strictly in their places, and a lock to the lock is required;
- remove the PC from the pistons, use a piece of the old ring to clean the piston grooves to bare metal. Be sure to check the cleanliness of the groove all around; there should be no coke left in it;
- We install new rings in the grooves, start with the lower MPC, then install the middle compression PK, and lastly the upper one. For installation, you can use a special device, but it is still more convenient to install the rings by hand. If the MPCs are cast iron, they cannot be bent along their axis, they can only be carefully moved apart. Compression rings also need to be bent carefully, to a minimum;
- we install the piston in place using a special mandrel, hammer it in with a wooden hammer handle or a brass or bronze drift;
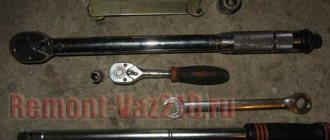
- We install one piston-rod at a time, and immediately attach a connecting rod cap to each one. The connecting rod nuts should be tightened with a torque wrench, force - from 4.5 to 5.5 kg;
- then we put everything in place - the oil receiver, the engine sump, the cylinder head. We fill the radiator with antifreeze, oil into the crankcase, and start the engine to check. After replacing the PC, the internal combustion engine may initially smoke and consume oil - the engine needs to be run in for approximately 2 thousand km. It happens that despite the seemingly normal condition of the liners, the internal combustion engine continues to smoke even after replacing the rings after break-in. In this case, you will have to bore the cylinders and install a repair piston group.
Removal
1. Remove the cylinder head from the car (see “Cylinder head - removal and installation”).
2. Remove the engine oil pan (see “Engine oil pan - removal”)
4. Turning the crankshaft by the bolt securing its pulley with a 17 mm wrench, set the piston of the first cylinder to the lower position.
5. Using a 14 mm socket wrench, unscrew the two nuts securing the connecting rod cover of the first cylinder.
6. Remove the connecting rod cover of the first cylinder.
7. Place the hammer handle against the piston and push it up.
8. Remove the piston from the cylinder.
9. Remove the connecting rod bearings from the connecting rod and cover.
Warning. When disassembling the connecting rod, do not press the bolts out of it.
If there are signs of severe wear on the crankpins of the crankshaft, then it is necessary to remove the engine and repair the crankshaft (see “Engine - repair with complete disassembly”).
10. Fix the piston by the connecting rod in a vice.
11. Slightly spreading the ring lock, remove the upper compression ring.
12. Similarly, remove the lower compression ring.
13. Remove the oil scraper ring.
. and its expander.
Warning. The advisability of replacing the rings depends on the degree of wear of the cylinders and pistons (see “Piston and connecting rod - replacement”).
What should the compression be?
To identify the point of maximum wear of engine parts, you need to know the permissible pressure values. It is related to the degree of compression in direct proportion - the more, the higher the pressure.
Today you can find 3 types of engines in operation with different characteristics:
- Old engines with a low compression ratio - up to 8.5.
- Modern gasoline engines in which the air-fuel mixture is reduced in volume by up to 9-11 times.
- Diesel engines capable of compressing the fuel mixture from 16 to 24 times.
The combustion chamber of an engine running on diesel fuel is characterized by a small volume. Therefore, the motor does not require an electric spark, just strong compression.
The amount of compression is influenced by various factors:
- tightness of valve seating;
- cracks in valve seats;
- presence of lubricant in the cylinders;
- ring wear;
- wear of parts of the cylinder-piston group.
Norm and minimum
Through testing, data on the optimal pressure in the cylinders for different types of engines was obtained. When the engine has reached operating temperature and the battery is fully charged, the compression should be:
- On older engines equipped with carburetors, the lowest value is 1 megapascal. In old units - 10 bar. If the engine is new, the pressure can reach 13 bar.
- The optimal pressure in a gasoline engine is 1.5 megapascals. The minimum level is 1.1 MPa.
- For a diesel engine, the normal value is 2.4-3 MPa.
If we more accurately determine the indicated coefficient, then for 4-stroke gasoline engines it is in the range of 1.2-1.3, for diesel engines - 1.7-2.
Signs of poor compression
Identification of the lower compression limit indicates increased engine wear. Friction occurs between the piston rings and the cylinder, which increases the gap between the parts. For this reason, compression is reduced.
The following signs can indicate that the compression is insufficient:
- There is a lot of smoke coming out of the breather. This is a valve that serves to remove crankcase gases from injection and carburetor engines.
- Reduced power of the power unit, especially noticeable on small engines.
- A lot of smoke comes out of the exhaust pipe as the engine oil burns in large quantities.
- High oil consumption due to wear of oil scraper rings and caps.
If at least one of these signs is noticed, then there is a reason to conduct a full engine diagnostics.
This will allow timely measures to be taken to restore its functionality. If we consider the reasons for the decrease in compression, we can highlight the main ones:
- Operating a car with a cold engine, thermostat failure.
- Overheating of the power unit.
- Use of low quality lubricant.
- Maintenance and oil changes are not carried out in a timely manner.
- The service life of the engine has expired.
If the head gasket is burned out or the valves are damaged, then changing the lubricant will not help. In these cases, engine repair will be required with replacement of piston group parts and other elements.
Permissible compression difference in cylinders
If the measured compression differs between cylinders, this complicates matters. The engine will have to be disassembled and overhauled. Not only will it be necessary to replace rings, valves and sealing caps.
Compression less than the minimum value in one cylinder means that there are defects in the piston or cylinder. In this case, all elements of the cylinder-piston group are usually changed, otherwise the difference in compression will remain and the problem will not go away.
The normal value is considered to be a pressure of 10-12 bar, depending on the car model and engine. But the permissible difference in compression in different cylinders has also been established. For example, in cylinders 2 and 3 this value may be 0.5 bar lower, which is quite acceptable. It depends on the load on the pistons - where there is more, there is more wear.
Advice! If the pressure in different cylinders differs greatly, for example by 3 or 4 atmospheres, then this is abnormal. The motor will run intermittently. This can happen in several cylinders at once, which brings a major overhaul closer.
How to properly break in the engine after installing new rings
After repair, proper running-in of the vehicle is essential. It deserves the same attention as the repair itself. Special attention is required for those units whose parts are interconnected by friction, and efficiency depends on ensuring the correct gaps between the elements. The first time after installing new piston rings, a car should travel 1000 kilometers at a speed of no more than 60 kilometers per hour. This is done so that the rings can rub in well with the liners and grooves on the pistons. Otherwise, the cost of repairing a VAZ 2112 car will be much higher next time. The main purpose of running in is to smooth out all micro-irregularities by rubbing the parts against each other until they are completely in contact. If friction occurs under heavy load, then the parts overheat and there is a possibility of damaging the power unit, therefore, the engine should initially operate with minimal loads.
Rules for running in a VAZ 2112 car after installing the rings
There are several basic rules for breaking in a car:
- The engine must not be fully loaded.
- Change gears in a timely manner.
- Do not drive on roads with long inclines.
- Regularly check the lubricant level.
- You can’t stand in one place for a long time and don’t make sudden accelerations.
- Change the oil and filter after 1000 kilometers.
Compliance with these simple rules, after replacing the piston on a VAZ 2112, will be the key to long-term operation of the car.
What should the piston ring clearance be? Detailed analysis
A topic of interest to many car enthusiasts is how to set the gap between the piston rings, and this is especially interesting to those who are going to carry out repair work themselves
Everyone knows that any car owner (experienced or not) tries to learn more about the damage that may occur during the operation of the car, as well as the precautions to take.
What should the piston ring clearance be?
We will look at various features and specifics of the topic, and also get acquainted with the basic techniques and techniques for repairing this part.
Firstly
, the very first step will be the fact that is associated with inspecting the pistons. It is necessary to check and carefully inspect the piston for cracks or minor mechanical damage on the surface. If you notice even a small defect, you should immediately replace the piston with a new one. To avoid an unpleasant situation or a larger breakdown.
Secondly, if your engine is disassembled, you should also pay attention to the pistons. Such preventive measures include cleaning the piston head from existing carbon deposits, cleaning and processing the grooves that are located under the piston rings
Third
, after the piston has been cleaned, be sure to inspect the gaps between the grooves and rings. In solving this problem, a table that will indicate the nominal piston ring clearances is more suitable than ever.
This:
- The parameters of the upper compression ring should be 1-0.04-0.075 mm;
- The compression ring, which is located at the bottom, should be 2-0.03-0.065 mm in size;
- Oil scraper ring with a gap of 3-0.02-0.055 mm.
Remember that each gap has its own parameters and distance, the most important thing is not to confuse them. The permissible gap should be 0.15 mm. If it is difficult to accurately determine the distance between the piston gaps by eye, you can use a special device - a micrometer.
How to properly use a micrometer to determine the size of the piston ring gap? It is necessary to measure the diameter of the piston in several places around its circumference. Then measure the width of the grooves using special feeler gauges.
After measurements, the average value of the gaps should be calculated. If the indicators differ from each other, then the piston should be replaced, if the indicators are the same, then everything is in order.
Fourth
, measuring gaps in piston ring locks. This measurement can be performed either using a special frame or with a simple cylindrical object. Indicators and parameters of the gap should be measured using a special probe. The parameters of the gap suitable for use have the following proportions - 0.25-0.45 mm.
In this case, an error of 1.0 mm may be allowed, which may arise as a result of wear of the part. If the gap size is higher than normal, the piston must be replaced. If the measured gap is less than the specified parameters (0.25 mm), then all that is needed is to simply sharpen the ends to the desired size.
Fifthly
, measuring the gap between pistons and cylinders. This measurement is based on establishing a correspondence between the already measured diameters of the piston and cylinder. Here the standard values are from 0.025 to 0.045 mm, with possible wear of 0.15 mm.
Necessary tool
Measuring cup
- Hammer
- Blower
- Bucket and brush for washing parts
- Dipstick
- Mandrel for driving dowels
- Tip for piston rings
- And also: wrenches, screwdrivers, wire brushes and other small tools.
Replacing piston rings on a VAZ 2107, as well as any other repairs, is best done with a service and safe tool. In any case, health is more valuable than money spent, perhaps, on new tools. Always keep the tool clean and in place - this way you can shorten it.
Signs and causes of wear (breakage) of piston rings
On VAZ cars, the engine wears out during operation, and the PCs also fail. Rings can:
- break into two or more parts;
- wear out in thickness;
- have general wear and tear.
Parts often break down due to overheating of the internal combustion engine; in this case, compression in the cylinders decreases and the engine loses power. Signs of a faulty PC are:
- bluish smoke from the muffler pipe, especially often it appears after a long period of idling when the gas pedal is sharply pressed;
- increased engine oil consumption;
- drop in power, the motor stops pulling;
- coking of spark plugs.
If there are signs of a malfunction in the piston group, the piston rings are replaced first. But replacing a PC does not always give the desired effect; often after repair the engine continues to smoke and consume oil. The reason for this is simple - there is wear in the cylinders themselves. In the block, the liners usually wear out unevenly - they take on an oval shape; due to wear, the piston rings do not fit tightly to the cylinder walls and do not provide a tight seal.
Malfunctions
VAZ 21124 engines have the same set of characteristic disadvantages characteristic of all VAZ engines. The most common:
| FAULTS | CAUSES | REMEDY METHODS |
| The engine is unstable or stalls at idle. | Ÿ Broken idle speed sensor. Air leaks through the crankcase ventilation hoses and the hose connecting the intake manifold and the vacuum brake booster. | Ÿ Change the idle speed sensor; replace damaged hoses; Ÿ tighten the hose clamps. If this does not help, check the serviceability of the fuel injection system. |
| The motor does not develop full power. | Ÿ The throttle valve does not open fully. Ÿ Broken throttle sensor. Ÿ The air filter is clogged. Poor quality fuel. | Ÿ Adjust the throttle valve drive; Ÿ change the faulty sensor; Ÿ change the air filter. |
| Increased fuel consumption. | Ÿ Ÿ Fuel leaks in connections. Ÿ Broken injectors and/or ignition system. Increased resistance to vehicle movement. | Ÿ Fill with high-quality fuel; Ÿ check and, if necessary, tighten the fastening clamps. Replace damaged parts; check the operation of the engine control system and fuel injection; Ÿ check the alignment of the front wheels, the operation of the brake system and the tire pressure. |
Purpose of piston rings
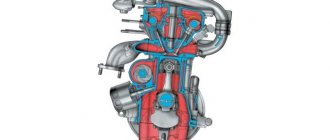
We will not go into detail about the principles of operation of an internal combustion engine. We will only touch on the issue of connecting the pistons and the engine cylinder. As you know, it is airtight. However, the pistons easily slide along the inner rings of the cylinder, preventing gases from the above-piston space from penetrating into the gap between the two surfaces into the crankcase of the unit.
However, some gas leakage still occurs even on a fully functional engine, but with high-quality rings it is an acceptable norm and cannot in any way affect the operation of the unit. When these piston parts wear out significantly, the amount of gases entering the crankcase increases.
But there is another purpose for performing a number of such functions:
- hermetic connection between the surfaces of the pistons and the cylinder walls;
- ensuring the required amount of oil on the cylinder walls and preventing it from entering the combustion chamber;
- The rings conduct heat from the pistons to the cylinder walls, which prevents overheating and corrosion.
It is not difficult to guess that the pistons perform their task under extremely aggressive conditions. On the one hand, these are extreme temperatures that arise during the operation of the unit. On the other hand, there are conditions of oil starvation in the upper part of the piston. These problems are solved by selecting materials for all types of rings and their different shapes.
But if the engine has average power, then regular, cheaper wide rings will be sufficient.
Inserted pistons on the previous 16 valves - comparative characteristics
Now I would like to talk to you about the comparative characteristics of the insert pistons described above:
Pistons produced in Togliatti by STI at Priora, unlike others, are manufactured by hot pressing. According to reviews from those who have already installed such pistons on Priora, they significantly reduce engine efficiency.
This is due to the lower compression ratio (18) compared to STK and Avtramat pistons and the larger combustion chamber area due to the deep valve grooves. The reduced silicon content in the alloy affects the strength of the piston under temperature loads, and nickel reduces its service life.
Having the disadvantage of the indicated higher cost, the forged piston STI loses to the Avtramat and STK. At the same time, there were cases of the camshaft drive belt breaking on Priors with STI pistons.
Replacing piston rings
On VAZ cars, as well as on all other models of passenger cars, it is advisable to change only the piston rings only if:
- there is no exhaust in the cylinders;
- there are no signs of damage to their inner surface.
If the liners are significantly worn, they need to be bored, and if the last size was already used before, the cylinder block needs to be relined. You can replace the PC on any VAZ engine without removing the internal combustion engine; this will require removing the cylinder head and oil sump. PCs are replaced if the gap at the joints does not exceed 1 mm.
For example, let's consider replacing piston rings on a VAZ-2114 car with an 8-valve internal combustion engine; such work must be carried out on a pit or a car lift:
- turn off the ignition, put the gearbox in neutral, disconnect the negative terminal from the battery;
- drain the antifreeze, remove the air filter housing along with the pipe (injector corrugation);
- remove the valve cover, camshaft, loosen the timing belt and move it to the side;
- disconnect the wires and cooling system pipes from the cylinder head, unscrew the head bolts;
- unscrew the nuts of the exhaust pipe of the muffler;
- We completely free the cylinder head from all fasteners that prevent it from being removed, and we remove the cylinder head;
- if there is protection under the engine, remove it;
- place a container under the engine sump, unscrew the plug on the crankcase, drain the oil;
- remove the lower hatch of the gearbox housing (three bolts);
- Using a 10 mm wrench or a socket wrench, unscrew all the oil pan bolts;
- dismantle the pan, remove the oil receiver;
- Unscrew the connecting rod nuts, remove the lower connecting rod caps, and carefully knock the pistons and connecting rods upward. Pistons should be knocked out through a soft metal drift or through a wooden block. First, you need to carefully knock out the connecting rod bolt without damaging the threads on it, then place the drift on the end of the connecting rod - in no case should you hit the bearings or the seat underneath them;
- It is recommended to remove the connecting rods one at a time, and immediately attach the caps to them; the caps should not be confused with each other, they are placed back strictly in their places, and a lock to the lock is required;
- remove the PC from the pistons, use a piece of the old ring to clean the piston grooves to bare metal. Be sure to check the cleanliness of the groove all around; there should be no coke left in it;
- We install new rings in the grooves, start with the lower MPC, then install the middle compression PK, and lastly the upper one. For installation, you can use a special device, but it is still more convenient to install the rings by hand. If the MPCs are cast iron, they cannot be bent along their axis, they can only be carefully moved apart. Compression rings also need to be bent carefully, to a minimum;
- we install the piston in place using a special mandrel, hammer it in with a wooden hammer handle or a brass or bronze drift;
- We install one piston-rod at a time, and immediately attach a connecting rod cap to each one. The connecting rod nuts should be tightened with a torque wrench, force - from 4.5 to 5.5 kg;
- then we put everything in place - the oil receiver, the engine sump, the cylinder head. We fill the radiator with antifreeze, oil into the crankcase, and start the engine to check. After replacing the PC, the internal combustion engine may initially smoke and consume oil - the engine needs to be run in for approximately 2 thousand km. It happens that despite the seemingly normal condition of the liners, the internal combustion engine continues to smoke even after replacing the rings after break-in. In this case, you will have to bore the cylinders and install a repair piston group.
Installation
1. Thoroughly clean the piston from carbon and deposits. We inspect the piston, connecting rod and pin. Cracks on them are unacceptable.
2. We select new rings in accordance with the class of the piston (see paragraph 5 “Piston and connecting rod - replacement”).
Note. There are no markings on the piston rings of the nominal size; repair piston rings are increased in diameter by 0.4 or 0.8 mm, and are marked “40” and “80”, respectively.
3. Before installing new piston rings, use a set of feeler gauges to measure the gap between the piston ring and the wall of the piston groove into which the ring will be installed.
If the gap exceeds the maximum permissible, the piston must be replaced.
Oil control piston ring.
. and install the upper compression ring with the words “VAZ” or “TOR” facing up.
We orient the lower compression ring so that its groove is directed downwards.
4. We put the piston rings on the piston as follows: by spreading the piston ring lock (no more than is required to put the piston ring on the piston), we first place the lock on the piston, and then the back part of the piston ring.
We install new piston rings on the piston, starting with the oil scraper ring expander. After installing the oil scraper ring, the expander lock must be rotated 180° relative to the piston ring lock.
After installing the piston rings on the piston, we rotate them with locks so that the upper compression ring lock is located at an angle of 45° to the piston pin axis, the lower compression ring lock is rotated 180°, and the oil scraper ring lock is 90° relative to the upper compression ring lock.
5. Lubricate the piston, rings and cylinder surface with fresh engine oil.
6. We put the mandrel on the piston and compress the rings with it, periodically lightly tapping the mandrel with the handle of a hammer to self-install the piston rings.
7. We wipe dry the beds of the connecting rod bearings in the connecting rod and the cover and install the bearings in the lower head of the connecting rod.
Note. The selection of connecting rod bearings for the crankshaft journals is shown below (see Table 8.1.34). If the crankshaft has not been bored, then it is advisable to replace the connecting rod bearings with new ones of the nominal size.
8. Lubricate the inner surface of the connecting rod bearings and the connecting rod journal of the crankshaft with clean engine oil. By turning the crankshaft, we move the journal to its lowest position.
9. Install the piston on the block and orient it so that the arrow on the bottom of the piston is directed towards the crankshaft pulley (see “Piston and connecting rod - replacement”).
10. Pressing the mandrel against the block and tapping the piston bottom with the handle of a hammer, we recess it into the cylinder, while simultaneously monitoring the movement of the connecting rod to the crankshaft journal.
11. Install the cover on the connecting rod and tighten the nuts to a torque of 43.3-53.5 Nm (4.4-5.5 kgf-m).
Warning. The connecting rod caps are not interchangeable. The connecting rod and its cover indicate the number of the cylinder in which the connecting rod must be installed. On the assembled connecting rod, the numbers should be located on one side.
12. We replace the piston rings of the other three pistons in the same way.
13. After installing all the pistons, we assemble the engine in the reverse order of disassembling it.
Despite the fact that the work of replacing oil scraper rings on VAZ cars is considered quite labor-intensive and difficult, you can handle it yourself. Of course, in order to replace the rings on a VAZ 2110, you will have to complete many successive steps. The final quality of the work will depend on the quality of the intermediate stages.
What are oil scraper rings
Another name for such rings is piston rings. It was not given by chance - such rings are usually installed on the outer surface of the pistons so that the open-shaped rings are deeply seated in special grooves.
Due to the frequent interaction of piston rings with gases and components made of various materials, accompanied by the impact of enormous friction, the rings wear out. In this case, they must be replaced as soon as possible. Otherwise, the oil scraper rings will no longer be able to perform the necessary functions.
So, in normal condition, the rings protect the piston from overheating and improve heat transfer through the cylinder walls. Rings also help to increase the level of tightness of the combustion or expansion chamber, preventing various gases from entering the crankcase. In addition, thanks to piston rings, it has become possible to optimize lubricant consumption - the rings distribute an oil film over the surface of the cylinders.
Rings in a worn state can no longer cope with their functions, which negatively affects the performance of the car. Even an inexperienced car enthusiast can notice that something is wrong - wear on the piston rings can cause the gases coming out of the exhaust pipe to turn a characteristic bluish color and reduce the engine compression rate. Most often, the most noticeable signs for a motorist are a significant and causeless increase in fuel consumption, as well as a significant increase in oil consumption. In cases where all these signs are observed at the same time, there should be no doubt - the rings need to be changed as soon as possible, no other measures will help in this situation.
The oil scraper ring consists of:
- Two steel discs
- Radial expander
- Axial expander
Regarding the installation of set ring discs, there are many opinions on which side to place the disc on the piston, top or bottom.
Let us explain what we are talking about. If you hold the oil scraper ring disc between your index finger and thumb and squeeze it a little, it will either rise up or down.
For example, when assembling Japanese engines (gasoline), the rings from the factory are positioned like this - the upper ring (disc) bends upward, and the lower one bends downward. If you follow American technology, then, for example, a Lincoln Navigator engine from the factory has both rings down. ZMZ plant - both rings up.
The manufacturers of dial-type rings themselves do not provide any instructions regarding the installation of dial-type discs, and then the most reliable way to install them is to repeat the factory assembly. This is acceptable for engines where the rings are being replaced for the first time, and the “original” rings are still in place.
Engine piston rings
In an internal combustion engine (ICE), piston rings (PR) serve as a seal between the cylinder walls (liners) and the piston, due to which compression is created in the cylinders. If you forget to put the PC into the engine during assembly, the engine will not start, since the necessary compression of the working air-fuel mixture will not be ensured.
In passenger cars, three rings are standardly installed on each piston - two compression rings and one oil scraper ring, and oil scraper rings can be stacked, that is, consist of several elements. Compression piston rings (CPRs) are used to create compression in the cylinders and are always made of high-strength cast iron with various additives. The upper CPC has the greatest strength, since it operates in the most severe temperature conditions and experiences maximum loads.
Engine oil piston rings (OPRs) are needed to drain oil from the cylinder walls; if the rings do not perform their function, the engine will consume oil. MPKs can be either cast iron or steel, and cast iron PCs are almost always made in one piece, but steel oil scraper rings can only be assembled (composite). Steel MPC for one cylinder consists of:
- two spring steel rings;
- axial expander;
- radial expander.
Selection of spare parts
Before going to the store, you need to roll the car out to a bright place or use a flashlight for work. You need to open the engine compartment cover (hood), approach the car from the left front fender and carefully inspect the left vertical wall of the cylinder block. It is there, in the very center, that the capital Latin letter should be located, indicating the class of the motor.
If the letter is not visible, it means the engine is dirty. You need to clean the surface of the power unit from dirt using a sandblaster and look again. If after this the letter does not appear, it means that it was “eaten” by corrosion. In this case, before going to the auto store, you need to purchase a bore gauge and use this tool to measure the actual dimensions of each cylinder. It happens that some craftsmen do not bore all the cylinders during a major overhaul.
Class A engines that have not been overhauled or bored have cylinders with a diameter of 79 to 79.01 mm, class B - from 79.01 to 79.02, class C - from 79.02 to 79.03, class D - from 79 .03 to 79.04, class E - from 79.04 to 79.05 mm. The original pistons for these blocks have diameters of 78.93, 78.94, 78.95, 78.96 and 78.97 mm, respectively. These are approximate figures, since in reality there is a tolerance of 9 thousandths of a millimeter.
Table of dimensions and tolerances of VAZ classic engine parts
Spare parts stores supply cast pistons of classes A, C and D, intended for unbored engines. Forged pistons for the VAZ 2106 are made to order and come in any size. The main repair dimensions of the VAZ 2106 engine cylinders are 79.4 (first bore) and 79.8 mm (second bore). Piston diameters for the first boring depending on the class (in millimeters):
Piston diameters for the second boring:
It should be noted that pistons are also divided into 3 categories based on the diameter of the piston pin hole, so new pistons must be purchased complete with pins. It is very difficult for a non-professional to distinguish a bored block from an unbored one, so if you are doing major engine repairs yourself, you must definitely purchase a bore gauge, and if this is not possible, then at least take old parts with you and compare them with store-bought parts.
Engine wear
The main question of this article is whether driving at low speeds leads to premature wear of the engine? And what modes are the most “wear-inducing”. The organization of expert tests is, in general, clear. The engine is the same: a VAZ eight-valve engine. A stand, equipment, gasoline and several cans of oil - each test cycle requires its replacement. The task is simple - you need to “travel” the same distance, at the same speed, but using different engine operating modes. In different gears... How to achieve this? You can drive at the same speed, maintaining engine speeds of 1500, 2500, and even 4000 rpm
The higher the speed, the lower the gear; it is important that the power produced by the engine is the same. This is easy to do at the stand - we measure the torque using a dynamometer, the speed is known - therefore, we know the power
We multiply “speed” by engine hours, which we also record – that’s the mileage. With wear it is more difficult - every time, after running the engine at a fixed time for a given time, the engine will have to be disassembled and weighed the main parts that form the friction units, these are bearing shells and piston rings. Plus, there is additional intermediate control, which we will carry out by determining the content of wear products in oil samples. If they found chromium, it means that the first piston rings are wearing out; found iron - cylinders and shaft journals; tin has appeared - it will determine the wear rate of the bearing liners (since it is part of the anti-friction layer); aluminum is a consequence of wear on the pistons and camshaft bearings. The engine worked at the specified constant modes with approximately the same power, 50 hours each. Not much for the resource, but we get wear rates, and then by simple extrapolation we estimate the approximate service life of the motor. At the same time, the engine speed during the test cycles varied from 1200 to 4000, that is, more than three times. And then the load on the motor was increased - and the cycle was run again. And then - more... The result was a voluminous table, where for each point of the regime its own wear rate was recorded, and divided by units - bearings and rings.
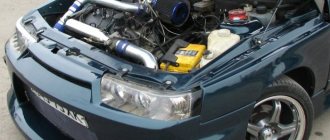
Lada 21099 Nasty Girl › Logbook › Lightweight Avtramat 21124N pistons. Review
Greetings dear readers! There was no news from me for a long time. The fault, as always, is winter and the fact that after overcooking the sills, I didn’t drive the car, but put it in the garage for the winter so that I could paint it when the weather warmed up. And since I don’t drive a car, there’s nothing to write about it.
This blog will cover 2 topics, one sad, the other useful! In order not to prolong the introduction, I will say right away that my garage was opened and robbed by unknown but very skillful individuals. Those who know me personally know that there was a lot of interesting things in the garage, and tools and equipment and spare parts, tuners, in general, Plyushkin bought and saved everything. Now there is nothing valuable left in the garage; everything has gone to the new owners. The car was not touched, thanks for that. In our city, such episodes are not uncommon, and there is little hope of identifying the attackers. The garage cooperative is located on the outskirts of the city, there is no security, lighting or fencing, so even wild animals are afraid to walk there at night. I am not discouraged, although this incident completely unsettled me.
But let’s not talk about the bad, let’s talk about the good, about reducing friction losses and what this affects. And how to increase the power of a 124 engine without resorting to buying tuning spare parts? The most revealing example of factory engine tuning is a comparison of the running characteristics of engines 21124 and 21126. With absolutely identical volumes, crankshafts, cylinder head and camshafts, the Priora drives noticeably more cheerfully throughout the entire speed range, well, except for the very bottom.