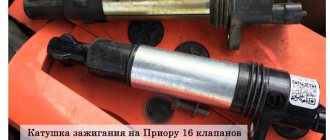
Priora error codes: complete vehicle diagnostics
Their main problem is that if some sensors are turned off, the car will not disrupt its operation and can continue to move unhindered. However, the breakdown itself can be detected much later, when the negative consequences of disconnecting the sensors become apparent.
Depending on which sensor fails, fuel consumption may increase sharply, and some malfunctions in the operation of the car’s engine may also occur. In addition, a common “symptom” of sensor disconnection can be accelerated wear and tear of some elements in the car.
In order to check for certain errors on the Priora, you can use a special controller, which is built into the car specifically for this purpose. Thanks to this controller, you don't have to go into the engine compartment with a multimeter to look and identify the problem.
This controller is connected to a special tester, which is connected by manufacturers to the on-board computer. It won’t take much time to perform a full check of the car for any malfunctions in the operation of systems and sensors. You can start the process by pressing two buttons, and then all that remains is to correctly decipher the error codes.
Diagnostics with ELM-327 scanner
Thanks to Chinese engineers, car diagnostics have become much easier and cheaper. Not long ago, a universal internal combustion engine scanner appeared on Chinese websites, which is suitable for almost all cars with OBD-2 connectors.
The ELM 327 scanner on the AliExpress website costs from 5 to 10 dollars, depending on the version.
This gadget is divided into two types and you should pay special attention to this when purchasing. ELM 327 works with our domestic cars only on version 1.5. Therefore, you need to purchase an ELM-327 v1.5 scanner. If you purchase version 2.1, then work with domestic cars is not guaranteed.
It should also be noted that this scanner only works in conjunction with a smartphone. If you have an Android smartphone, then you just need to buy a scanner with Bluetooth only.
If your smartphone is based on iOS, then you need to purchase a scanner with a Wi-Fi module, since Apple smartphones do not allow connecting third-party devices via Bluetooth.
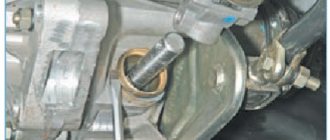
Rough road sensor - replacement
The rough road sensor is mounted on a bracket and attached to the right mudguard of the body.
Removal
1. We prepare the car for work.
2. Squeezing the loops of the latch, disconnect the wiring harness block from the sensor.
3. Using a Phillips screwdriver, unscrew the two screws securing the rough road sensor to the bracket and remove the sensor.
Installation
Install the sensor in reverse order.
The process of diagnosing a car using a tester or a connected computer
Much more accurate and reliable data when checking a car for malfunctions can be obtained if you use separately connected equipment. But the introduction of such tools and devices gives encrypted readings, therefore, in order to correctly understand and find all the faults in the car, you need to decrypt the data received from diagnostic devices. Of course, manufacturers could have done things easier for Russian-speaking car enthusiasts. It would be possible to write “replace the canister valve” on the device screen after diagnostics, but instead, only a code in the form of p0441 can be found on the display, and code p0130 will appear only due to problems with the oxygen sensor.
But the problem is that Lada Priora is produced not only for the domestic market, it is also produced for sale in other countries. Therefore, such a classification of automobile problems and their code on the testing device was created.
It is easier to enter only a certain number of universal codes into the program than to enter your own language data for each national market . As a result, you can look at a specific code on the display and easily determine the essence of the problem in the car using a list that lists all encrypted codes. A special code is used to indicate error codes on the Lada Priora car. This cipher includes:
- letter fault code;
- digital code for the location of a malfunction in the vehicle design.
On the Lada Priora, all gap codes in the vehicle's operation will have five digits. Here is a complete list of Priora designations. The first character of the code will be a Latin letter. The letter “P” indicates problems with the engine, or more precisely with its electronic system. The letter “B” indicates problems with the interior electronics.
The letter “C” is present on the screen only if there are failures in the electronic system of the vehicle chassis. If combined errors occur in several operating systems of the vehicle, the letter “U” will appear on the display. The letter designation is followed by a number.
The zero indicator is indicated by the OBD-2 code. Numbers 1 and 2 show the company code, and the third digit is responsible for the backup code. The subsequent set of numbers conditionally shows the place where errors were detected during diagnostics. A zero code indicates the exhaust system. Number 1 indicates the fuel system, number 2 indicates the air supply system.
If there is a malfunction in the ignition, then the number 3 will appear. If there are problems with additional control, the number 4 will appear. If there are malfunctions in the idle speed, then the number 5 is responsible for this, and if there are problems in the ECU, the number 6 will appear. Numbers 7 and 8 are associated with the transmission In the general code, the very last two digits indicate the error number in the operation.
Useful video
You can learn more about how the scanner works in the video below:
In conclusion, it should be noted that using elm327 for the VAZ 2114 you can significantly save on car diagnostics and fix problems immediately after they appear (either on your own or at specialized service stations).
Computer diagnostics is a complex process. Even now, many people prefer to trust it exclusively to specialized service stations with appropriate scanning equipment.
Autonomous scanners allow you to identify all faults in the electronic and mechanical systems of a car quickly and completely.
The problem is the cost of the service. It is high and not accessible to everyone. Not even all auto repair shops provided such a service. Repairs, therefore, were most often carried out the old fashioned way - using the “scientific poke” method.
Features of diagnosing VAZ and LADA cars using auto scanners
Reading time
Difficulty of the material:
Most modern Russian cars of the VAZ and LADA family are equipped with an electronic control unit, as well as an on-board computer. Thanks to such electronics, the use of diagnostic equipment is becoming increasingly important.
The presence of all kinds of sensors on important components (engine, electrical, gearbox) allows you to monitor parameters, as well as accurately determine the type of malfunction. All information read by such sensors is sent to the ECU, then the data is converted into numbers using standardized protocols and transmitted to diagnostic equipment via the OBD2 connector. Then, using the software, the parameters and values of the sensors are displayed on the external display.
The OBD2 diagnostic adapter reads and deletes errors , and depending on the capabilities and cost, such a car scanner can solve other problems, including chip tuning.
In this article we will consider and select suitable scanners for diagnosing VAZ cars, as well as programs for them. In addition, we will familiarize ourselves with the theory and provide recommendations for performing independent self-diagnosis.
Regularity of auto diagnostics
It is recommended to periodically, but at least once a quarter, carry out computer diagnostics of your car.
Lada Priora wagon 2012, engine Gasoline 1.6 liter., 98 hp, Front drive, Manual — electronics
Comments 63
Hello. The Priora won't start. The starter turns. Is it possible to read errors using elm327 only when the ignition is on?
no only with it on
I understand that you have it constantly connected?! It just sticks out there in the plug, but the glove compartment closes properly?
why constantly, no, when there is a need then I connect
I practiced on three Open Diagram machines today! Showed only one truth! At four stationary speed the speed showed 67 km/h, the mains voltage was 7 volts. On the Priora the injection time was 78 ms. Does anyone know what is the reason for the incorrect readings?
Question for software developers. Make screenshots of the survey in OpenDiag too. THE RESULTS ARE MANDATORY FOR PUBLIC VIEW.
Where's the fuel consumption?
He exists, he cannot but exist!
Average? Or current
Install and see everything!
So I’m wondering if it’s worth it) otherwise when something is not on the screen you remember the old
The best advice is to try it yourself and post your results!
Hello, is it possible to use opendiag to make all doors open at once using the remote control?)
Will it work on Android?
Avtolubitel01
Hello, is it possible to use opendiag to make all doors open at once using the remote control?)
But it doesn’t work with the standard key, or what? it seems simple there.
I have a switchgear))) only for diagnostics)) I went to different specialists twice, they said the comfort unit is being repaired)) it does not record the ban on separate door unlocking))
I also bought a 327 adapter. I tried a bunch of programs for Android and couldn’t find one that worked properly. And I think using a mobile phone as a BC is tantamount to feeding a pig pineapples) And BC is still more convenient than an adapter-phone bundle. By the way, for a neighbor on a grant, plugging the adapter into the connector turns off the electric power steering.
Diagnostics of VAZ (LADA) cars
Is it necessary to devote energy to finding electrical problems in car services, order a tow truck, plus an endless wait for diagnostics at a service station. In fact, we detect breakdowns in the electrical equipment of a VAZ car right at their location. This greatly reduces the time needed to repair faults. Diagnostics of electrical equipment of LADA passenger cars is the defining direction of our technical assistance service! In 90% of cases, we identify breakdowns and glitches of the car right on the highway!
Car scanner ELM327 - description, instructions and reviews
pages:
- ➡️ How the ELM327 diagnostic scanner works
- ➡️ Scanner characteristics
- ➡️ Review of scanner models based on ELM 327
- ➡️ Features and functions of the ELM 327 scanner
- ➡️ Instructions based on the example of Scan Tool Pro Bluetooth
- ➡️ Car list and compatibility
- ➡️ Reviews, summing up, what to buy
ELM327 Bluetooth (Wi-Fi or USB) car scanner is a device designed for scanning and diagnosing vehicle parameters , detecting faults, reading and correcting problems in the computer and engine. The device operates via a smartphone or PC. Also, such scanners monitor the condition of sensors, engine and other components interacting with the on-board computer or control unit (ECU) of the car.
Self-diagnosis has become a trend in recent years. ELM327 Bluetooth scanners for car diagnostics gained popularity in 2015-2018.
The main reason for the demand for Bluetooth adapters for car diagnostics in Russian is the cost savings on car maintenance, since such a service at a service station costs from 500 rubles to 8,000 rubles, depending on the malfunction, so the device pays for itself in 3-4 visits to a car service center.
This article provides an overview of the ELM327 Bluetooth car scanner - prices, models, manufacturers, reviews, as well as characteristics, photos and videos, describes the principle of operation of the gadget, and provides detailed instructions.
Attention:
All reviews are real, you can read them yourself on the site. Comments are also presented at the end of the article and on the official website.
About the elm327 scanner “SCAN TOOL PRO” on the DRIVE2 auto portal:
Device and diagnostics using a wireless Bluetooth auto scanner
Before you buy an ELM327 Bluetooth adapter, let’s get acquainted with the technical side of the issue and consider everything in order. What are ELM327 auto scanners? In fact, this is the name of the microcircuit. The controller was developed by the Canadian company ELMEelectronics. The internal architecture of the chip reads and converts protocol data from cars of any brand into a code that is decrypted by the program.
To read information, you need to receive it and then convert it; this is exactly why you need an OBD II controller - a “bridge” between the on-board computer/ECU of the car and the adapter ver. 1.5 ELMЗ27.
Types of ELM327 auto scanners and which one is better to buy
Before you buy an ELM327 Bluetooth, you need to know in advance its firmware number, protocol, and also what you plan to use to scan the car. If you have a smartphone on Android or iOS, then you can purchase a wireless option: the elm327 bluetooth or Wi-Fi auto scanner. If you don’t have a smartphone, it’s safer to use a USB device via a computer.
The table shows a list of modifications of diagnostic wireless adapters for cars, as well as a version with a wire. It’s not difficult to navigate the OBD II ELM 327 adapter models; the names speak for themselves.
No. Models of the diagnostic auto scanner ELM327 Functions of the diagnostic auto scanner ELM327 Bluetooth Data transfer List of cars By protocol Scanner firmware
| 1 | Wi-fi ver 1.5 mini | Read further in the article | OBD2 | ver 1.5 | Bluetooth |
| 2 | ver 1.5 mini USB | Wi-Fi | |||
| 3 | ver 1.5 mini Bluetooth | USB | |||
| 4 | Other analogues of auto scanners with firmware version ELM327 2.1 |
It is important to know:
Firmware version 2.1 is a modification of the microcircuit version 1.5, but it was not made by the developer, so for error-free compatibility, it is recommended to buy a scanner version 1.5.
Autodiagnostics and review of modern Scan Tool Pro scanners in Russian
In the Russian market of equipment for car diagnostics, elm327 Bluetooth scanners have become very popular: Scan Tool Pro, Smart Scan Tool, Roadgid S6 Pro, Vgate.
The models are translated into Russian, as is the software for them. The diagnostic scanner is based on the ELM-327 chip, and the data is transmitted via the OBD2 protocol.
Models are sold with Bluetooth or Wi-fi support.
Before you buy a scanner for car diagnostics, Scan Tool Pro, read a detailed review of the device on our portal, or follow the link to the official website to order and check compatibility.
The process of diagnosing a Lada Priora car using an on-board computer
First of all, you need to know how to reset the parameters using the button to reset all daily mileage indicators. It is located on the instrument panel. You must press this button and, while continuing to hold it, you must simultaneously turn on the ignition using the key. Using these steps, you will be able to see all the error codes that have occurred and are available. Before displaying a list of error codes, the vehicle's autonomous self-diagnosis is enabled.
At this time, at the beginning of the diagnostic process, all arrows on sensors and instruments should show a jump from the minimum to the maximum indicator, at the same time at this moment all the necessary indicators and errors for checking the car should be shown on the liquid crystal display.
If at this moment any arrow does not show the correct movement or any position on the display does not appear, then you need to check the sensors and systems of the car for errors. Also, do not forget to check the display itself for faults, because A situation is possible when the car is working correctly, but errors are shown on the display solely due to the separation of any contacts.
Now, in the same mode of self-checking the car, you need to double-click any button that is responsible for switching the operating mode of the on-board computer. After these steps, certain numbers should appear on the on-board computer’s LCD screen. These are the Lada Priora error codes.
Error code
Decoding
Recommendations
Comments 23
For diagnostics and error resetting, I am considering this option for the LAUNCH Creader VI scanner, it costs from $100. USA. motorstate.com.ua/item/LAUNCH-CREADER-VI It seems to me a serious alternative)) Yes, it is completely Russified.,
It all depends on the ECU.
shtat matrix rules)))
If only for diagnostics, then take ELM and not necessarily with bluetooth, the free OpenDiag program works great with the cable.
In short, should you take the “Mini ELM327 OBD2 OBDII V1.5 Bluetooth Diagnostic Interface Scanner”?
On older K-LINE priors, the CAN bus (ELM adapter) also works fully. On the new Priors, K-LINE was removed and only CAN was left. so only ELM will do. In general, you can look at what kind of ECU it is and go from there.
As for ELM, you’re unlikely to find free, adequate software for Windows. So if you take ELM, then only bluetooth to connect to a tablet or phone.
Priora norm 2012 with abs, power steering, e gas, some kind of Bosch)
buy a regular k-line adapter with auto-connect. I’ve been working with it for a year now and can connect to everyone without any problems.
Like any modern car, the Lada Priora is equipped with dozens of various sensors, the functioning of which determines the condition of the main vehicle systems. Diagnostics of the machine for errors allows you to detect all sensor faults in order to eliminate breakdowns. Now you will learn how Priora error codes are deciphered and how to independently diagnose the on-board computer (hereinafter referred to as BC).
How is self-diagnosis performed?
We have sorted out the main errors on the Priora, now it’s worth finding out how self-diagnosis is performed. The VAZ 2170 with 16 valves has a special controller with which diagnostics are performed. If you have an on-board computer installed, then diagnostics are performed on it. There is also special equipment that allows for a more in-depth check of Priora 16 class systems.
Since most Priora 16 cars already have an on-board computer, we will consider the option without the use of special devices. Diagnostics begins with activation of the test mode. The work proceeds according to the following scheme:
- Turn off the ignition. Now we hold down the daily mileage reset button, without releasing the button, we start the ignition of the Priora 16 cl;
- On the instrument panel you will see a display with an indication. After turning on the ignition, all components of the instrument panel will light up. The needles of the temperature, speedometer, tachometer and other instruments will begin to move to the maximum level and back. This behavior indicates that self-diagnosis has begun;
- Let's move on to the right steering wheel switch. Here you will find a button for switching the on-board computer settings. Click on it, a message with the software version will appear on the instrument panel screen;
- The instrument panel error diagnosis will begin if you press this key again. Various codes will appear on the display, which you can decipher in the table below;
- When the diagnostics are complete, you can reset the error data. Press and hold the daily mileage reset button for about 5 seconds.
Video diagnostics with ELM scanner
There are two proven methods for finding problems on this modification of the car. Each has its own advantages and disadvantages.
Self-diagnosis using on-board computer
This method does not require the user to have additional equipment. All the necessary systems are already installed inside the machine. The processing sequence looks like this:
- Find the odometer reset key on the daily mileage;
- While holding the button, turn the ignition key.
If everything is done correctly, all the lamps on the dashboard will light up, the arrow indicators will make a full revolution and drop to the “0” position. In this way, the functionality of all vehicle systems is checked. If there is no response from any indicator, you need to check the circuit following the indicator. To more accurately determine the source of the problem, you can, in the same mode, press the mode scroll key to the “error codes” position, which in 90% of cases provokes the appearance of one of these indicators:
- 2 – short circuit or high voltage flow on the BS;
- 3 – the fuel level sensor in the gas tank is covered;
- 4 – antifreeze temperature sensor has burned out;
- 5 – error of the sea thermometer;
- 6 – severe overheating of the internal combustion engine;
- 7 – you need to check the oil level – the pressure has dropped;
- 8 – failure or jamming of the calipers, the pressure inside the line has dropped;
- 9 – battery “died”;
- E – failure or violation of the integrity of the EEPROM data packet.
To exit the menu, you must leave the on-board computer alone for 30 seconds. The main disadvantage of the method is its mediocre accuracy. The light only shows a broad problem in the design of the entrusted part of the machine. Thus, to more specifically identify the problem, you will need to resort to the following technology.
Checking via connected unit
Modern computers connect to the car's network via a diagnostic connector. The block is located inside the cabin, under the dashboard on the front passenger side. To work you will need a laptop or PC with the necessary software. After establishing a stable connection, an error code will appear on the unit’s display, explaining why the machine is acting up.
Standard codings were developed due to the sale of cars for export. It is inconvenient for the manufacturer to program each ECU for a different language. The standard cipher consists of 5 characters, each of which is responsible for a narrow range of information. One of these elements always comes first:
- P – malfunction of the power plant electronics;
- C – chassis electronics failure;
- B – problem inside the cabin;
- U – synchronization of two or more circuits is disrupted.
Next comes the first digit:
- 0 – OBD 2;
- 1/2 – enterprise code;
- 3- reserve
The data indicates a malfunction. The following indicates the serial number of the circuit containing the breakdown:
- 0 – exhaust gas system;
- 1/2 – fuel/air supply;
- 3 – ignition distribution system;
- 4 – additional control;
- 5 – violation of idle speed;
- 7/8 – gearboxes, differentials and drive axles.
The last two indices indicate the serial number of the breakdown.
Programs and applications used
Software that can be used for diagnostics is widely available. The portable diagnostic device Scan Tool Pro or any other OBD2 adapter without its own external environment is capable of working both through a smartphone (Anroid, iOS) and through a laptop running Windows OS.
Common and popular programs for diagnosing VAZ and GAZ are currently:
• OpenDiagPro. Designed for cars with an injector. It monitors not only all the main digital and graphic parameters of the power unit, but also indicates ECU errors. There is a version for PC and smartphones, used for diagnostics via 16 pin OBD2. • Diagnostic Tool v1.31.2 - functional program, a huge number of adjustments. Works via KLine (VAG adapter cable). Only the version for computers and laptops is distributed. • Standard My Tester VAZ program, used when the vehicle leaves the factory. Also suitable for diagnostic operations. PC version only. • The KWP_D program makes it possible to check all brands of domestic cars, a number of popular foreign cars, and their power units. Desktop version only. • The AVTOVAZ New program is also of interest to users. It helps to audit fuel injection, control the operation of injectors and the fuel pump. PC version only. It also works via KLine (VAG).
Types of equipment used to check LADA
A list of diagnostic devices used not only in specialized car services, but independently, for example, in a garage. • Odometer correctors, with setting mileage values; • Models that support protocols, by reading information, erasing errors, codes are deciphered: ELM327 USB / Bluetooth / Wi-Fi running on the elm327 chip; • Vag adapter (cable) for later versions of the ECU and 12 pin pads; • Testers whose work is organized on the basis of oscilloscopes.
Diagnostic devices that support combination with ABS and SRS units, as well as using a CAN bus, are in demand.
Modern popular models
The best diagnostic scanners compatible with the VAZ have been selected for review. We pay attention to the following samples:
Scan Tool Pro
Scan Tool Pro is a compact adapter without an external environment, built on a universal microprocessor elm327 (basic) Chip version v.1.5 (PIC18F25k80). This diagnostic OBD2 scanner is used in conjunction with a laptop or smartphone; it has Wi-Fi and Bluetooth versions.
The device is practical and reliable, so it is sold out from official dealers very quickly. Reviews for this adapter are mostly positive, but it is difficult to purchase due to the shortage of original versions. Supports all common protocols and car brands.
Scan Tool Pro - budget multiscanner
A good choice for a novice diagnostician. New 2020
Nowadays there are scanner models with different versions of firmware and chips on sale. Scan Tool Pro with firmware 2020 is the most stable version so far, and also has maximum compatibility with cars manufactured since 2001 (Russia, Asia, Europe, States). You can buy Bluetooth scanners for car diagnostics of the Scan Tool Pro brand from an official dealer who provides a 12-month warranty using the link on the right. Happy diagnostics!
Launch Creeder VII
Launch Creeder VII. A semi-professional tool for self-diagnosis of modern engine control systems and ECUs. Suitable for domestic cars equipped with an electronic control unit. There is an external display and built-in software.
Coolant temperature sensor - removal, check, installation
To complete the work you will need:
— multimeter (in voltmeter mode, ohmmeter with a measurement limit from 100 Ohm to YukOhm);
— thermometer (with a change limit of at least 100 °C);
- a small heat-resistant container with a volume of about 0.5 liters for water;
- about 0.3 liters of water, heated to boiling temperature.
The thermometer can be replaced with a digital multimeter with thermometer mode.
Removal and inspection
1. Drain the coolant.
2. Remove the air filter housing.
3. Release the clamp of the wiring harness block and disconnect the block from the sensor.
4. Connect the negative probe of the engine voltage.
5. Turning on the ignition, use a voltmeter to measure the voltage at terminal A of the wiring harness block (the terminal designations are marked on the wiring harness block).
Comment
The voltage at the terminal must be at least 12 V. If the voltage does not flow to the block or it is less than 12 V, it means that the battery is discharged, the power circuit is faulty, or the ECU is faulty.
Warning!
When the voltage measurement is complete, turn off the ignition.
6. Using a 19 mm spanner, unscrew the temperature sensor and remove it from the thermostat housing. The connection between the sensor and the thermostat is sealed with a copper washer.
7. Connect an ohmmeter to the sensor terminals.
8. Fill the container with boiling water, immerse the working part of the sensor in water and record the readings of the device at a temperature of about 100 °C. As the water cools, we measure the resistance of the sensor at temperatures of 90, 80, 70, 60, 50, 45, 40, 35, 30, 25 and 20 °C.
If conditions permit, readings can be taken at a lower temperature. The resistance of a working sensor should be close to the data specified in Table 9.2.3.
We replace the faulty sensor.
Installation
1. Install the sensor in reverse order.
2. Fill the engine cooling system with liquid.
3. Start the engine and make sure there are no coolant leaks from under the sensor. If necessary, tighten the sensor into the thermostat housing.
Recommendation
If the leak cannot be eliminated in this way, you should reinstall the sensor by applying a heat-resistant sealant to its threaded part, or replace the copper washer.
How to remove and check the sensor
Access from above to the Priora DD is difficult due to the intake module located above it. The easiest way to get to the sensor is from below, first removing the engine protection or at least unscrewing and folding its front part. When working from above, you will have to do everything by touch. In any case, before starting work, it is necessary to disconnect the ground wire attached to the “negative” terminal from the battery.
To remove the crankcase protection, you need to:
- unscrew 5 nuts with a 10mm head;
- unscrew the 2 19 nuts installed on the back of the shield;
- remove protection.
- by pressing the metal latch of the DD connector, disconnect the block of wires going to the controller;
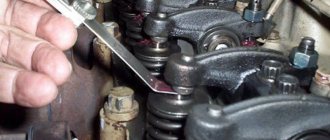
- using a 13mm wrench, loosen the bolt securing the sensor;
- Unscrew the bolt and remove it from the threaded hole, removing the sensor.
- We connect a multimeter to the DD terminals. We set the device to voltmeter mode, choosing a measurement limit of up to 200 mV.
- We take a metal object - pliers or a bolt - and lightly tap it on the DD.
When you tap on a working sensor, the voltmeter will show voltage surges. A faulty DD will not react in any way. A more accurate diagnosis of a removed sensor can only be done using a special stand.
Installation of a new DD is carried out in the reverse order of dismantling. Experts recommend installing a similar Bosch instead of the “native” one. Before going to the store for a new sensor, you should write down the markings of the removed sensor. Tightening the bolt securing it to 13 should be done with a slight force - 10.4–24.2 N m (1.1–2.5 kgf). Tightening too tightly will affect the operation of the sensor.
Problems with engine detonation can occur due to various faults. They are often associated with the operation of the electrical circuit from the knock sensor to the electronic control unit, or with the knock sensor itself. The diagnostic scanner can detect 4 common knock errors - P0325, P0326, P0327 and P0328.
Error code: Troubles and stalls during acceleration, Check light is on... - Electrics - Subaru Impreza Club
Air and fuel system problem codes
P0030 means that the sensor cable, which is responsible for heating the oxygen, has broken. The break is located before the exhaust gas neutralization system. If the cable of the same sensor is shorted to ground, then code P0031 occurs. If the circuit after the neutralizer is broken, the number 6 will appear at the end of the code. Code P0112 is a weak signal from the sensor that is responsible for the air temperature; if there is a strong signal, then code P0113 appears.
If there are problems with a weak throttle signal, then the code P0122 appears, and a strong one - P0123. If there is a problem with the oxygen device, then error P 0130 appears. With P0133, the response to the mixture comes slowly; if error P0134 occurs, the device does not work.
If there is a lot of air in the fuel, then the code is 0171, and if it is 72, there is a lot of gasoline in the mixture. Code P0201-P0204 indicates damage to the injectors and their cables. If there is a code 0217, then the engine is heating up; if it is 0230, there is a malfunction in the fuel pump. With codes from P0261 to P0272, problems need to be looked for in the injectors.
Car scanner ELM327 for car diagnostics: description, functions, programs
A car scanner is a device designed to diagnose various electronic systems in a car. With the advent of car scanners, car diagnostics have become a fairly quick and simple process. Modern car scanners based on the ELM327 controller are very compact, easy to use and provide fairly accurate results.
Using the ELM327 auto scanner, you can identify and eliminate some engine problems at an early stage, which will subsequently prevent serious breakdowns and significantly save the family budget.
It is also worth noting that, unlike classical diagnostics, the ELM327 auto scanner can be used by people who do not have professional knowledge in this field. Due to its ease of use, you can find thousands of positive reviews about this device on the Internet.
Description and main characteristics of the ELM327 auto scanner
A car scanner based on the ELM327 controller is a device that is a diagnostic adapter designed to read information from a car’s electronic control unit and eliminate minor problems in its “brains”.
The ELM327 autoscanner, in particular, can help in solving the following problems:
- Reading the values of engine sensors and other electronic systems of the car;
- Identification of faulty sensors and diagnostics of devices for their correct operation;
- Reading and viewing fault codes;
- Resetting errors in the computer memory (turning off the CHEK ENGINE light).
We will tell you more about the capabilities of the auto scanner below in the review of diagnostic programs.
The ELM327 auto scanner is inserted into a special diagnostic connector, which is most often hidden under the fuse box cover, in the dashboard, or under the driver’s instrument panel. The diagnostic adapter communicates with the car’s computer using the OBD-II (On Board Diagnostic) protocol, but on the Internet it can most often be found under the name OBD2.
The OBD-II standard is supported by almost all American cars manufactured since 1996, and European cars since 2001 (diesel cars since 2004). But sometimes it happens that the auto scanner does not work on cars produced before 2003 - this is due to the fact that not all automakers immediately began to implement this standard.
In order to work with the ELM327 auto scanner you will need a reader with diagnostic software installed. Such a device can be a smartphone or tablet PC running Android, a laptop, or a desktop computer. The software is usually included with the auto scanner.
Depending on the type of execution, connection of the ELM327 autoscanner with a reading device is possible through:
- Bluetooth;
- Wi-Fi;
- USB cable.
Diagnostic connector for Lada Priora
Modern cars, in the event of malfunctions in the operation of the engine or its systems, store errors in the memory of the electronic control unit (ECU). There is a special connector to connect it to diagnostic equipment in the car. The Lada Priora uses a standard European OBD-II connector.
Diagnostic connector Lada Priora OBD 2
Diagnostic connector location
Diagnostic connector location
On Lada Priora cars, the diagnostic connector is located behind the glove compartment (glove box) on the rear wall on the left side. To gain access to the connector, open the glove compartment. Then disengage the glove box latches and lower it down.
Assignment of diagnostic block contacts
Assignment of diagnostic block contacts: 2 - J1850 Bus 4 - Chassis Ground 5 - Signal Ground 6 - CAN High (J-2284) 7 - ISO 9141-2 K Line 14 - CAN Low (J-2284) 15 - ISO 9141-2 L Line 16 - Battery Power
After reading the error codes, they are deciphered using the table:
Kalina/Priora on-board computer errors:
0102 Low level of mass air flow sensor signal 0103 High level of mass air flow sensor signal 0112 Low level of intake air temperature sensor 0113 High level of intake air temperature sensor 0115 Incorrect signal of coolant temperature sensor 0116 Incorrect signal of coolant temperature sensor 0117 Low level of temperature sensor coolant 0118 Coolant temperature sensor signal high 0122 Throttle position sensor signal low 0123 Throttle position sensor signal high 0130 Oxygen sensor signal 1 incorrect 0131 Oxygen sensor signal low 1 0132 Crankshaft sensor signal high 1 0133 Slow response oxygen sensor 1 0134 No signal from oxygen sensor 1 0135 Malfunction of oxygen sensor 1 heater 0136 Short circuit to ground of oxygen sensor 2 0137 Low level of oxygen sensor 2 0138 High level of high signal of oxygen sensor 2 0140 Open circuit of oxygen sensor 2 0141 Malfunction of oxygen sensor 2 heater 0171 Too lean mixture 0172 Mixture too rich 0201 Injector 1 control circuit open 0202 Injector 2 control circuit open 0203 Injector 3 control circuit open 0204 Injector 4 control circuit open 0261 Injector 1 circuit short to ground 0264 Injector 2 circuit short to ground 0267 Injector circuit short to ground sunki 3 0270 Short to ground in the injector 4 circuit 0262 Short to 12V in the injector 1 circuit 0265 Short to 12V in the injector 2 circuit 0268 Short to 12V in the injector 3 circuit 0271 Short to 12V in the injector 4 circuit 0300 Many misfires 0301 Misfires in cylinder 1 0302 Misfire in cylinder 2 cylinder 0303 Misfire in cylinder 3 0304 Misfire in cylinder 4 0325 Open circuit of knock sensor 0327 Low level of knock sensor signal 0328 High level of knock sensor signal 0335 Incorrect crankshaft position sensor signal 0336 Crankshaft position sensor signal error 0340 Phase sensor error 0342 Neither low signal level phase sensor 0343 High signal level of the phase sensor 0422 Low efficiency of the converter 0443 Malfunction of the canister purge valve circuit 0444 Short circuit or break in the canister purge valve 0445 Short to ground of the canister purge valve 0480 Malfunction of the cooling fan circuit 1 0500 Incorrect speed sensor signal 0501 Not correct speed sensor signal 0503 Interrupt speed sensor signal 0505 Idle speed control error 0506 Low idle speed 0507 High idle speed 0560 Incorrect on-board power supply voltage 0562 Low on-board power supply voltage 0563 High on-board power supply voltage 0601 ROM error 0603 External RAM error 0604 Internal RAM error 0607 Knock Channel Malfunction 1102 Low Oxygen Sensor Heater Resistance 1115 Faulty Oxygen Sensor Heater Circuit 1123 Rich Idle 1124 Lean Idle 1127 Rich Partial Load 1128 Lean Partial Load 1135 Oxygen Sensor Heater Circuit 1 open, short circuit 1136 Rich mixture in Light Load mode 1137 Lean mixture in Light Load mode 1140 Measured load differs from calculation 1171 CO potentiometer low level 1172 Potentiometer CO level high 1386 Knock channel test error 1410 Canister purge valve control circuit short circuit to 12V 1425 AD purge valve control circuit sorber short short to ground 1426 Control circuit of the canister purge valve open 1500 Open circuit of the control circuit of the fuel pump relay 1501 Short to ground of the control circuit of the fuel pump relay 1502 Short circuit to 12V of the control circuit of the fuel pump relay 1509 Overload of the control circuit of the idle speed regulator 1513 Circuit of the idle speed regulator short circuit to ground 1514 Idle air control circuit short circuit to 12V, open 1541 Fuel pump relay control circuit open 1570 Incorrect APS signal 1600 No communication with APS 1602 Loss of on-board voltage to the ECU 1603 EEPROM error 1606 Rough road sensor incorrect signal 1616 Rough road sensor low signal 1612 Reset error ECU 1617 Rough road sensor high signal 1620 EPROM error 1621 RAM error 1622 EPROM error 1640 EEPROM Test error 1689 Incorrect error codes 0337 Crankshaft position sensor, short to ground 0338 Crankshaft position sensor, open circuit 0441 Air flow through the valve is incorrect 0 481 Cooling fan circuit malfunction 2 0615 Starter relay circuit open 0616 Starter relay circuit short circuit to ground 0617 Starter relay circuit short circuit to 12V 1141 Malfunction of the oxygen sensor 1 heater after the converter 230 Malfunction of the fuel pump relay circuit 263 Malfunction of the injector driver 1 266 Malfunction of the force driver nki 2 269 Malfunction of injector driver 3 272 Injector driver fault 4 650 CheckEngine lamp circuit fault
Error code: obd2 adapter nissan on AliExpress - buy online at a good price
How to use
Before purchasing an adapter, make sure it is compatible with your car. After purchasing the adapter, it is important to correctly connect the scanner to the connector. As a rule, the OBD 2 connector is located in the passenger compartment under the dashboard. Models before 2006 usually have a 12 pin connector (GM), and to connect the scanner you will need a 16 pin adapter.
Information on the location of the connectors is presented in the table and photo below.
Location of diagnostic connectors and recommended auto scanners:
| No. | Brand VAZ | Connector location | Suitable and recommended scanners + program |
| 1 | 2105, 2107 (with injector) | On the left side of the steering column | VAG-Adapter + Adapter 12 pin + OpenDiag Mobile |
| 2 | 2108, 2109 | Below the storage shelf, in the center. | |
| 3 | VAZ 2113, 2114, 2115 | In the cigarette lighter area, approximately 10-12 cm lower. | Scan Tool Pro + 12 pin adapter + OpenDiag Mobile |
| 4 | VAZ 2110, 2111, VAZ 2112 | On the right side in relation to the steering column, under the dashboard. | |
| 5 | Lada Priora, Kalina, | In the opening located behind the glove compartment. | Scan Tool Pro 2022 + OpenDiag Mobile |
| 6 | Lada Vesta | Located under the steering column on the left, on the left near the handle for opening the hood, under the mounting block | |
| 7 | Lada Largus | Inside the glove compartment on the back wall and closed with a protective cap | |
| 8 | Lada Granta | Right above the cigarette lighter. |
Location of connectors on some vehicles:
Diagnostic modes, OBD protocols for Lada cars
The adapter's task is reduced to decoding the incoming stream of data packets and converting them into a form accessible to external software. ELM327 works according to the protocol principle used in injection-type cars. The device receives information from the ECU data bus, processes it and sends it to a PC or smartphone.
Data exchange is carried out through several types of protocols:
Lada cars with electronically controlled internal combustion engines use several protocols:
The fastest option is the CAN bus. The system can operate in duplex mode, which expands the functionality of the on-board electronics. However, we note: each protocol has its own set of diagnostic modes. The most extensive service is offered by the latest generations of tires. For Lada, the standard set of modes is:
It is possible to adjust the characteristics of the lambda probe for individual ECU modules and firmware.
Important:
Some ECUs do not support the full set of functions without the use of a dealer scanner.
Select the car model and year of manufacture to determine which diagnostic modes your car supports through the ELM327 adapter, as well as what protocol the OBD2 port is based on. The data is presented for the following Lada models and their modifications: Granta, Kalina, Largus, Niva, Priora, VAZ 2107, Vesta, XRAY and others.
Scanner ELM327 for VAZ-2107i. Review
For owners of AvtoVAZ fuel-injected cars, there is often a need for diagnostics - all of a sudden, the “Check engine” lamp may come on or problems with the engine may appear.
It will be very expensive to go to the service center for the slightest reason, so it is more advisable to purchase a simple Chinese car scanner for self-diagnosis.
For myself, after reading reviews on Aliexpress, I chose the USB version of the ELM327 adapter version 1.5 with the FTDI FT232RL chip.
- Declared technical characteristics:
- Designed for almost all passenger cars from 1996 to the present: Acura, Alfa Romeo, Audi, BMW, Cadillac, Chevrolet, Chrysler, Citroen, Daewoo, Fiat, Ford, Honda, Hyundai, Infiniti, Jeep, Kia, Land Rover, Lexus, Mazda, Mercedes Benz, Mini, Mitsubishi, Nissan, Opel, Peugeot, Renault, Saab, Ssang Yong, Subaru, Suzuki, Toyota, Volkswagen, Volvo, and other brands after modification.
- Supports the following OBDII protocols: ISO15765-4 (CAN)
- ISO14230-4 (KWP2000)
- ISO9141-2
- J1850 VPW
- J1850 PWM Outgoing protocol: RS232
- Baud rate: 9600; 38400
- Operating voltage: 12V
- Built-in protection against overload and voltage surges.
Rated current: 45 mA
Dimensions 2.5*8.8*4.6 cm
The kit includes the adapter itself and a disk with drivers and programs.
The data on the sticker coincides with the declared characteristics, everything is assembled very high quality, does not creak, the plastic is hard, the cable is soft, about 1 m long.
When connected to the laptop, the drivers were downloaded automatically from the Internet, so the disk was not needed. From the Internet we download and install any free diagnostic program, for example, OpenDiagFree 1.4, released specifically for VAZ cars.
We connect the adapter to the diagnostic connector - in the "classic" it is located under the glove compartment, and the cord to the laptop - the LED lights up.
Don't forget to turn on the ignition on the car so that power is supplied to the ECU controller.
Open the program and see a window with a choice of adapter type.
Select “ELM327 Adapter” and click “OK”. The main window of the program opens. Check the box “Define additional equipment” and click the “Define equipment” tab.
The initial reading of data from the ECU will start, the LEDs on the adapter will begin to wink, which means the connection has been configured.
As we can see, after scanning the configuration, the program identified the car brand Lada 1.6 liter, 8-valve; engine control unit January 7.2 EURO2 from AVTEL, its serial number and firmware version. No additional equipment was found, and the VAZ-2107 does not have it as such.
Now let’s follow the arrow “Go to unit diagnostics”. The main working window will appear with parameters and graphs displayed in real time.
Except for a couple of readings, everything is zero, since the engine is still turned off.
In the lower left corner we see the engine temperature reading 88 °C - not yet cooled down. Now let’s go to the “Errors” tab, there we see only one: “Error 1602 - loss of onboard voltage in the controller.” Usually appears when removing the terminals from the battery with the ignition on.
Click on “Reset errors” and start the engine - the program will begin to give readings of the sensors.
Idle speed is 800-860, “floating” a little. Let's increase the speed by pressing the accelerator pedal.
As we can see, the readings change, the graph curves are displayed. You can also go through other tabs.
No more errors appeared, the scanner works perfectly.
I ordered it here.
How to order.
UPD. Sometimes the scanner cannot connect to the ECU port, the immobilizer or alarm may be triggered, try turning the ignition and alarm on and off, and repeat the connection.
UPD2. Review of the Bluetooth version of the ELM327 adapter.
Subscribe to the blog! Good luck on the roads!
Decoding codes
Well, if you succeed in checking your car for faults, then you need to decipher the combinations of errors, otherwise why do you need diagnostics at all?
Self-diagnosis
Let's look at the decoding of combinations of faults that you can read when checking the Lada Priora yourself.
| Number | Malfunction |
| 2 | When independently checked, this code indicates an increased voltage level in the on-board network. It is recommended to check the main electrical circuits. |
| 3 | Errors have been reported in the operation of the gasoline level control sensor in the fuel tank. |
| 4 | This code indicates a malfunction in the refrigerant temperature level control sensor. |
| 5 | Malfunction of the ambient temperature sensor. The information sent to your device may not be accurate. |
| 6 | The engine is reported to be overheating, and antifreeze may boil. |
| 7 | The BC informs the car owner about the emergency lubricant pressure. |
| 8 | Malfunctions in the brake system were detected. This may indicate defects that may subsequently affect the safety of the driver and passengers. |
| 9 | Low battery reported. |
| E (EEPROM) | Faults have been detected in the data packet. |
The arrows on the dashboard move to maximum values when performing self-diagnosis of the vehicle, and all icons on the panel are lit. Please note: if the button for switching functions of the on-board computer is not pressed for more than 10 seconds, the dashboard will return to the operating state.
Failures in the ignition system
If you were unable to check your VAZ Priora yourself, you can do this using a special tester. In this case, the error code will be a combination of a letter and four numbers:
- P – means a breakdown in the operation of the electronic systems of the internal combustion engine;
- C – malfunction of the chassis;
- B – breakdown in the electronics of the car interior;
- U – indicates an error in the joint operation of different systems;
- the number 0 indicates the OBD-2 code;
- 1 and 2 – enterprise code;
- 3 – reserve code.
| Combination | Description of the breakdown |
| P0300 | The control unit transmits a signal that there is no spark in all cylinders of the 16-valve car engine. |
| P0326 | Incorrect signal received by the control unit from the knock sensor. It is recommended to perform a more thorough check of the device. |
| P0327 | There is an open or short circuit in the knock sensor circuit. The circuit should be checked. |
| P0335, P0336 | There are errors in the operation of the crankshaft sensor. In addition, such combinations may indicate an incorrect signal coming from the device to the on-board computer. |
| P0337 | The crankshaft position monitoring device shorts to ground. |
| P0338 | There is a short circuit or open circuit in the crankshaft sensor circuit. |
| P0342 | The signal in the headlight sensor circuit is too low |
| P0343 | A too high signal has been detected in the circuit of the same device. |
| P0422 | The neutralizer has broken down; it is recommended to replace the device. |
| P0444 | The Lada Priora control unit detected a break in the wiring of the canister valve. |
| P0445 | The canister valve has shorted to ground. |
| P0480 | There is a break in the wiring of the fan relay; the relay should be checked and, if necessary, replaced. |
| P0481 | There is a short circuit in the cooling fan wiring. |
Connector for self-diagnosis of a VAZ Priora car
Fuel and air system error codes
| Codes | Description |
| P0030 | The control unit detected an open circuit from the oxygen sensor heating device to the exhaust gas converter. |
| P0031 | A short to ground is reported in the oxygen sensor circuit. |
| P0102 | An incorrect signal level was detected in the electrical circuit of the mass air flow control device. |
| P0116 | An incorrect signal is received from the coolant temperature monitoring device. You should check the electrical circuit and the condition of the device itself. |
| P0122 | The on-board computer receives an incorrect signal from the TPS. |
| P0130 | The oxygen level control sensor has failed. |
| P0171 | The control unit has detected an excessive amount of air in the fuel mixture. |
| P0172 | The on-board computer detected an excessive amount of gasoline in the fuel mixture. |
| P0201 – P0204 | The Lada Priora control unit detected a break in the wire of one of the four injectors. |
| P0217 | This fault code means the motor is overheating. |
| P0230 | A malfunction has been detected in the electrical circuit of the electric fuel pump relay. It is necessary to carry out a complete diagnosis of the electrical circuit to identify breaks and short circuits. |
| P0261 | There is a short circuit in the wiring of the injector of the first cylinder. |
| P0263 | The driver of the first injector has failed. |
| P0266 | There was a breakdown in the operation of the second injector driver. |
| P0269 | The control unit has registered errors in the functioning of the third injector driver. |
| P0272 | The fourth injector driver has failed. |
| P0264, P0267, P0270 | One of these combinations indicates a short circuit in the second, third or fourth injector circuit. |
Video “Control unit error 1602”
In this video, the author talks about the power failure error on the ECU of a VAZ Priora car.
To check instrument panel error codes, you need to enable test mode. To do this, you need to press the daily mileage reset button and, without releasing it, turn on the ignition. All familiar positions should light up on the liquid crystal display (LCD), and the arrows of the tachometer, speedometer, coolant temperature indicator and fuel level indicator should move from minimum to maximum values and back. The serviceability of the LCD and the above sensors is visually checked.
Press any key to switch functions of the on-board computer (BC). The program version is displayed on the LCD.
Press the BC function switch button again. The LCD should display (if present) the following error codes:
2 – increase the voltage of the on-board network,
3 – fuel level sensor error*,
4 – coolant temperature sensor error*,
5 – error of the external temperature sensor (if there is no sensor reading within 20 seconds, indication on the LCD is “-C”),
6 – engine overheating**,
7 – emergency oil pressure**,
8 – brake system defect**,
9 – battery is discharged**,
E – detection of an error in a data packet stored in EEPROM.
*- if an open circuit of the sensor is detected within 20 seconds
**- the criterion for triggering the acoustic alarm is met
If necessary, you can reset error information. To do this, press and hold down the daily mileage reset button for 3 seconds.
The next time you press any of the BC control buttons, all familiar positions should light up on the LCD - the system has returned to its initial state.
If you do not press any control buttons for approximately 30 seconds, the instrument panel enters the operating state.
Decoding error codes and criteria for their occurrence
Checking Dashboard Error Codes
1. Starting position: ignition off, battery on. 2. While holding down the daily mileage reset button, turn on the ignition. All positions of familiarity areas (segments) should light up on the LCD, which indicates the start of self-testing. 3. Press any of the on-board computer control buttons. The LCD should display the program version (Ver 1.0 and higher). 4. Press any of the control buttons again. The following error codes (if any) should be displayed on the positions of the first and second lines of the LCD:
2 Excessive voltage 3 Fuel level sensor error* 4 Coolant temperature sensor error* 5 Outside temperature sensor error** 6 Engine overheat*** 7 Emergency oil pressure*** 8 Brake defect*** 9 Battery low*** E Recognition errors in the data packet stored in the EEPROM
Note: * – an error is registered if within 20 seconds. a sensor break is detected; ** – an error is registered if within 20 seconds. The actual sensor data is not recognized (indication on the LCD is “— °C”); *** – accompanied by an acoustic signaling device.
1. Acoustic alarms. All acoustic indicators are displayed only when the ignition is turned on and if certain criteria are met. If several criteria are active in parallel, the alarms should be displayed in the sequence of their arrival one after another with a pause of 1.5 to 2.5 seconds. 2. Engine overheating. Criteria: coolant temperature display ≥ 115°C. Alarm: constant sound for 5 seconds. Termination: The coolant temperature gauge drops to ≤ 110°C. Repetition: The coolant temperature gauge drops to ≤ 110°C, then rises again to ≥ 115°C. 3. Emergency oil pressure. Criteria: engine speed ≥1000 rpm; The “oil pressure” input is active for 10 seconds. Alarm: constant sound for 5 seconds. Termination: Oil pressure input not active or speed ≤ 900 rpm. Repetition: Oil pressure input active, speed dropped to ≤ 900 rpm and then increased again within 10 sec. ≥ 1000 rpm. 4. Brake defect (front brake pad wear indicator). Criterion: the “brake defect” input is active for 10 seconds. Alarm: 0.5 sec on/0.5 sec off 5 repetitions. Abort: Brake defect input is not active. Repetition: “Brake defect” input active for 10 sec. 5. Low batteries. Criteria: speed ≥ 1000 rpm, “battery” input active for 60 seconds. Alarm: 0.5 sec on/0.5 sec off. 5 reps. Termination: Battery input not active or speed ≤ 900 rpm. Repetition: The battery input is active and the speed has dropped to ≤ 900 rpm and then increased again within ≥ 60 sec to ≥ 1000 rpm. 6. Seat belts are not fastened when the ignition is turned on. Criteria: Ignition on, seat belts not (yet) fastened. Alarm: 0.5 sec on/0.25 sec off/0.25 sec on/0.25 sec off, 5 repetitions. 7. Fuel reserve. Criterion: the fuel reserve indicator is turned on. Alarm: 0.25 sec on/0.25 sec off, 2 repetitions.
Location
Often faced with a problem where the diagnostic connector is located. In each car they are installed differently, taking into account the specifics of the entire structure. As for Prior, everything here is done quite cleverly. If you don't know the exact location, it will be difficult to find.
Car manufacturers have placed a diagnostic connector in the glove box. You can find it on the passenger side in the interior. Simply put, look in the glove compartment. If you contact service centers, specialists will immediately find the required design. Beginners need to be more vigilant in this matter.
It is best to work according to already compiled instructions. Let's take a closer look at the process:
- We completely open the glove box and clear it of foreign objects to make it easier to work.
- The glove compartment should hang on plastic guides on each side.
- We press on the side plates so that the small door opens further. This will make it easier to work and find the Priora diagnostic connector.
- We pull out the tabs on the side and completely remove the glove box from the latches.
- Provides access to the input plug for diagnostics. Now he is free and ready to go.
Access to the device is open. The following operations directly depend on the purpose of “opening” your car. More often they get to the connector to reconnect it or check the correct signals from the ECU. This way his work will be adjusted and will not create problems or unforeseen situations.
Glove compartment in a Lada Priora car
Troubleshooting
Note! If you are unsure of your own abilities, the motorist is strongly recommended to seek help from a specialized workshop or a qualified technician.
If you have the necessary equipment, you can determine whether 8 or 16 valves are broken in a Lada Priora car yourself. Due to the simple design of the machine, repairs do not require the user to have in-depth knowledge of mechanics, electronics or other sciences.
Today I tested it, it works, the connection is stable. If there is an error, then the software writes the number and transcript.
To solve the issue, you need !
1. Smartphone, Tablet for Android v4,5,6.7 2. Bluetooth adapter ELM 327 bluetooth-elm327 />3. OpenDiag software
With the purchase of this adapter, there is no need to install such things as the State on-board computer. The adapter is in the glove compartment, the pipe is always with you!
Diagnostic application
There are several really useful applications that can be used to perform high-quality car diagnostics.
OpenDiag Mobile
It is the main and most useful application for diagnosing domestic cars. This application is designed specifically for Russian-made cars.
Advantages and disadvantages
Pros:
- Decoding of all errors and a detailed description of the malfunction;
- Online engine monitoring;
- View misfires;
- Recording LOGs;
- Forced activation of fans and much more;
Minuses:
- Absence in the AppStore, that is, it is not suitable for iOS;
- Some ECUs are chargeable;
Advantages and disadvantages
Pros:
- Free application;
- A large number of different functions;
- Online engine monitoring;
Minuses:
- No error decoding;
What is the ELM327 scanner and how to use it
The designation ELM327 is well known to many car owners. This is a scanner or adapter that connects to the car’s on-board computer via the OBD-II connector. A useful device is used to diagnose faults, read performance indicators and reset ECU (electronic control unit) errors.
Scanner ELM327 / aliexpress.com
The scanner got its name from the microcontroller, which is a kind of connecting link between the car’s diagnostic bus and a computer or smartphone. This chip, developed by a Canadian company, fell into the hands of Chinese electronics manufacturers, who jumped at the chance to copy it.
What does the ELM327 scanner do?
The functionality of the ELM327 is quite extensive. But it largely depends on the support of certain capabilities by the specific version of the adapter, the ECU of the machine itself, as well as the software that is used for diagnostics.
In addition to reading, decoding and clearing diagnostic error codes, the scanner can display in real time engine speed and vehicle speed, the temperature of all fluids, current fuel and air consumption, throttle position, pressure in the fuel system and much more.
In some cars, using the ELM327 adapter, you can unlock and reconfigure automatic locking and folding of mirrors, gas pedal responsiveness, and dashboard data.
How to choose ELM327
Due to the many clones of different quality, there is a risk of running into a device with reduced functionality that will not work correctly or will not start at all. There are three important things to consider when purchasing.
Connection type
There are several versions of ELM327 with different connection interfaces. The most common are adapters with Bluetooth, Wi-Fi and USB. They differ not only in connectivity, but also in compatibility with smartphones and computers. Otherwise the functions are identical.
- Bluetooth are the cheapest scanners that work only with Android smartphones.
- Wi-Fi - more expensive versions, compatible with both Android and iOS smartphones, as well as computers.
- USB is slightly cheaper than Wi-Fi scanners. They work only with computers, but they are distinguished by reliable communication.
Firmware version
The adapter software is constantly updated. On the original ELM327, the current version is already 2.2. Chinese clones are sold with firmware 1.5 and 2.1. Oddly enough, the newer version is worse.
The chip that came to the Chinese had firmware version 1.5. All clones with this firmware have the original ELM327 software. Later, copies of scanners version 2.1 appeared. The latter is just a modified firmware 1.5, and not for the better - to reduce the cost of production, the Chinese have removed many communication protocols. In addition, there are regular adapters with version 1.5, which are sold under the guise of 2.1.
In fact, three variants of ELM327 clones are currently available for sale:
- ELM327 1.5 - old but original firmware;
- ELM327 2.1 - stripped-down original firmware disguised as newer one;
- ELM327 2.1 - original firmware disguised as new, but without changes.
Obviously, it is worth buying an adapter with the original firmware version 1.5. For example, here is one of the trusted sellers from whom you can buy an inexpensive Bluetooth version of the ELM327.
Car diagnostic connector type
For some cars, especially before 2000 and domestic ones, the diagnostic connector has connectors of other standards. It is not possible to connect a scanner directly to them. For such cases, special adapters are used: on one side they have a compatible connector for a specific car model, and on the other, a standard OBD-II.
On the left is the adapter VAG 2×2 - OBD-II (Volkswagen, Audi until 1997), on the right - GM12 - OBD-II (Daewoo, VAZ) / aliexpress.com
Proprietary pads can have different shapes and number of contacts. Therefore, before purchasing a scanner, check which connector standard is used on your car, and, if necessary, purchase the appropriate adapter.
How to check the ELM327 scanner
After purchasing the ELM327 adapter, check that it is indeed version 1.5. When ordering from AliExpress, check whether the PIC18F25K80 chip is installed in it and emphasize that you will diagnose the scanner using special software and open a dispute in case of problems.
Visual inspection
Visually identifying a quality adapter is not so easy. The opaque or dark plastic housing makes it impossible to inspect the components. Their miniature size and hard-to-read markings further complicate matters.
PIC18F25K80 chip on the scanner board / aliexpress.com
If you carefully open the case, you can look at the ELM327 boards. Carefully inspect all the parts and look for the processor code PIC18F25K80. Firmware 1.5 requires just such a chip, so its presence will be a certain guarantee of quality.
Application tester
YouTube channel Eugene Barsuk
A special application tests compatibility with diagnostic bus protocols and shows the real version of the scanner. To check, do the following.
- Insert the ELM327 adapter into the car's diagnostic connector and turn on the ignition.
- Open the Bluetooth or Wi-Fi settings on your smartphone and pair with the adapter (password: 0000 or 1234).
- Install the verification application and click the “Connection” button.
- Wait for the scan to finish and check the results.
- Successful work with most car brands is guaranteed if the adapter supports all revisions up to 1.4 or 1.4b inclusive.
How to connect to a car
The exact setup procedure is usually described in the instructions.
Step 1: Install the diagnostic application
Various programs are used to connect to the machine's ECU. There are both free and paid versions for Android, iOS and Windows. The necessary software is often already included with the scanner itself. Install it or one of the popular applications.