Lada Priora began to be produced in 2007 and received 8 and 16 valve injection engines. Depending on the year of manufacture and restyling in 2010, the fine fuel filter will have its own distinctive original part number, but in essence it is one filter that is designed to clean gasoline. The original manufacturer of this part is the Big Filter company (Russia), its price is about 500 rubles, so very often Prior owners want to choose a suitable analogue with the same or even lower cost.
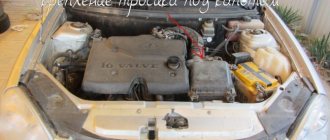
Replacing the fuel filter Lada Priora
The manufacturer recommends replacing the fuel filter on the Priora every 30 thousand kilometers, however, depending on the quality of the gasoline being filled, the filter may operate differently. If you have to fill up with cheap gasoline or at a gas station where its quality remains in doubt, it is better to replace it more often than required. If the gasoline is of high quality. then this can increase the service life of the consumable by one and a half times, but no more, since this can already affect the fuel pump, which may fail due to the quality of the supplied fuel.
When is the best time to replace an element?
Ideally, it is best not to wait until some malfunction appears that forces you to change the fuel fine cleaning element. Considering that the cost of the filter is low, and the replacement operation can be performed independently, you can set the interval to 10 thousand km. Signs that indicate the need for replacement:
- A situation often arises when, due to the fault of a clogged fine fuel filter, failures in engine operation occur, especially when accelerating the car. Sometimes the car may even stall, and starting the engine will then be difficult.
- The second sign of a clogged fuel filter can be increased noise from the electric fuel pump. When driving, this sound is almost impossible to hear, but when idling in the interior of the Lada Priora, you can hear a high-pitched buzzing sound. This indicates that the pump is operating under increased load; in normal mode, no extraneous sounds are heard.
If such signs appear, it is better to change the filter on the Priora, given that the cost of the issue is low. The fact is that a clogged element not only resists the flow of fuel, but also begins to let debris particles pass further along the path, into the injector nozzles. There, particles settle on work surfaces and form a film of dirt, which leads to their production.
After the first cleaning of the injector, the dirt film will disappear, but the wear on the surfaces will remain, and the injectors will simply begin to leak. Surely many Lada Priora owners have noticed a phenomenon when, after ultrasonic cleaning of the injector, engine performance became worse. This is the result of a long drive without replacing the fuel filter; now you will have to change the injectors as well.
When is the fuel filter changed on a Priora?
The Russian car Lada Priora is no exception to the rule: gasoline passes through a fine filter on its way from the tank to the injectors of the 16-valve engine. According to technical documentation, it is replaced every 30,000 km. mileage But experienced car mechanics recommend changing the fuel filter more often, about once every 15–20 thousand km. The main reasons for premature replacement:
- low quality fuel at domestic gas stations;
- unfavorable operating conditions for vehicles in Russia;
- driving style.
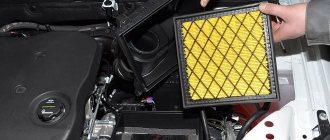
The KNECHT KL 83 fine filter is a good choice. European quality and low price
There are often cases when the fuel filter has to be changed even more often. A clear sign of the need for replacement is the car moving jerkily at high speed; if the filter is heavily clogged, the car will move jerkily at low speed.
Filter failure
It is recommended to check and replace the filter every 20 thousand km.
Rapid contamination is facilitated by low-quality dirty fuel, which can completely clog the filter as a result of which it will stop passing gasoline, which will lead to the engine stopping. When water appears in the car tank, there is a possibility that it will enter the filter element, which may result in the element becoming clogged. This happens especially often in winter. When the car is parked on the street, the water that gets into the filter freezes in it, blocking the fuel path to the engine. Which also leads to the engine stopping or the inability to start it.
How to determine the need for replacement
Each malfunction in a car has its own characteristic features, from which we can conclude that it is necessary to replace certain components. Fuel filters are no exception, the clogging of which manifests itself as follows:
Read also: continuous operation time
- the car moves jerkily at high speeds with subsequent problems when driving at low speeds;
- increased noise level of the fuel pump.
In accordance with the maintenance regulations, the fuel filter on the Lada Priora is replaced every 30,000 km. However, in fact, the need for this procedure occurs much earlier; regular use of the car, combined with the low quality of fuel that our gas stations “sin” with, leads to rapid clogging of this element.
The cost of a fuel filter for a Lada Priora is about 250 rubles - not the most serious reason for saving. And you can replace it yourself. Next, we’ll talk about how to do it yourself.
Replacement process
To replace the fuel filter on a Daewoo Matiz, you need to know the location of the element. As a rule, in all Korean cars, the fuel filter element is located under the rear right wheel, attached to the body.
So, let's consider the sequence of actions aimed at replacing the fuel filter element:
- In order not to remove the negative terminal, you can remove the fuse that controls the fuel pump.
- Let's crawl under the car. Accordingly, you will need a hole. And disconnect the grounding of the fuel filter.
We relieve the pressure in the fuel system by removing the fuel pump fuse, starting the car and letting it stall. After that, turn off the ignition. We take the filter out of the bracket.
It is located to the right of the tank in the rear direction of travel. We fold the fuel line away from the filter: first, the supply pipe, then the pipe at the outlet of the filter.
First, place the container under the work area - gasoline will still spill a little, despite the pressure being released.
On Matiz, the fuel filter element is protected by a plastic casing, which is secured with a 10mm bolt. It must be unscrewed. Remove the protective casing from the filter (if installed).
Why do you need an air flow meter?
We fold back the grounding and put the old filter aside. We connect the new filter so that the arrow on it is directed towards the direction of travel: it indicates the direction of fuel passage through the filter.
Using a small screwdriver, disconnect the fuel pipe clamp from the filter. On the second side you need to do the same operation. Now you can remove the filter itself.
Connect the ground terminal. We fix the filter on the bracket (it simply snaps into it). Replace the fuel pump fuse and start the car.
Installation is carried out in reverse order.
It is worth remembering that the fuel pump fuse was first removed, so it needs to be put back in place.
Product selection
As with all cars in this series, in addition to the original fuel filter, you can find a fairly large number of analogues, most of which are cheaper and in no way inferior in quality to the original product.
Original
96335719, 96444649, 96503420, 96537170 and 96507803 - the original catalog number of the fuel filter element for Daewoo Matiz manufactured by Daewoo. All of them are suitable for installation on a vehicle. It is easily installed on the vehicle and does not require additional fastenings or effort. The average cost is 600 rubles.
Fuel filter Daewoo Matiz.
Analogs
In addition to the original fuel filter, the automotive spare parts market is quite saturated with analogues, which have recently gained great popularity among car enthusiasts.
1200 rub. for the photo report
We pay for photo reports on car repairs. Earnings from 10,000 rubles/month.
Write:
Replacing the fuel filter on a Daewoo Matiz with a 0.8 liter engine does not have any special tricks, so there should be no problems with replacing the fuel filter on a Matiz, except perhaps searching for where you can buy it.
The process of replacing the Matiz fuel filter is very similar to the same procedure in Sens (that is, no tools are needed, and the hoses are removed in the same way). The only difference between replacing the fuel filters on these cars will be its location.
On Daewoo Matiz, the fuel filter is located under the bottom (on the right side in a niche between the body threshold). Therefore, to change the fuel filter on a Matiz you will need an inspection hole or overpass.
Where is the windshield washer reservoir located?
- To disconnect the fuel hose fittings, you either need a lot of hand force, or, alternatively, use pliers similar to pliers (round nose pliers curved at the end), but you won’t be able to press the latch with ordinary pliers.
- Having put the hoses on the new Matiz fuel filter (they are stretched until they click), you also don’t forget to put on the sensor plug.
- The entire process of replacing the fuel filter on a Daewoo Matiz can be clearly seen in the video.
How to replace the fuel filter
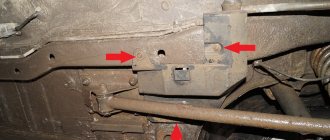
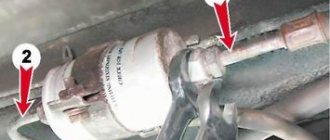
Those who don’t know where the fuel filter is located can see it in the photo; it is mounted on a body bracket above the rear suspension beam:
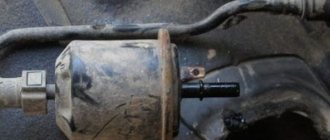
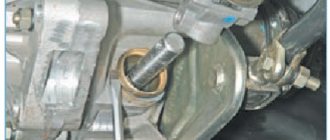
- Remove the tip of the outlet and inlet tubes from the filter fitting by pressing the spring lock.
- Loosen the clamp.
- Remove the fuel filter.
Remove the tip of the outlet and inlet pipes, loosen the clamp of the Lada Priora fuel filter, remove the Lada Priora fuel filter
Resetting pressure in the Priora fuel system
A device such as the fuel pump in LADA Priora always maintains the required pressure in the system. When the car is already in the pit, this very pressure needs to be released, otherwise fuel will spill.
Replacing the filter with a new one in Lada Priora
- So, you know where the element that needs replacement is located, first place a container under it.
- On one side, squeeze the plastic clamp, and on the other hand, press the spring clamp and remove the tubes from the fittings. Handle the plastic retainer carefully; this product is very fragile.
- If fuel does not flow, then the container can be removed.
- Using a wrench, loosen the clamp bolt holding the filter to the bracket and remove the contaminated element.
- Look at the condition of the rubber O-rings located at the tips of the fuel pipes. If the rubber is torn or cracked, the rings must also be replaced. The ring itself is located quite deep in the tip. When removing the ring, the plastic of the retainer may break. In this case, you will need to replace the entire fuel pipe.
- Install the filter in the reverse order of removal. It is important to make sure that the arrow on the body coincides with the direction of movement of the fuel.
- Carefully tighten the clamp nut.
- Place the fuel hoses on the filter fittings, making sure that the clamps on the protrusions snap into place. Functionality check
- Place the container under the new filter again.
- At this stage, turn on the ignition of the LADA Priora and wait for the electric gasoline pump to raise the pressure in the system.
- Start the power unit.
- Inspect everything carefully for tightness of connections. If fuel drips anywhere, it is solely due to the O-rings. Still, it is extremely difficult to determine the defect of these rubber seals by eye.
- Under no circumstances should fuel leak. And if it appears, then everything needs to be disassembled and the rings replaced, and if necessary, then the fuel pipes along with the tips too.
Fuel filter location
In the fuel supply system of the Lada Priora, access to filters may be difficult.
The fine filter on the Lada Priora car is located behind the gas tank
Any car enthusiast should know where the following components are located:
- The fuel tank is integrated into the underbody recess under the rear seats.
- A coarse mesh filter is installed on the suction pipe of the electric fuel pump inside the fuel tank.
FGO is installed on the suction pipe of the electric fuel pump in the gas tank - The fine filter is attached with a clamp to a bracket on the bottom of the car behind the gas tank.
The FTO on the Lada Priora car is located between the recess for the spare wheel and the gas tank - The distribution rail with injectors is located under the hood and bolted to the engine. At its end there is a diagnostic fitting with a valve.
The fitting with the valve is located at the end of the fuel rail
The location of the filters and fuel system rail is the same for all modifications of the VAZ 2170, regardless of the body type (sedan, hatchback or station wagon).
Procedure for replacing the fuel pump mesh
The procedure for replacing fuel filters looks like this:
- Purchase of spare parts.
- Choosing a workplace.
- Preparing the tool and vehicle for disassembling part of the fuel system.
- Removing the electric fuel pump and installing a new filter.
If the gasoline pump mesh is not changed in time, the suction pipe may become clogged with dirt.
Since the FTO is located on the bottom of the car, replacing it will require a lift, inspection hole or overpass. Replacing the fuel pump mesh can be done by simply placing the car on a flat surface. In this case, the gas tank must be at least half empty. Otherwise, when manipulating the FGO, you can spill fuel on the casing, and a persistent smell of gasoline will appear in the cabin.
Preparing for work
You can dismantle the electric fuel pump in any convenient place, observing fire safety measures.
The following tools will be required:
- two screwdrivers - flat and figured;
- pointed pliers or round nose pliers;
- socket or socket wrenches for 10, 12 and 13;
- car vacuum cleaner and rags.
To dismantle the electric fuel pump you will need a minimum set of tools
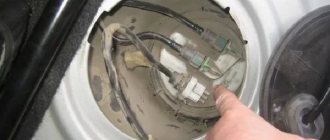
Preparing the car involves providing access to the top hatch of the gas tank. To do this, the rear seats are removed and the surface under them is cleaned with a vacuum cleaner. This will prevent debris from entering the tank.
The hatch under the seats is covered with a layer of dust that needs to be removed
Then the fuel supply system releases the pressure that remains after the engine stops. If this is not done, then when you remove any tube, gasoline will splash out. Pressure can be relieved in three ways:
- The electrical connector is disconnected from the fuel pump. The engine starts and runs until it stops completely.
- The fuel pump can be turned off by removing the corresponding fuse. The car starts and runs until the remaining fuel in the lines is completely exhausted.
- A universal option is to relieve pressure through the diagnostic fitting on the ramp. The hood opens and the cap is removed from the valve at the end of the ramp. The pressure will decrease when pressing on the spool with a screwdriver - in this case you need to place a small container. The cap is then screwed into place.
The valve is a regular spool closed with a plastic cap
Procedure for removing the mesh
To get to the metal hatch located under the rear seats, you need to fold back the floor flap at the right (in the direction of travel) door. Further operations are performed in the following order.
- Use a Phillips screwdriver to unscrew two self-tapping screws that press the cover to the bottom of the car. The hatch is removed and moved to the side.
The hatch covering the fuel pump is screwed on with two self-tapping screws.
- The bolt on the negative terminal of the battery is loosened, and the battery is disconnected from the on-board power supply. The plastic tab on the fuel pump power connector is bent and the block is disconnected.
The block is easily removed from the socket
- The fuel hoses are disconnected. On the supply hose, the plastic stopper is first unlocked, then the wire lock. The return hose is secured with a metal clamp, which must be carefully squeezed with pliers to remove the pipe.
To remove the tubes, you need to bend the wire retainer
- The eight nuts holding the mounting flange are unscrewed, and the washers are removed from the studs (they may get lost). The flange is dismantled.
The flange holds the pump housing and is secured with eight nuts
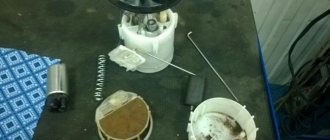
- Having remembered the correct position of the plastic cover, the electric fuel pump is removed from the tank. When the body is halfway out of the opening, tilt the tank and pull out the float. To prevent debris from entering the tank, cover the hole with a clean rag.
When demolishing, the electric fuel pump housing rises up and then tilts to the side
- To remove the suction pipe with filter from the glass, the internal connector is disconnected. Then you should simultaneously press on the ends of the four plastic latches and pull out the pipe.
The glass is attached to four plastic latches that must be pressed simultaneously
- The contaminated mesh is removed from the tube and replaced with a new one. Fitting the filter is accompanied by a characteristic click.
The mesh is put on the suction pipe by hand and fixed
- The inner surface of the glass is cleaned of dirt. Assembly of the unit is carried out in the reverse order.
Having removed the hatch cover at the very beginning of disassembly, pause and clean all the dust from the opened opening. Otherwise, some of it will inevitably end up in the tank.
Assembly should be performed carefully, preventing foreign objects from entering the gas tank. After installing the pump flange, attach a ground wire to any stud. After removing traces of fuel, you need to check the tightness of the connections. When the ignition is turned on, the operating pump will begin to increase pressure, and gasoline may leak out through loose joints.
After replacing the mesh, the engine is started and its operation is checked in different modes.
The technology for replacing FGOs on engines with 8 and 16 valves is absolutely the same. There is only a minor difference in the location of the fuel rail diagnostic fitting, which does not affect the procedure.
Questions about choosing a new filter
Depending on the year of manufacture, gasoline filters of different designs were installed on the Lada Priora. To avoid making a mistake, look under the car. The differences will be in the way the fuel hoses are connected. A fine filter is installed near the fuel tank, closer to the rear suspension. It is secured to the tank with a metal clamp. Buy a filter of the same design that is installed on the car .
Number 8 in the figure indicates the location of the fuel filter
Filters from KNECHT and MANN have proven themselves well. Catalog number KNECHT KL 83, MANN - WK 512.
In most cases, the Lada Priora has a filter with connections through plastic fittings. Less commonly used is a threaded connection.
What to check in a reverse osmosis system if the filter is not working correctly
Structurally, this filtration system consists of several cartridges with carbon filters and a membrane, as well as a tank for purified water.
Reverse osmosis systems, like any other filter elements, can become clogged over time, and individual elements may not work correctly, causing the filter’s performance to decrease.
If the filter makes strange sounds, vibrates, works slowly, does not drain water, or, conversely, sends a large amount of water into the drain, then you should check the following parameters:
Typical malfunction cases and methods for correcting them
If serious problems arise (damage to the membrane, leakage of the tank, etc.), reverse osmosis repair . However, very often the faults are local in nature and you can fix them yourself.
Here is a list of the most common problems and ways to solve them:
- Water constantly flows into the drain.
- insufficient pressure - if the actual inlet pressure is lower than what the filter manufacturer requires, then it is necessary to install a booster pump;
- Replaceable filter cartridges are clogged and require replacement;
- the shut-off valve is faulty - if, when the tap on the storage tank is closed, even after a few minutes, water continues to flow out of the drain tube, the shut-off valve needs to be replaced.
- Leaks.
- not a hermetically sealed connection of the tubes - the edges of the tubes are cut unevenly or they are not inserted all the way;
- Threaded connections are loose - check and tighten all existing nuts;
- There are no O-rings on the connections - install;
- high pressure (above 6 atmospheres), sudden surges - install a reduction gearbox in front of the first prefilter;
- The tank is not filled completely.
- first connection of the system - the tank is filled within one and a half to two hours;
- cartridges and/or reverse osmosis membrane are clogged - replace them;
- the check valve in the membrane flask is clogged - unscrew and rinse under running water, put it in place;
- The drainage water flow restrictor is clogged - replace it;
- too high or insufficient pressure in the tank - drain all the water from the tank and use a car pump with a pressure gauge to check the pressure in the nipple. At high pressure in the pipeline (3.5-6 atmospheres), the pressure in the tank can be 0.5-0.6 atm. If there is no more than 2 atmospheres in the water supply, then in the tank it can be reduced to 0.25-0.4 atm. High inlet pressure can cause noise and vibration during system operation. If the pressure in the water main is below 2.5 atm, filter manufacturers recommend additionally installing a booster pump.
Preparatory stage
You will not need any skills when replacing the filter, you will not need specialized devices, just a key to “10”, know where the element to be replaced is located, and how to change it correctly, and for this there are detailed step-by-step instructions. To carry out the work, you need a lift or inspection hole, since the filter is located on the bottom of the car in the rear. Stock up on rags. Also prepare an unnecessary container. Inspect the fuel hoses and fasteners, pay attention to their integrity. If necessary, clean them from dust and dirt.
How often should the Priora fuel filter be replaced and why?
A worn element has less capacity and can lead to engine failure and premature wear of fuel system components.
You can install a fuel filter on a Lada Priora within 15-20 minutes. The expenditure of time and money will be minimal, and transport will begin to operate as normal. Therefore, it is not recommended to neglect repairs.
The most dangerous consequence of using a clogged cleaner is problematic operation of the carburetor or injector due to accumulated debris. Timely replacement of the Priora fuel filter will also save the fuel pump, the service life of which quickly decreases when working with a worn purifier.
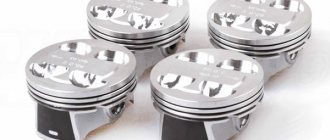
Engine elements are most susceptible to wear when small particles penetrate. In some cases, parts of the CPG may fail and require major repairs or expensive restoration.
It is impossible to accurately determine the frequency of installation of a new element. The condition of the purifier is affected by the mixture used, conditions and frequency of operation.
According to the manufacturer's recommendation, the fuel filter for Priora should be changed every 30-35 thousand kilometers. If vehicles frequently operate under difficult conditions, it is necessary to check the element after 20 thousand kilometers.
Camshaft and crankshaft sensors on Lada Kalina (8 valves): description and replacement nuances
Phase sensor (camshaft position)
Camshaft Sensor You will find this part on the left side of the cylinder head. The operating principle is quite simple. There is a special pin on the camshaft itself. When it passes by the sensor, but sends a signal to it. This moment corresponds to compression of the piston of the first cylinder.
The controller determines the camshaft angle. This is important information for machine systems and sensor failure has certain consequences. The information is sent to the vehicle's ECU, which uses it to control the ignition and fuel supply to each cylinder.
In what situations is replacement required?
If this part fails, you will see a “Check” indicator on the vehicle’s instrument panel. This is how the ECU signals the driver that the engine needs to be checked. At the same time, the fuel supply pattern changes - it goes to all cylinders simultaneously and, as a result, consumption increases.
The cause of the breakdown may be mechanical damage, as well as other things. There is no point in trying to repair the old unit itself - it costs little and you will waste more nerves and time.
In the video below you will find instructions for replacing this part (the author of the video is Alexandr V).
Replacement instructions
To replace the camshaft sensor, you only need a "10" key. It is better to use a socket with a collar or a ratchet. It will be inconvenient to work with a regular key, although it is still quite possible.
The dismantling and installation procedure is as follows:
- First, disconnect the block with wires by pressing the latch and slightly pulling it up;
- now, using the key, unscrew the part itself;
- it can be pulled out by slightly pulling towards the windshield;
- installation is carried out in the reverse order of steps.
There are no difficulties in this process, but be careful not to damage both the block with wires and the connector for the controller itself on the cylinder block.
Crankshaft position sensor
Crankshaft position corrector separately Although this controller fails quite rarely, its failure can lead to the most unpleasant consequences. You may simply end up in the middle of the road with no way to continue driving.
This element is installed on the oil pump cover. The DPKV transmits information to the ECU so that it can synchronize the fuel supply. Inductive type sensor. As mentioned above, it rarely fails, but this becomes a big problem.
In what situations is replacement required?
If this DPKV is completely out of order, you will not be able to start the engine at all.
But even if it just works intermittently, this can be recognized by a number of signs:
- poor engine starting;
- unstable work;
- power reduction;
- detonation with increasing load.
If you notice such signs and there are no other reasons for them, change the sensor. You can check it by testing the resistance of the windings. If the ohmmeter readings differ from 550-570, then the part is faulty. Fortunately, it costs little and replacement can be done very quickly.
Replacement instructions
To replace this part, you will again need a "10" key and nothing else.
- Turn off the ignition. Then disconnect the wire block by pressing the latch.
- Now, using a wrench, unscrew the fastening bolt.
- All that remains is to remove the old DPKV and install the new one in the reverse order.
In the video below you will learn how to check the performance of the DPKV (the author of the video is IZO)))LENTA).
Loading …
avtozam.com