When problems appear with starting the engine, or the headlights do not light up well, for many car enthusiasts such symptoms indicate the need to repair the generator. In domestic Lada Priora cars, it is often necessary to dismantle this element along with the air conditioner. Many people believe that it is almost impossible to remove the generator on this car with climate control, since it is located in a hard-to-reach place. But in reality, the operation is not so simple, although it will require time and accuracy.
How to remove the generator
It is preferable to have a crane beam indoors; in extreme cases, you can use a jack on wheels, special for hanging the engine. You should proceed in the following way.
- Disconnect the battery terminals.
- Hang up the motor.
- Remove the drive belt.
- Loosen the hoses on the power steering or air conditioning.
- Remove the mountings from the generator.
- The generator can now be disconnected and powered up. First to the side, then up.
- When all wiring is disconnected, the generator can be removed.
Replacing the alternator belt on a Priora 16 valve is carried out in the reverse order, just install the new part following the instructions.
Tips and tricks
Generators and brushes come in four types, depending on the year of manufacture of the Lada Priora. Typically, removing the air conditioner is required in cars with a 127 engine. In this case, the air conditioner pipes are located below the radiator. These tubes completely cover the gap between the radiator and the block. Therefore, dismantling without removing the compressor will be quite problematic. First you have to disconnect the air conditioner pump from the brackets.
It is also not easy to remove the bolt that is screwed to the generator from below. The bolt can be unscrewed if it is on the side opposite the motor. Otherwise, the bolt will be located next to the engine mount, and you will have to cut it off with a circular saw. This operation will take an extra 10 minutes. It is better to position the new fastener with the head in the desired direction so that there are no more problems when unscrewing.
If the compressor is already unscrewed, it does not need to be attached. It will cling to surrounding elements. When screwing the air conditioner into its old place, you must first install all the bolts, and only then screw them in. It is also advisable to start the engine after assembly and check how the generator operates. Only then can the bottom be screwed on.
How to remove a generator on a Lada without air conditioning
If you do not have additional equipment installed, replacing the Priora 16 valve generator will be a little easier, since there will be more space under the hood.
- Remove the negative terminal from the battery.
- Remove the protection from the engine.
- Unscrew the nut on the belt tensioner (not completely, a maximum of four turns). Now you can turn it around by turning the screw a little. When it is loose enough, you can remove it.
- Remove the protective cap to later remove the terminal from the wiring harness. Now you can remove the wiring block.
- Remove the nut to remove the top mounting bolt, then do the same with the bottom mounting bolt.
- Remove the belt and then the entire generator.
Since in advanced configurations with air conditioning the belt on the generator is longer, then if it is necessary to replace it, you need to remember some subtleties. Especially if you feel that the quality of grip on the rollers has become much worse, then you will have to re-tension or change them. The first thing that indicates a problem is a whistle, a clear decrease in the battery charge level, even if it should be fully charged. New batteries can be ordered here: https://www.rimir.by/products/car/akkumulyatory-95/. In this case, first of all, you should look at the belt to see if it is elastic, if there are any third-party cracks on it.
Removing and replacing the Lada Priora air filter with your own hands
Replacing the Priora 16 valve alternator belt should be done after 60 thousand kilometers, or once every two years.
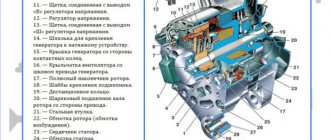
Design and principle of operation of the generator
This device converts the mechanical energy received from the crankshaft into electricity. Thanks to the generator, power is supplied to the electrical appliances of the car. It powers the ignition, recharges the battery and other systems. When the driver starts the engine, the largest amount of electricity is consumed by the starter. At this moment, power to electrical consumers is supplied only from the battery. Naturally, the battery may drain quickly. To prevent this from happening, it must be powered by a generator.
The generator consists of an aluminum housing, inside of which there is a rotor on bearings and a coil. There is a stationary stator between the back and front covers. A belt connected to the crankshaft causes the rotor to rotate. To rectify the current in terms of voltage and strength, a diode rectifier is used.
Generator device
The transmitting link is brushes - sliding contacts. They carry control current from the voltage stabilizer. Due to the stabilizer, the generator creates a voltage of about 14 Volts, regardless of the engine speed. It is important that the regulator remains in good working order, otherwise optimal voltage parameters will not be maintained. In this case, the auto electrician may fail.
The temperature of the operating generator is reduced by fans. The device is attached to the brackets using four bolts. It can be seen if you open the hood. The mounting points are located on the covers.
Appearance of the generator for Priora
It is important to promptly identify problems with the power supply. The first symptoms are the flashing of the headlights and the appearance of a warning light on the dashboard. If the generator breaks down or fails completely, the battery quickly runs out of power. In this case, it is impossible to even start the engine. The car cannot move.
How to tension a belt and check its tension
For Priora, in addition to the original ones, similar belts from foreign brands such as Contitech, Dayco, Gates, and Flennor are recommended.
- Loosen the roller nut; you will have to hold the cage with a wrench. By then rotating this key, the clip can be turned.
- Tighten the nut against the roller. Check the quality of tension only on the long section between the pulleys. If, when pressing on the belt in this place, it bends no more than 10 millimeters, the tension is appropriate.
- If your Lada has a hydraulic booster, you should tighten it a little more. If you don't pull it tight enough, it will whistle obviously, a defect that can be easily detected by ear. Then pull it a little tighter. If you hear not a whistle, but a hum, the belt, on the contrary, needs to be lowered.
On a Priora, in a regular service, changing just the belt can cost from 300 rubles (not counting consumables). If the generator is with rollers or mounted, then the price will increase significantly to one and a half thousand rubles. Do not forget the receipt for the services provided; the warranty for the work performed must be at least six months; if the belt deteriorates due to poor installation or tension, you must demand a replacement at the expense of the service.
The replacement generator itself starts at 5 thousand rubles. The cost of removal and installation work alone will average 1000 rubles for simple models.
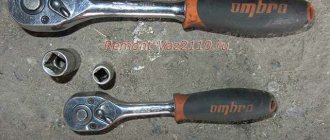
Required tools and materials
Most motorists already have everything they need for this operation. Therefore, you won’t have to spend money on buying expensive equipment or consumables. The following tools should be at hand:
- Wrenches with a diameter of 10, 13, 17 mm.
- The collar is L-shaped.
- Combination and socket wrenches with a diameter of 13 mm and 17 mm.
- Screwdriver with star bit.
- A prybar or small crowbar.
- Flexible extension.
- Lubrication - may be required to treat bolts that are difficult to loosen.
For convenience, you can replace the wrenches with a set of sockets with extensions. It is also advisable to put stops, otherwise the wheels may roll during repair work.
Algorithm for removing the generator
In any configuration, it is initially necessary to prevent the flow of electricity. To do this, disconnect the negative terminal from the battery.
Next, perform actions in the following sequence:
- remove the generator drive belt;
- remove the rubber cover, which is secured with a nut;
- remove the connection wires with the contact pin;
- unscrew the lower fastening nut;
- remove the nut with sleeve;
- remove the lower fastening bolt;
- remove the bolt and remove the tension bar.
Repair of the Lada 2171 generator, the procedure for assembling and disassembling the Lada 2170 generator, checking and troubleshooting the generator of the Lada Priora car. Diagnostics of electrical circuits of the VAZ 2170 Priora. Instructions for repairing electrical equipment of the generator and starter of the VAZ 2171 Priora. Operation of the anti-theft system, battery, light alarm. Car diagram.
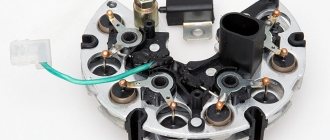
You will need: flat and Phillips blade screwdrivers, 8" and 10" wrenches, 8" and "24" socket wrenches, hammer, tester. 1. Remove the generator from the Lada Priora car (see “Removing and installing the generator”). 2. Remove the voltage regulator (see “Checking and replacing the voltage regulator with brush holder”). 3. Unscrew the three nuts securing the rectifier unit and the two nuts securing the spacer bushings for the plus terminal and the generator excitation terminal... 4. ...then remove the bushings. 5. Unsolder the six terminals of the stator winding... 6. ...and remove the rectifier unit from the Lada Priora generator.
Note
This is what the removed rectifier unit looks like from the side of the protective casing...
...and so - from the stator side.
This is what a capacitor looks like, which is non-removable. 7. Check the “negative” diodes by connecting the “positive” (red) probe of the tester to the “negative” plate (bus) of the rectifier unit, and the “negative” (black) probe alternately to the three contact terminals of the diodes in three mounting places (one at a time) stator windings of the VAZ 2172. If the diodes are in good condition, the tester will show 580–620 Ohms. 8. Connect the “negative” (black) probe of the tester to the “minus” plate of the rectifier unit, and the “positive” (red) probe alternately to the same three contact terminals. If the diodes are working properly, the tester will show an infinitely high resistance.
9. If the tester shows low or close to zero resistance, then the diode is “broken,” if the tester reading tends to infinitely high resistance, regardless of the color of the connected probes, then the diode is “broken.” In both cases, the rectifier unit must be replaced. 10. Check the “positive” diodes in the same way, but only relative to the “positive” plate of the rectifier unit or the “B+” terminal of the generator. 11. Check the stator windings with a tester for the absence of a break (diagram with solid lines) and for the absence of a short circuit to the VAZ 2170 Priora starter housing (diagram with dotted lines). When taking measurements, make sure that the winding leads do not touch the generator cover. 12. Mark the relative positions of the Lada Priora generator covers... 13. ...unscrew the four coupling bolts... 14. ...and, using a screwdriver, remove the VAZ 2171 generator cover from the side of the slip rings. 15. Remove the stator from the cover. 16. Inspect the stator. There should be no traces of the armature touching the stator on its inner surface. If there is wear, the bearings or alternator covers must be replaced. 17. Place the spanner on the nut and through its hole, insert the hex key into the shaft hole. Unscrew the nut with a spanner wrench, holding the shaft from turning. 18. Remove the spring washer and pulley from the rotor shaft. 19. Remove the rotor shaft from the bearing. If necessary, screw the pulley fastening nut onto the rotor shaft and press the rotor shaft out of the bearing through a wooden spacer with light blows of a hammer. 20. Inspect the cover on the drive side (assembled with the Lada Priora generator bearing).
21. If, when rotating the bearing, you feel play between the rings, rolling or jamming of the rolling elements, the protective rings are damaged or there are lubricant leaks, replace the bearing, and if cracks are found in the cover, especially in the places where the generator is attached, it is necessary to replace the cover of the Lada Priora generator. 22. To replace the bearing or cover, remove the four screws securing the bearing thrust washer... 23. ... and remove the washer. 24. Using an aluminum spacer, press the bearing out of the cover of the VAZ 2171 generator with light blows of a hammer. 25. Press the new bearing into the cover using a socket of a suitable diameter. 26. Inspect the slip rings. If they have burrs, marks, scratches, signs of wear from brushes and other defects, the rings must be sanded. If damage to the rings cannot be removed with sandpaper, turn the rings on a lathe, removing a minimum layer of metal, and then sand them. 27. Check the resistance of the rotor winding with a tester by connecting it to the slip rings. If the tester shows infinity, it means there is a break in the rotor winding and needs to be replaced. 28. Check that the rotor winding is not shorted to the housing by connecting the tester leads to any slip ring and the rotor housing. The tester should show infinity. 29. Check the ease of rotation of the bearing on the slip ring side. If, when rotating the bearing, you feel play between the rings, rolling or jamming of the rolling elements, the protective rings are damaged or there are lubricant leaks, the bearing must be replaced. 30. To do this, use a puller to press the bearing off the rotor shaft and press on a new one using a suitable mandrel, applying force to the inner ring of the bearing. 31. Inspect the generator cover from the slip ring side. If cracks are found, the cover must be replaced.
Helpful advice: Replace all parts in specialized workshops or at an authorized dealer, since the cost of spare parts is quite high, and replacing parts is labor-intensive, using professional tools. In addition, in these cases, qualified diagnostics is required. After repairs, the generator must be tested on a diagnostic stand. Such a stand simulates the real operation of a generator with variable loads, while at the same time continuous monitoring of the charging voltage and current is carried out. Based on the results of the inspection, the contractor provides a guarantee both for spare parts purchased and installed by him, and for repair and diagnostic work performed.
32. Assemble the VAZ 2170 generator in the reverse order of disassembly, orienting the generator covers and stator housing according to the marks made earlier.
What bearings are on the Priora generator (VAZ 2170): size, price, article number
We have already figured out how to replace failed parts. Now it remains to understand which bearing is better to buy. There are different generators on Priors - 115A or 90A. The second is for a less powerful car without air conditioning and power steering. Ball bearings have a number (marking). The front element is 6303, the rear element is 6202.
There are a lot of both original and non-original spare parts on the market:
- Front ball bearing 6303: FAG 6303 2ZR (Germany), SKF 6303-2Z (Sweden), KOYO 6303 ZZ, CM (Japan), NTN 6303 ZZ (Japan).
- Rear ball bearing 6202: FAG 6202-С-2HRS, SKF 6202-2-RSH, KOYO 2RS, NTN; 6202LLU.
In addition to the bearings listed above, below is a table that will help you navigate the offers on the market and select the best quality part:
Selecting a generator bearing - price and manufacturers
| No. | Brand | Catalog number | Price 2022, rub. | ||
| Front | Rear | Front | Rear | ||
| 1 | ASAM Romania | 30904 | 30903 | 200 | 270 |
| 2 | Bosch Germany | 1120905533 | F00M990410 | 420 | 450 |
| 3 | NTN France | 6202-LLU | 6303-LLU | 280 | 330 |
| 4 | KOYO Japan | 140084 | 140093 | 400 | 500 |
Priora generator bearing dimensions
| Characteristic | Unit | Values according to GOST (TU) | |
| 6-180202 | 6-180303 | ||
| Inner diameter | mm | 15 | 17 |
| External diameter | mm | 35 | 47 |
| Height | mm | 11 | 14 |
| Static load capacity | N | 3550 | 6650 |
| Dynamic load capacity | N | 7800 | 13500 |
| Speed | rpm | 24000 | 19000 |
| Radial clearance | mm | 0,008-0,022 | |
| Steel type | — | SHH-15 | |
| Hardness of rings and balls | H.R.C. | 61-65 | |
| Lubricant type | — | C17, Litol | |
| Ring roughness | Ra | 0,32 | |
| Torque | H*M | — | |
| Number of rolling elements | PC. | 8 | 6 |
| Ball diameter | mm. | 5,953 | 9,525 |
| Weight | G. | 0,045 | 0,115 |
Lada Priora Hatchback Beast! › Logbook › Replacing the Lada Priora generator
Hi all! I'll tell you about replacing the generator. When buying a car, the seller casually said that there was something wrong with the generator, I didn’t attach much importance to it, it was my first car, but in vain) One summer it wouldn’t start for me, and I was standing backwards downhill, leaving the yard that overlooks onto a one-way road with a slope such that it’s downhill = oncoming traffic) And I’m with a girl and this is the first time like this) Somehow I got out of the yard, let’s go downhill, I’m trying to start it, it won’t start, in general it was complete fail)) After that I decided to figure out what was wrong with my battery and generator. BATE generator 90A, from the factory Without load it produces 13.8V, under full load the voltage drops to 12.4V. Now everything has fallen into place. I started to find out that no one repairs generators, they can only change everything, I don’t understand this and there are no conditions to remove it, leave the car somewhere, figure it out and put it back (you need a pit with electricity)
Cold weather is upon us, winter is coming, I don’t want the car to let me down. I was looking for a BOSCH 115A, but they are unacceptably expensive, and in one place they offered me a BOSCH 90A for 10,000 rubles! In general, the choice fell on the Kzate 115A and spare parts are easily accessible, unlike the BOSH ones. At the VAZ representative office, a replacement costs 650 rubles, but I really wanted to do it myself!
Source
Step-by-step instruction
- Remove the engine protection from below.
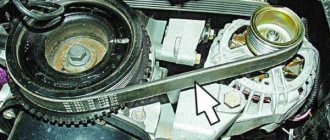
- Remove the ridge belt driving the air conditioning compressor and generator.
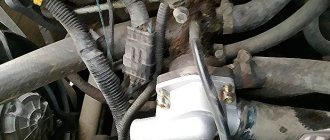
- Disconnect the contacts from the generator: first, under the rubber protective cap, terminal B+ (it is secured with a 10 nut), then terminal D (white chip).
Using a 10 mm wrench, unscrew the generator contact - Unscrew the top mount of the generator from the top of the engine compartment with two 13 mm spanners.
Using two 13 mm wrenches, unscrew the top mount of the generator - Remove the bolt.
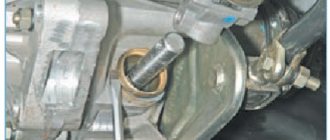
Remove the generator mounting bolt - Unscrew the lower mounting bolt from the bottom of the engine compartment using a 17mm wrench.
Unscrew the lower mount of the generator with a 17mm spanner - Unscrew the compressor mount to the bracket with a 12mm wrench. The compressor is secured with 4 bolts: one short, three long. Start with the bottom ones. It is more convenient to unscrew the upper ones using a wrench, an extension, a cardan and a 12mm socket.
Start with the lower air conditioning compressor mounting bolt. - Move the compressor first downwards, then to the right towards the body side member. There is no need to remove the tubes. On a note. It is not necessary to secure the compressor. It will be held in place by the surrounding parts.
- Remove the bolt with metal sleeve from the lower mounting.
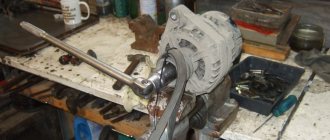
Remove the bolt with metal sleeve from the lower mounting of the generator - Pull the generator down from the engine compartment.
Pull the generator down from the engine compartment
Repair work
Replacing a Lada Priora generator with air conditioning
If you need to replace a Priora generator with air conditioning, then there are two nuances that lie in the manufacturer of the air conditioner. Panasonic allows you to remove the unit without a compressor, but the Hull compressor will not allow you to get the generator.
Removing the generator from a Lada Priora with air conditioning step by step:
Modification of the VAZ 2110 generator (installation of a diode)
| The vehicle charging voltage level must comply with the requirements of the vehicle instructions and be within the range of 13.9-14.4 Volts, regardless of the operating mode of the engines and switched-on consumers. How to increase the voltage of a VAZ 2110 without much effort? One of the simple options was suggested by Illuzion. |
Modification of the VAZ generator from Illuzion
There are many consumers in the car: air conditioning, heated seats, etc., then with everything turned on, the voltage dropped to 11.2V. You can increase the voltage in a VAZ 2112 car by 10% if you install a diode in the VAZ generator. For example, a diode from another similar diode bridge or KD202V. After modifying the VAZ generator, the voltage rose to 12.2V.
Photo report on increasing voltage from the Gloom Garage website
It was decided to increase the voltage using a diode in circuit D, the voltage regulator. Any diode with a breakdown voltage of 20V and a current of at least 5A is suitable. The voltage drop is preferably no more than 0.6-0.7V. The 2D219B diode is excellent.
| Urev(V) | Ipr(A) | Upr(V) | Irev(mA) | Frame | |
| 2D219A | 15 | 10 | 0.6(10A) | 20 (15V) | KD-11 |
| 2D219B | 20 | 10 | 0.6(10A) | 20 (20V) | KD-11 |
| 2D219V | 15 | 10 | 0.45(10A) | 20 (15V) | KD-11 |
| 2D219G | 20 | 10 | 0.45(10A) | 20 (20V) | KD-11 |
You will need half a meter of wire 2*0.75mm. We solder the ends to the female and male terminals No. 4. We dress them in cambric, or better yet, heat shrink. On the other side, we solder the diode. A mother to the cathode, a folder to the anode. We isolate the diode itself, for example, put it in a can of photographic film. Remove the “-” terminal from the battery. We unscrew the “+” wires from the generator, disconnect the “D” wire to the tidy. Having gained full access to the back cover, remove it by prying 3 latches. Here in front of us is our voltage regulator. Having threaded the wires from the diode through the slots in the cover, we connect the “mother” to the LV, the “father” to the standard wire. Close the lid and screw all the wires into place. I left the wire short, so I had to attach it to the phase sensor harness. The result is presented in the form of a table:
| Load | Voltage up to | Voltage after |
| without load | 14.2 | 14.45 |
| +dimensions | 13.8 | 14.45 |
| +PTF | 13.7 | 14.4 |
| +neighbor | 13.6 | 14.35 |
| +heater | 13.5 | 14.3 |
| +Fan | 13.4 | 14.2 |
| +far | 13.2 | 14.1 |
| + heating | 13.1 | 14.0 |
| +heater max | 12.9 | 13.95 |
The process of modifying the generator is also shown in the video: If you need to remove or disassemble the generator, you can use these instructions.
xn--2111-43da1a8c.xn--p1ai
see also
- Priora camshaft position sensor
- Priora misfires in cylinder 3
Misfire causes Priora- Disc brakes on Priora
- Priora on-board computer readings
- How to connect fog lights on a Priora
- How to connect an alarm system to a Priora
- How to connect fog lights on a Prior
- How to connect PTF to Priora
- Door trims for Priora
- Replacing the Priora throttle position sensor
Causes of problems
Lack of power supply may be due to mechanical damage or disturbances in the electrical device of the generator.
In the first case it is:
- body deformation;
- violation of fixation (breakage of fastenings);
- wear of bearings, springs, couplings and other components.
Electrical problems on Lada Priora:
- interruption of the electrical circuit in the winding/short circuit;
- relay failure;
- disturbances in the conductivity of the diode bridge current;
- wear of carbon brushes;
- armature plate deformation/short circuit.
It’s good if the damage turns out to be minor, for example, wear of the carbon brushes. Then replacing them will solve the problem. In some cases, only a new unit can correct the situation. To replace the brushes, you can get by with freeing access to the dynamo without removing it, but replacement requires the complete dismantling of the equipment.
Given the differences in models, there are also nuances in removing the generator.