Radiator soldering
This type provides the highest quality repairs, but unfortunately it is more labor-intensive, although no special equipment is required.
Radiator soldering materials
Recommended for soldering cooling radiators, interior heaters (heater radiator) and air conditioners. To work you will need:
- soldering iron with a power of at least 100 W;
- soldering acid or other flux, special flux for soldering aluminum;
- solder;
- metal brush.
The technique is not complicated; after determining the location of the leak, you should:
- provide free access of the soldering iron to the soldering area;
- clean the soldering area;
- treat the area with flux.
- Heat the soldering iron thoroughly, heat the solder evenly and pour it over the soldering area.
The solder should flow well over the joint or surface. If this does not happen, then the surface is poorly cleaned and treated with flux.
What is the difference?
Is there a fundamental difference between different Lada car models when it comes to the operation of DTOZH?
It would be useful to note that there is an unspoken division of vase models into groups, thanks to which it is possible to carry out repair work on one car, relying on the instructions for another. This may not apply to all systems, but regarding this topic it works quite well and does not harm either the car or its owner.
The first group is the VAZ 2101 and the following models up to the VAZ 2107. The coolant temperature sensor on the VAZ 2106 is located in the cylinder head (cylinder head), like all cars of the model range listed above. Accordingly, the signs of breakdown, diagnostic and replacement methods will be similar for them.
What should you pay attention to if the coolant temperature sensor of a VAZ 2107 fails? First of all, this is the inability to start the engine in any weather, as well as poor idling, uncharacteristic exhaust color and excessive fuel consumption. How to replace a temperature sensor on a VAZ 2106? First of all, you need to cool the engine and drain the coolant.
Then remove the terminals from the battery and remove the protective casing, after which the wires are disconnected from the detector, it unscrews itself and a new one is put in its place
Reverse assembly manipulations are carried out and the engine is started in order to check the proper operation of the system.
Then remove the terminals from the battery and remove the protective casing, after which the wires are disconnected from the detector, it unscrews itself and a new one is put in its place. Reverse assembly manipulations are carried out and the engine is started in order to check the proper operation of the system.
How to replace a temperature sensor on a VAZ 2106? First of all, it is necessary to cool the engine and drain the coolant. Then remove the terminals from the battery and remove the protective casing, after which the wires are disconnected from the detector, it unscrews itself and a new one is put in its place. Reverse assembly manipulations are carried out and the engine is started in order to check the proper operation of the system.
- The second group is VAZ 21099, VAZ 2108 and VAZ 2109. Despite the apparent difference, the main nuances when working with DTOZh remain the same in the case of these car models. Moreover, no matter whether the VAZ 2109 is an injector or a carburetor, the signs of a device failure will be absolutely the same as the basic principles of replacing it.
- The third group is the VAZ 2110 injector/carburetor and the following VAZ 2111 and VAZ 2112. Regardless of the type of engine and its features (8 valves or 16 valves), the system still gives a signal if the DTOZh fails, it also fails, when the sensor is faulty and wastes fuel to the same extent where it is not so necessary, if the system is deceived by incorrect data. Replacing the coolant temperature sensor of a VAZ 2110 is possible on your own if you only have a key of the required size.
- The fourth and last group on the list is the so-called Samara - 2 series, which includes the VAZ 2113, VAZ 2114 and VAZ 2115. A distinctive feature of this model range is the presence of two temperature sensors - DTOZH and a coolant indicator sensor. The fact that there are two of them in no way complicates replacing a broken device, it only forces the owner to be a little more careful when diagnosing a malfunction.
How to drain antifreeze (antifreeze)
Replacing the cooling radiator on a VAZ 2107 (injector) is no different from similar work on a car with an installed carburetor. The first step is to drain the antifreeze.
You need to work with coolant carefully, because it is a rather toxic substance. Under no circumstances should you drain while it is hot. Wait until the engine has cooled down and only then begin work. It is more convenient to drain antifreeze in a pit. First you need to place a large container holding at least 10 liters. If there is no hole, you will have to tinker with finding a suitable container that would fit under the motor protection from below.
Important! Never open the expansion tank or radiator tank, or remove the clamps until the coolant has cooled. Otherwise, you risk getting burned and losing a large amount of expensive antifreeze due to its splashing under pressure.
Before starting work, you need to move the interior heater lever to the right position.
Fault diagnosis
If someone in this area carried out statistics, it would most likely turn out that in 99 percent of cases the radiator may be faulty for two reasons: contamination or loss of tightness.
- Contamination or scale occurs as a result of using low-quality antifreeze. Sometimes drivers fill the system with plain water, which will inevitably lead to the formation of plaque. Contamination of the internal surfaces and walls of the tubes leads to a decrease in the throughput of the mechanism, and also makes heat transfer less efficient. This is evidenced by frequent engine overheating, which can be judged by the engine oil temperature.
- Damage to the integrity of the structure. Most often we are talking about the formation of cracks or holes on the walls due to flying stones or other reasons. If the gap is large enough, you may find a small puddle of antifreeze under the car after it has been idle. If it is small in size, then the antifreeze flows out only when the engine is warm and immediately evaporates, leaving no traces behind. But a decrease in the coolant level in the expansion tank indicates that the seal is broken somewhere.
To eliminate the malfunction or replace the radiator with a new one, it is necessary to dismantle it. But before that you will have to drain all the antifreeze from the system.
Radiator repair
Remove severe contamination by washing with cleaning agents. To do this, unscrew the metal tubes from the radiator, after which we fill the heat exchanger with a cleaning agent, give time for the substance to take effect, and then rinse the radiator with running water.
As cleaning agents, use special liquids for cleaning radiators or use traditional methods (citric acid solution).
If flushing does not help and the radiator is blown through with force, only mechanical cleaning can help. But it is not always advisable to do this, since you will have to disassemble the radiator and unsolder it. It is not always possible to put it back together qualitatively.
As for leaks due to cracks, if they appear on the tubes, it is easier to buy new tubes than to repair the breakdown. If the radiator itself is leaking, try to solder the crack (if the radiator is made of brass). Radiators made of brass lend themselves well to soldering, but this work should be entrusted to a professional.
Aluminum radiators cannot be soldered, so if a crack forms, they are replaced.
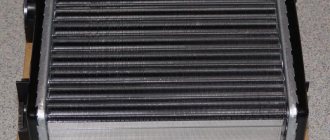
Before installing the heater radiator in place, evaluate the condition of the foam rubber seal installed in the heater body around the perimeter of the heat exchanger seat. If the seal is in a condition unsuitable for further use, we replace it.
Installing the radiator and assembling the stove is carried out in the reverse order to that described above. In this case, pay special attention to the places where the tubes connect to the radiator - it is better to replace the rubber seals and tighten the fasteners well.
After assembling the stove and connecting it to the cooling system, during the first time the car is used, you need to periodically inspect the pipe connections for leaks.
Self-diagnosis
If fan malfunctions are detected, it is necessary to find their cause. To do this, you can follow the following algorithm:
- Check the fluid level in the radiator. If there is a shortage, add antifreeze or water to the device.
- Make sure that when the fluid temperature is high, the radiator also heats up. Otherwise, we can conclude that the problem is related to the thermostat.
Next, checking the forced airflow system itself should begin with the sensors and continue point by point until the cause of the malfunction is found:
- In carburetor “sevens”, with the ignition on, disconnect the terminal blocks from the fan switch sensor and short them together. Starting rotation indicates problems with this device.
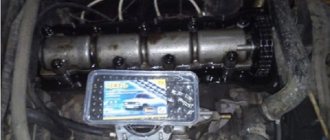
- In injection models, turn on the ignition, disconnect the terminals from the coolant temperature sensor and use a multimeter or autotester to measure the resistance level of the connector contacts. At 90°C the resistance should be about 0.25 kOhm or approach zero.
- Using an autotester, check whether the fan circuit fuse F7 (located in the mounting block) is passing current.
- Diagnose the electric motor by connecting it directly to the battery.
- Check if the relay contacts are burnt out.
- If all the previous elements of the circuit are in good condition or have been replaced, all that remains is to make sure that the wiring is intact and that there is no dirt on the contacts.
How to check for leaks
To check how tight the radiator is, you need to use a large container of water. If you live in an apartment, a bathtub will do. We plug all the holes, immerse the device in water and apply 0.1 MPa of air pressure to it. If you have an aluminum model, then the pressure needs to be increased to 0.2 MPa. Air bubbles that appear in the water indicate depressurization of the device and show where the leak is located.
Self-diagnosis
If fan malfunctions are detected, it is necessary to find their cause. To do this, you can follow the following algorithm:
- Check the fluid level in the radiator. If there is a shortage, add antifreeze or water to the device.
- Make sure that when the fluid temperature is high, the radiator also heats up. Otherwise, we can conclude that the problem is related to the thermostat.
Next, checking the forced airflow system itself should begin with the sensors and continue point by point until the cause of the malfunction is found:
- In carburetor “sevens”, with the ignition on, disconnect the terminal blocks from the fan switch sensor and short them together. Starting rotation indicates problems with this device.
- In injection models, turn on the ignition, disconnect the terminals from the coolant temperature sensor and use a multimeter or autotester to measure the resistance level of the connector contacts. At 90°C the resistance should be about 0.25 kOhm or approach zero.
- Using an autotester, check whether the fan circuit fuse F7 (located in the mounting block) is passing current.
- Diagnose the electric motor by connecting it directly to the battery.
- Check if the relay contacts are burnt out.
- If all the previous elements of the circuit are in good condition or have been replaced, all that remains is to make sure that the wiring is intact and that there is no dirt on the contacts.
Functions and principle of operation of the VAZ-2107 cooling system
The engine cooling system of the VAZ-2107 belongs to the category of liquid, sealed, using forced circulation of coolant. To compensate for temperature fluctuations in the volume of antifreeze, an expansion tank is used in the system. The liquid heated in the engine is used in the interior heater, which is connected to the system by inlet and outlet hoses.
The cooling system includes the following elements.
- The tube through which coolant is discharged from the heater radiator.
- Hose supplying fluid to the interior heater.
- Thermostat bypass hose.
- Cooling jacket pipe.
- The hose through which fluid is supplied to the radiator.
- Expansion tank.
- Cooling jacket for the cylinder block and cylinder head.
- Radiator cap (plug).
- Radiator.
- Fan shroud.
- Radiator fan.
- Rubber lining for the radiator.
- Pump drive pulley.
- The hose through which fluid is removed from the radiator.
- Generator and pump drive belt.
- Pump (water pump).
- The hose through which coolant is supplied to the pump.
- Thermostat.
The main function of the cooling system is to maintain the engine temperature within normal limits, i.e. in the range of 80–90 °C. The operating principle is based on the removal of excess heat into the atmosphere through an intermediate technological link - coolant. In other words, antifreeze or other liquid, heated to a high temperature in the cooling jacket, is sent to the radiator, where it is cooled under the influence of air flows and again supplied to the engine. Circulation is carried out using a pump driven by a belt from the crankshaft - the faster the crankshaft rotates, the faster the coolant circulates in the system.
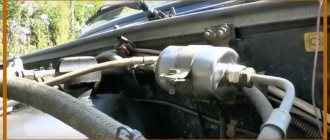
Cooling system radiator
The cooling radiator of the VAZ-2107, which is a key element of the car’s cooling system, is usually made of copper or aluminum. The radiator design includes:
- upper and lower tanks;
- cover (or stopper);
- inlet and outlet pipes;
- safety pipe;
- tube-plate core;
- rubber cushions;
- fastening elements.
In addition, the radiator housing has a hole for the fan sensor, which is usually located on the lower tank, next to the drain hole.
The radiator dimensions are:
- length - 0.55 m;
- width - 0.445 m;
- height - 0.115 m.
Product weight - 6.85 kg. To ensure higher thermal conductivity, radiator tanks can be made of brass. The core is assembled from thin transverse plates, through which vertical tubes soldered to them pass: this design allows the liquid to be cooled more intensively. To connect to the cooling jacket, there are nozzles on the upper and lower tanks on which hoses are attached with clamps.
Initially, the manufacturer for the VAZ-2107 provided a copper single-row radiator, which many car owners replace with a double-row one (with 36 tubes) to increase the efficiency of the cooling system. In order to save money, you can install an aluminum radiator, which, however, is less durable and difficult to repair. If necessary, the “original” radiator on the “seven” can be replaced with a similar element from any “classic” by performing a certain reconstruction of the fastening elements.
I had several classic VAZs, and different radiators in the stoves and in the cooling system. Based on operating experience, I can say one thing: the heat transfer is almost the same. Due to metal tanks and an additional row of cassettes, brass is almost as good as an aluminum radiator in terms of heat transfer. But aluminum weighs less, is practically not subject to thermal expansion, and its heat transfer is better; when you open the heater tap, brass produces heat in almost a minute, and aluminum in a couple of seconds. The only negative is the strength, but in our country everyone is trying not to attract masters, but to do something themselves with crooked hands using a crowbar and a sledgehammer. And aluminum is a delicate metal, you need to be gentle with it, and then everything will be fine. And many say that the pressure in the cooling system vomits them. So if you monitor the valves of the expansion caps and the cooling radiator, then there will be no excess pressure.
Madzh
https://otzovik.com/review_2636026.html
Dismantling algorithm
VAZ cars of the classic family, which includes modification 2107, are good because to remove the heater radiator you do not need to dismantle the front panel, so the work of removing the heat exchanger of the interior heating system is not difficult. No specific tools are required, just 8 and 10 size screwdrivers and wrenches are needed.
Algorithm for removing the heater radiator:
Video: VAZ 2107 Replacing the heater radiator
- Drain the coolant by unscrewing the drain plugs on the engine and main radiator.
- On the left side of the engine shield (standing in front of the car) we look for two rubber tubes through which coolant is supplied and discharged to the heater. We loosen the clamps of these tubes and tighten them.
- We unscrew the screws securing the rubber seal through which the metal radiator pipes pass. Let's remove the seal.
- We move to the salon.
- We dismantle the shelf under the storage compartment on the passenger side. To do this, you need to unscrew the screws that secure it.
- Remove the lower part of the center console. It is attached to the floor and front panel with self-tapping screws. Since keys, a cigarette lighter, and a clock are installed on the lower part, after unscrewing the fastening elements, we move the box toward you (by turning on the reverse gear at the gearbox) and disconnect the wiring going to the indicated elements (it is better to mark the wires so as not to confuse them during assembly). After this, the box can be removed from the cabin.
- Unscrew the control mechanism cable from the antifreeze supply shut-off valve.
- We disconnect the lower part in which the fan is located from the stove body. It is attached to the top of the case using 4 latches installed on the sides. Use a screwdriver to pry up the latches, after which the lower part of the case will drop down. We move it to the side or completely remove it, having first disconnected the power wires of the fan motor.
- After dismantling the bottom of the case, you will have access to the radiator, which can be removed by pulling it down using the metal pipes.
Note that this is only one of the methods for disassembling the stove on a VAZ-2107. It is not necessary to drain the antifreeze; you can disconnect the rubber tubes without removing them, and 1.0-1.5 liters of coolant will flow out of the cooling system, which are topped up after assembly. The main thing is that after disconnecting the tubes, lift their ends up and secure them in this position.
During the disassembly process, you can immediately disconnect the pipelines from the radiator along with the shut-off valve and then remove the heat exchanger itself.
The radiator is leaking, what to do?
Above we described what will happen if you don’t know how to stop the radiator from leaking and bring it to the point where the antifreeze level gradually decreases. We also clarified that this situation must be eliminated immediately, but some car owners solve such problems in a different way. If the leaks are minor, they simply add antifreeze to the radiator, checking the level regularly. This method is not financially justified and can lead to the above-mentioned consequences if you miss the moment when the cooling radiator leaks more and the antifreeze level drops faster than the car owner expected. Therefore, even minor damage should be repaired using special adhesive and sealant.
External sealant
If a small radiator leak is detected, sealant is considered the best and most convenient way to eliminate it. It is especially effective for repairing plastic components of an assembly if they are cracked. This product works less well with metals, but its technical capabilities are enough to eliminate small cracks when the radiator leaks. It contains metal shavings, which strengthen the frozen layer of material. It is necessary to work with this sealant quickly, because it sets in a few minutes. Complete hardening occurs within several hours. It is necessary to study the manufacturer's recommendations, because some sealants completely harden within 24 hours.
For those who do not know how to fix a small radiator leak, it is worth saying that before performing this work, the edges of the crack must be processed and then degreased. Otherwise, the restored area will be weak, and the formation of a new crack on it will remain a matter of time. The sealant consists of two components that must be mixed before use, and only then applied to the damaged surface to repair a leak in the radiator. Depending on the location of the damaged area, some work can be performed without removing the unit. If the crack is in a hard-to-reach place, you will have to dismantle the part to carry out repairs.
Internal sealant
We looked at how to seal a leak in the radiator from the outside of the unit. But manufacturers also offer a series of sealants for internal use. The principle of operation of such a product is that it is poured along with other additives into the coolant and circulates through the system. For those who do not understand how to repair a leak in a car radiator in this way, it is not difficult to explain everything. This product contains in its component composition plastic chips, which, due to the presence of a water-soluble monomer and access to oxygen, polymerize, tightening cracks from the inside. This seals the cooling system.
Why do you need a fan?
During the hot season or while driving on city roads, the volume of natural air flow may not be enough to operate the cooling system. Then forced airflow is turned on using a fan installed on the radiator housing.
In the first VAZ-2107 models, this process is started mechanically: the fan impeller begins to rotate as soon as the engine is started. The fans of later “sevens” are equipped with electric motors with special sensors that automatically respond to high coolant temperatures (90°C and above). This way, mechanical fans run continuously, while electric fans only run when needed.
Repairing a radiator without removing it from the car
The radiator can be repaired without removing it from the car and without disassembling it if the damage is in the upper accessible part. To do this, you need to prepare the following equipment:
- Hairdryer for warming up;
- Welding hair dryer;
- Soldering iron with adjustment;
- Flat electrodes made of polyamide.
The welding area must be thoroughly cleaned and degreased. We prepare a patch according to the size of the damage. It needs to be cleaned well. Apply a plastic patch to the damaged area and heat it with a welding hairdryer, setting the turbo mode. Gradually, the patch material melts and spreads over the surface of the radiator; for reliable adhesion, the patch must be pressed with a heated soldering iron. Heat the entire patch thoroughly and smooth the edges.
Small cracks can simply be melted with a hot soldering iron. The edges of the crack will melt and join together.
The technology looks like this:
- We warm up the damaged area with a hair dryer;
- Using a hot soldering iron, we gradually pass along the entire length of the crack;
- Carefully level the surface of the molten plastic.
In an emergency, you can repair a plastic heat exchanger using modern glue. To do this, you need to apply a small amount of special glue with a hardener to the area to be repaired and wait a little while for the glue to harden. In this way you can seal a small crack.
Coolant suitability
The refrigerant is checked based on monitoring its freezing point. This temperature increases over time as the glycol content in the liquid decreases, which evaporates faster than water. Control can be carried out by measuring the density of the liquid with a hydrometer.
Measuring the density of antifreeze can also be done using an optical disc tester - a refractometer. This instrument uses the relationship between the concentration of glycol in a liquid and the refractive index of light. A drop of the material under study is applied to the prism of the device, and it is observed where the boundary between the white and blue fields lies. Two scales are used for two grades of glycols.