A complete replacement of VAZ 2107 thresholds is the type of repair that sooner or later every vehicle owner will have to do, even if from the first day the body was treated with anti-corrosion compounds and the car was operated in a gentle manner. The last model of the classic sevens rolled off the assembly line in 2012 and the minimum age of the youngest car is 8 years.
What parts do the thresholds of the VAZ 2107 consist of?
Thresholds on a VAZ are considered non-removable body elements. The parts are welded to the bottom and, in addition to their main purpose, protecting the body from mechanical damage, they perform a power function, increasing the overall rigidity of the vehicle’s base.
The iron bears the general structural load, so a rotten threshold primarily affects the overall geometry of the body, the doors begin to shift, the shape of the bottom changes, and as a result, the main components and assemblies move out of their place. The thresholds on the VAZ are structurally similar to a hollow box. They consist of the following parts:
- External element. Performs a decorative function and protects the body from external influences of an aggressive environment and mechanical damage.
- Amplifier. The power load element is a stamped sheet of rolled steel.
- Connector. The element is located inside the threshold block, connected by spot welding to the amplifier and the outer part, providing the necessary rigidity of the structure.
In cars assembled before 2000, rolled steel of maximum thickness was used for all body elements; the elements were characterized by increased resistance to corrosion. Since 2000, the thickness of the rolled sheet has decreased, the design of the threshold has also changed, and a partial internal connector was used during assembly.
When choosing a repair, it is necessary to take into account the design features and complete any intervention with anti-corrosion surface treatment, since galvanizing of the metal is not carried out.
Description and purpose
Technologically, the threshold is a hollow box welded to the bottom of the car using gas or electric welding. Structurally, the part consists of four parts connected to each other by spot welding; the total length of the part corresponds to the length of the sidewall. The design includes:
- Overlay or outer part. A metal plate that is located on the outside of the car. Spot welded to the amplifier.
- Amplifier. The power load element is a plate of perforated stamped steel, welded to the bottom of the car.
- Connector. The element is visible from below the body and connects the inside of the sill and the amplifier.
- Inner part. A strip visible from inside the cabin that is attached to the amplifier and the base of the underbody.
Thresholds for all models of the VAZ line belong to the load-bearing elements of the body, which bear up to 25% of the force and vibration load. Factory welding covers the sill edges of the front and rear fenders, which are overlap welded to the part. When completely replacing an element, it is possible to cut out the threshold without dismantling the wings. The cutting runs near the factory welds. In addition to power load, the elements provide protective and decorative functions:
- They give the car a finished look and aesthetics.
- Protect the underbody and interior of the body from corrosion due to the penetration of salt reagents and moisture.
- They take on the mechanical impact from gravel flying during movement and impacts when moving over obstacles.
Why do you need a threshold amplifier?
The thresholds on Zhiguli are reinforced with a metal plate, 0.8 mm thick, with perforations (holes) along the length. The cost of the part does not exceed 400 rubles; when replacing, a set of 2 pieces will be required.
The amplifier is designed for the stability of the entire body structure; the part accounts for up to 30% of the entire vibration load and up to 70% of the force load. The structure can be strengthened using a separate, non-production metal, and a plate of the required thickness and length can be selected for repair.
Average prices for parts for VAZ 2106
Thresholds for the VAZ 2106 are today produced by several companies, the price of a set starts from 1,600 rubles. It includes:
- threshold - 2 pcs.;
- amplifier - 2 pcs.;
- connector
There is an option to select individual elements or order the production of metal plates according to factory sizes. Companies that manufacture thresholds, fenders, etc. use cold-rolled steel with a thickness of 1 mm for the outer part, from 1.5 mm for the amplifier, the cost is from 700 rubles. for one amplifier, from 1500 rubles. behind the bent outer profile.
When choosing parts, you need to pay attention to the following:
- The metal must be at least 0.8 mm for the external trim, at least 1.5 mm for the amplifier.
- There should be no transport primer or any other paint, primer, etc. on the surface.
- The part may be longer than necessary, but not less than 160 cm.
If the replacement of threshold 2106 is carried out at a service station, the cost of the work is estimated at no less than 10,000 rubles. In the services you can buy all the necessary elements, anticorrosive, paintwork, etc., but you should be prepared that a complete replacement of the threshold from components and service materials will cost 25,000 rubles.
Reasons for replacing thresholds
Rotten thresholds on the VAZ 2107 are a matter of time. To extend the life of these body elements, you need to know the reasons why such an unpleasant problem as corrosion destruction occurs. The reasons why the threshold on the VAZ 2107 rotted are as follows:
- Corrosion - the underbody and sills are exposed to maximum moisture, which is the cause of damage to body elements. Moisture that gets inside the space of a part cannot evaporate for a long time, so a process such as corrosion occurs. The element deteriorates at an accelerated rate when it is exposed to water and reagents that are sprinkled on roads during icy conditions. The first thing that occurs is pinpoint corrosion, which is also called “saffron milk caps”. They are the first harbingers that you will soon need to resort to repairs.
- Mechanical impacts - damage to the car body can accelerate the process of rotting. This type of damage includes impacts from rocks, curbs or vehicles. When the device is deformed, the geometry of the body is disrupted. Mechanical damage causes damage to the paintwork, allowing moisture to enter and destroy the metal surface of the body.
If one of the above reasons is observed, then the driver will soon need to have the devices repaired. Repair most often involves replacing them. When replacing, you need to weld the thresholds, so you will need a welding machine.
What is needed for replacement
Replacing thresholds on a VAZ 2107 is a rather labor-intensive procedure, but almost every car owner can do it with his own hands. To repair thresholds, you will need to first prepare tools and materials. These include:
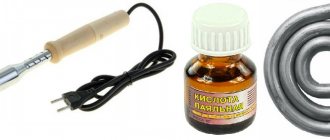
- Power tools - drill, grinder and welding machine.
- Primer and paint.
- Clamps - at least 4 pieces.
- Special joint sealant.
- New elements that will be installed to replace old ones.
These are the basic tools and materials. Additionally, you will need hand tools and supplies. During the work, it may be necessary to replace the amplifier if it is rotten. You can determine its serviceability after removing the old thresholds on a VAZ 2107 car. In this case, corrosion spots or holes will be detected on the amplifier. Let's look at how to remove and replace car body parts below.
Procedure for replacing thresholds on the seven
How to replace thresholds on a VAZ 2107 is described in detail in the material. We begin to carry out work, for which the following sequence is observed:
- Old rotten thresholds must be removed using a grinder. To do this, it is recommended to first remove the front and rear doors and drive the car onto a one-way overpass.
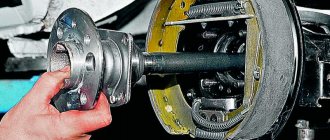
- After this, the condition of the threshold amplifier is checked. The amplifier looks like a steel plate with holes. If this plate shows signs of corrosion damage, then it is necessary to replace the entire amplifier or weld the damaged part.
- Using a grinder and special wheels, you will need to clean the surfaces for welding work. To do this, you will need to remove all unevenness and dirt.
- If amplifiers are being replaced, they must first be tried on and adjusted to the installation location. To do this, corresponding holes with a diameter of 4-6 mm are drilled every 50-70 mm.
- The amplifier is welded to the car body. The joints must be cleaned, and then the entire surface of the element must be treated with an anti-corrosion agent.
- After this, you can begin installing new thresholds on the VAZ 2107. The new element is tried on, after which it is fixed using clamps or clamping pliers.
- Holes are drilled through which the welding connection will be made. Any type of welding is suitable for the job, but it is better to use a semi-automatic welding machine, since the thickness of the metal thresholds does not exceed 1 mm.
- Next, welding is applied. First, we weld the part in the drilled holes around the perimeter, and then you need to weld the part to the car pillar. It all depends on the experience of the welder. The neater the seam, the less work will need to be done after welding.
- After the part is welded, you can begin cleaning the seams. After cleaning, you need to coat the joints with a special joint sealant.
- Now you need to putty the joints. Putty is needed to level the surface of the thresholds with the surface of the car body.
- At the final stage, the part is painted. It is important to take your time here and adhere to all technologically recommended deadlines. After painting, you must also wait until the paint is completely dry.
Step-by-step replacement process
- Start by completely disassembling the interior, removing seats, upholstery, and carpets.
- For ease of operation, dismantle the doors.
Protect your car windows from sparks when welding and using an angle grinder. Disconnect the battery terminals and place the vehicle on a pit or tipper. Take the new threshold and place it on top of the old one. Next, use a marker to mark the lines along which you will cut the old threshold. From the factory, the edges of the threshold go under the front and rear fenders and are welded with an overlap.
After drilling, use a knife to separate the threshold from the body along the resistance welding line. Drill out the resistance welding points and separate the amplifier from the body.
Assess the condition of the connector and replace it in whole or in part. After welding the connector, clean off any minor rust with a grinder and prime everything with epoxy primer.
Prepare the amplifier for welding, cut and prime where necessary. Drill holes at the resistance welding points at the top and bottom. Next, clean the soil in the weld areas and weld the amplifier.
After welding, clean everything and prime with epoxy primer. Prepare the threshold for welding, cut it to size and drill holes at the resistance welding points. Clean the transport primer from inside the threshold and prime the threshold with epoxy. Install the threshold on the body and secure it with body pliers. Make “pot mitts” and slowly scald the threshold around it. In our case, in addition to the threshold, the pillar between the doors was also damaged, so two patches were welded onto it.
Clean the weld seams and clear the transport soil from the threshold.
Prime the threshold with epoxy primer and let it dry thoroughly. “Stuff” the groove on the ground with Scotch Brite and apply sealant to the welds in the right places. If necessary, fill the face welds. Apply external corrosion protection using an air gun. After all work has been completed, apply an anti-corrosion compound to hidden cavities.
The process of replacing VAZ 2107 thresholds is clearly shown in this video:
Tools and materials for work
To repair thresholds on a VAZ 2107, you will need a lot of different tools and processing materials. Below is a list of tools and materials without which it is impossible to make a high-quality replacement of thresholds.
- Semi-automatic welding machine with accessories;
- Power tools (grinder, drill and accessories);
- A set of keys and sockets (for disassembling the interior);
- Ratchet driver;
- Hammer;
- Knife for chopping metal;
- Kerner;
- Marker;
- Compressor;
- Pneumatic gun for applying anti-corrosion agents;
- Several body pliers;
- Spray gun;
- Epoxy primer;
- Degreaser;
- Putty (with fiberglass and finishing);
- Red scotch-brite;
- Solvent;
- Sealant for welds;
- External anti-corrosion agent for application with an air gun (for example, Teroson RB2000, Body 951);
- Internal anti-corrosion agent for application with an air gun (e.g. APP-F400, Dinitrol ML, TecTyl 210R).
Selection of spare parts
The threshold on the VAZ 2107 consists of three parts:
- Faceplate.
- Amplifier inside.
- Connector.
Thresholds corrode differently for everyone, but, as a rule, if through holes appear, then all three parts need to be replaced.
- Right threshold 21010-5401060-00;
- Left threshold 21010-5401061-00;
- Amplifier 21010-5401100-00;
- Connector 21010-5101068/69.
Replacing thresholds with your own hands
Before changing the thresholds 2107, preliminary work is carried out related to the preparation of the tool and body. Required repair kit:
- pliers;
- Bulgarian;
- electric arc welding machine;
- drill;
- chisel;
- new threshold, amplifier;
- anti-gravel mastic;
- anticorrosive;
- sandpaper R-80;
- automotive putty;
- primer, degreaser;
- auto enamel.
Step-by-step algorithm for preparatory work:
- It is necessary to raise the car onto an overpass or level on a flat surface.
- Disconnect the negative terminal from the battery.
- Remove the doors. Leave the loops in place. In some cases, if the outer panel and amplifier are completely changed, the fender will be removed.
- Remove the headlights and front bumper.
- Carry out initial corrosion cleaning to mark replacement angles. If the threshold is cut out completely, remove the plastic lining from the pillars, wrap the floor covering, and protect the body paintwork with mounting tape or film.
Dismantling for complete replacement
Since the VAZ 2107 was produced for 30 years, depending on the year of manufacture, the car sills have a different design. The box may have one or two seals, a solid or separate amplifier. The instruction manual indicates the specific version of the unit for each year's car.
Cutting out a part during a complete replacement takes place in the following stages:
- Determine the lines of welding connections to the bottom.
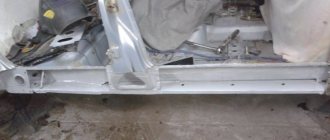
- Cut the threshold with a grinder in sections, starting from the front door, then to the rear and center, going around the base of the central pillar to avoid cutting out the pillar reinforcement.
- Drill out the factory contact welding spots.
- Remove the element.
- Clean the burrs and remove traces of cutting.
- Try on a new element. To do this, install the part on bolts or screws. The holes from the screws are then welded.
- Place the car in transport position, check the gaps between the door and the fender, and adjust the position of the new part if necessary.
After dismantling and preliminary fitting, all elements are welded. The inside must be treated with a rust converter and an anti-corrosion oil or paraffin compound.
Welding work
Overcooking the thresholds begins with installing the amplifier. The part is welded to the bottom through perforations; if a metal plate acts as an amplifier, then holes with a diameter of 6 mm or more should be drilled in advance. Step-by-step instructions for welding work:
- The amplifier is welded semi-automatically; for convenience, the plate is pressed with welding clamps. The order of welding the clamps: in the area of the front wheel arch, the central part, the rear wheel arch.
- For ease of work, if the amplifier in the area of the central pillar is not damaged, the overlay is welded on top of the old, pre-treated piece of the amplifier.
- The threshold cover is welded. It is recommended to secure the exterior with the doors already installed.
- The connector is attached. The part is connected to the underbody panel; it is more convenient to carry out welding work from the bottom of the car.
Overwelding can be carried out in two ways of connecting the part to the body: end-to-end and overlapping. When making butt joints around the perimeter of the parts being welded, there is no need to apply an additional layer of putty to level the surface.
An overlap connection is simpler; with this method, it is necessary to leave up to 1 cm of the old threshold in order to place a new element on the old part. This method is not used if corrosion has affected the bottom of the car, otherwise it will be necessary to weld metal patches or inserts for reinforcement.
Joining methods vary depending on the welding location. Butt welding with inserts is more often used at the edges of the threshold; overlapping or butt welding without inserts is used in the area of the central pillar.
Repair without welding
Thresholds 2106 are very rarely repaired without welding. This is due to the fact that the “youngest” car is 13 years old, such a service life for metal is critical. If necessary, you can patch corrosion holes with metal patch or use epoxy resin, putty or fiberglass. Necessary tools that will be needed for repair:
- sandpaper R-80;
- fiberglass cover;
- epoxy resin;
- rubber spatula, roller (optional);
- solvent;
- rust remover;
- automotive putty;
- aluminum powder;
- primer;
- enamel.
Repair with epoxy resin and fiberglass goes through the following stages:
- Clean the area of corrosion with sandpaper and rust remover until bare metal.
- Prepare epoxy resin, be sure to add aluminum powder to the mixture, this will reduce the fragility of the material after drying.
- Degrease the defect on the threshold.
- Apply a thin layer of glue to the surface and cover the damage with a piece of fiberglass. Cut the patch larger than the damaged area.
- If necessary, apply several layers of fiberglass, coating each layer with epoxy resin.
- Roll each layer with a roller to remove excess air.
- Treat the surface with automotive putty, leveling possible dents at the defect sites.
- After drying, use sandpaper to remove any rough edges.
- Prime the surface, let dry, and paint at the final stage.
If it is necessary to update the body after winter, then the repair procedure is similar; if there is no corrosion, the surface is cleaned, primed, and painted.
About local threshold repair
The need for such repairs arises when the threshold is not rusty, but simply deformed due to the impact so much that a hole appears in it. In this case, the car owner can resort to local repair of thresholds, which consists of straightening the deformed area and then welding it.
This task may seem simple to some, but it is not. Because local repair of thresholds requires special equipment and extensive experience working with a welding machine. A novice driver usually has neither the first nor the second. So there is only one way out: seek qualified help from a car service center.
Local repair sequence
Let's consider in general terms what exactly auto mechanics do when they get a "seven" with crumpled and torn sills.
- Hoses with small hydraulic devices are inserted through the hole into the threshold. Then pressure is applied to these mini-jacks from the compressor, and they begin to squeeze the crumpled section of the threshold outward, straightening it.
- Then one or more small anvils are installed under the raised section of the threshold and careful manual editing of the threshold begins using a special hammer. This is a very lengthy and painstaking procedure.
- After the deformed area is completely leveled, the hole in the threshold is welded. This can be either welding the torn edges of the threshold, or applying a patch if too large a piece has been torn out of the threshold and it is impossible to weld the edges.
Plastic thresholds
The VAZ 2107 is a rather old car, which is no longer in production at the moment. Nevertheless, the “seven” is still popular in our country to this day, and many drivers want to somehow make their car stand out from the crowd. Very often, a so-called body kit is used for this, which includes plastic sills (sometimes these parts are called sill moldings, sometimes plastic overlays, it’s all the same thing). The function of plastic thresholds is purely decorative; these details do not solve any practical problem.
A set of factory plastic thresholds for the VAZ 2107, which can be purchased at any tuning spare parts store
Particularly advanced drivers make plastic thresholds themselves. But for this you need to have special equipment for working with polymer material, plus you need to get the industrial polymer itself somewhere, which is not so easy. Therefore, car owners take the easier route and simply buy plastic thresholds; fortunately, there is no shortage of them now. But when choosing pads in a store, you should consider several nuances:
- In addition to purely aesthetic qualities, attention must also be paid to the mechanical properties of the thresholds. The linings purchased should not be too hard, because such products quickly crack, especially if the machine is operated in cold regions of the country. For this reason, fiberglass overlays should be abandoned;
- The best choice for the “seven” would be plastic linings with the addition of synthetic resins. These linings are flexible and do not crack due to temperature changes or exposure to road chemicals.
Step-by-step replacement process
Model 2110 is part of the AvtoVAZ classic line, and model 2111 completes the series. Restoring the threshold on cars begins with installing a connector, welding the amplifier and installing an external panel.
VAZ 2110 and 2111
For VAZ 2110, 2111, when repairing the sill, a part of the profile is installed; the craftsmen recommend using a metal plate for the amplifier, rightly believing that the original simple amplifier of the old brand is made of metal, which is not suitable for fully strengthening the body and protecting the bottom. Replacing the threshold on a VAZ 2110 in steps:
- Mark cutting lines for old thresholds. Place the car on an elevated platform. You don't have to turn it on its side.
- Use a grinder to cut out the threshold along the marking line, starting from the front doors to the central pillar, from the rear fender to the front pillar. The last thing to cut out is the area around the central pillar, without touching its amplifier. Before cutting, it is recommended to drill holes with a drill at the junction of the outer panel and the body, then cutting or cutting with a grinder will be faster and more accurate.
- Cut out the parts of the VAZ threshold amplifier.
- Clean the surface with a brush or disk mounted on an angle grinder.
- Weld the amplifier to the subframe.
- Overlap weld the connector and reinforcement.
- Attach the outer part of the sill and fit it to the body as tightly as possible, cut off the excess parts, and clean it. Grasp with clamps.
- Fasten with spot welding, weld in steps.
- Clean all welds with a grinder and putty the surface.
- Sand it, prime it and paint it at the final stage.
At the final stage, motorists install trims as a tuning element or decorate the car with body kits of various shapes. Considering that the ground clearance on the VAZ 2110 is small, the experts do not recommend installing “Fast and Furious” type body kits, but limiting yourself to the top and side decorative trims. The panels will provide a beautiful appearance and protect the bottom from premature corrosion.
VAZ 2107
Solid car sills made from a profile pipe are often installed on the classic model 2107 and Niva. In this case, a one-piece profile structure replaces the entire box. At the same time, the jacks are changed and the bottom is strengthened. Replacing thresholds on a VAZ 2107 with a pipe in steps:
- Tilt the car on its side, after removing the doors and wheels.
- Using a grinder, cut off the outer part of the old threshold and turn off the amplifier.
- Cut the square pipe to length, weld plugs at the ends of the profile. Weld the profile from the outside along the length in increments. In the central part, bend it to the shape of the original part. On the VAZ 2107, the outer trim has a recess in the central part. It is convenient to bend profiles with two hammers.
- Weld the cross members, from the sill to the side members and the jack mounts.
- Connect the profile to the bottom with metal inserts along the length.
- Clean the welding areas with a grinder, degrease, and treat with bitumen mastic. At the final stage, putty, apply primer, and paint.
VAZ 2108 and 2109
The standard amplifier for the VAZ 2109, 08 is made of metal up to 1 cm thick with perforations along the length. The replacement technology is no different from the VAZ 2111. For self-repair, you can use a metal sheet to replace the factory part.
Anti-corrosion treatment of thresholds
Treating thresholds with special compounds can significantly extend their service life. Here's what's required for this processing:
- safety glasses, rubber gloves and a respirator;
- electric drill with a metal brush;
- fine sandpaper;
- water;
- degreasing composition (usually white spirit is used);
- clean rags;
- construction hair dryer;
- anti-gravel bottle.
Sequence of operations
The anti-corrosion treatment itself does not take too much time. Much more time is required for preliminary preparation of the machine.
- The car is washed, special attention is paid to the thresholds during washing.
- After complete drying, the machine is installed on a pit or on an overpass (an overpass is preferable, since you can do without a flashlight there, but when working in a pit you will definitely need a backlight).
- Use a drill with a metal brush to remove all pockets of rust from the thresholds. The sills are then sanded with sandpaper, after which a thin layer of rust converter is applied to them.
- After drying, the surface of the thresholds is degreased with white spirit and dried.
- All parts of the body adjacent to the sills and not requiring anti-corrosion treatment are sealed with masking tape.
- Several layers of anti-gravel (at least three) from a spray can are applied to the thresholds. In this case, the can must be shaken periodically and kept at a distance of 30 cm from the surface to be treated.
The can of anti-gravel should be kept thirty centimeters from the threshold- The applied coating is dried with a hair dryer. The heating temperature should not exceed 40°C.
- After drying the thresholds, the masking tape around them is removed. You can drive a car no earlier than 3 hours later.
Let's summarize
In order to replace thresholds, you need to have many different tools, as well as have welding and painting skills. If you do not have the tools or space for repairs, we recommend turning to professionals. It will be much cheaper and faster. The price of replacing one VAZ 2107 threshold at a service station (with treatment) is from 7 to 14 thousand rubles.
Sources
- https://neauto.ru/osobennosti-remonta-i-zameny-porogov-na-vaz-2107/
- https://avtorazbor59.ru/stati/vaz-2107-zamena-porogov.html
- https://bumper.guru/klassicheskie-modeli-vaz/kuzov/zamena-porogov-vaz-2107.html
- https://autorn.ru/vaz/2107/443-zamena-porogov-vaz-2107.html
[collapse]
Approximate prices
Digesting thresholds in Russia on a VAZ 2107 car is not cheap. So, in most service stations in the country, this service costs approximately 5,000-15,000 rubles for the restoration of one lining. This price includes the cost of such work:
- Digestion – from 5000 rubles.
- Straightening the linings - about 3,000 rubles.
- Painting a part with a paint coating costs about 3,000 rubles.
- Removal of the threshold - from 2000 rubles.
- Reinforcement – from 4000 rubles.
- Digestion to order with installation - about 10,000 rubles.
Prices are for one threshold. The cost of urgent work and visiting an auto repairman will be individual in each case.