The Starline A93 operating instructions include an electrical diagram that must be followed when connecting the alarm. The service manual will allow you to perform the initial setup of the security system, including programming anti-theft options and automatic engine start.
Main characteristics of the model
Let's look at the characteristics that all models of the anti-theft system belonging to the A93 line have:
- The device provides protection in three stages. First comes the password, then the immobilizer, after which the car is opened by the standard system.
- The system includes controllers with remote adjustment functions. If they try to lift the car with a tow truck or a jack, the alarm will record the attempted theft and the siren will sound.
- Availability of an option for remote engine start - “smart” start at a specified time or by command from the key fob. Automatic start of the power unit can be carried out when the temperature drops to a certain threshold, using a timer, alarm clock, or after a set time period.
- If the machine is equipped with CAN and LIN lines, then the alarm installation procedure will not take much time. Thanks to their presence, the car owner will not have to plug the device into the car’s electrical circuits, which makes the security system even more reliable. The presence of the above tires helps to reduce the number of “brakes”.
- The anti-theft remote control is made of durable plastic. It withstands mechanical stress and does not crack.
- The presence of additional channels allows you to configure the car's light alarm, the activation of the side mirror folding device, etc.
- The range of the signal can be up to two kilometers.
You can learn about the features of using and setting up the A93 alarm using the example of a Kia Sid car from the video filmed by Andrey Popov.
Advantages and disadvantages
Advantages characteristic of this model of security systems:
- Remote engine start makes it possible to remotely start the engine and start driving in an already warmed-up car. For intelligent remote start of the power plant, the consumer does not need to purchase and install additional modules.
- Thanks to the t° sensors of the engine and the interior, you can set the autostart of the car based on temperature.
- Possibility to expand functionality by installing additional modules.
- A complete set of alarm systems is considered to be an advantage, since some alarm models do not have sirens or limit switches.
- The two-way communication function allows you to find out about the status of the anti-theft system without approaching the vehicle.
- Self-installation is possible thanks to CAN and LIN buses, which allow you to quickly install the alarm with minimal interference in the vehicle’s on-board network.
Disadvantages highlighted by consumers in reviews:
- Incorrect operation of the key fob. Over time, the communicator begins to function intermittently. This is due to wear on the device or damage to the internal components of the board. If the key fob does not work correctly initially, most likely the problem lies in the low noise immunity of the security system. Perhaps the reason is a factory defect in the signaling system.
- Low cost/quality ratio. Consumers note that the price is too high.
- Starline A93 alarms cannot be installed on all cars. For example, consumers note that this model does not fit the Lada X-Ray car.
How to disable service mode
Starline a92 alarm system with automatic engine start (operating and installation instructions)
In order to disable the service mode on the StarLine a91 alarm system, you should:
- Press key 3 on the communicator and wait for 2 signals to sound - 1 long and 1 short.
- Quickly press button 3 to move the flashing cursor to the key icon.
- Press key 2 and wait for 3 signals to play - 2 short and 1 melodic. The parking lights of the car will light up 2 times, the option will be exited and the illumination of the icon on the Starline A91 car alarm display will turn off.
To exit the service mode of the Starline a92 security system, in the cursor control option on the LCD monitor of the communicator, press key 4, select the key icon, and briefly press button 2. This action will remove the backlighting of the icon and disable the option.
In the Starline i93 immobilizer, the Valet option is disabled according to the following algorithm:
- The car's ignition system must be turned on.
- You must enter PIN COD 1 or 2. After entering the data correctly, a trill sound will sound.
- Wait 2 s and re-enter the information.
- After 5 seconds, turn off the ignition system.
- Wait 7 seconds and turn on the ignition. The immo block will signal with 2 long beeps that the service mode is disabled.
Disabling the “Valet” option in the Starline A96 security and telematics complex can be done in several ways:
- by controlling the cursor on the communicator display screen;
- by quickly simultaneously pressing the key fob keys 1-3;
- By holding down the label key for 5 seconds;
- sending an SMS with the message “50”;
- giving the command “50” through the voice menu;
- using the StarLine program on your phone;
- through your personal account on the company’s official portal.
Proper use – maximum effect
The installation instructions are also available online, allowing you to read them without downloading. The instructions are what you need to read first. There are several reasons for this:
- After reading the user manual, you will not break the key fob trying to learn how it works on your own;
- You will learn the full functionality of StarLine a93;
- You will be able to competently use all the capabilities of the device;
The operating instructions are available for download and online viewing on our website completely free of charge. After reading the manual, you will learn how to configure options individually, be able to use car autostart, learn how to receive car safety notifications on your mobile phone and discover many other possibilities.
Installation of car alarm Starline A63
Operating and installation instructions for Starline A91 with auto start
There is nothing difficult about installing the Starline A63 alarm yourself. The operating instructions clearly illustrate the connection diagram and procedure. But there is one feature that can spoil the mood. The compact housing of the central unit does not allow the connectors to snap off. Once you have inserted the connector into the socket, it will be impossible to pull it back out without removing the top cover. It opens quite easily, but the board is not secured with anything. You must be extremely careful not to short-circuit the contacts of the elements to the machine body during installation.
After the system is installed, it must be programmed according to the table that is published in the operating instructions. You should take this stage most seriously and check the settings of all functions. Otherwise, at the right time, the Starline A63 alarm will not work as you would like. For example, the siren volume is set to two levels out of 10. It must be increased. A correctly installed system does not cause failures during operation.
The Starline A63 car alarm provides a full range of security functions, is protected from burglary and will reliably protect your car from theft or robbery.
Installation instructions
User manual
- Absolutely legal (Article 12.2.4).
- Hides from photo and video recording.
- Installs independently in 2 minutes.
- Invisible to the human eye, does not deteriorate due to weather.
- 2 year warranty
Video “Review of the Starline A93 KAN+LIN alarm system”
The Autopulse channel presented a brief description of the capabilities and functions of this anti-theft installation for cars.
Do you have any questions? Specialists and readers of the AUTODVIG website will help you ask a question
Was this article helpful?
Thank you for your opinion!
The article was useful. Please share the information with your friends.
Yes (80.00%)
No (20.00%)
X
Please write what is wrong and leave recommendations on the article
Cancel reply
Rate this article: ( 5 votes, average: 4.80 out of 5)
Discuss the article:
Description
Starline b9 operating instructions
Automatic start is available as an option along with the alarm system. In this configuration, the engine starts remotely, and, if necessary, remotely in automatic mode. In the latter version, the engine starts at a specified time or at a specific temperature. Optionally, the security complex is equipped with a telephone control option. In this case, the alarm system is supplemented with a GSM interface, which sends information to the car owner’s smartphone. The keychain has a shock-resistant design. The design of the keychain is ergonomic. The internal antenna is protected. The 2CAN+2LIN option allows you to install a security alarm on modern cars equipped with CAN or LIN buses. As an additional option, it is possible to connect free monitoring. In this case, the car owner can track his vehicle on the website starline.online. The accuracy of location is measured in meters. The option is available if there is a GSM interface and when GPS-GLONASS is connected. Satellite systems are also an optional extra.
Options
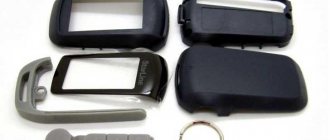
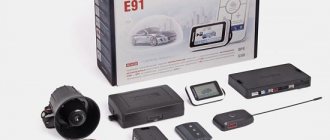
The Starline A93 alarm system with auto start is quite extensive. It includes not only the alarm itself, pagers and sensors, but also a lot of useful accessories and elements necessary for the successful installation of the system at home. All models, regardless of their cost or functionality, are supplied in the following kit:
- Detailed operating instructions.
- Guarantee for service in case of breakdown.
- User's note.
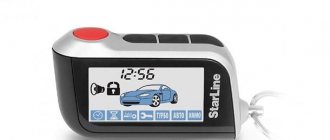
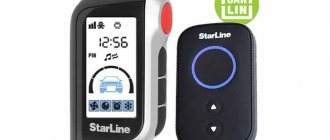
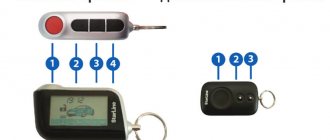
- The main key fob, equipped with an information screen and supporting feedback.
- The microprocessor unit that controls the system.
- Battery for the main key fob. It uses a AAA battery.
- Another pager. It does not have a screen, but is indispensable in case of loss of the main one.
- Power element.
- Signal transmitter and receiver.
- Inspector of standard immobilizer.
- Sound indicator.
- Wire for connecting batteries and controlling pulses.
- Cable connecting the module and temperature sensor to the microprocessor.
- An electrical cable for connecting 2CAN interfaces, if the system supports operation with this bus.
- All kinds of diodes.
- Self-tapping screws and terminals for grounding installation.
- A diode element that determines the state of the alarm system.
- Service mode key.
- Temperature sensor.
- An adapter for connecting sensors and devices.
- All kinds of diodes.
- Self-tapping screws and terminals for grounding installation.
Eco
The Starline 93/93a car alarm of the Eco series belongs to the budget price segment, but at the same time it has a lot of useful settings and functions. The system provides reliable machine protection and supports the following security functions:
- Dynamic security code with an individual encryption key.
- Control of the communication channel and the availability of an option to independently check the functionality of working nodes.
Eco alarms use service channels that regulate parameters or carry out maintenance of the security complex. The user of the machine himself selects the desired sensitivity of the sensors, the intensity of the siren sound, and can also turn on “hands-free.”
If desired, the driver can install a number of additional blocks on the device, including:
- Module for entering a vehicle without a key. This connection requires a CAN bus in the car.
- GSM device that allows you to track the location of the car.
- Block CAN+LIN or 2CAN+2LIN, if compatible with the vehicle.
By installing such blocks, the driver automatically increases the degree of protection of the car from unauthorized access and theft. The key disadvantage of the Eco version is the lack of advanced functions and monitoring of the alarm status.
GSM
The Starline alarm system with auto-start bc GSM module has more modernized technical characteristics and supports the following options:
- Conversational encryption of the code value when sending signals.
- Ability to function smoothly at different temperatures.
- Invulnerability to power surges in the vehicle's on-board network.
- Supports self-diagnosis functions of the microprocessor and communication channel.
- Carrying out service diagnostics using special pads.
- Identification using a secret password.
- Keyless entry to the salon.
Model A93 GSM is a telematic security system with the following functions:
- Monitoring the status of the machine and its location on the map using GPRS and GSM interfaces.
- Controlling your car using additional channels.
Can Lin
The Can+Lin series features improved tracking capabilities and extended range capabilities. If desired, the user can independently install additional accessories, expanding the basic functionality.
Devices in this series were created for the latest car models that will support updated options. If you place them on an old “penny”, most of the tools will be inaccessible. This is due to the lack of connectors.
Features of Kan-Lin alarms include:
- Identification using a personal encrypted code.
- Hidden activation or disabling of security functions on door locks.
- Keyless access to the inside of the car.
2can 2lin
When installing a 2can lin alarm with your own hands, you need to understand how this Starline anti-robbery mode works and how to configure it step by step. The functionality of models with this marking resembles that discussed in the previous version. However, these systems include advanced monitoring functions that allow the user to find a car from a great distance, even from another city or country.
To implement this task, you will need to purchase an additional GSM/GPS unit. The manufacturing company advises installing the model on cars manufactured no earlier than 2010.
The key functions of the alarm include:
- Enhanced code protection against electronic hacking or interception when transmitting signals from the key fob to the microprocessor unit.
- Wide range of temperatures in which the system operates smoothly.
- Stable operation during on-board voltage surges.
- Flexible self-diagnosis.
- Communication interface monitoring.
The Starline A93 2CAN+2L alarm version is considered more advanced and designed for expensive vehicles that require enhanced protection against theft.
2can+2lin gsm eco slave
Alarm with auto start Starline 2can+2lin gsm eco slave is the company’s most powerful and modern product, which is equipped with integrated monitoring systems that allow you to track the current location of the vehicle, providing maximum protection. The key difference of the series is its resistance to electronic hacking of the dialogue code.
Resistance to negative external influences and aggressive operating environments make the model an indispensable solution for residents of northern or southern countries with extremely hot or cold climates. Any voltage surges in the on-board network have virtually no effect on the operation and execution of basic commands by the alarm. The model kit is the same as in other versions of the A93. By installing the system on his car, the driver can monitor its placement without using additional satellite modules.
Dialog
In terms of characteristics, this system is practically no different from the previous one, and it is suitable for cars with Start/Stop buttons. The model has a multifunctional interface that is easily integrated into more than 300 cars. To configure additional options, you can use channels without installing external devices.
Optional functionality consists of the following features:
- Connecting a digital blocking relay.
- Installation of a GSM or GPS cellular communication sensor using one connector.
Alarm characteristics
Security functions of STARLINE A93
- Dialogue protection: the presence of a convenient interactive 128-bit control code, which cannot be penetrated by any of the known code grabbers (devices that allow reading the system code);
- Radio Interference ProtectionStarLine operates reliably in extreme urban radio interference environments
- SUPER SLAVE (optional) Car security control using a standard key fob with reliable additional interactive authorization using an additional StarLine key fob. Option available when integrating 2CAN or CAN+LIN interface
- Extended temperature range Operates at temperatures from minus 50 to plus 85 ° C
- Record energy efficiency Battery charge lasts up to 60 days in security mode
- Communication channel monitoring Continuous communication channel monitoring checks whether the key fob is within the alarm coverage area
- Authorization by PIN code (optional) Additional authorization by entering an individual PIN code. Option available when integrating 2CAN or CAN+LIN interface
- 3D shock and tilt sensor will work when jacking up and evacuating the car
- Telematics (optional) Remote control of vehicle security, with the integration of optional GSM-GPRS, GPS-GLONASS etc
- Control from your phone GSM interface allows you to control and receive alerts on your phone
- Free monitoring (optional) When you connect StarLine GPS-GLONASS-Master, you can find out the location of your car with an accuracy of several meters
- AutostartIntelligent autostart allows you to start the engine based on temperature, at a specified time or periodically
- 2CAN (optional) Integration of the 2CAN interface ensures installation of alarm systems on vehicles equipped with several digital CAN buses
- CAN+LIN (optional)Integration of the CAN+LIN interface ensures quick installation on vehicles equipped with CAN, LIN buses, such as: Lada Kalina, Lada Kalina II, Lada Priora and Lada Granta
- Flexible service channelsCan be programmed: hazard warning lights, folding mirrors, customizing seats for the owner and much more
- Shockproof keychain with protected antenna
Functions
The functions and capabilities of Starline alarms are quite extensive. They include the following items:
- “Super Slay” option, which guarantees enhanced protection according to three principles: dialogue encoding, standard security system and validator-blocker of the power unit. To change the alarm settings, the user uses a flip or simple key.
- GSM-GPRS and GLONASS modules are used as communication and positioning interfaces. The presence of telematics makes it possible to effectively track the coordinates of the vehicle via a smartphone. Any data about the condition of the car and its location will be transmitted in the form of SMS messages to a mobile phone. The user is also given the opportunity to use the official web resource.
- Ability to operate in conditions with increased radio noise. Protective capabilities are provided by a 128-channel transceiver.
- 3D shock sensor with the ability to remotely change operating parameters. Its presence allows the user to track the fact that the car has been stolen or towed.
- Remote start of the power unit based on temperature or time interval.
- Saving battery life. With this feature, the user can extend the battery life up to 2 months when using protective mode. This is due to proprietary technologies and software solutions that reduce electrical energy consumption.
- Flexible service channels for setting up the Starline A93 alarm, light indication and other functions. The user can independently control mirrors, seat adjustments and other parameters.
Starline a93 autostart
A93 allows you to start the engine automatically:
- by alarm clock - at a certain point in time; by voltage – when the battery voltage drops below the programmed one; by interval - after a certain number of hours (2, 4, 6, 8, 10... 24); by engine temperature – when the engine temperature drops below the programmed one (-3°C, -6°C, -9°C... -27°C).
2.1. Auto start on alarm clock
Before setting up autorun on an alarm, make sure that the time on the key fob is set correctly, the alarm is turned on and programmed for the time you need.
To activate the alarm, move the cursor to the alarm icon in the manner shown in the figure below.
Now briefly press button 1. One light signal from the car will follow, for five seconds the remaining time until the start of autostart will be displayed on the screen, the alarm icon will light up permanently.
2.2. Periodic autostart
In this mode, Starline A93 allows you to automatically start the car at certain time intervals - from 2 to 24 hours in increments of 2.
To enable interval autorun, move the cursor to the watch face icon as shown in the figure below.
Now briefly press button 1. One light signal from the car will follow, and for four seconds the current value of the interval autostart will be displayed on the screen (2H - 2 hours, 4H - 4 hours, etc.).
Short presses of button 1 change the value of autorun periods. Each press increases the interval by 2 hours.
When you select the autorun interval you need, press button 1 for a long time or simply do nothing for 4 seconds. The key fob will sound 2 beeps, the icon on its screen will light up permanently, indicating that automatic start by interval is activated.
After a few seconds, the engine will start automatically. You can turn it off immediately or let it run for the programmed time.
2.3. Starline a93 starting by engine temperature
The Starline A93 alarm allows you to autostart based on the engine temperature if it drops below the programmed one. The trigger range is assigned from -3°C to -27°C in steps of 3.
At least one hour passes between two consecutive temperature autostarts. For example, the autostart temperature is programmed to be -20°C. When the temperature dropped below -20°C, the car started, ran for 10 minutes and stalled. 40 minutes after stopping, the engine temperature again dropped below the programmed temperature. But the car alarm will not allow auto-start to occur. The next automatic start will occur only an hour after the car stalled.
To enable automatic start based on temperature, move the cursor to the snowflake icon as shown in the figure below.
Now briefly press button 1. One light signal from the car will follow, the key fob will emit a melodic signal and for five seconds the current temperature at which autostart will occur will be displayed on its screen.
Short presses of button 1 change the autostart temperature value. Each press changes it by 3°C.
When you select the autorun interval you need, press button 1 until you hear a beep or simply do nothing for 4 seconds. The key fob will sound 2 beeps, the icon on its screen will light up permanently, indicating that automatic start based on temperature is activated.
2.4. Automatic engine start based on voltage
In this mode, the Starline A93 alarm starts the engine when the voltage in the car drops below the programmed one. The voltage can be changed in 0.1V steps from 11.7V to 12.3V.
Just as with autostart based on temperature, autostart based on voltage drop occurs no earlier than 1 hour after the last engine start.
This function is useful when the car owner leaves the car for a long time, for example, when he goes on a business trip. Then there is a high probability that the battery will be discharged and upon arrival from a business trip the car owner will not be able to start the engine due to a dead battery.
To enable the function, follow the steps shown in the pictures below.
2.5. How to disable automatic launches
To disable autostart on Starline A93 by alarm, temperature and interval, move the cursor to the alarm clock, snowflake or dial icon in the manner shown in the figure below.
Then briefly press button 1 on the key fob. A melodic signal will sound, the turns will blink 2 times, and the corresponding icon will disappear from the screen.
To turn off voltage autostart, follow the same steps as when turning it on. Just select the value 00 00.
Advantages and disadvantages of the system
Advantages of the anti-theft complex:
- Extensive functionality. The alarm has many useful options that make driving easier. For example, auto engine start, “Anti-robbery”, “Comfort”, etc.
- Possibility of monitoring the main parameters of the vehicle and the anti-theft system.
- Convenient alarm control using the remote control.
- Possibility of expanding the functionality of the anti-theft installation through the use of additional devices. According to owner reviews, the system works efficiently only with Starline modules.
- Availability of digital interface.
Minuses:
- Problems with the remote control appear after a certain time. Compared to key fobs from other versions of Starline alarms, the device in the A93 model wears out faster. This may be due to increased wear and tear on the internal elements of the communicator.
- High cost of the security system.
- Car alarms are not universal; they cannot be installed on some models of modern vehicles. For example, using the system on a Lada X-Ray car, the car owner will be faced with a lack of access to all functions.
Remote engine start
StarLine a93 conveniently and effectively introduces a remote start function for the power unit, which creates additional convenience when operating the vehicle.
Setting the software neutral
· The handbrake is activated when the engine is running, the driver leaves the cabin, closing the doors. Pressing the second button turns on the mode;
· The ignition is turned off. Depending on the program neutral conditions, the motor either continues to operate or not;
· The car is armed.
Table: starting, extending operation and stopping the engine from the key fob
| What to do. | Keychain. | System. |
| Start the power unit from a distance. | ||
| Button No. 1 to notify with two melodies. | · One siren signal; · One flash of headlights; · Doors are locked; · The motor will start. |
|
| Extension of work. | ||
| Press and hold the first button until two tunes are played on the remote control. | · The headlights will blink once; · The engine is running. |
|
| Stop the engine from a distance. | ||
| The first button is long, the fourth is short. | · Four flashes of optics; · The engine stalls. |
|
Table: instructions for setting autorun by time
| What to do. | Keychain. | System. |
| Setting a timed trigger | ||
| Cursor to icon: Click on the first key. | The headlights will flash once. |
|
| Select the period with the first key. | — | The period change is shown on the display: |
| Recording into memory with the first key before the melody. | After a few seconds, the engine warm-up cycle begins. |
|
| Disable the function. | ||
| Cursor to icon Click on the first key. | Two flashes of headlights. | · One remote control melody; · The icon will disappear |
Table: temperature trigger setting
| What to do. | Keychain. | System. |
| Setting the start based on outside air temperature. | ||
| Cursor to icon: Click on the first key. | The headlights will flash once. |
|
| Select the period with the first key. | — | The change in the start temperature value is shown on the display: |
| Recording into memory with the first key before the melody. | After a few seconds, the engine warm-up cycle begins. |
|
| Disable the function. | ||
| Cursor to icon: Click on the first key. | Two flashes of headlights. | · One remote control melody; · The icon will disappear: |
Table: autostart on alarm clock
| What to do. | Keychain. | System. |
| Setting the alarm to start. | ||
| Cursor to icon: Click on the first key. | The headlights will flash once. |
|
| Disable the function. | ||
| Cursor to icon: Click on the first key. | Two flashes of headlights. | · One remote control melody; · The icon will disappear: |
A few words about the capabilities of the system
AllProValet auto button on starline alarm
When choosing security devices, both for cars and for other objects, first of all, pay attention to their capabilities. Products from this company have a very diverse set of them.
The car can be divided into 9 conventional sectors, for each of which the device selects its own method of protection. Most models of this brand have the following functions:
- Installation of a relay designed to block unauthorized start of the power unit;
- Installation of a push-button switch for all doors, hood and rear trunk lid;
- Provision is made for installing sensors with two shock levels on car body parts;
- There is a control function for turning on the ignition;
- There is provision for blocking the release of the hand brake.
For such purposes the following is provided:
- Security of control signals from interception by dynamic codes;
- Limited number of alarm cycles;
- Ability to turn off the alarm without disabling security functions;
- If the battery is disconnected, all settings of the security device are saved;
- In cases where it is necessary to perform an emergency shutdown, individual access codes are provided.
The following options are available for this:
- Notification by sound signals and turning on of external lighting;
- Sending a “distress” signal to a key fob that has feedback;
- Possibility to program settings for blocking the motor;
- There is a simulation of a power unit malfunction;
- It is possible to enable the “panic” mode.
Programming security and service alarm functions
We looked at the main security alarm functions available in the key fob setup mode, but these are not all the available functions of the system. To configure each alarm parameter to your liking, you must go into programming mode. To do this, you will need the Starline A93 programming table and perform the following steps:
Starline a93 programming table
- Turn off the ignition and press the service button 5 times.
- Turn on the ignition, 5 siren signals and a characteristic sound signal from the key fob will sound, confirming entry into the programming mode.
- By short pressing buttons 2 and 3, you need to select the “AF” item (to set up security and service functions) and press the third button, first long, then short. In this case, the display will indicate the first function of the programming table number 1.
- By briefly pressing buttons 2 or 3 you need to select the required function (see table No. 1). Then, after selecting a function, briefly press button 1 to select the desired option for this function. Let's take an example of setting up the automatic activation of the car security mode. To do this, follow steps 1-3 to enter the programming mode according to the first table. Then, by briefly pressing buttons 2 and 3, select function 4, which is responsible for the automatic security mode. Next, using the same buttons, you need to select a function option, for example, 3, and the screen should display the value “4-3”, where the number 4 means the serial number of the function, and the number 3 is the option for performing the function.
- To exit the programming mode, you must turn off the ignition by turning the key, or without touching anything, wait for the system to automatically exit this mode.
Using an example, let's look at setting the “programmable neutral” function. To do this, follow steps 1-3 to enter the programming mode according to the second table. Then, by briefly pressing buttons 2 and 3, select function 15, which is responsible for the “programmable neutral” mode. Next, using those buttons 2 and 3, you need to select a function option, for example, 3, and the screen should display the value “15-4”, where the number 15 means the serial number of the function, and the number 4 is the option for performing the function.
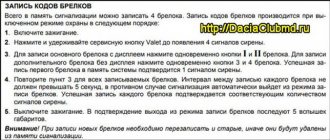
How to register a key fob
You can register up to 4 remote control key fobs in the memory of the Starline A93 car alarm. To do this you need:
- disable security mode;
- press the Valet button seven times;
- turn on the ignition - the car will emit seven siren signals;
- briefly press buttons No. 1-2 - the car will emit one siren signal, and the key fob will emit one sound signal;
- turn off the ignition - the car will respond with three light signals.
If there are several key fobs, then the second point is repeated for each of them. In this case, the interval between recording key fobs should not exceed 5 seconds.
IMPORTANT! When registering key fobs, all information about the previous key fobs is deleted from the system memory. Therefore, all new and old key fobs must be registered within one programming cycle
Setting up autostart alarm Starline A93
Starting the car:
- Move the gearshift knob to the neutral/parking position (switch off all gears);
- Turn off the ignition and remove the key from it (the engine must be on);
- Activate the parking brake (on manual)
- Close all doors tightly, as well as the hood and trunk lid;
If any step is missed, remote launch is not possible. But with proper preparation of the car (the engine is turned off by the alarm itself), it can be started from the remote control in different ways.
Press and hold button 1 (until two melodic beeps appear), then release the button
Periodically starting the engine from the key fob:
This function is especially relevant in winter, when periodic warming up of the engine is required. The starline a93 key fob can automatically start the engine to warm up (after 2, 3, 4, 24 hours).
How to set up autorun by time
The Starline A93 alarm system allows you to regularly start the car engine at regular intervals. The start period can be set from 2 hours to 24 hours with a minimum increment of 2 hours.
To activate the mode, you must:
- place the key fob cursor on the icon with the image of an hourglass and briefly press button No. 1 - the car will respond with one light signal, and the key fob with one melodic sound;
- The key fob display will display the current value of the car engine autostart period for 4 seconds (for example, “4H” means that the engine will start every 4 hours).
To change the engine autostart period, you need to lightly press button No. 1 until the desired value appears on the display. Each press of button No. 1 increases the automatic start period by 2 hours.
After the desired autorun period value is displayed on the display, press button No. 1 and hold it until a melodic trill sounds, or wait until the selected autorun period is automatically saved, which will occur 4 seconds after selecting the desired parameter. At the same time, two short melodic signals will sound on the key fob, and an icon with an hourglass will begin to appear on its display. A few seconds after setting the selected parameters, the engine will automatically start and warm up.
Activate autostart mode based on temperature
This feature monitors the outside air temperature and, if necessary, starts the car engine to warm up. The start temperature is set within the range from -3 °C to -27 °C, the minimum step is 3 °C. The minimum period of time between restarts (excluding time spent warming up the engine) is 60 minutes. Once the user activates the temperature-based engine start feature, the number of temperature starts is not limited.
To enable engine autostart mode based on temperature, perform the following steps:
- press the icon with the image of a key and button No. 1 - the car reacts with one light signal, and the key fob emits a melodic trill once;
- over the next 4 sec. the key fob display shows the current value of the starting temperature;
- to change the temperature value, you need to press button No. 1 (1 press = 3 oC);
- after selecting the desired temperature parameters, hold down button No. 1 until a sound signal is heard, or wait for automatic saving, which occurs after 4 seconds.
If the engine autostart function based on temperature is successfully activated, the key fob emits two short melodic signals, and the icon with the image of a key on the key fob display becomes active.
Auto start on alarm clock
When this function is activated, the car engine will automatically start at the specified time. To activate the function, perform the following steps:
- the key fob cursor is moved to the icon with the image of a clock and button No. 1 is briefly pressed, after which the car emits one light signal, and the key fob emits one melodic sound;
- the key fob display shows the time after which the engine will automatically start according to the alarm clock;
- after 5 sec. The current time display on the key fob resumes.
The engine autostart function using an alarm clock is activated for one start cycle. The fact that the mode has been successfully enabled is indicated by active icons depicting a clock and a bell on the key fob display.
User manual
An instruction manual that will allow you to turn the security system on and off is included with the device. If it is missing, you can download the service manual from the network.
Download installation and operating instructions
Before reading the manual, you need to know exactly the model of the security system.
| Alarm operation and installation manuals | |
| Download free operating instructions in pdf format: | Starline A93 use |
| Download free installation instructions in pdf format: | Starline A93 installation |
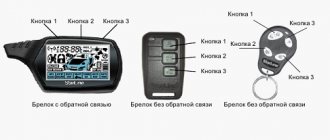
Purpose of the icons on the keychain
Designation of indicators on the remote control display
Description of symbols on the communicator screen:
- 1 — the option to automatically start the power plant by alarm is activated;
- 2 - function of periodic start of the machine engine;
- 3 — mode of remote starting of the car engine based on air temperature;
- 4 — the machine service function is activated;
- 5 — engine turbo timer mode;
- 6 — option to automatically activate car protection;
- 7 — immobilizer-engine blocker mode is enabled;
- 8 — the option to lock keys on the communicator is activated;
- 9 - charge of the key fob power supply, if there is only one strip left in the battery, you need to change the battery;
- 10 — temperature of the power unit;
- 11 — anti-robbery mode is activated;
- 12 - indicator indicating that the car’s engine is running;
- 13 — the communicator reports the connection of one of the Starline GSM modules;
- 14 — time indicator;
- 15 - if the hammer icon lights up, this indicates the activation of the impact controller;
- 16 - all car door locks are locked, the alarm is activated;
- 17 — vehicle door locks are open;
- 18 — the alarm option is activated;
- 19 — the timer function for starting the internal combustion engine is enabled;
- 20 - this indicator indicates that the communicator is in the area where alert signals are received; if there are no bars on the antenna, then the remote control has left it;
- 21 — vehicle protection mode using audible alarms is activated;
- 22 - if the siren is crossed out, then the security function is still turned on (only alarm signals in the event of a break-in will not be played, information about the break-in will be sent to the communicator);
- 23 - the car’s hand brake lever is not tightened, the same indicator appears when you press the brake pedal;
- 24 - the symbol informs about programming a personal password to control the alarm (it can have from one to three digits);
- 25 — the user has selected the algorithm for the functioning of a car with a manual transmission;
- 26 - reports an open car trunk;
- 27 - car doors are not locked.
Setting up the key fob
In order for the consumer to be able to use all functions, including starting the engine remotely, the communicator must be linked before use. Without this, it will not be detected by the system. When binding each new key fob, information about the old ones is deleted from the memory of the microprocessor module.
If several communicators are programmed at once, each device must be prepared before starting the procedure:
- The vehicle is disarmed. When the ignition is deactivated, the user must quickly click 7 times on the Valet service key.
- The key is inserted into the lock. The ignition is activated. The siren should emit seven beeps. This indicates that the security complex has entered code setting mode.
- Then the consumer needs to press the first and second buttons of the remote control. These keys are pressed and held until the communicator and the machine give a single signal.
- With a time interval of no more than five seconds, you should perform similar actions with the second remote control.
- Then the ignition in the car is turned off. The turning lights of the car will blink three times, this indicates the successful completion of the procedure.
You cannot allow a pause between programming two Starline A93 alarm remotes for more than five seconds, otherwise the system will exit the programming mode.
Factory reset
To reset the Starline A93 car alarm settings to factory settings, do the following.
- Press the service button 9 (to reset table 1 settings) or 10 (to reset table 2 values) times with the ignition off and turn on the ignition. The siren will sound 9 or 10 times.
- Press the service button once. The siren will chirp 1 time.
- Briefly press button one of the key fob. A short siren signal means that all settings in programming tables 1 or 2 have been reset to factory values.
- Turn off the ignition.
Be careful! Resetting the settings to factory settings may result in the car no longer starting with the key. There will also be problems with autostart - both automatic and remote starts will stop working.
Photo gallery
Photos of different versions of Starline A93.
2CAN+2LIN GSM ECO SLAVE
Model Starline A93 Eco
A93 2CAN+2LIN
Model CAN+LIN
Installation of the module in the StarLine A93 2CAN+2LIN Eco alarm system
Installation of the module in the security complex
We carry out it on a de-energized car. It will take literally five minutes in time if you know the installation location of the main alarm unit and in the absence of artificial complications in dismantling the unit.
Remove the cover by unscrewing the four bolts:
We remove the board from the case:
We install the GSM module “sandwich” on top of the board to the left of the 2CAN-2LIN module:
You should be careful when doing this, because... there is a possibility of bending the pin legs:
By this time, you should already decide on a cellular operator. It should be remembered that the module operates in 2G frequencies, and, for example, a Tele2 SIM card will not work in Moscow, because Tele2 is presented in it only at 3G/4G frequencies. You should also be guided by the quality of coverage of specific operators in your region. In Crimea, out of the entire zoo of complete SIM cards, only MTS will work.
Insert the SIM card all the way to the left:
And we assemble the main block in the reverse order.
Initial setup of the GSM module
For the GSM module to operate, the following information must be recorded in its memory:
- The PW access password, consisting of 4 digits, is required for authorization when making calls from phones that are not registered in the module’s memory, as well as for the ability to delete and add new user phones using SMS messages.
- the PS access password, consisting of 4 digits, is required to provide additional protection when entering a new owner’s phone number (M1) into the module’s memory from phones that are not registered in the memory; The PW or PS password is NOT the PIN code of the SIM card!
- telephone numbers of users from which the module is controlled and to which alerts are sent.
To simplify entering this data, the device has an initial setup procedure, which is automatically activated when you call the module if there are no phone numbers stored in the module’s memory.
Initially, the GSM module’s memory contains neither phone numbers nor PW and PS passwords, so the M1 number is recorded when calling the module. Install the SIM card into the GSM module.
Accordingly, we supply power to the alarm and wait 30–40 seconds. The module will register in the network and will be in waiting mode for an incoming call.
From the phone that will be used as Master (M1) we call the number of the SIM card installed in the GSM module.
The module will answer the call and hear a greeting:
— StarLine welcomes you! Enter password #1!
In tone mode, enter 4 digits of the PW access password. After successful entry, we hear a confirmation beep and a request to enter the PS access password, also consisting of 4 digits:
— Enter password number 2!
Again in tone mode we dial 4 digits, now the PS access password. After successful entry, we hear a sound confirmation. The M1 phone number and passwords PW and PS will be recorded in the module’s memory, and a confirmation SMS message with the recorded data will be sent to the M1 phone (I recommend rewriting the passwords and deleting the SMS from the phone’s history).
Module initialization
If the module does not control the security system regardless of the channel (SMS, calls, application, website), then it is necessary to carry out the initialization procedure (linking the module with the main unit).
For this:
- press the service (VALET) button 7 times and turn on the ignition without pausing;
- 7 short signals should be played;
- after that, wait for three flashes of the emergency lights and a melody on the key fob (after about 30–60 seconds);
- turn off the ignition.
If everything is done correctly, the GSM module icon will appear on the key fob:
It wouldn’t hurt to immediately connect the application to your online telemetry account. To do this, download the appropriate version of your smartphone’s OS, and when you first start, log in using the data from the red card included in the kit:
Recommendations for installing car alarm components
Although the connection diagrams and installation maps differ for Starline alarm models, the locations of the main components are identical.
According to the numbers on the diagram, the main components are placed as follows:
- The central control unit is usually located under the center console near the driver's seat or behind the glove box. It is better not to install the unit in the engine compartment, since there are a large number of devices there that can affect the purity of the digital signal. In addition, the control unit contains a temperature sensor, so there should be no heat sources nearby, for example, heating system pipes.
- The transceiver module together with the antenna is installed in the upper part of the cabin, usually in the area of the windshield, to improve the quality of signal reception and increase the maximum control range. It is necessary to ensure that there are no metal objects or other electronic devices nearby. The distance must be at least 5 cm. The transceiver is connected to the 5-pin output, which is located on the control unit using the wire that comes with the car alarm.
- A flashing LED informing about the status of the security system is connected to a 2-pin output in the central unit. If the indicator flashes, it means the car is protected. A non-working indicator indicates that the car alarm is disabled. It is advisable to place the LED in the area of the windshield so that it is visible from a distance and informs the driver that the alarm is activated.
- The siren is mounted in the engine compartment away from heat sources, with the horn facing down so that moisture does not accumulate. If the siren operates for a long time after the alarm is triggered, it may fail. To prevent such a situation, it is advisable to include a 5A fuse for the siren in the electrical network.
- The power unit temperature sensor is attached to a metal part of the cooling system, preferably close to the thermostat, near the standard coolant temperature regulators.
Limit switches for the luggage compartment and hood must be installed so that there is a gap of at least 3 mm when closing. They must be in reliable contact with the body (video author - AvtoDobryak.ru).
The secret Valet button is installed in a place where it is difficult for an attacker to reach when breaking into a vehicle. With its help, the security system is switched to service mode. Similar requirements apply to installing a button to activate the anti-robbery mode. Both buttons are connected by wire to the control unit.
The two-level shock sensor is connected to the control unit using a four-wire cable. Before you turn on the sound on the Starline alarm system, you need to correctly adjust the sensitivity of the sensor during installation. If the sensitivity is too high, false alarms may occur due to strong gusts of wind or from passing cars. The adjustment is carried out using potentiometers located on the regulator body.
Engine blocking increases the anti-theft characteristics of the alarm, as the thief will face serious problems after breaking into the car. Connection to the system is carried out via a black-yellow cable, but you need to program the connector type to HP. These actions are performed according to the instructions and connection diagram for the Starline alarm system.
Installation should begin by connecting the power wires of the main units. The negative must be connected to the standard mounting bolts of the car's grounding wires. They are located either in the area of the mounting block or in the front of the car in the lower corners. If you cannot find the fastening bolts, you can make your own ground fasteners to the metal parts of the body for grounding. Typically, such fasteners are mounted under the dashboard.
To enable the autostart mode, the alarm system has an immobilizer bypass.
What to do if a car alarm starts to take on a life of its own
h24,0,0,0,0—> p, blockquote50,0,0,0,0—>
This is usually said if the alarm system starts to go off randomly in security mode, does not allow you to disarm the car, or performs other independent actions that are not associated with human activity or other factors. In this case you should:
p, blockquote51,0,0,0,0—>
- check the limit switches of all doors, hood, trunk, there may be rattling;
- examine the installation location of the central car alarm unit (for moisture leakage), its elements, power circuits (no sparking);
- check the key fob battery;
- If the previous steps do not reveal a malfunction, reset to factory settings.
If the set of measures listed does not change the situation, you need to temporarily turn off the alarm and contact a specialist.
p, blockquote52,0,0,0,0—> adsp-pro-5—>
How to install it yourself?
The system installation procedure is as follows:
- The battery is turned off because the on-board network must be de-energized. The ignition in the car must be turned off.
- The microprocessor unit is being installed. This device is installed first, since wires from all components of the anti-theft system will be supplied to it. It must be placed in a secret place, preferably dry and inaccessible to strangers. It is best to install the module behind the dashboard, in this case, if the car is broken into, it will take a criminal time to find it. The block must be properly fixed using self-tapping screws or clamps so that it does not vibrate during movement.
- A siren is installed under the hood of the car. It should be placed with the horn facing down so that moisture does not collect inside the device. The siren should be installed away from the engine. After installation, you need to make sure that there is no access to the device and wires from under the bottom of the car.
- Limit switches are installed on the hood, luggage compartment and each door. To do this, you will have to dismantle the upholstery, since the wires from the switches will pass under it. They must be placed so that there is no access to the devices when the doors are locked.
- The shock and tilt controller is installed in the central part of the body. It can be placed on a partition that separates the car interior and the engine compartment, the main thing is not under the bottom of the vehicle. In this case, the attacker will have the opportunity to dismantle the device. The shock sensor must be fixed on a flat surface; there should be no plastic or rubber gaskets between it and the controller. Their presence will cause the device to function incorrectly.
- The antenna module with indicator light is being installed. It is recommended to place the device on the windshield of the car, in the cabin. Before performing the task, the internal surface is cleaned and degreased; this will allow the transceiver to be effectively fixed. There should be no metal parts or electronic devices near the device at least 4 cm, as this will cause interference with its operation. The wiring from the antenna adapter must be laid under the side rack trim, and the transceiver itself must be placed as high as possible on the glass.
- A service key is installed to control the emergency mode. It must be placed in an inaccessible place, but so that the consumer has access to it from the driver’s seat. You can place the button under the instrument panel and wrap it with electrical tape to disguise it as a harness with standard wiring. But you need to remember where it is located.
- All elements are connected via CAN bus. The wiring is laid under the interior trim; to do this, it must be dismantled. Additionally, the cables can be wrapped with electrical tape. This will increase security in the event of a break-in, since the criminal will have to deal with the conductors, and also prevent them from quickly deteriorating.