One of the sore spots of a passenger car is its sills. They are constantly exposed to moisture, mechanical damage, and the aggressive environment of reagents that are sprinkled on roads.
If they are not repaired and maintained in a timely manner, then the time comes when through holes form in them, the strength of the car’s structure is compromised and their replacement is required. You can do this work yourself.
A video of replacing thresholds with your own hands will be a good help. By following the detailed instructions, this work can be done on your own, significantly saving your finances.
Design features
In the traditional version, the threshold consists of three elements. These include:
- connecting elements;
- structural reinforcement;
- outer panel.
They are attached to each other using spot welding - for this you will need a special device, here you can study the instructions on how to make spot welding with your own hands.
What are the defects?
According to the type of attachment to the supporting body, the thresholds are classified into removable, which are installed on the body with bolts, and non-removable. The elements are welded to the sidewall and provide the car structure with the necessary rigidity and reinforcement. Regardless of the type of installation, the elements suffer the same damage.
- Dents. Defects are formed from impacts with gravel, careless parking, or as a result of a minor accident. Mechanical damage from gravel damages the outer part of the underbody, wheel arches, and side members.
- Scratches, chips. The outer part is damaged. The defect does not affect driving safety; the appearance of the car suffers.
- Corrosion. Rust occurs due to natural wear and tear of the metal and due to improper processing or lack of anti-gravel protection. The degree of wear affects driving safety. If the non-removable threshold, as part of the power element of the body, rots, the overall geometry of the structure changes, the main components and assemblies are distorted: the engine and transmission elements.
Depending on the defect, the repair method is selected: welding, pulling out dents, straightening using spot welding, or sealing holes with adhesive.
Replacing the threshold on a VAZ
If you wish, you can replace the VAZ thresholds yourself. For this purpose you will need:
- Do the prep work. It is necessary to remove both doors and fenders, and remove the seats from this side of the car. Remove the wheels. Remove flammable materials from the work area. Turn off the battery.
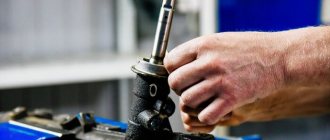
- Using a grinder, cut off the rusty part. Cut off threshold connectors. Clean the surface for attaching the new threshold. Lubricate the treated surface with a corrosion neutralizer.
- If necessary, use metal patches to recreate the structure of the car body to attach a new part.
- The front of the amplifier is attached to the old case. Welding points are cleaned.
- The bottom of the amplifier is aligned with the connector.
- The parts of the front part of the threshold are adjusted and secured with clamps.
- The outer part of the threshold is fixed to the car body using self-tapping screws.
- First of all, the bottom of the threshold is welded, and the connector is attached to the bottom of the housing.
- The threshold is securely welded and the seams are cleaned.
Read here - How to make a heated floor with your own hands: step-by-step description, diagrams, rules and methods for arranging heating elements (120 photos and videos)
«>
The work is completed by applying primer, putty and paint. The tightness of the seams is checked.
Reasons for replacement
There are quite a decent number of such reasons, the most common of which are the appearance of rust or severe deformation. In the second case, most likely, the consequences of a traffic accident.
But before you start replacing the thresholds, you need to understand the degree of wear. Thanks to this, it is easier to understand whether it is necessary to change the entire threshold or a separate part of it.
You can understand this by looking at the state of the paint on the metal, if it is completely absent or appears in bubbles. If this occurs over the entire area of the part, then the easiest way would be to replace the entire threshold. However, there may be another case when only part of the threshold is in such a state; it can be cut off and the whole part welded on.
Niva repair
It is important to understand that the thresholds on the Niva consist of an amplifier, external and internal parts. Accordingly, the amplifier consists of a middle, front and rear part.
Replacing thresholds on a Niva with your own hands consists of the following steps:
- Using a screwdriver, the strength of all the above parts is tested. Those structures where a hole can be punched must be replaced.
- The door is removed, the seat, floor mats, seat belt and other flammable parts are removed. The battery is disconnected.
- Using a grinder, the damaged part is cut off and the joint is cleaned. If necessary, part of the bottom is cut off and metal patches are welded.
- New threshold elements are welded in strict sequence. The attachment point is cleaned and treated with an anti-corrosion substance.
- Putty, primer and paint are applied.
We can assume that the threshold replacement is complete. The car structure is assembled in the reverse order.
How to digest rapids
Do-it-yourself welding of car thresholds takes place according to the following algorithm:
- An inverter is the simplest method of semi-automatic welding; it is recommended not to buy the device, but to rent it.
- Check the garage electrical network for load capacity and stable voltage supply without surges.
- Charge the welding machine with wire, connect the phases, check the electric welding for functionality.
- Before welding work, the threshold is grabbed onto points and the geometry of the body and the tightness of the door are checked.
- It is recommended to weld not with a continuous seam, but in increments: 2 cm seam, 5 cm gap.
- They start cooking from the central counter, first under the front door, then under the back.
- After welding, the seam must be carefully cleaned without completely removing the beads, this reduces the rigidity of the structure.
Useful tips
Before you replace the thresholds with your own hands, you need to listen to some tips:
Check it out here too!
DIY illuminated ceiling: 85 photos of the best options! Types of lighting: spots and features of their connection, LED backlight, diode backlight, “starry sky”Assembling a shower cabin with your own hands: assembling the tray, preparing and installing the walls, installing the portal. All stages of assembly with photos
How to make ventilation with your own hands - we ensure freshness in the house, create comfort yourself (photo + video)
- study the design features of this car brand;
- it is important to inspect the car and determine the elements to be replaced;
- purchase these items in new condition in advance;
- prepare the necessary tools, which include spot welding, grinders, clamps, hand tools;
- place the car on a flat surface;
- it is important to understand that the car cannot be moved until the end of the work, as this may lead to deformation of its body;
- the work looks better when replacing the entire threshold structure rather than parts of it;
- all connections must be strong, these points should be thoroughly cleaned;
- it is important to use a high-quality anti-corrosion substance to treat all areas with damage to the paintwork;
- then putty and primer are applied, after each stage cleaning is carried out;
- Particular attention should be paid to the selection and application of paint and varnish material; the aesthetic appearance of the car will depend on this.
By doing this work yourself, you can achieve high quality and significantly save your budget.
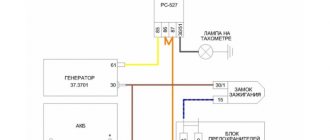
The device of car thresholds
The outer part of the threshold is not the main power part of this structure. It provides rigidity to the body, but the main rigidity is provided by the internal reinforcement, connector and internal part of the sill. These panels are spot welded together to form a box-shaped hollow structure that bears the bulk of the loads. This design gives the car longitudinal strength. The outer part of the threshold provides a more cosmetic function.
Each internal part of the threshold plays a role in providing structural rigidity.
The entire sill design reinforces the underbody. Example of a car threshold design
- The inside of the sill is the part that can be seen from inside the car.
- Connector - This part can be seen from below the car.
- The internal reinforcement is usually a flat piece of steel that is stamped for reinforcement.
- The outer part of the threshold is the part of the threshold that can be seen from the outside, it is called the threshold.
The design of the threshold of a particular vehicle may differ from that shown in the illustration.
Photo of replacing thresholds with your own hands
Check it out here too!
How to make an arch from plasterboard: we make an interior arch according to photo instructions. 120 photos of arches in the interiorHow to make a balcony with your own hands - tips on how to make a balcony in an apartment beautiful. Step-by-step guide to the use of modern building materials + 70 photos of the best design options
Installing a compartment door with your own hands - step-by-step instructions for installing sliding doors and tips on choosing fittings (110 photos + video)
Repair of the VAZ-2110 underbody without welding
With any body repair, first of all, it is necessary to carry out an external inspection of the hardware, identify and note for yourself which areas are in poor condition and need repair or replacement. The condition of the bottom metal is determined in different ways:
- using a hammer and a core - if you think that there is rust in a certain area, you need to lightly hit the metal, check if there is rotten iron under the anti-corrosion coating;
- try to jack up the car on each side - if the thrust pads are rotten, this will be noticeable when you try to jack up the car;
- press in different places on the floor of the car - weak, rotten iron will bend under your feet;
- try to move the front seats back and forth in the cabin - problematic movement of the seats also often indicates the poor condition of the metal.
Any repair of sills and underbody using a non-welding method is not professional, and craftsmen consider it only a temporary measure to properly restore the condition of the body; a welding machine is indispensable. When repairing the bottom without welding, patches and new body elements are not welded, but installed on rivets or self-tapping screws (bolts), preparation and all other work is carried out in the same way as during traditional body repair using a welding machine.
Convenience of thresholds when boarding passengers.
In this case, some motorists who have a low-slung vehicle may doubt the need for thresholds, citing the fact that they can simply raise their legs higher and see where they need to be placed later. However, this opinion can only be held by men who have never had to wear high-heeled shoes, or who no longer remember what it was like to be a small child. If you are not an avid bachelor and care about a comfortable fit for your loved ones and loved ones, then you will not think for a minute about whether it is really necessary to install such thresholds in your car. This is simply an irreplaceable part for convenient and comfortable boarding of passengers!
How much does it cost on average to repair thresholds at a service center?
At a car service center, you can either carry out a complete replacement or limit yourself to cosmetic repair of metal from rust. The average cost of work for a service station in the capital region is given; the price does not include the cost of the material used and the part itself:
- Complete replacement of thresholds - from 8,000 rubles. Customer details.
- Replacement of sills and rear wing - from 23,000 rubles.
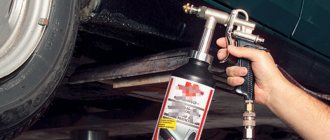
- Cosmetic repairs with epoxy glue from RUB 2,000.
At a service station within walking distance you can buy all the necessary parts for replacement; the craftsmen will recommend sets of thresholds, moldings, install additional plastic body kits, and carry out tuning.
Approximate price if you carry out repairs and changes yourself:
- Set of thresholds and amplifiers - from 2000 rubles.
- The cost of one threshold: external part and connector - from 700 rubles.
- Amplifier (1 pc.) - from 300 rub.
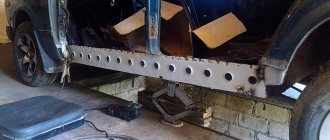
As an amplifier, you can use a metal plate of the required length and width. It is necessary to make perforation holes in the part with a drill with a diameter of 0.8 cm at a distance of 8-10 cm around the entire perimeter.
When using profile pipes, the price of work will not exceed 3,000 rubles. The cost of the profile is from 450 rubles. for 1 meter, bitumen mastic will cost from 500 rubles. per kilogram jar.
Threshold repairs on a VAZ are carried out if the part is new, but due to careless driving the body has received a dent from an impact. In other cases, it is recommended to replace the element with a new one.
Restoration methods
There are more than ten ways to repair car thresholds with your own hands without welding. With the advent of new samples of glue, resins, protective fibers and equipment, the number of methods is increasing. The most common, simple ones for garage repairs:
- fiberglass treatment;
- epoxy glue;
- construction foam;
- hood without painting;
The use of a reverse hammer, as well as a spotter, are both spot welding repair methods.
fiberglass
Repair using fiberglass or fiberglass is quite simple, cheap, but reliable. Advantages:
- does not interact with reagents on the roads - water, acids, electrolyte;
- has little weight;
- easy to use;
- used for a long time;
- has a low price.
As an alternative, fiberglass or fiberglass is used. The method is used if there are pronounced pockets of corrosion on the metal, without impact deformation. Epoxy glue or resin is used together with the material.
For repairs you will need sandpaper, hardener, brushes, spatulas of different sizes. As a substitute for epoxy glue, you can use polyester resin, which is similar in properties, but somewhat inferior to epoxy in strength. To complete the surface sealing you need:
- Use a grinder to remove the paint layer.
- Sand it with sandpaper.
- Cut a patch from the fiberglass larger than the corrosion area.
- Degrease and prime the surface.
- Glue the patch with putty or epoxy glue.
- Fill the surface and prime it.
- Treat with anti-gravel compound.
- Paint it.
Epoxy glue
A common epoxy adhesive is the ED-20 brand; as a rule, it comes complete with PEPA hardener. These components are mixed in a ratio of 1:10
When working with epoxy glue, you must take precautions, protect your eyes and hands. Contact with chemically active substances can cause severe irritation of the skin and mucous surfaces of the eyes, which can cause allergies.
The repair procedure is similar to using fiberglass. If the deformation is minor, it is permissible not to use reinforced mesh. The glue is applied to the damaged area in several layers, puttyed, primed and painted.
Construction foam
Manufacturers of Japanese vehicles often use special foam, which is used to fill the permanent threshold box during factory assembly of the car. It is believed that the material will ensure that there is no corrosion inside the threshold and will preserve the parameters of the seal. The sealant is anti-corrosion resins and mastics, polyester components, which have nothing in common with construction foam.
When making repairs yourself, you cannot pour standard foam for construction work into the body cavities; the metal begins to rot much faster. It is allowed to use foam when applying a thin layer of the composition to previously cleaned areas of severe rust. To strengthen the threshold, mesh and fiberglass are used. It is mandatory to prime the surface and apply an anti-corrosion coating.
Replacing parts or the entire bottom
Repairs begin with inspection and repair of thresholds. Rotting of the central part of the body begins with corrosion of the sills and wheel arches, so if rust has destroyed parts of the bottom by 30%, then we can confidently say that the sill is rotten by 60% and requires complete replacement. The bottom of the VAZ 2114 consists of the following elements:
- underbody panels under the seats;
- threshold extension;
- crossbars;
- side member amplifier;
- space for a jack or jacks;
- central support platform;
After cleaning the underbody from anticorrosion, the jacks, side members and panels under the feet of the driver and passenger are inspected. These are the most vulnerable parts. If the general condition is satisfactory, then it is recommended to cut out the problem areas and install the original floor parts from the repair kit. The process of partial overcooking of the bottom in steps:
- Drill out the spot welding points and cut out the rusted metal with a chisel.
- Clean the edge of the future weld with a grinder and treat with a degreaser.
- Attach the original part or the cut out patch. The metal patch should protrude 1 cm beyond the edges of the trim; welding will be carried out overlapping.
- Spot weld the edge of the metal. Weld the patch in increments of 2 cm welding, 4 cm skip.
- Clean the weld seam.
- Treat with primer, apply a layer of oil anticorrosive or bitumen mastic under the sound insulation layer.
- After complete cleaning, treat the outer part of the bottom with bitumen mastic.
A complete replacement of the bottom of the VAZ 2114 is required in 50% of cases of body repair. However, experienced drivers warn about the danger of independently repairing the entire bottom, which remains the main part of the supporting body. If you don’t have experience, you can disrupt the geometry of the car, and even the slightest misalignment threatens that it will be impossible to set the wheel alignment and the car will start to drive sideways, the tires will quickly begin to wear out, the engine mount may come off, fuel and oil consumption will increase, etc. Beginners are advised to cut out the bottom in parts and replace only the part that is rotten.
Before the bottom is completely re-welded, all pipes of the fuel, brake and exhaust systems are dismantled. On VAZ 2114 cars, after three to four years, all pipes and fittings of the fuel and brake systems are corroded and acidified. It is almost impossible to remove the element; service technicians recommend cutting out the metal hoses and, after working on the bottom, installing new pipes made of brass or copper. The advantages of such hoses over metal ones are obvious.
- The softness of the metal will allow the hoses to be bent and installed exactly in the bottom pockets.
- If the bottom is changed in parts and the master has to tap out the place for the pipe himself, the brass tube can be installed at any angle and secured to a special coupling.
Algorithm for replacing the entire bottom:
- Drill out spot welding areas.
- Use a chisel to cut out the bottom. You can use a grinder, but it is recommended to tap the metal with a chisel or hacksaw blade.
- Leave 1 cm of the old bottom to allow for overlapping welding of the new element.
- Reinforce the side members with additional metal panels.
- Place the bottom from below and grab the points.
- Cook in 3-4 cm increments.
- Clean the weld seam with a grinder or metal disc.
Characteristics of protective elements
From such a blow, the trim itself will only suffer, it will crack, and then it can be easily replaced with a new one, and the repairs that would be necessary if the molding was missing will no longer be needed. The disadvantage of plastic products is their fragility. They cannot stand either time or harsh climatic conditions. In severe frosts, they crack even from the slightest blow, which, of course, is bad.
Need to restore a badly damaged car? You can’t do without a composition that includes fiberglass. Do you want to modernize your bumper or headlights, give them an original look and improve their shape? And here you can’t go without fiberglass. Moldings made from this material are durable, lightweight, quite affordable, and not much more expensive than plastic ones.
In terms of technical parameters, stainless steel comes first. After all, it is difficult to find any other material that is stronger and more reliable than steel. Having installed steel moldings, you can be sure that it will last, if not for centuries, then for decades. Yes, and steel looks more impressive, richer, more stylish and luxurious, and does not make it look like a budget, like plastic. But there are two nuances.
Restoration of permanent thresholds
A reliable technology for restoring a permanent threshold remains the application of a metal patch by welding if there are through holes and large corrosion damage. Pull out dents with a reverse hammer or spot welding; chipped paintwork with epoxy resin.
The thresholds are first removed so as not to damage other body parts. Then traces of rust are removed from the surface using a solution. Next, the epoxy resin is diluted with a hardener and applied to a previously degreased surface. Pieces of fiberglass of the required size are placed on the laid glue and pressed down for adhesion. After 12 hours, the area is sanded, uneven areas are removed, a layer of primer is applied, and at the final stage it is painted.
If we are talking about minor damage - rust or dents in a small area, then even beginners can do such repairs. If you lack the skills or desire, it is recommended to contact specialized workshops; tinsmiths will conduct a full inspection of the part and adjacent elements, and will also suggest how to seal the thresholds in the car reliably and quickly.
Nature of damage requiring repair
The main types of damage to the sills (regardless of their type) and the bottom include:
mechanical damage resulting from contact with other cars or as a result of impacts from stones and gravel particles;- a corrosive effect on the material, leading to the formation of rusty cracks and cavities, the protective treatment of which does not bring tangible results.
The first group of faults is associated with the peculiarities of domestic roads and leads to the car losing its strength characteristics, and, as a consequence, the impossibility of operation in the previous modes. If there are a large number of them and the spar is damaged, driving a car becomes completely unsafe.
Corrosion processes also pose a serious threat to the supporting structure, which increases over time. Despite the many ways to combat corrosion, they, however, do not stop the destruction process, which ultimately leads to the need to replace rotten elements.
With non-removable body parts, the only way out of this situation is to use welding of the thresholds using any known method.
Technologies for restoring damage to the structure of these parts differ both in the methods used and in the cost of the materials used in welding.
Varieties of threshold designs
Depending on the method of fastening and purpose, they are divided into several types:
- Fixed. They are welded to the body and form a single whole with it. They look like a rigid structure.
- Removable ones, unlike the previous ones, are fastened with self-tapping screws or bolts. Used as additional body protection or an auxiliary step.
- Power structures are installed on jeeps with a frame structure. Fastened by welding or bolts. They are larger in size than those of cars with a monocoque body.
During repairs, design features are taken into account. Thresholds can be plastic, metal, chrome, or illuminated.
Self-brewing
Restoration of non-removable thresholds and the bottom can begin only after placing the car on a repair platform or in a pit with a size sufficient for welding. The bottom is inspected by tapping it with a hammer.
In case of severe rust damage, it is necessary to clean the surface around the embedded area using sandpaper or a grinding tool..
Repairing a body by welding, including welding the bottom, comes down to installing a small patch of metal of the same structure and thickness on the damaged area.
But first you should prepare the problem area, namely, carefully cut out the rusted metal.
If painting after welding is not intended, then the appropriate color of the patch should be selected in advance, which, together with the threshold, after repair, must be carefully sanded and treated with an anti-corrosion compound.
Common Mistakes
If you have no experience in body repair, you can make mistakes even when correcting minor damage. To prevent them, it is useful to familiarize yourself with the mistakes that beginners and non-professionals make most often.
Common mistakes when repairing thresholds:
- When repairing metal thresholds, the surface is not cleaned properly. The entire outer part and connector must be carefully treated to remove all traces of rust.
- Metal patches welded to thresholds are not treated with anti-corrosion compounds. To prevent the metal from becoming leaky, it must be cleaned and an anti-corrosion compound applied on top. They also need to process the insides of removable thresholds.
- I don't treat the underbody of the car. When repairing, it is necessary to apply protective mastic to it.
- They forget to check the drainage holes. They need to be cleaned and Movil or another preservative must be poured into the cavity of the thresholds.
Every car enthusiast will be able to eliminate minor defects in thresholds, having the necessary tools and materials at hand. If everything is done correctly, you can postpone contacting the service for a couple of years. Complex damage requires the use of welding and certain skills, and if they are not available, it is better to turn to professionals.
- How to change the fluid in a car air conditioner yourself: sequence of work
- Where is the front wheel hub located, its structure and purpose
British port is turning into a giant car park
Fiberglass and mesh
To repair more extensive damage, an aluminum patch mesh is used. A piece slightly larger than the hole is cut out of it and attached with masking tape. Next, sealing holes in the car body without welding is carried out in the following sequence:
- a thin layer of fiberglass putty is applied without touching the tape;
- after drying, the tape is removed;
- subsequent layers of putty are applied after the previous one has dried;
- the surface of the car is treated with sandpaper or a grinding machine until smooth;
- To strengthen the mesh, several layers of putty are applied to the back of the body.
Long-term auto patches are made from fiberglass and epoxy resin. Several overlays are cut from it, the first of which should cover the hole with a margin of 2 cm. The size of each subsequent piece is made larger than the previous one. The last overlay should cover all the metal stripped during the preparation process.
The cut pieces are impregnated with resin and placed on the hole in a sequence of increasing sizes. If you need to seal large holes on the back of the body, use linings to prevent the fabric from sagging. After laying all layers of fiberglass, wait for the resin to completely harden. The time required for this is indicated in the instructions.
Read more: Ford Explorer 4 photos