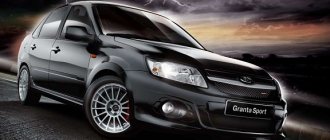
Many believe that the domestic manufacturer offers not so bad cars. In particular, there are many good reviews about the VAZ 2110, which has already been discontinued. Today this car is already quite old, but even models with 15 years of travel experience in Russia are in no hurry to disappoint owners with their reliability. Of course, there are many questionable components and moments in the car. The interior isn't very attractive, the materials aren't the most expensive, and the build isn't the best. But overall, this car can claim to be one of the best from AvtoVAZ. The car sold in millions of copies, so today a huge number of representatives of this model travel on the roads of Russia. It is also worth noting that the tenth VAZ family was sold in hatchback (2112) and station wagon (2111) body styles. The sedan turned out to be the most popular, but other representatives did not go unnoticed in the automobile market.
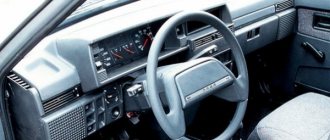
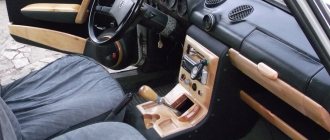
A good power plant, an indestructible gearbox, simple electrics and a completely adequate suspension - these are the main advantages of the car. But the salon is not included in this list. Everything here is overly simple and somehow ascetic. One of the biggest disappointments for the owner will be the seats. They are somewhat shapeless and not very attractive in appearance. The seating position in the car is deep, so visibility is not the best unless you are 190 cm or taller. Not everyone can get comfortable behind the wheel. And the position of the steering wheel is quite strange, it requires a higher position for comfortable control. However, this problem can be solved quite simply - by purchasing, altering and installing seats from a good foreign car. Today we will determine which seats from foreign cars are suitable for the VAZ 2110 and the entire tenth family of domestic cars.
How to remove the rear seats on a VAZ 2110 and 2112? When you really need it
Before removing the rear seats on the VAZ 2110 and 2112, check all the nuances of this work.
This is not difficult to do, but it has its own peculiarities. Although this model is the progenitor of several models, from 2111 to Lada Priora, it still differs from its brothers in some elements. True, not too much. At one time, the Ten was positioned as a completely modern car. For the first time, a carburetor with automatic choke and many other new products were used on domestic cars. How to remove the rear seats on a VAZ 2110 and 2112 is a question often asked by the owners of this car. The design of the seats and their fastenings is as simple as possible, but at the same time reliable. This allows you to remove the seats at the right time. At one time, entrepreneurs who used the car for work pulled out the seats when they needed to travel for goods. After which they were easily and quickly put back.
Can the backrests be removed separately?
This is not difficult to do; you also need to pull the loop behind the headrest, and then unfasten the upholstery and remove the backrest from the lower fastenings. Many car enthusiasts complain that the locks are made of low-quality materials, and after several removals the latches no longer hold the parts properly. Therefore, unless absolutely necessary, it is recommended to remove the backrests along with the bottom pillow. This will increase the service life of the seats.
In the VAZ 2110 model, the seat fastenings are made quite simply. Dismantling these structures requires tools that every car enthusiast can find.
Removal
Disassembly should begin by loosening the backrest upholstery.
. It is secured using buttons located on the side of the trunk. Next, pay attention to the seat. First, the pillow lock handle is moved to the right. After this, you need to raise the seat on the right side. They do the same on the left. Next, move the seat cushion forward and remove it. Half the work is already done.
The head restraints are removed from the clamps. To do this, press the fastening buttons and pull the headrest up. The second section is treated similarly. Don't lose the release buttons. Next, the upholstery is completely removed, otherwise it will not be possible to remove the seat. The seat lock is pulled out through the loop. It is located behind the backrest. The right side of the backrest is raised, and its fastening loops are removed from the hooks located on the floor of the car. The left side is removed in the same way.
After this, remove the armrest. To do this you will need a 10mm socket wrench. Using a wrench, unscrew the two fastening nuts. The armrest is then removed. If necessary, you can also remove the seat belts. Installation is carried out in reverse order.
Step-by-step instructions for dismantling
Before starting work, we prepare the necessary tools. To remove the seats we will need:
- flat and Phillips screwdrivers;
- key to 10;
- pliers;
- repair kit (depending on the situation).
It is better to work with gloves so as not to accidentally injure your hand on sharp metal corners.
The procedure is as follows:
- Unfasten the rear seat upholstery buttons on the trunk side.
- Pull back the loop and remove the latch near the headrest.
To get to the latch, you need to pull the loop near the headrest
- We pull out the hooks on the back from the metal brackets that are on the body.
Remove the hooks that hold the seats to the body
- The armrest mounting frame is fixed with three screws; we unscrew them for further dismantling.
- To remove the armrest itself, use a 10mm wrench and unscrew the nuts.
Use a 10mm wrench to remove the armrest fastening nut.
- The mounting pad is secured with two latches; we press them out with a flat-head screwdriver.
To remove the mounting pad, press the two latches
- Unscrew the fastening bolt and pull out the seat cushion lock.
After unscrewing the mounting bolt, the lock can be easily removed
- Dismantling ends by unscrewing the last two nuts with a 10mm wrench, after which the base of the lock is removed.
We recommend: Why antifreeze boils in the expansion tank: a review of common breakdowns
Other models
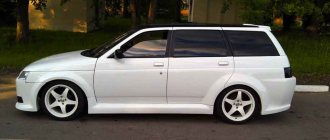
On the VAZ 2111 and VAZ 2112, the seat mountings are slightly different in design. Therefore, their dismantling is slightly different from similar work for dozens. Here both the seat and back are divided in half. Each part can be folded independently of the other half. This makes the hatchback and station wagon more comfortable. They can also be removed separately. The seats are equipped with headrests, this increases the safety of the car. In addition, it is simply much more convenient for passengers.
By pulling a specially designed loop, we lift the left seat, after which it tilts forward. Using a spanner wrench (10 mm), unscrew the two hinged nuts. After this, you can remove the seat from the car. The right side is dismantled in the same way.
Using a 13 mm socket wrench, unscrew the nuts located at the bottom of the left seat fastening hinges. There are only two nuts. Next, the backrest fastening clamp rises up. After this, the backrest folds forward. Unscrew the nut and bolt located at the top of the fastening hinges. The right side is removed in the same way.
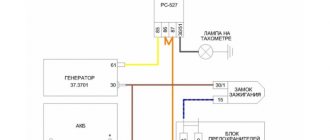
IMPROVING INSTRUMENT PANEL LIGHTING
The VAZ 2112 dashboards have always had one problem: dim lighting. This was especially noticeable at night. So the first thing tuning enthusiasts do is change the light bulbs in the instrument panel. Initially, there are simple and extremely weak incandescent lamps. They are being replaced by white LEDs, which have two advantages: some are durable and economical. Here's what you'll need to get started:
- 8 white LEDs;
- medium sized flathead screwdriver.
SEQUENCE OF OPERATIONS
To remove incandescent lamps from the VAZ 2112 instrument unit, you will have to unscrew it and pull it out.
- The steering wheel moves down all the way.
- Above the dashboard there is a visor into which a pair of screws are screwed. They are removed using a screwdriver.
The location of the screws holding the panel is shown by arrows - The visor is pulled out from the panel. To do this, you need to slightly push it towards you, and then pull it forward and up.
- Under the visor there are 2 more screws, which are unscrewed with the same screwdriver.
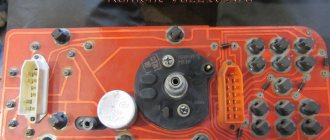
- The block with instruments is removed from the niche. The wires located on the rear wall of the unit are disconnected. There are also light bulbs there. They are unscrewed and previously prepared LEDs are installed in their place.
Light bulbs are unscrewed from the printed circuit board by hand, their location is shown by arrows - The wires are connected to the block, it is installed in a niche and screwed together with a decorative visor.
VIDEO: REMOVAL OF THE INSTRUMENT PANEL ON A VAZ 2112
Tuning
Modifications to the rear seat of the VAZ 2110 are not that common. In this case, these structural elements are most often heated. This is quite easy to do. It turns out that such a modification is not too expensive in terms of money. And it becomes much more comfortable for passengers to travel. This thing will seem especially useful to drivers with large families living in the northern regions of the country.
For installation, you can use a commercially available heating kit - “Emelya”. You can also use a heater removed from another car. This element from Priora is best suited. The heating should have two parts (for the seat and backrest). To install, it is not necessary to completely remove the seats; partial dismantling is sufficient.
Heating is installed under the casing. The connection is made in the same way as on the front ones. The power buttons are located on the rear doors. It is best to display the power indicators on the dashboard. This will allow you to control the operation of the device. You also need to monitor the position of the device. It should not touch the seat springs.
Conclusion
. For various reasons, any driver has to deal with the need to remove seats. Therefore, it is important to know how to remove the rear seats on a VAZ 2110 and 2112. This will make your task much easier. Like any seat assembly, they can break; this happens rarely, but it does happen. You can always fix the problem yourself.
PHOTO GALLERY: TUNED VAZ 2112 SALON
Interior tuning is done in contrasting red and black colors
This car has a new europanel installed in combination with a non-standard leather-wrapped steering wheel.
The red braid of the steering wheel and the red seats are clearly from another car.
The car owner is quite capable of making the interior of the VAZ 2121 a little more comfortable and reducing the noise level in it. But any improvement is good in moderation. Otherwise, the car may turn into a laughing stock.
VAZ 2110 seats repair
The most common problem with the driver's seat of the VAZ 2110 is its misalignment. The reason lies in the breakdown of the seat frame, backrest or brackets that connect them. Naturally, there is no point in buying and installing a new seat, since you can repair the old one. To repair a seat, you need to disassemble it, find the cause and eliminate it.
Removing the seat of a VAZ 2110
First you need to move the seat forward completely, after which, using a screwdriver, we remove the torsion bars from the brackets that are located under the seat at the rear and remove them. Then you need to move the VAZ 2110 seat all the way back and unscrew the nuts that secure the brackets.
We remove the brackets. Now you can lift the seat and unscrew the bolts that secure the slides, first the front ones, and then, by moving the seat forward, the rear ones. Now you can remove the seat and continue disassembling it.
They are attached in exactly the same way as the seat belt bracket, so we unscrew the bolt, remove the bushings and disconnect the slide.
Removing seat upholstery VAZ 2110
First of all, you need to disconnect the seat from the backrest. To do this, unscrew two bolts on each side that hold the backrest and seat frames together. When this is done, we disconnect the seats and begin to disassemble it.
The standard seat bottom upholstery is secured with plastic pads. In order to remove them, you simply need to pull the pads one by one towards the center of the seat, after which they will come off the metal frame. Now you can remove the filler.
Now we remove it (there is no need to pull it up), turning the front and back sides inside out alternately. When the seat back cover is almost completely removed, you need to use two flathead screwdrivers to remove the fasteners in which the headrest was installed. Now you can remove the filling and the soft foam part of the back.
Video instructions: how to fold out the seats on a Chevrolet Niva
To fold the back of the rear seat, you need to find the lock that locks it in a stationary state and pull the loop to release the latch.
But before this, space is first freed up to accommodate the backrest: Next, the backrest folds completely freely and provides space for transporting cargo in a Niva Chevrolet SUV.
To unfold the product, you simply need to recline the backrest and the lock itself will lock it in the desired position, and return the pillow in the same way to its original position.
It is imperative to ensure the quality of the lock’s fixation after the structure has been unfolded. While supporting the folded seat, remove the hook from the handle.
Once you have slowly lowered the seat, press down firmly to secure it in place. Warning Once you have disconnected the hook, turn the seats over and the legs will automatically unfold.
Pull the adjustment lever located on the side of the seat and raise the backrest. Warning Make sure that the seat legs are folded out. If they do not decompose automatically, decompose them by hand.
After you have folded the seat or returned it to its original position, lightly move the seatback back and forth to check that the seat is securely secured.
Remove the headrests from the front seats and insert them into the storage holes located at the bottom of the rear seat. Recline the rear seatback completely.
With the front seatbacks folded down, slide the front seats all the way forward.
“>
Features of the event
Before tuning, you need to determine for which part it is needed. Of course, you can improve the entire vehicle at once, but in some cases one part of it, for example, the interior, is enough.
This option will allow you to show your imagination to the maximum. Bring to life the most interesting and original ideas. This way you can create your own world inside the machine. It will be unique and individual. You can also use ready-made templates. The main thing is to determine what goals you are pursuing and what you want to get in the end.
Tuning the interior allows you to experiment in full. In this case, you can install new seat covers. Choose your own design and color for them. An excellent option are custom-made products. Pay attention to other elements of the car that are located in the cabin. For example, door handles, gearshift levers, etc.
There are a lot of ways to modernize them.
One of the most common is to use covers. You can also use special inserts for this. They are not difficult to find. They are presented in a large assortment in stores that specialize in selling accessories and other things for cars. In addition, you can make them yourself. A piece of leather or leather substitute, scissors and glue will help with this. You can also easily replace different buttons by upgrading them in this way.
Instrument panel: upgrade options
When getting into a car, the first thing that catches your eye, especially to those on the right hand side of the driver, is the control panel.
The vehicle manufacturer offers a boring and ordinary version. Few drivers like this conservative approach to its design, since the control panel is constantly in his field of vision. But don’t rush to get upset, the situation can be corrected. Head to an auto supply store. Look for the dashboard insert. Their selection is huge. Everyone will be able to choose the option that will meet their requirements and preferences. This will allow you to change the color and texture of the panel. To make it brighter, use new instrument lighting. LEDs are an excellent option. They will give a bright blue color to the panel.
If you decide to replace the light bulbs on your appliances yourself, you will need to follow a few simple steps. First you need to saw off the part of the LED that is on top. Since this is where the lens is installed, which is responsible for focusing the beam. Please note that this procedure must be carried out extremely carefully. Otherwise, the light element will be damaged.
For further work, pliers are needed. Use them to remove the LED from the base. And do it extremely carefully. Install new ones under the socket, observing the polarity. After completing the entire procedure, turn on the system. This way you can check that the LEDs are working properly. If everything is in order, then replace the LCD.
After this, remove the paint on the arrows that are located at the bottom end. This must be done without fail, because the paint impairs their visibility when exposed to light, and as a result they are barely noticeable. An excellent option for this case would be to repaint the bottom end in a different color. White is optimal.
Flocking the interior of a VAZ 2112
Another popular option for upgrading a coupe is flocking.
Flock is a soft and pleasant to the touch fabric, somewhat similar to velvet. In addition to its visual effect, flock is also able to reduce extraneous noise in the cabin and absorb sunlight, which often interfere with the normal operation of the car. Many drivers claim that the flock attracts dust and is very difficult to clean. Actually this is not true. To completely clean the material, just vacuum it. This should be done no more often than once every 2-3 weeks. If you are still in doubt, you can treat the material with an antistatic agent. To tune a car, you need to purchase a special flocking kit. It is best to give preference to an inexpensive, but not the cheapest set at a price of about 3-4 thousand rubles.
In addition, you need to buy the flock itself and glue for it. After purchasing the equipment, you can start working. The first thing you need to do is remove from the interior those parts that will be amenable to pasting. After dismantling, we carefully clean the elements from dirt and polish and sand their surfaces. Next, apply glue evenly and immediately apply flock to the part. After this, the interior elements should be completely dry. At the end, you will need to remove excess pieces of material, and you can install the parts in place.
Interior renovation costs
And everyone is healthy again!